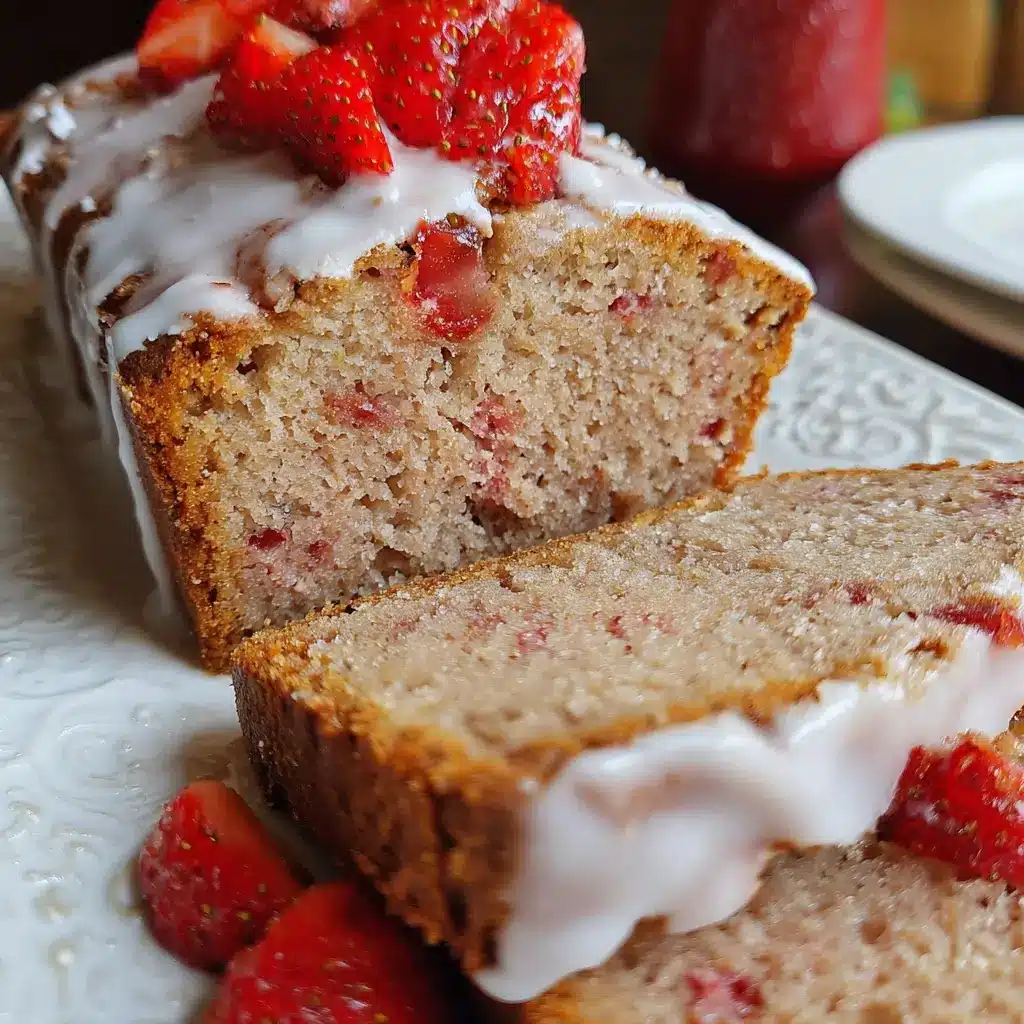
The scent of this Strawberry Bread baking is the official announcement of spring in my kitchen. I still remember the first time I pulled a loaf from the oven; the air filled with a warm, buttery aroma swirled with the sweet, jammy perfume of baked strawberries. My family, drawn by the irresistible smell, gathered around the cooling rack with an almost comical impatience. When I finally sliced into the loaf, revealing a tender, blush-pink crumb studded with jewel-like pieces of fruit, I knew I had a winner. That first bite was a revelation—impossibly moist, perfectly sweet, and bursting with the authentic taste of fresh strawberries. It wasn’t just a quick bread; it was an experience. It’s since become our go-to recipe for everything from lazy Sunday brunches to potluck offerings and thoughtful gifts for neighbors. This isn’t just a recipe; it’s a memory-maker, a slice of pure, simple joy that I am so excited to share with you.
The Ultimate Moist Strawberry Bread Recipe
This recipe has been tested and perfected to ensure a consistently moist, flavorful, and beautiful loaf every single time. It strikes the perfect balance between a tender cake and a hearty quick bread, making it versatile for any occasion. The key is using the right ingredients and following the techniques that prevent a dense or soggy loaf, resulting in a bakery-quality treat you can easily make at home.
Yields: 1 standard 9×5 inch loaf
Servings: 10-12 slices
Ingredients:
For the Strawberry Bread:
- 2 ½ cups (300g) All-Purpose Flour, plus 1 tablespoon for tossing the strawberries
- 1 teaspoon Baking Soda
- ½ teaspoon Baking Powder
- ½ teaspoon Fine Sea Salt
- 1 cup (200g) Granulated Sugar
- ½ cup (120ml) Neutral Oil (like canola, vegetable, or melted coconut oil)
- 2 large Eggs, at room temperature
- ½ cup (120ml) Buttermilk, at room temperature (or sour cream/plain yogurt)
- 1 teaspoon Pure Vanilla Extract
- 2 cups (about 300g) Fresh Strawberries, hulled and diced into ½-inch pieces
For the Optional Vanilla Glaze:
- 1 cup (120g) Powdered Sugar, sifted
- 2-3 tablespoons Milk or Cream
- ½ teaspoon Pure Vanilla Extract
Step-by-Step Instructions for Perfect Strawberry Bread
Following these detailed instructions will guide you to a flawless loaf. We’ll break down not just the “what,” but the “why” for each step, empowering you to understand the baking process and replicate it with confidence.
Part 1: Preparation and Dry Ingredients
- Preheat and Prepare the Pan: Adjust your oven rack to the middle position and preheat to 350°F (175°C). Grease a 9×5 inch loaf pan generously with butter or non-stick spray. For guaranteed easy removal, line the pan with parchment paper, leaving an overhang on the two long sides to act as “handles.” This simple step is a game-changer and prevents any part of your beautiful loaf from sticking.
- Combine the Dry Ingredients: In a large mixing bowl, whisk together the 2 ½ cups of all-purpose flour, baking soda, baking powder, and salt. Whisking for at least 30 seconds is crucial as it aerates the flour and evenly distributes the leavening agents (baking soda and powder). This ensures a uniform rise and prevents any bites from tasting metallic or salty. Set this bowl aside.
- Prepare the Strawberries: In a separate small bowl, place your diced strawberries. Sprinkle them with 1 tablespoon of flour and toss gently to coat each piece. This is the most important tip for baking with fruit. The light flour coating absorbs some of the fruit’s excess moisture and creates friction within the batter, preventing the heavier strawberries from sinking to the bottom of the loaf during baking. This ensures you get beautiful pockets of fruit distributed throughout every single slice.
Part 2: Mixing the Wet Ingredients and Combining
- Mix the Wet Ingredients: In another large bowl (or the bowl of a stand mixer fitted with a paddle attachment), combine the granulated sugar and the neutral oil. Beat them together on medium speed for about a minute. The mixture will look like wet sand.
- Add the Eggs: Add the room-temperature eggs, one at a time, beating well after each addition until the mixture becomes lighter in color and slightly fluffy. This process incorporates air, which contributes to the bread’s tender texture. Scrape down the sides and bottom of the bowl with a spatula to ensure everything is evenly mixed.
- Incorporate Vanilla and Buttermilk: Beat in the vanilla extract. With the mixer on low speed, slowly stream in the buttermilk. The mixture might look slightly curdled or separated at this stage—this is completely normal. The acid in the buttermilk is preparing to react with the baking soda to create a super tender crumb.
Part 3: Final Assembly and Baking
- Combine Wet and Dry: Pour the wet ingredients into the bowl with the dry ingredients. Using a spatula or wooden spoon, fold the mixture together until it is just combined. It is essential not to overmix. A few streaks of flour and small lumps are perfectly fine. Overmixing develops the gluten in the flour, which will result in a tough, dense, and chewy bread instead of a light and tender one.
- Fold in the Strawberries: Gently fold the flour-coated strawberries into the batter. Use a spatula and a gentle hand, mixing only until they are evenly distributed throughout the batter. Aim for about 5-6 folds.
- Fill the Pan and Bake: Scrape the thick, beautiful batter into your prepared loaf pan and use the spatula to smooth the top. Place the pan on the center rack of your preheated oven. Bake for 50-65 minutes.
- Check for Doneness: Baking times can vary depending on your oven and the moisture content of your strawberries. Start checking for doneness at the 50-minute mark. The bread is done when a wooden skewer or long toothpick inserted into the very center of the loaf comes out clean or with a few moist crumbs attached (but no wet batter). The top should be a deep golden brown and feel firm to the touch. If the top is browning too quickly before the center is cooked, you can loosely tent it with a piece of aluminum foil for the last 10-15 minutes of baking.
- Cool the Bread: Once baked, remove the loaf from the oven and place it on a wire cooling rack. Let it cool in the pan for 15-20 minutes. This allows the bread to set up, making it easier to remove without breaking. After 20 minutes, use the parchment paper handles to lift the loaf out of the pan and place it directly on the wire rack to cool completely. Allowing air to circulate all around the loaf is key to preventing a soggy bottom. Do not glaze the bread while it is still warm.
Part 4: The Optional Glaze
- Make the Glaze: Once the strawberry bread has cooled completely to room temperature, prepare the glaze. In a small bowl, whisk together the sifted powdered sugar, 2 tablespoons of milk, and the vanilla extract until smooth. If the glaze is too thick, add more milk, one teaspoon at a time, until it reaches a thick but pourable consistency. If it’s too thin, add a bit more powdered sugar.
- Glaze and Set: Drizzle the glaze over the top of the cooled loaf, letting it drip artfully down the sides. Let the bread sit for at least 30 minutes for the glaze to set before slicing and serving.
Nutrition Facts
- Servings: 10-12
- Calories per serving: Approximately 290-340 calories (this will vary based on the exact size of your slices and if you include the glaze).
Preparation Time
- Prep Time: 20 minutes
- Cook Time: 50-65 minutes
- Cooling & Glazing Time: 2 hours
- Total Time: Approximately 3 hours 20 minutes
How to Serve Your Strawberry Bread
This bread is wonderfully versatile. Here are some of our favorite ways to enjoy it, from a simple snack to a show-stopping dessert.
- For a Perfect Breakfast or Brunch:
- Serve a thick, fresh slice as is, alongside a hot cup of coffee or tea.
- Lightly toast a slice and spread it with high-quality salted butter.
- Elevate it with a generous schmear of tangy cream cheese or mascarpone.
- Serve it as part of a larger brunch spread with scrambled eggs, bacon, and a fresh fruit salad.
- As a Delightful Afternoon Snack:
- A simple, unadorned slice is the perfect pick-me-up.
- Pair it with a glass of cold milk for a nostalgic treat.
- Enjoy with a dollop of plain Greek yogurt for a protein boost.
- To Transform it into a Decadent Dessert:
- Warm a slice slightly in the microwave (about 15 seconds) and top it with a scoop of vanilla bean ice cream.
- Serve with a generous dollop of freshly whipped cream and a few extra sliced strawberries on top.
- Drizzle with a high-quality balsamic glaze for a sophisticated sweet-and-savory twist.
- Cube the bread and use it as a base for a trifle, layering it with vanilla pudding, whipped cream, and more fresh berries.
- For Gifting and Parties:
- Bake a loaf, let it cool completely (do not glaze), wrap it beautifully in cellophane with a ribbon, and give it as a thoughtful homemade gift.
- For parties, slice the loaf and arrange it on a platter, allowing guests to serve themselves. It’s a perfect addition to a dessert table or potluck.
Additional Tips for Success
These five expert tips will help you troubleshoot common issues and take your strawberry bread from great to absolutely unforgettable.
- Room Temperature is Non-Negotiable: Using room temperature eggs and buttermilk is critical. Cold ingredients do not emulsify properly with the fat, which can result in a dense, greasy, or oddly textured bread. Room temperature ingredients blend together smoothly, creating a uniform batter that traps air more effectively, leading to a lighter, fluffier final product. To quickly bring eggs to room temp, place them in a bowl of warm (not hot) water for 5-10 minutes.
- The “Do Not Overmix” Mantra: This is the golden rule of all quick breads. Once you combine the wet and dry ingredients, you activate the gluten in the flour. The more you mix, the more gluten develops, leading to a tough, rubbery texture. Mix only until the flour streaks disappear. A lumpy batter is a good sign—it means you haven’t overworked it.
- Fresh vs. Frozen Strawberries: While fresh, in-season strawberries provide the best flavor and texture, this recipe works beautifully with frozen strawberries as well. Do not thaw them first! Thawing frozen berries makes them release a lot of water, turning them mushy and potentially making your bread soggy. Use them directly from the freezer, dice them if they are large, toss them in the tablespoon of flour, and fold them into the batter. You may need to add 5-10 minutes to your baking time.
- Mastering the Doneness Test: Ovens vary, so visual cues and the toothpick test are your best friends. In addition to the toothpick coming out clean, look for other signs. The loaf should be a rich, golden brown. The edges should be slightly darker and starting to pull away from the sides of the pan. If you gently press on the top of the loaf, it should spring back. Trust your senses over the timer.
- Cooling is a Crucial Step: It’s tempting to slice into the bread the moment it leaves the oven, but patience pays off. Cooling in the pan for 15-20 minutes allows the bread’s structure to set, preventing it from crumbling when you remove it. Cooling completely on a wire rack before glazing or storing is equally important. Trapping steam from a warm loaf in a container or under a glaze will create a sticky, soggy top.
Frequently Asked Questions (FAQ)
Here are answers to some of the most common questions about making this delightful strawberry bread.
1. Can I make this recipe into muffins?
Absolutely! This batter is perfect for muffins. Simply grease and flour a standard 12-cup muffin tin or line it with paper liners. Divide the batter evenly among the cups, filling them about three-quarters of the way full. Bake at 350°F (175°C) for about 20-25 minutes, or until a toothpick inserted into the center of a muffin comes out clean.
2. My bread sank in the middle. What did I do wrong?
A sunken middle is usually caused by one of three things. First, underbaking. If you pull the bread out too soon, the center structure hasn’t set and will collapse as it cools. Second, overmixing the batter can develop too much gluten which rises rapidly and then falls. Third, your leavening agent (baking soda or powder) could be expired and not providing enough lift. You can test your baking soda by dropping a pinch in vinegar (it should fizz vigorously) and your baking powder by dropping a pinch in hot water (it should also bubble).
3. How should I store my strawberry bread to keep it fresh?
Because of the high moisture content from the fresh fruit, this bread is best stored in an airtight container or wrapped tightly in plastic wrap. It will keep at room temperature for up to 3 days. For longer storage, you can refrigerate it for up to a week. Be aware that refrigeration can sometimes dry out the crumb; you can refresh a slice by warming it in the microwave for 10-15 seconds. This bread also freezes beautifully for up to 3 months. Freeze it as a whole loaf or in individual slices, wrapped tightly in plastic wrap and then in aluminum foil.
4. Can I reduce the amount of sugar in this recipe?
You can, but it’s important to understand sugar’s role. It does more than just add sweetness; it’s crucial for moisture, browning, and creating a tender texture. You can likely reduce the sugar by about ¼ cup (50g) without drastically affecting the final result, but reducing it further may lead to a drier, more crumbly, and less flavorful bread.
5. Can I add other ingredients or make substitutions?
Yes, this recipe is a great base for creativity!
- Add-ins: A ½ cup of white chocolate chips, chopped pecans or walnuts, or the zest of one lemon or orange would be delicious additions.
- Spices: Add ½ teaspoon of cinnamon or a ¼ teaspoon of cardamom to the dry ingredients for a warm, spiced flavor.
- Fruit: You could substitute the strawberries with other berries like raspberries or blueberries, or even try a combination. Diced rhubarb is also a fantastic, tangy pairing with strawberry.
- Yogurt/Sour Cream: If you don’t have buttermilk, an equal amount of full-fat plain yogurt or sour cream is an excellent substitute and will provide a similar tangy flavor and tenderizing effect.

Moist Strawberry Bread Recipe
Ingredients
For the Strawberry Bread:
- 2 ½ cups (300g) All-Purpose Flour, plus 1 tablespoon for tossing the strawberries
- 1 teaspoon Baking Soda
- ½ teaspoon Baking Powder
- ½ teaspoon Fine Sea Salt
- 1 cup (200g) Granulated Sugar
- ½ cup (120ml) Neutral Oil (like canola, vegetable, or melted coconut oil)
- 2 large Eggs, at room temperature
- ½ cup (120ml) Buttermilk, at room temperature (or sour cream/plain yogurt)
- 1 teaspoon Pure Vanilla Extract
- 2 cups (about 300g) Fresh Strawberries, hulled and diced into ½-inch pieces
For the Optional Vanilla Glaze:
- 1 cup (120g) Powdered Sugar, sifted
- 2–3 tablespoons Milk or Cream
- ½ teaspoon Pure Vanilla Extract
Instructions
Part 1: Preparation and Dry Ingredients
- Preheat and Prepare the Pan: Adjust your oven rack to the middle position and preheat to 350°F (175°C). Grease a 9×5 inch loaf pan generously with butter or non-stick spray. For guaranteed easy removal, line the pan with parchment paper, leaving an overhang on the two long sides to act as “handles.” This simple step is a game-changer and prevents any part of your beautiful loaf from sticking.
- Combine the Dry Ingredients: In a large mixing bowl, whisk together the 2 ½ cups of all-purpose flour, baking soda, baking powder, and salt. Whisking for at least 30 seconds is crucial as it aerates the flour and evenly distributes the leavening agents (baking soda and powder). This ensures a uniform rise and prevents any bites from tasting metallic or salty. Set this bowl aside.
- Prepare the Strawberries: In a separate small bowl, place your diced strawberries. Sprinkle them with 1 tablespoon of flour and toss gently to coat each piece. This is the most important tip for baking with fruit. The light flour coating absorbs some of the fruit’s excess moisture and creates friction within the batter, preventing the heavier strawberries from sinking to the bottom of the loaf during baking. This ensures you get beautiful pockets of fruit distributed throughout every single slice.
Part 2: Mixing the Wet Ingredients and Combining
- Mix the Wet Ingredients: In another large bowl (or the bowl of a stand mixer fitted with a paddle attachment), combine the granulated sugar and the neutral oil. Beat them together on medium speed for about a minute. The mixture will look like wet sand.
- Add the Eggs: Add the room-temperature eggs, one at a time, beating well after each addition until the mixture becomes lighter in color and slightly fluffy. This process incorporates air, which contributes to the bread’s tender texture. Scrape down the sides and bottom of the bowl with a spatula to ensure everything is evenly mixed.
- Incorporate Vanilla and Buttermilk: Beat in the vanilla extract. With the mixer on low speed, slowly stream in the buttermilk. The mixture might look slightly curdled or separated at this stage—this is completely normal. The acid in the buttermilk is preparing to react with the baking soda to create a super tender crumb.
Part 3: Final Assembly and Baking
- Combine Wet and Dry: Pour the wet ingredients into the bowl with the dry ingredients. Using a spatula or wooden spoon, fold the mixture together until it is just combined. It is essential not to overmix. A few streaks of flour and small lumps are perfectly fine. Overmixing develops the gluten in the flour, which will result in a tough, dense, and chewy bread instead of a light and tender one.
- Fold in the Strawberries: Gently fold the flour-coated strawberries into the batter. Use a spatula and a gentle hand, mixing only until they are evenly distributed throughout the batter. Aim for about 5-6 folds.
- Fill the Pan and Bake: Scrape the thick, beautiful batter into your prepared loaf pan and use the spatula to smooth the top. Place the pan on the center rack of your preheated oven. Bake for 50-65 minutes.
- Check for Doneness: Baking times can vary depending on your oven and the moisture content of your strawberries. Start checking for doneness at the 50-minute mark. The bread is done when a wooden skewer or long toothpick inserted into the very center of the loaf comes out clean or with a few moist crumbs attached (but no wet batter). The top should be a deep golden brown and feel firm to the touch. If the top is browning too quickly before the center is cooked, you can loosely tent it with a piece of aluminum foil for the last 10-15 minutes of baking.
- Cool the Bread: Once baked, remove the loaf from the oven and place it on a wire cooling rack. Let it cool in the pan for 15-20 minutes. This allows the bread to set up, making it easier to remove without breaking. After 20 minutes, use the parchment paper handles to lift the loaf out of the pan and place it directly on the wire rack to cool completely. Allowing air to circulate all around the loaf is key to preventing a soggy bottom. Do not glaze the bread while it is still warm.
Part 4: The Optional Glaze
- Make the Glaze: Once the strawberry bread has cooled completely to room temperature, prepare the glaze. In a small bowl, whisk together the sifted powdered sugar, 2 tablespoons of milk, and the vanilla extract until smooth. If the glaze is too thick, add more milk, one teaspoon at a time, until it reaches a thick but pourable consistency. If it’s too thin, add a bit more powdered sugar.
- Glaze and Set: Drizzle the glaze over the top of the cooled loaf, letting it drip artfully down the sides. Let the bread sit for at least 30 minutes for the glaze to set before slicing and serving.
Nutrition
- Serving Size: One Normal Portion
- Calories: 290-340