Ah, Lemon Meltaways. Just the name itself conjures up images of delicate, buttery cookies that practically dissolve on your tongue, leaving behind a burst of bright, zesty sunshine. I remember the first time I stumbled upon a recipe similar to this. I was looking for something special for a spring garden party, something light, refreshing, and undeniably elegant. These cookies, with their ethereal texture and vibrant lemon punch, were an absolute revelation. My guests couldn’t get enough of them! They weren’t just cookies; they were little bites of happiness, the kind that make you close your eyes and savor the moment. My family now requests them for every special occasion, from Easter brunches to simple afternoon teas. The secret, I’ve found, lies in the quality of the ingredients and the gentle handling of the dough – it’s a recipe that rewards patience with an unforgettable, melt-in-your-mouth experience. They’re deceptively simple to make, yet they possess an air of sophistication that makes them perfect for gifting or impressing guests. Trust me, once you try these Lemon Meltaways, they’ll become a cherished staple in your baking repertoire too.
Our Irresistible Lemon Meltaways Recipe
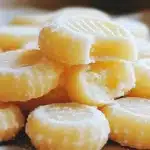
These Lemon Meltaways are the epitome of a delicate, buttery cookie with a bright, zesty lemon flavor. The cornstarch in the recipe is key to their signature “meltaway” texture, making them incredibly tender and light. Dusted with powdered sugar, they look like little snow-kissed lemon drops, perfect for any occasion.
Ingredients for Lemon Meltaways
Here’s what you’ll need to create these delightful cookies. Using high-quality ingredients, especially fresh lemon and good butter, will significantly enhance the final flavor and texture.
- For the Cookies:
- 1 cup (227g) unsalted butter, softened to room temperature
- ¾ cup (90g) powdered sugar (also known as confectioners’ sugar or icing sugar), plus more for dusting
- ¼ cup (30g) cornstarch
- 1 tablespoon finely grated lemon zest (from about 1-2 large lemons)
- 2 tablespoons fresh lemon juice
- 1 teaspoon pure vanilla extract
- 2 cups (240g) all-purpose flour
- ¼ teaspoon salt
- For Dusting (Optional but Recommended):
- ½ cup (60g) powdered sugar
Step-by-Step Instructions for Perfect Lemon Meltaways
Follow these instructions carefully to achieve the perfect melt-in-your-mouth texture that these cookies are famous for.
- Prepare Your Pans and Oven: Preheat your oven to 350°F (175°C). Line two large baking sheets with parchment paper or silicone baking mats. This prevents sticking and helps with even baking.
- Cream Butter and Sugars: In a large mixing bowl, or the bowl of a stand mixer fitted with the paddle attachment, combine the softened unsalted butter, ¾ cup of powdered sugar, and cornstarch. Beat on medium speed for about 2-3 minutes, or until the mixture is light, fluffy, and pale in color. Scrape down the sides of the bowl occasionally with a rubber spatula to ensure everything is well incorporated. This creaming process incorporates air, which is vital for the cookies’ tender texture.
- Add Lemon and Vanilla: Add the finely grated lemon zest, fresh lemon juice, and vanilla extract to the butter mixture. Beat on low speed until just combined. The zest provides the primary lemon aroma, while the juice adds a tangy brightness.
- Combine Dry Ingredients: In a separate medium bowl, whisk together the all-purpose flour and salt. This ensures the salt is evenly distributed, which helps to balance the sweetness and enhance the lemon flavor.
- Add Dry to Wet Ingredients: Gradually add the flour mixture to the wet ingredients in two or three additions. Mix on low speed until just combined after each addition. Be very careful not to overmix at this stage. Overmixing develops gluten in the flour, which can result in tough cookies instead of tender meltaways. Stop mixing as soon as the flour is no longer visible. The dough will be soft and slightly crumbly.
- Chill the Dough (Optional but Recommended for Shaping): If the dough seems too soft to handle, you can chill it for about 15-20 minutes. This makes it easier to roll into balls. However, if you work quickly, you might be able to skip this step.
- Shape the Cookies: Scoop tablespoon-sized portions of dough (about 15-20g each if using a scale) and roll them into smooth balls between your palms. Place the balls about 1-2 inches apart on the prepared baking sheets. These cookies don’t spread excessively, but giving them some space ensures even baking.
- Bake: Bake in the preheated oven for 12-15 minutes. The cookies should be set and the bottoms just very lightly golden. The tops will remain pale; you don’t want them to brown significantly, as this can make them crispier rather than tender.
- Cool and Dust: Let the cookies cool on the baking sheets for 5-10 minutes before carefully transferring them to a wire rack to cool completely. They are quite delicate when warm.
- First Dusting (Optional): While the cookies are still slightly warm (but not hot), you can lightly dust them with powdered sugar. Some of this sugar will melt into the cookie, creating a sweet, slightly sticky base.
- Second Dusting: Once the cookies are completely cool, generously dust them again with powdered sugar. You can do this by sifting it over the cookies or by gently rolling each cookie in a bowl of powdered sugar for a thicker coating. This second dusting gives them their characteristic snowy appearance.
Nutrition Facts
- Servings: This recipe yields approximately 36-48 cookies, depending on size.
- Calories per serving (1 cookie): Approximately 70-90 calories.
Disclaimer: Nutritional information is an estimate and can vary depending on the exact ingredients used, portion sizes, and any substitutions made.
Preparation Time
Understanding the time commitment will help you plan your baking session effectively.
- Active Preparation Time: 25-30 minutes (includes mixing and shaping)
- Chilling Time (Optional): 15-20 minutes
- Baking Time: 12-15 minutes per batch
- Cooling Time: Approximately 30-60 minutes
- Total Time (Excluding optional chilling): Approximately 1 hour 10 minutes to 1 hour 45 minutes (depending on number of batches)
How to Serve Your Lemon Meltaways
These delicate cookies are versatile and can be enjoyed in numerous ways. Here are some serving suggestions:
- Classic Afternoon Tea:
- Arrange them beautifully on a tiered serving stand alongside other small pastries, scones, and finger sandwiches.
- Pair with a pot of Earl Grey, English Breakfast, or a delicate herbal tea like chamomile or mint.
- Dessert Platter Feature:
- Include them as part of a larger dessert platter with fresh berries, chocolate truffles, and other mini desserts. Their bright lemon flavor offers a refreshing contrast.
- Coffee Break Treat:
- Enjoy a couple of cookies with your morning coffee or mid-day espresso for a delightful pick-me-up.
- Holiday Cookie Exchanges and Gifting:
- Their elegant appearance makes them perfect for holiday cookie tins or cellophane bags tied with a pretty ribbon.
- They are always a hit at cookie swaps due to their unique texture and universally loved lemon flavor.
- Alongside Ice Cream or Sorbet:
- Serve one or two Lemon Meltaways alongside a scoop of vanilla bean ice cream or a tangy raspberry sorbet. The contrast in temperatures and textures is exquisite.
- Special Occasions:
- Perfect for baby showers, bridal showers, Easter celebrations, or spring garden parties due to their light, fresh, and elegant nature.
- Simple Pleasure:
- Sometimes, the best way to serve them is simply on a pretty plate, ready to be enjoyed by family and friends (or just yourself!) with a glass of cold milk.
- Garnish Ideas (Optional):
- For an extra touch of elegance, place them on a platter garnished with fresh lemon slices (thinly cut) or a sprinkle of extra lemon zest around the plate.
- A few edible flowers could also enhance their visual appeal for special events.
Additional Tips for Lemon Meltaway Perfection
To ensure your Lemon Meltaways are truly exceptional, consider these five additional tips:
- Embrace Room Temperature Ingredients: This is crucial, especially for the butter. Softened (not melted) butter creams more effectively with the sugar, incorporating air that leads to that light, meltaway texture. Cold butter won’t cream properly, and melted butter will result in denser, greasier cookies. Take your butter out of the fridge at least an hour before you plan to bake.
- Don’t Overcrowd the Baking Sheets: While these cookies don’t spread excessively, giving them adequate space (about 1-2 inches apart) allows hot air to circulate evenly around each cookie. This promotes consistent baking, ensuring they are all perfectly tender and not under or over-baked in spots. Bake in batches if necessary.
- Measure Flour Correctly: How you measure flour can significantly impact your cookies. The “spoon and level” method is best: use a spoon to fluff up the flour in its container, then spoon it lightly into your measuring cup until it’s overflowing. Finally, sweep a straight edge (like the back of a knife) across the top to level it off. Scooping directly from the bag can compact the flour, leading to too much flour in your recipe and drier, tougher cookies.
- Adjust Lemon Intensity: The amount of lemon zest and juice can be tweaked to your preference. For a more intense lemon flavor, you can increase the zest by up to another teaspoon. If you prefer a milder lemon note, you can slightly reduce it. Remember that fresh zest and juice provide the brightest, most authentic lemon flavor.
- Proper Storage is Key: To maintain their delicate texture and fresh flavor, store Lemon Meltaways in an airtight container at room temperature for up to 5 days. If you live in a very humid environment, they might soften a bit more quickly. You can add a piece of bread to the container to help absorb excess moisture. Avoid storing them with crispier cookies, as the meltaways can absorb moisture and lose their characteristic texture. For longer storage, they can be frozen.
Frequently Asked Questions (FAQ) about Lemon Meltaways
Here are answers to some common questions you might have about making these delightful cookies:
- Q: Can I use bottled lemon juice instead of fresh?
- A: While fresh lemon juice is highly recommended for the brightest, most natural flavor, you can use bottled lemon juice in a pinch. However, be aware that bottled juice often has a slightly different, sometimes more muted or artificial, taste compared to fresh. If using bottled, ensure it’s 100% pure lemon juice. You absolutely must use fresh lemon zest; dried zest will not provide the same aromatic oils and vibrant flavor.
- Q: My cookies spread too much and became flat. What went wrong?
- A: Several factors can cause cookies to spread excessively:
- Butter too soft/melted: If your butter was overly soft or partially melted, it will cause the cookies to spread more. Aim for room temperature butter that still holds its shape.
- Not enough chilling (if dough was very soft): If your kitchen is warm and the dough became very soft, chilling it for 15-30 minutes before baking helps the fat solidify, reducing spread.
- Over-creaming: While creaming is important, excessive creaming can incorporate too much air, which can then collapse and cause spread. Stick to the 2-3 minute guideline.
- Baking on hot pans: Always allow baking sheets to cool completely between batches. Placing dough on a hot pan will cause the butter to melt too quickly.
- A: Several factors can cause cookies to spread excessively:
- Q: Can I make the dough ahead of time?
- A: Yes, absolutely! You can prepare the cookie dough, wrap it tightly in plastic wrap (or form it into a log if you plan to slice and bake, though meltaways are typically rolled), and refrigerate it for up to 2-3 days. If refrigerating for more than a few hours, you may need to let it sit at room temperature for 10-15 minutes to soften slightly before rolling into balls. You can also freeze the raw dough balls (flash freeze on a baking sheet then transfer to a freezer bag) for up to 3 months; bake from frozen, adding a couple of extra minutes to the baking time.
- Q: How do I get the powdered sugar to stick so nicely?
- A: The key is often a double dusting. The first light dusting while the cookies are still slightly warm allows some of the sugar to melt and adhere to the surface, creating a slightly sticky base. Once the cookies are completely cool, a second, more generous dusting will stick beautifully to that initial layer and give them their classic snowy look. Sifting the powdered sugar also helps achieve an even, delicate coating.
- Q: My cookies aren’t as “meltaway” as I expected. What could be the issue?
- A: The “meltaway” texture comes from a few key elements:
- Cornstarch: This is a crucial ingredient for tenderness. Ensure you used the correct amount.
- Butter Temperature and Creaming: Properly softened butter creamed well with the powdered sugar creates air pockets.
- Not Overmixing the Flour: Once flour is added, mix only until just combined. Overmixing develops gluten, leading to a tougher cookie.
- Correct Flour Measurement: Too much flour can make cookies dry and less tender. Use the “spoon and level” method.
- Baking Time: Overbaking can dry out the cookies, making them more crisp than meltaway. Aim for pale tops and just lightly golden bottoms.
- A: The “meltaway” texture comes from a few key elements:
Lemon Meltaways Recipe
Ingredients
- For the Cookies:
- 1 cup (227g) unsalted butter, softened to room temperature
- ¾ cup (90g) powdered sugar (also known as confectioners’ sugar or icing sugar), plus more for dusting
- ¼ cup (30g) cornstarch
- 1 tablespoon finely grated lemon zest (from about 1–2 large lemons)
- 2 tablespoons fresh lemon juice
- 1 teaspoon pure vanilla extract
- 2 cups (240g) all-purpose flour
- ¼ teaspoon salt
- For Dusting (Optional but Recommended):
- ½ cup (60g) powdered sugar
Instructions
- Prepare Your Pans and Oven: Preheat your oven to 350°F (175°C). Line two large baking sheets with parchment paper or silicone baking mats. This prevents sticking and helps with even baking.
- Cream Butter and Sugars: In a large mixing bowl, or the bowl of a stand mixer fitted with the paddle attachment, combine the softened unsalted butter, ¾ cup of powdered sugar, and cornstarch. Beat on medium speed for about 2-3 minutes, or until the mixture is light, fluffy, and pale in color. Scrape down the sides of the bowl occasionally with a rubber spatula to ensure everything is well incorporated. This creaming process incorporates air, which is vital for the cookies’ tender texture.
- Add Lemon and Vanilla: Add the finely grated lemon zest, fresh lemon juice, and vanilla extract to the butter mixture. Beat on low speed until just combined. The zest provides the primary lemon aroma, while the juice adds a tangy brightness.
- Combine Dry Ingredients: In a separate medium bowl, whisk together the all-purpose flour and salt. This ensures the salt is evenly distributed, which helps to balance the sweetness and enhance the lemon flavor.
- Add Dry to Wet Ingredients: Gradually add the flour mixture to the wet ingredients in two or three additions. Mix on low speed until just combined after each addition. Be very careful not to overmix at this stage. Overmixing develops gluten in the flour, which can result in tough cookies instead of tender meltaways. Stop mixing as soon as the flour is no longer visible. The dough will be soft and slightly crumbly.
- Chill the Dough (Optional but Recommended for Shaping): If the dough seems too soft to handle, you can chill it for about 15-20 minutes. This makes it easier to roll into balls. However, if you work quickly, you might be able to skip this step.
- Shape the Cookies: Scoop tablespoon-sized portions of dough (about 15-20g each if using a scale) and roll them into smooth balls between your palms. Place the balls about 1-2 inches apart on the prepared baking sheets. These cookies don’t spread excessively, but giving them some space ensures even baking.
- Bake: Bake in the preheated oven for 12-15 minutes. The cookies should be set and the bottoms just very lightly golden. The tops will remain pale; you don’t want them to brown significantly, as this can make them crispier rather than tender.
- Cool and Dust: Let the cookies cool on the baking sheets for 5-10 minutes before carefully transferring them to a wire rack to cool completely. They are quite delicate when warm.
- First Dusting (Optional): While the cookies are still slightly warm (but not hot), you can lightly dust them with powdered sugar. Some of this sugar will melt into the cookie, creating a sweet, slightly sticky base.
- Second Dusting: Once the cookies are completely cool, generously dust them again with powdered sugar. You can do this by sifting it over the cookies or by gently rolling each cookie in a bowl of powdered sugar for a thicker coating. This second dusting gives them their characteristic snowy appearance.
Nutrition
- Serving Size: One Normal Portion
- Calories: 70-90