There are certain recipes that become instant family legends, the ones requested for every holiday, potluck, or just a Tuesday pick-me-up. For us, these Lemon Meltaway Cookies skyrocketed to that legendary status almost immediately. The first time I made them, I was intrigued by the name – “meltaway.” Could they truly live up to such a delightful promise? Oh, they absolutely did. I watched as my husband took his first bite, his eyes widening slightly before closing in pure bliss. “Wow,” was all he managed initially, followed by, “These are incredible… they actually do melt in your mouth!” My kids, notorious critics of anything too “fancy,” devoured them, leaving behind only a faint dusting of powdered sugar and pleas for more. The secret, I discovered, lies in the delicate balance of butter, powdered sugar, and cornstarch, creating a texture unlike any other cookie – impossibly tender, light, and crumbly in the best way possible. Combined with the bright, zesty punch of fresh lemon, they are pure sunshine in cookie form. They are deceptively simple to make, yet the result feels incredibly special. Making a batch fills the kitchen with the most wonderful buttery, citrusy aroma, a prelude to the melt-in-your-mouth magic to come. These cookies aren’t just a treat; they’re an experience, a little bite of happiness that dissolves on the tongue, leaving you reaching for another.
What Makes Lemon Meltaway Cookies So Irresistible?
The magic of Lemon Meltaway Cookies lies in their unique and utterly captivating texture, coupled with a perfectly balanced, vibrant flavor profile. They aren’t your average chewy or crispy cookie; they occupy a special category all their own. The name “meltaway” is not mere hyperbole; it’s an accurate description of the sensory experience.
First and foremost is the texture. Imagine a cookie so tender it practically dissolves the moment it hits your tongue. This isn’t achieved through leavening agents like baking soda or powder, which create air pockets for a different kind of lightness. Instead, the meltaway quality comes from a specific combination of ingredients:
- Butter: Provides richness, flavor, and contributes significantly to the tenderness. Using good quality, softened butter is key.
- Powdered Sugar: Unlike granulated sugar, powdered sugar contains cornstarch and dissolves more readily into the butter, creating a smoother, less granular base and contributing to that melt-in-the-mouth feel. It coats the flour proteins differently than granulated sugar, inhibiting gluten development, which leads to a more tender crumb.
- Cornstarch: This is the secret weapon! Cornstarch interferes with gluten formation in the flour, resulting in an incredibly delicate, almost powdery crumb structure that crumbles and melts beautifully. It replaces some of the flour, lowering the overall protein content of the dough.
The resulting cookie is shortbread-like but even more delicate. It’s crumbly but holds together just enough, yielding effortlessly with the slightest pressure. It’s less a “bite” and more a “dissolve.”
Secondly, there’s the flavor. The richness of the butter and the sweetness of the powdered sugar create a luxurious base, but it’s the lemon that truly makes these cookies sing. Using both fresh lemon zest and fresh lemon juice provides a multi-layered citrus experience. The zest contains the lemon oils, offering an intense, bright aromatic punch, while the juice adds a tartness that cuts through the richness and sweetness, balancing the cookie perfectly. It’s a clean, vibrant lemon flavor that tastes natural and refreshing, not artificial or overpowering.
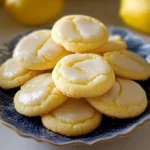
Finally, the appearance adds to the charm. Often rolled into small balls and coated generously in powdered sugar after baking, they look like little snowballs or ethereal puffs. The pale interior contrasts beautifully with the snowy white exterior. This final dusting of powdered sugar isn’t just for looks; it adds an extra touch of sweetness and reinforces that initial melt-away sensation as the powdery coating dissolves instantly.
Combining this extraordinary texture, bright flavor, and charming appearance makes Lemon Meltaway Cookies a truly unique and memorable treat. They are sophisticated enough for special occasions yet simple enough for everyday enjoyment, delivering a moment of pure, dissolving bliss with every bite.
Gather Your Sunshine: Ingredients for Lemon Meltaway Cookies
Precision is key in baking, especially for achieving that signature meltaway texture. Using the right ingredients in the correct proportions is crucial. Here’s what you’ll need to create these little bites of lemony heaven:
- Unsalted Butter: 1 cup (2 sticks or 226g), softened to room temperature. (Using unsalted butter allows you to control the salt content precisely. Ensure it’s properly softened – not melted, but soft enough to indent easily with a finger.)
- Powdered Sugar: 3/4 cup (90g), sifted, plus approximately 1 cup (120g) more for rolling the baked cookies. (Also known as confectioners’ sugar or icing sugar. Sifting prevents clumps and ensures a smooth dough. Do not substitute with granulated sugar.)
- Lemon Zest: 1 tablespoon, finely grated (from approximately 1 large or 2 small lemons). (This is where the primary lemon aroma and flavor come from. Use a microplane or fine grater, avoiding the white pith.)
- Fresh Lemon Juice: 2 tablespoons. (Adds brightness and tang. Freshly squeezed juice offers the best flavor compared to bottled.)
- Vanilla Extract: 1 teaspoon. (Enhances the other flavors and adds warmth.)
- All-Purpose Flour: 2 cups (240g), measured correctly (spooned and leveled). (The main structure builder. Measuring correctly is vital – too much flour can make the cookies dry.)
- Cornstarch: 1/4 cup (30g). (The key ingredient for the signature tender, meltaway texture. Do not omit this!)
- Salt: 1/4 teaspoon. (Balances the sweetness and enhances the lemon flavor.)
Ingredient Deep Dive: Why These Specifics Matter
- Softened Unsalted Butter: The temperature and type of butter are foundational. Softened butter creams properly with the powdered sugar, incorporating air and creating a smooth base. Melted butter will result in greasy, overly spread cookies. Unsalted lets you add the precise amount of salt needed to balance flavors. European-style butters with higher fat content can add even more richness, but standard unsalted butter works perfectly.
- Sifted Powdered Sugar: Powdered sugar’s fine texture is essential for the melt-in-your-mouth quality. It blends seamlessly with the butter. Sifting removes any lumps that could create inconsistencies in the dough and ensures accurate measurement. Granulated sugar would create a completely different, likely crunchy, texture.
- Cornstarch – The Meltaway Magic: As mentioned, cornstarch is the star player for texture. It’s a pure starch that doesn’t contain the proteins found in flour (which form gluten). By replacing some flour with cornstarch, you significantly reduce potential gluten development. Gluten provides structure and chewiness – exactly what you don’t want in a meltaway cookie. Cornstarch ensures maximum tenderness and that signature dissolve.
- Fresh Lemon Zest AND Juice: Relying solely on juice might make the dough too wet, while relying only on extract can taste artificial. Zest provides the fragrant essential oils locked in the lemon peel, delivering potent aroma and deep citrus flavor. The fresh juice adds necessary moisture and that bright, tangy counterpoint to the sweetness and richness. Always zest before juicing!
- Properly Measured Flour: Baking is a science. How you measure flour dramatically impacts the outcome. Scooping flour directly from the bag with your measuring cup compacts it, leading to potentially 25% more flour than intended. This results in dry, tough cookies. The correct method is to fluff the flour in its container, gently spoon it into the measuring cup until overflowing, and then level it off with a straight edge.
- Salt’s Balancing Act: Even in sweet recipes, salt is crucial. It doesn’t just make things salty; it enhances other flavors, balances sweetness, and makes the lemon pop even more. A small amount makes a big difference.
By understanding the role of each ingredient, you’re better equipped to execute the recipe successfully and appreciate the delicious science behind these delightful Lemon Meltaway Cookies.
Step-by-Step to Meltaway Perfection: Instructions
Follow these steps carefully to achieve the perfect Lemon Meltaway texture and flavor. Remember, patience, especially during the chilling stage, is key!
- Cream Butter and Sugar: In the bowl of a stand mixer fitted with the paddle attachment, or in a large bowl using a hand mixer, beat the softened unsalted butter on medium speed until smooth and creamy (about 1 minute). Add the 3/4 cup (90g) of sifted powdered sugar. Start on low speed (to avoid a sugar cloud!), then increase to medium and beat for 2-3 minutes, until the mixture is very light, pale, and fluffy. Scrape down the sides and bottom of the bowl periodically to ensure even mixing. Why this matters: This step incorporates air into the butter and sugar, which contributes to the cookie’s lightness and tender texture. Proper creaming is essential.
- Add Wet Ingredients and Zest: Add the finely grated lemon zest, fresh lemon juice, and vanilla extract to the creamed butter mixture. Beat on medium-low speed until just combined, about 30 seconds to 1 minute. Scrape down the bowl again. Tip: Ensure your zest is fine – large pieces can interrupt the smooth texture.
- Combine Dry Ingredients: In a separate medium bowl, whisk together the all-purpose flour, cornstarch, and salt. Whisking helps distribute the cornstarch and salt evenly throughout the flour, ensuring consistency in every cookie.
- Add Dry to Wet Ingredients: With the mixer on its lowest speed, gradually add the dry ingredient mixture to the wet ingredients in 2-3 additions. Mix only until the flour mixture is just incorporated and no dry streaks remain. Be careful not to overmix! Crucial step: Overmixing develops the gluten in the flour, which will make the cookies tough instead of tender and meltaway. Stop mixing as soon as the dough comes together. The dough will be soft.
- Chill the Dough: Scrape the dough out onto a piece of plastic wrap. Gently form it into a flattened disk (about 1-inch thick), wrap it tightly in the plastic wrap, and refrigerate for at least 1 hour, or up to 2 days. Why chilling is vital: Chilling solidifies the butter, preventing the cookies from spreading too much during baking. It also allows the flour to hydrate fully and the flavors to meld, resulting in a better texture and taste. Don’t skip or shorten this step! A well-chilled dough is easier to handle and bakes predictable shapes.
- Preheat Oven and Prepare Baking Sheets: When ready to bake, preheat your oven to 350°F (175°C). Line two large baking sheets with parchment paper or silicone baking mats. Parchment paper ensures even baking and prevents sticking, making cleanup easier.
- Shape the Cookies: Remove the chilled dough from the refrigerator. If it’s very firm, let it sit at room temperature for 5-10 minutes to become slightly more pliable. Pinch off small pieces of dough and roll them between your palms into smooth balls, about 1 inch (2.5 cm) in diameter. Place the balls about 1.5-2 inches apart on the prepared baking sheets. They won’t spread excessively if the dough is well-chilled, but give them some space. Uniform size ensures even baking.
- Bake: Bake one sheet at a time in the preheated oven for 10-13 minutes. The cookies should be set and the bottoms just barely beginning to turn a very light golden color. Do NOT overbake. You want them to remain pale on top to maintain the tender texture. Overbaking will make them dry and hard, defeating the meltaway purpose. Check early: Ovens vary, so start checking around the 10-minute mark.
- First Cool and Coat: Let the cookies cool on the baking sheet for about 5 minutes. While they are still warm (but cool enough to handle), prepare the remaining 1 cup (120g) of powdered sugar in a shallow bowl. Gently roll each warm cookie in the powdered sugar until lightly coated. Transfer the coated cookies to a wire rack to cool completely. Why coat while warm? The warmth helps the first layer of powdered sugar adhere slightly, creating a good base.
- Second Coat (Optional but Recommended): Once the cookies are completely cool (at least 30 minutes on the wire rack), roll them in the powdered sugar again for a thicker, more generous, snowy coating. This second coat gives them their classic meltaway appearance and an extra touch of sweetness.
- Store: Store the completely cooled Lemon Meltaway Cookies in an airtight container at room temperature.
Enjoy the incredibly tender, bright, and delicious results of your baking!
Understanding the Numbers: Nutrition Facts
Please note that these are estimates and can vary based on specific ingredient brands, exact cookie size, and the amount of powdered sugar used for coating.
- Servings: This recipe yields approximately 24-30 cookies, depending on the size you roll them (based on 1-inch balls).
- Calories per serving (1 cookie): Approximately 100-120 calories.
Disclaimer: The nutritional information provided is an estimate calculated using standard nutritional databases. For precise nutritional values, consider using a specific recipe nutrition calculator with your exact ingredients and measurements. These cookies are a delightful treat, best enjoyed in moderation as part of a balanced diet.
Time Commitment: Preparation Time Breakdown
While these cookies require chilling time, the active preparation is quite manageable. Here’s a breakdown:
- Active Preparation Time: 20-25 minutes (Mixing the dough: 10-15 mins; Shaping the cookies: 10 mins)
- Chilling Time: Minimum 1 hour (Can be extended up to 48 hours)
- Baking Time: 10-13 minutes per batch (If baking two sheets sequentially, total bake time approx. 20-26 minutes)
- Cooling & Coating Time: 5 minutes initial cool + ~30 minutes full cool + 5 minutes coating = ~40 minutes
- Total Estimated Time: Approximately 1 hour 45 minutes to 2 hours, with a significant portion being passive chilling and cooling time.
This makes them achievable even on a moderately busy day, as you can prepare the dough ahead of time and bake later.
Serving Suggestions: Presenting Your Lemon Meltaways
These delicate cookies are versatile and shine in various settings. Here are some ways to serve them:
- Afternoon Tea or Coffee Break: Their light texture and bright flavor make them perfect companions to a hot cup of tea (Earl Grey, chamomile, or green tea work beautifully) or coffee. Arrange them prettily on a small plate.
- Dessert Platters: Include them on a cookie platter alongside treats with contrasting textures and flavors, such as chewy chocolate chip cookies, crisp biscotti, or rich brownies. Their pale appearance adds visual interest.
- With Fresh Berries: Serve a small bowl of fresh raspberries, blueberries, or sliced strawberries alongside the cookies. The tartness of the berries complements the lemon beautifully.
- Alongside Sorbet or Ice Cream: A couple of Lemon Meltaways make a wonderful textural contrast to a scoop of lemon sorbet, raspberry sorbet, or simple vanilla bean ice cream.
- Holiday Cookie Exchanges: Their snowy appearance makes them naturally festive for winter holidays, but their bright flavor is welcome year-round. They package well.
- Gift Giving: Pack them in decorative tins or cellophane bags tied with a ribbon for a lovely homemade gift. Layer them with parchment paper to prevent sticking.
- Simple Pleasure: Enjoy them just as they are, perhaps with a cold glass of milk, for a simple, delightful treat anytime.
- Garnish for Other Desserts: Crumble one or two cookies over puddings, mousse, or yogurt for a lemony, buttery crunch.
Pro Tips for Peak Performance: Additional Tips
Elevate your Lemon Meltaway game with these five essential tips:
- Embrace the Chill: Do not underestimate the importance of chilling the dough for at least the minimum time specified (1 hour). Chilling solidifies the butter, which is crucial for preventing the cookies from spreading into flat puddles during baking. It also makes the soft dough much easier to handle and roll into neat balls. If your kitchen is warm, you might even benefit from chilling the shaped cookie balls on the baking sheet for 15-20 minutes before they go into the oven.
- Fresh is Best for Lemon Flavor: While bottled lemon juice can work in a pinch for the liquid component, freshly grated lemon zest is non-negotiable for achieving that vibrant, authentic lemon aroma and taste. The oils in the zest pack the most potent flavor. Use a microplane for a fine zest that incorporates seamlessly. Ensure your lemons are fresh and fragrant.
- Master Flour Measurement: As stressed earlier, incorrectly measured flour is a common culprit for baking failures. Use the “spoon and level” method: fluff the flour in its container, gently spoon it into your measuring cup until it mounds over the top, then sweep off the excess with the back of a knife or straight edge. Avoid scooping directly from the bag, which compacts the flour and adds too much to the recipe, leading to dry, crumbly cookies.
- Watch Baking Time Like a Hawk: These cookies bake quickly and should not brown significantly. The goal is pale and tender. Overbaking, even by a minute or two, can turn them from meltaway to merely dry. Look for the edges to be set and the bottoms to be just starting to show a hint of pale golden color. They might seem slightly soft when removed from the oven but will firm up as they cool on the baking sheet.
- Perfect the Powdered Sugar Coat: For that signature snowy look and extra touch of sweetness, the double-coating method works best. The first roll while the cookies are warm creates a base layer as the sugar slightly melts onto the surface. The second roll, once completely cool, provides the thick, powdery finish that stays put. Ensure the cookies are fully cool before the second roll, otherwise the sugar might absorb moisture and become pasty. Sift the coating sugar if it’s lumpy for a smooth finish.
Troubleshooting Common Cookie Conundrums
Even seemingly simple recipes can sometimes present challenges. Here’s how to troubleshoot potential issues with your Lemon Meltaways:
- Problem: My cookies spread too much and became flat.
- Cause: Most likely, the dough wasn’t chilled sufficiently, or the butter was too soft/melted when creamed. Over-creaming butter and sugar can also incorporate too much air, leading to collapse. Your oven might also be running cool.
- Solution: Ensure dough is chilled for at least 1 hour (longer is often better). Make sure butter is softened but not greasy/melty. Chill shaped dough balls before baking if needed. Check oven temperature with an oven thermometer. Don’t over-cream.
- Problem: My cookies are dry, hard, or crumbly (not in a good meltaway way).
- Cause: The most common reasons are overbaking or measuring too much flour. Overmixing the dough after adding flour can also contribute by developing too much gluten.
- Solution: Measure flour using the spoon and level method. Mix only until combined – stop as soon as dry streaks disappear. Bake only until the bottoms are faintly golden, watching closely. Remove from the oven even if they seem slightly underdone on top; they continue cooking on the hot pan.
- Problem: My cookies don’t taste very lemony.
- Cause: Not enough lemon zest was used, or the lemons weren’t very potent. Relying only on lemon juice won’t provide strong flavor. Using old, dried-out lemons.
- Solution: Use the full amount of zest called for (or even slightly more if you love lemon). Ensure you’re using fresh, fragrant lemons. Use a microplane to get fine zest, releasing more oils. Make sure to include both zest and fresh juice.
- Problem: The dough was too sticky to roll.
- Cause: Dough wasn’t chilled long enough, or the kitchen environment is very warm. Measurement inaccuracy (slightly too little flour or too much liquid) could also be a factor, but chilling usually resolves stickiness.
- Solution: Chill the dough for longer! Even an extra 30-60 minutes can make a big difference. If it’s still persistently sticky after adequate chilling, you can try lightly dusting your hands with powdered sugar (not flour) when rolling. Avoid adding significant amounts of extra flour as it will change the texture.
- Problem: The powdered sugar coating absorbed or looks patchy.
- Cause: Cookies were likely not cooled completely before the second coating, or they were stored before being fully cool, creating moisture. High humidity can also affect the coating.
- Solution: Allow cookies to cool completely on a wire rack before the final roll in powdered sugar. Store only when fully cool in an airtight container. If humidity is high, you may need to re-dust them before serving.
Exploring Variations: Twists on the Classic Lemon Meltaway
While the classic lemon version is phenomenal, the meltaway base is adaptable. Here are some ideas:
- Other Citrus Delights: Swap the lemon zest and juice for other citrus fruits!
- Lime Meltaways: Use lime zest and juice for a bright, tropical twist. Delicious!
- Orange Meltaways: Use orange zest and juice. Consider adding 1/4 tsp of cinnamon or cardamom for warmth.
- Grapefruit Meltaways: Pink grapefruit zest and juice offer a unique, slightly floral tang.
- Herbaceous Notes: Finely chop fresh herbs and add them with the zest for a sophisticated flavor profile.
- Lemon Rosemary: Add 1 teaspoon finely chopped fresh rosemary.
- Lemon Thyme: Add 1 teaspoon finely chopped fresh thyme leaves.
- Speckled Variations: Add seeds or spices for visual appeal and flavor.
- Lemon Poppy Seed: Add 1 tablespoon of poppy seeds along with the dry ingredients.
- Cardamom Spiced: Add 1/2 teaspoon ground cardamom to the dry ingredients for a warm, aromatic spice that pairs beautifully with lemon.
- Add-Ins (Use Sparingly): While the delicate texture is key, small add-ins can work if used judiciously.
- Mini White Chocolate Chips: Add 1/2 cup of mini white chocolate chips. Regular sized chips might overwhelm the cookie.
- Finely Chopped Nuts: Add 1/2 cup finely chopped pecans or walnuts. Toast them first for better flavor, but ensure they are chopped small.
- Glazed Instead of Rolled: Skip the powdered sugar rolling. Once cookies are completely cool, drizzle or dip them in a simple lemon glaze (mix approx. 1 cup powdered sugar with 1-2 tablespoons fresh lemon juice until desired consistency is reached). Let the glaze set completely.
- Different Shapes: While balls are classic, you can adapt the shape. Roll the chilled dough into a log (about 1.5 inches diameter), wrap tightly, and chill until very firm. Slice the log into 1/4-inch thick rounds and bake. Or, if the dough is very well-chilled, you might be able to use simple cookie cutters, but handle gently and expect some fragility.
Storing Your Sunshine: How to Keep Lemon Meltaways Fresh
Due to their delicate nature and powdered sugar coating, proper storage is important to maintain their texture and appearance.
- Room Temperature (Best Method): Once the cookies are completely cool (this is crucial!), store them in an airtight container at room temperature. Layer them gently, separated by sheets of parchment paper or wax paper to prevent the powdered sugar from rubbing off or the cookies sticking together. They should stay fresh and maintain their meltaway texture for 3-5 days.
- Refrigerating: Refrigeration is generally not recommended for baked meltaway cookies. The cool, moist environment can make the powdered sugar coating damp or clumpy, and it can slightly harden the cookie’s texture, diminishing the “meltaway” quality. If you must refrigerate, ensure the container is truly airtight.
- Freezing Baked Cookies: Lemon Meltaways freeze reasonably well. Let them cool completely, then place them in a single layer on a baking sheet and freeze until solid (about 1 hour). Transfer the frozen cookies to an airtight, freezer-safe container or zip-top bag, layering with parchment paper. They can be frozen for up to 1 month. To serve, thaw them uncovered at room temperature for an hour or two. Note: The powdered sugar coating might look a bit patchy after thawing; you can give them a light re-dusting before serving if desired.
- Freezing Dough: Cookie dough freezes exceptionally well. Prepare the dough through Step 5 (shaping into a disk and chilling). You can freeze the entire disk wrapped tightly in plastic wrap and then placed in a freezer bag. Alternatively, shape the dough into balls, place them on a parchment-lined baking sheet, freeze until solid, then transfer the frozen balls to a freezer bag. Dough can be frozen for up to 3 months. Bake directly from frozen, adding 1-3 minutes to the baking time. Do not thaw the dough balls before baking. Coat with powdered sugar as usual after baking and cooling.
Proper storage ensures you can enjoy these delightful cookies for days, or even bake them fresh from frozen dough whenever the craving strikes!
Your Questions Answered: Lemon Meltaway Cookie FAQs
Here are answers to some frequently asked questions about making Lemon Meltaway Cookies:
- Q: Can I use bottled lemon juice instead of fresh?
- A: Freshly squeezed lemon juice provides the brightest, most natural flavor and is highly recommended. However, if you absolutely must, you can substitute bottled lemon juice in the same quantity (2 tablespoons). Be aware that the flavor might be slightly less vibrant or have a subtle “processed” note compared to fresh. Never substitute bottled juice for the lemon zest – the zest is essential for the main lemon flavor profile.
- Q: Can I use granulated sugar instead of powdered sugar in the dough?
- A: No, this is not recommended. Powdered sugar (confectioners’ sugar) is crucial for achieving the signature smooth, tender, “meltaway” texture. Its fine consistency and the presence of cornstarch interact differently with the butter and flour than granulated sugar. Using granulated sugar would result in a completely different cookie, likely with a grainier texture and less tenderness. Stick to powdered sugar for this recipe.
- Q: Why is cornstarch necessary? Can I leave it out?
- A: Cornstarch is the secret ingredient that gives these cookies their characteristic delicate, crumbly, melt-in-your-mouth texture. It lowers the protein content of the dough and inhibits gluten development, leading to extreme tenderness. Leaving it out and replacing it with more flour would result in a cookie that is much closer to standard shortbread – still potentially delicious, but it wouldn’t have that distinctive “meltaway” quality. Don’t skip the cornstarch!
- Q: Can I make these cookies gluten-free?
- A: Yes, you likely can make a gluten-free version. Use a good quality gluten-free all-purpose flour blend that contains xanthan gum (a common 1:1 baking substitute). Follow the recipe as written, substituting the all-purpose flour with the GF blend. Keep in mind that the texture might be slightly different – potentially a bit grittier or more crumbly depending on the specific GF flour blend used. Ensure your cornstarch is also certified gluten-free if required for dietary reasons.
- Q: My cookies didn’t really “meltaway,” they were just kind of… standard shortbread. What went wrong?
- A: Several factors could prevent the true meltaway texture:
- Overmixing: Mixing too much after adding the flour develops gluten, making the cookies tougher. Mix only until combined.
- Incorrect Sugar: Using granulated sugar instead of powdered sugar.
- Omitting Cornstarch: Cornstarch is key to the tenderness.
- Incorrect Flour Measurement: Too much flour makes them dense and dry.
- Overbaking: Baking them until golden brown or crisp will eliminate the delicate texture. Aim for pale and just set.
- Butter Temperature: Using melted or overly cold butter can affect how it incorporates, impacting the final texture. Ensure it’s properly softened.
- A: Several factors could prevent the true meltaway texture:
Lemon Meltaway Cookies Recipe
Ingredients
- Unsalted Butter: 1 cup (2 sticks or 226g), softened to room temperature. (Using unsalted butter allows you to control the salt content precisely. Ensure it’s properly softened – not melted, but soft enough to indent easily with a finger.)
- Powdered Sugar: 3/4 cup (90g), sifted, plus approximately 1 cup (120g) more for rolling the baked cookies. (Also known as confectioners’ sugar or icing sugar. Sifting prevents clumps and ensures a smooth dough. Do not substitute with granulated sugar.)
- Lemon Zest: 1 tablespoon, finely grated (from approximately 1 large or 2 small lemons). (This is where the primary lemon aroma and flavor come from. Use a microplane or fine grater, avoiding the white pith.)
- Fresh Lemon Juice: 2 tablespoons. (Adds brightness and tang. Freshly squeezed juice offers the best flavor compared to bottled.)
- Vanilla Extract: 1 teaspoon. (Enhances the other flavors and adds warmth.)
- All-Purpose Flour: 2 cups (240g), measured correctly (spooned and leveled). (The main structure builder. Measuring correctly is vital – too much flour can make the cookies dry.)
- Cornstarch: 1/4 cup (30g). (The key ingredient for the signature tender, meltaway texture. Do not omit this!)
- Salt: 1/4 teaspoon. (Balances the sweetness and enhances the lemon flavor.)
Instructions
- Cream Butter and Sugar: In the bowl of a stand mixer fitted with the paddle attachment, or in a large bowl using a hand mixer, beat the softened unsalted butter on medium speed until smooth and creamy (about 1 minute). Add the 3/4 cup (90g) of sifted powdered sugar. Start on low speed (to avoid a sugar cloud!), then increase to medium and beat for 2-3 minutes, until the mixture is very light, pale, and fluffy. Scrape down the sides and bottom of the bowl periodically to ensure even mixing. Why this matters: This step incorporates air into the butter and sugar, which contributes to the cookie’s lightness and tender texture. Proper creaming is essential.
- Add Wet Ingredients and Zest: Add the finely grated lemon zest, fresh lemon juice, and vanilla extract to the creamed butter mixture. Beat on medium-low speed until just combined, about 30 seconds to 1 minute. Scrape down the bowl again. Tip: Ensure your zest is fine – large pieces can interrupt the smooth texture.
- Combine Dry Ingredients: In a separate medium bowl, whisk together the all-purpose flour, cornstarch, and salt. Whisking helps distribute the cornstarch and salt evenly throughout the flour, ensuring consistency in every cookie.
- Add Dry to Wet Ingredients: With the mixer on its lowest speed, gradually add the dry ingredient mixture to the wet ingredients in 2-3 additions. Mix only until the flour mixture is just incorporated and no dry streaks remain. Be careful not to overmix! Crucial step: Overmixing develops the gluten in the flour, which will make the cookies tough instead of tender and meltaway. Stop mixing as soon as the dough comes together. The dough will be soft.
- Chill the Dough: Scrape the dough out onto a piece of plastic wrap. Gently form it into a flattened disk (about 1-inch thick), wrap it tightly in the plastic wrap, and refrigerate for at least 1 hour, or up to 2 days. Why chilling is vital: Chilling solidifies the butter, preventing the cookies from spreading too much during baking. It also allows the flour to hydrate fully and the flavors to meld, resulting in a better texture and taste. Don’t skip or shorten this step! A well-chilled dough is easier to handle and bakes predictable shapes.
- Preheat Oven and Prepare Baking Sheets: When ready to bake, preheat your oven to 350°F (175°C). Line two large baking sheets with parchment paper or silicone baking mats. Parchment paper ensures even baking and prevents sticking, making cleanup easier.
- Shape the Cookies: Remove the chilled dough from the refrigerator. If it’s very firm, let it sit at room temperature for 5-10 minutes to become slightly more pliable. Pinch off small pieces of dough and roll them between your palms into smooth balls, about 1 inch (2.5 cm) in diameter. Place the balls about 1.5-2 inches apart on the prepared baking sheets. They won’t spread excessively if the dough is well-chilled, but give them some space. Uniform size ensures even baking.
- Bake: Bake one sheet at a time in the preheated oven for 10-13 minutes. The cookies should be set and the bottoms just barely beginning to turn a very light golden color. Do NOT overbake. You want them to remain pale on top to maintain the tender texture. Overbaking will make them dry and hard, defeating the meltaway purpose. Check early: Ovens vary, so start checking around the 10-minute mark.
- First Cool and Coat: Let the cookies cool on the baking sheet for about 5 minutes. While they are still warm (but cool enough to handle), prepare the remaining 1 cup (120g) of powdered sugar in a shallow bowl. Gently roll each warm cookie in the powdered sugar until lightly coated. Transfer the coated cookies to a wire rack to cool completely. Why coat while warm? The warmth helps the first layer of powdered sugar adhere slightly, creating a good base.
- Second Coat (Optional but Recommended): Once the cookies are completely cool (at least 30 minutes on the wire rack), roll them in the powdered sugar again for a thicker, more generous, snowy coating. This second coat gives them their classic meltaway appearance and an extra touch of sweetness.
- Store: Store the completely cooled Lemon Meltaway Cookies in an airtight container at room temperature.
Nutrition
- Serving Size: One Normal Portion
- Calories: 100-120