


Introduction
If you’re a fan of indulgent pastries with a tropical twist, you’re in for a treat. Introducing the King’s Hawaiian Cheesecake Danish; a delightful fusion of creamy cheesecake filling, sweet apricot jam, and the unmistakable flavor of King’s Hawaiian Sweet Rolls. This easy-to-make dessert not only satisfies your sweet tooth but also adds a touch of elegance to your breakfast or brunch table. In this article, we’ll walk you through the recipe with detailed instructions, nutritional facts, serving suggestions, and additional tips to make your baking experience a breeze.
Ingredients
Before we dive into the preparation, let’s take a look at the ingredients you’ll need. This simple list ensures you have everything on hand for a quick and delicious creation.
- 1 can of King’s Hawaiian Sweet Rolls
- 1 package cream cheese, softened
- 1/4 cup sugar
- 1 tsp vanilla extract
- 1 egg
- 1/4 cup apricot jam
- Powdered sugar, for dusting
Instructions
Creating this delectable dessert is as easy as it is enjoyable. Follow these steps to make your own King’s Hawaiian Cheesecake Danish:
- Preheat the Oven: Set your oven to 350°F (175°C) to ensure it’s ready when you are.
- Prepare the Cheesecake Mixture: In a mixing bowl, combine the cream cheese, sugar, vanilla extract, and egg. Beat these ingredients together until the mixture is smooth and creamy.
- Prepare the Rolls: Cut the sweet rolls in half and place them on a baking sheet. These will serve as the base for your danish.
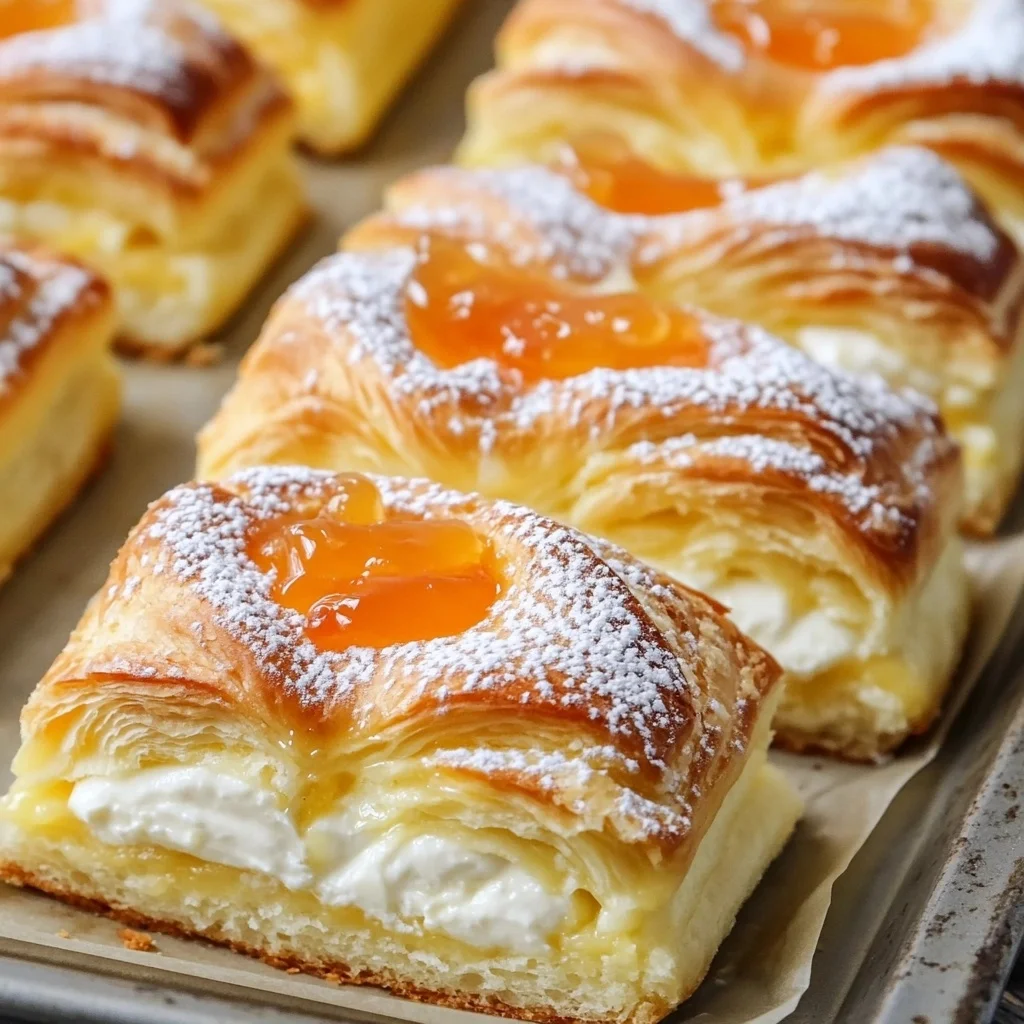
- Assemble the Danish: Spoon the cream cheese mixture onto each roll half, spreading it evenly. Top each with a small dollop of apricot jam for a burst of fruity flavor.
- Bake: Place the baking sheet in the preheated oven and bake for 15-20 minutes or until the rolls are golden brown and the cheesecake filling is set.
- Cool and Serve: Allow the danishes to cool slightly before dusting them with powdered sugar. Serve warm or at room temperature for the best experience.
Nutrition Facts
Understanding the nutritional content of your dessert can help you enjoy it mindfully. Here’s a breakdown of the nutritional facts per serving:
- Calories: 210
- Protein: 4g
- Carbohydrates: 30g
- Fat: 8g
- Sugar: 10g
How to Serve
The King’s Hawaiian Cheesecake Danish is a delightful treat that transcends the traditional boundaries of a pastry. Its sweet and creamy filling, combined with the unique flavor profile of King’s Hawaiian bread, makes it a versatile option for a variety of occasions. Here are some comprehensive serving suggestions to enhance your dining experience:
Breakfast or Brunch
Start your day off right with the King’s Hawaiian Cheesecake Danish as a centerpiece for breakfast or brunch. To create a well-rounded meal, consider pairing it with a fresh fruit salad that includes a mix of seasonal fruits such as strawberries, blueberries, kiwi, and pineapple. The bright flavors of the fruit will perfectly complement the rich, creamy cheesecake filling.
Additionally, serve the Danish alongside a steaming cup of coffee or a fragrant herbal tea. For coffee enthusiasts, a light roast or a flavored coffee such as vanilla or hazelnut can enhance the sweetness of the pastry. Alternatively, opt for a refreshing iced tea, perhaps with a hint of lemon, to add a zesty contrast.
Dessert
Transform your King’s Hawaiian Cheesecake Danish into an indulgent dessert that’s sure to impress guests or satisfy your sweet tooth. Serve it warm, straight from the oven or gently reheated, to enhance its gooey texture. A generous scoop of vanilla ice cream placed on top or alongside the Danish melts into the warm pastry, creating a delightful warm-and-cold contrast that elevates the entire dish.
For an extra touch of decadence, consider adding a dollop of freshly whipped cream, lightly sweetened and perhaps infused with a hint of vanilla or almond extract. To finish, drizzle a homemade raspberry or chocolate sauce over the top, adding both visual appeal and an explosive burst of flavor. Garnish with fresh mint leaves or a dusting of powdered sugar for a sophisticated touch.
Afternoon Snack
The King’s Hawaiian Cheesecake Danish makes for an irresistible afternoon snack that can help rejuvenate your day. Pair it with a refreshing glass of iced tea, perhaps sweetened with a touch of honey or flavored with fresh mint or citrus slices, to provide a revitalizing contrast to the pastry’s sweetness.
Alternatively, a homemade lemonade adds a zesty and invigorating element to your snack experience. For a twist, consider infusing the lemonade with herbs like basil or rosemary for an added layer of flavor that pairs beautifully with the Danish.
For a more substantial afternoon treat, consider serving the Danish with a side of yogurt and granola. The tanginess of the yogurt, combined with the crunch of granola, creates a wonderful textural contrast that balances the richness of the cheesecake filling.
Special Occasions and Celebrations
The King’s Hawaiian Cheesecake Danish is not only perfect for everyday enjoyment but also shines during special occasions and celebrations. For gatherings, consider presenting the Danish as part of a dessert buffet alongside other pastries or desserts. This allows guests to sample a variety of treats and makes for an eye-catching display.
For holiday celebrations, consider incorporating seasonal flavors into your presentation. For example, during Thanksgiving, serving the Danish alongside spiced apple cider or pumpkin-flavored drinks can create a festive atmosphere. For Valentine’s Day, a heart-shaped Danish adorned with a drizzle of pink icing can serve as a sweet romantic gesture.
In every scenario, the King’s Hawaiian Cheesecake Danish can adapt to the occasion, providing a delicious and inviting experience that will leave a lasting impression on your guests. Whether enjoyed alone or paired with complementary items, it promises to be a highlight on any table.
Additional Tips
Elevate your Danish pastry-making journey with these thoughtful suggestions that not only personalize your pastries but also enhance their overall flavor and texture:
Add Some Zest
To infuse your cream cheese mixture with a burst of freshness, consider adding a teaspoon of finely grated lemon or orange zest. This simple addition not only brightens the flavor profile but also adds a delightful aromatic quality. The citrusy notes can beautifully complement the sweetness of the jam and the richness of the cream cheese, creating a more complex and enjoyable taste experience. For an extra layer of flavor, you could also incorporate a splash of citrus juice, but be mindful of the moisture content to ensure your filling remains thick and doesn’t seep into the pastry.
Jam Alternatives
While apricot jam is a classic choice, don’t be shy to explore other jam varieties that cater to your taste preferences. Raspberry and strawberry jams are excellent alternatives that can bring a tangy sweetness or a bright, fruity flavor to your Danish. If you’re feeling adventurous, consider using a mixed berry jam or even homemade preserves for a rustic touch. For those who enjoy a bit of tartness, a sour cherry or blackberry jam can provide a delightful contrast to the creamy filling. Always remember to adjust the amount of jam based on its sweetness level; some jams are more concentrated than others.
Make Ahead
To streamline your baking process, prepare the cream cheese mixture ahead of time. This can be done up to two days in advance. Simply mix your ingredients—cream cheese, sugar, vanilla extract, and any zest or flavorings—until smooth, then store it in an airtight container in the refrigerator. This not only saves you time on the day of baking but also allows the flavors to meld beautifully, enhancing the overall taste of your Danish. On baking day, just take it out of the fridge to bring it to room temperature before using it, ensuring a smoother spreadability that won’t tear your pastry.
Experiment with Toppings
Adding toppings can take your Danish pastries to the next level in terms of both flavor and texture. Before baking, consider sprinkling chopped nuts, such as almonds, pecans, or walnuts, across the top. The crunch they provide contrasts wonderfully with the soft, creamy filling and flaky pastry. Additionally, shredded coconut flakes can add a hint of tropical flavor and a lovely chewiness. For a sweeter touch, drizzle a bit of honey or maple syrup over the top before serving, or finish with a light glaze made from powdered sugar and milk for a professional-looking finish.
Spice It Up
For those who enjoy a hint of warmth in their pastries, consider adding a pinch of cinnamon or nutmeg to the cream cheese mixture. These spices can introduce a cozy, comforting element that pairs beautifully with both the creaminess of the cheese and the sweetness of the jam. Just be cautious with the amounts; a little goes a long way!
Use Quality Ingredients
Lastly, the quality of your ingredients can make a significant difference in the final product. Opt for high-quality cream cheese, preferably full-fat, for a richer flavor and creamier texture. If possible, choose artisanal jams made with real fruit and minimal additives. Freshly grated zest and pure vanilla extract will also elevate the taste of your Danish, setting your pastries apart from those made with more generic ingredients.
By incorporating these additional tips, you can create delicious, personalized Danish pastries that are sure to impress family and friends alike. Whether you’re hosting a brunch, celebrating a special occasion, or simply indulging in a homemade treat, these enhancements will make your baking experience more enjoyable and your pastries more delightful. Happy baking!
FAQs
1. Can I use a different type of roll for this recipe? While King’s Hawaiian Sweet Rolls are recommended for their unique flavor and texture, which contribute to the overall taste profile of the danishes, you certainly have the option to experiment with different types of rolls. For instance, you might consider using other brands of sweet rolls that have a similar sugar content and softness, such as Sara Lee or Pepperidge Farm. Alternatively, brioche or challah bread can be used for a richer flavor—though these may result in a denser texture. If you’re looking for a less sweet option, try using plain dinner rolls, but be prepared for a notable difference in taste. Ultimately, while the original flavor may be altered, the beauty of cooking lies in experimentation, so feel free to try out various rolls that suit your palate or dietary needs.
Can I freeze the danishes? Yes, you can freeze the baked danishes, which is an excellent way to extend their shelf life without sacrificing flavor. To ensure the best quality, allow the danishes to cool completely at room temperature—this step is crucial as it prevents condensation from forming, which can lead to freezer burn. Once cooled, wrap each danish individually in plastic wrap to minimize exposure to air. Following this, place the wrapped danishes in an airtight container or a heavy-duty freezer bag to provide an additional layer of protection. They can be stored in the freezer for up to one month. When you’re ready to enjoy them, simply reheat in the oven at 350°F (175°C) for about 10-15 minutes or until warmed through. This technique helps to retain their original texture and flavor, making them taste freshly baked.
Is it possible to make this recipe gluten-free? Yes, you can create a gluten-free version of this recipe without compromising on taste. To do this, substitute the King’s Hawaiian Sweet Rolls with gluten-free sweet rolls or gluten-free bread that you enjoy. Many brands now offer gluten-free alternatives that mimic the sweetness and softness of traditional rolls, such as Udi’s Gluten Free or Schär. Be sure to check the ingredient list for added sugars or preservatives that might alter the flavor. Additionally, you might want to enhance the flavor of your gluten-free danishes by adding a touch of vanilla extract or a sprinkle of cinnamon to the filling. Keep in mind that gluten-free doughs can sometimes behave differently than their gluten-containing counterparts, so you may need to adjust baking times slightly to achieve the perfect texture.
How can I store leftovers? To maintain the freshness and taste of any leftover danishes, store them in an airtight container in the refrigerator. This method helps to keep them moist and prevents them from drying out. They can be safely stored for up to three days; however, the texture may begin to change as they sit. When you’re ready to enjoy them again, you can warm them slightly in the oven or microwave. For oven reheating, set it to 350°F (175°C) and warm the danishes for about 5-10 minutes, or until they are heated through. If using a microwave, place the danish on a microwave-safe plate and heat for about 15-30 seconds, being careful not to overheat as it can make them rubbery. For an extra touch, consider drizzling a little melted butter or sprinkling powdered sugar on top after reheating to revive their original appeal.
Conclusion
The King’s Hawaiian Cheesecake Danish is a delightful combination of flavors that’s sure to impress your family and friends. With its creamy cheesecake filling, sweet apricot jam, and soft, pillowy rolls, it’s a dessert that’s both simple to make and irresistibly delicious. Whether you’re serving it at a brunch, as a dessert, or enjoying it as an afternoon snack, this danish is sure to become a favorite. So gather your ingredients, follow our easy steps, and enjoy the sweet rewards of your baking skills!


