


I still remember the first time I decided to tackle homemade gyros. I’d always thought they were one of those magical street foods, too complex for a home kitchen. Then, a friend raved about making them in their Instant Pot, and a lightbulb went off! I was skeptical, imagining tough, flavorless meat. But oh, how wrong I was! The first batch of these Instant Pot Beef Gyros I made was a revelation. The beef was incredibly tender, practically melting in our mouths, and infused with those classic, aromatic Greek spices. My family, usually a tough crowd with new recipes, devoured them. My husband, who fancies himself a gyro connoisseur, declared them “restaurant-worthy,” and the kids actually asked for seconds (a rare win!). The Instant Pot transformed a typically slow-cooked dish into a weeknight possibility, and the aroma that filled the house was simply divine. Since then, it’s become a beloved staple, a go-to for a satisfying, flavorful meal that feels both special and surprisingly easy. The best part? The active cooking time is minimal, letting the pressure cooker do all the hard work.
The Ultimate Instant Pot Beef Gyros: A Flavor Explosion
Gyros are a cornerstone of Greek street food, traditionally made with meat (often lamb, pork, or chicken) cooked on a vertical rotisserie. This Instant Pot version brings all that iconic flavor and tender texture to your home kitchen with a fraction of the effort, using readily available beef chuck roast. The pressure cooker works its magic, tenderizing the beef and infusing it with a rich, aromatic blend of herbs and spices. Paired with fresh tzatziki sauce, warm pita bread, and crisp vegetables, these homemade beef gyros are a culinary journey you won’t want to miss. Get ready to impress your family and friends with a dish that tastes like it took hours to prepare, but secretly came together with the help of your trusty Instant Pot.
Ingredients: Crafting Your Perfect Beef Gyros
Gathering high-quality ingredients is the first step towards achieving authentic gyro flavor. Here’s what you’ll need to create this mouthwatering dish:
For the Beef Gyro Meat:
- Beef Chuck Roast: 2.5 – 3 lbs, trimmed of excessive fat and cut into 2-inch chunks
- Olive Oil: 2 tablespoons (for searing)
- Beef Broth: 1 cup (low sodium preferred)
- Red Wine Vinegar: 2 tablespoons
- Lemon Juice: 2 tablespoons, freshly squeezed
- Garlic: 4-6 cloves, minced
- Dried Oregano: 2 tablespoons
- Dried Marjoram: 1 tablespoon
- Dried Thyme: 1 teaspoon
- Dried Rosemary: 1 teaspoon, crushed
- Onion Powder: 1 tablespoon
- Garlic Powder: 1 teaspoon
- Smoked Paprika: 1 teaspoon (optional, for color and a hint of smokiness)
- Salt: 1.5 teaspoons (or to taste)
- Black Pepper: 1 teaspoon, freshly ground (or to taste)
- Bay Leaves: 2
For the Homemade Tzatziki Sauce (Highly Recommended):
- Greek Yogurt: 2 cups, plain, full-fat
- Cucumber: 1 large, grated and squeezed dry
- Garlic: 2-3 cloves, minced or pressed
- Lemon Juice: 2 tablespoons, freshly squeezed
- Fresh Dill: 2 tablespoons, chopped (or 2 teaspoons dried dill)
- Fresh Mint: 1 tablespoon, chopped (optional, but adds a lovely freshness)
- Olive Oil: 1 tablespoon, extra virgin
- Salt: ½ teaspoon (or to taste)
- Black Pepper: ¼ teaspoon (or to taste)
For Serving:
- Pita Bread: 6-8 rounds, preferably thick and fluffy
- Tomatoes: 2-3 ripe, thinly sliced or diced
- Red Onion: 1 small, thinly sliced
- Lettuce: Romaine or iceberg, shredded (optional)
- Feta Cheese: Crumbled (optional, for an extra salty kick)
- Kalamata Olives: Pitted and halved (optional)
- Fresh Parsley: Chopped, for garnish (optional)
Instructions: Your Step-by-Step Guide to Gyro Glory
Follow these detailed instructions to ensure your Instant Pot Beef Gyros are tender, flavorful, and absolutely perfect.
Phase 1: Preparing the Tzatziki Sauce (Do this first or while beef cooks)
- Prep the Cucumber: Grate the cucumber using a box grater. Place the grated cucumber in a clean kitchen towel or several layers of paper towels and squeeze out as much liquid as possible. This step is crucial to prevent a watery tzatziki.
- Combine Ingredients: In a medium bowl, combine the squeezed cucumber, Greek yogurt, minced garlic, fresh lemon juice, chopped dill, chopped mint (if using), extra virgin olive oil, salt, and pepper.
- Mix & Chill: Stir well to combine all ingredients. Taste and adjust seasoning if necessary (more salt, lemon, or dill). Cover and refrigerate for at least 30 minutes to allow the flavors to meld. The longer it chills, the better it tastes. This can be made a day ahead.
Phase 2: Cooking the Beef Gyro Meat in the Instant Pot
- Season the Beef: Pat the beef chuck roast chunks dry with paper towels. In a small bowl, combine the dried oregano, marjoram, thyme, rosemary, onion powder, garlic powder, smoked paprika (if using), salt, and black pepper. Generously rub this spice mixture all over the beef chunks, ensuring they are well-coated.
- Sear the Beef: Set your Instant Pot to “Sauté” mode on high. Once the display reads “Hot,” add the 2 tablespoons of olive oil. Carefully add half of the seasoned beef chunks to the pot in a single layer, being careful not to overcrowd. Sear for 2-3 minutes per side, until nicely browned. This browning step (Maillard reaction) develops a deep, rich flavor. Remove the seared beef and set aside on a plate. Repeat with the remaining beef chunks, adding a little more oil if needed.
- Deglaze the Pot: Turn off the “Sauté” mode. Pour in the beef broth, red wine vinegar, and lemon juice. Use a wooden spoon or spatula to scrape up any browned bits (fond) stuck to the bottom of the pot. This is packed with flavor and essential for preventing a “Burn” notice.
- Pressure Cook: Return all the seared beef to the Instant Pot. Add the minced garlic and bay leaves to the pot. Secure the lid, ensuring the steam release valve is set to the “Sealing” position. Select “Pressure Cook” (or “Manual”) mode and set the timer for 50-60 minutes on high pressure. The exact time will depend on the thickness and marbling of your beef; 55 minutes is a good average for 2-inch chunks.
- Natural Pressure Release (NPR): Once the cooking cycle is complete, allow the pressure to release naturally for at least 15-20 minutes. This helps keep the meat tender and juicy. After 15-20 minutes, you can carefully perform a quick release of any remaining pressure by moving the valve to the “Venting” position.
- Shred the Beef: Carefully remove the lid once the pin has dropped. Remove the beef chunks from the pot and place them on a cutting board or in a large bowl. Discard the bay leaves. Using two forks, shred the beef. It should be incredibly tender and shred easily.
- Reduce Sauce & Combine (Optional but Recommended): If the liquid in the Instant Pot seems too thin, you can turn on the “Sauté” mode and let it simmer for 5-10 minutes to reduce and concentrate the flavors. Once slightly thickened, return the shredded beef to the pot and toss it with the sauce to coat it thoroughly. This step ensures every strand of beef is packed with flavor.
- Optional Crisping Step: For an extra touch of authenticity and texture reminiscent of rotisserie-cooked gyro meat, you can crisp up the shredded beef.
- Oven Broiler Method: Spread the shredded beef (drained of most excess liquid but still moist) in a single layer on a baking sheet. Broil on high for 3-5 minutes, watching carefully to prevent burning, until the edges are slightly crisped.
- Skillet Method: Heat a large skillet (cast iron works best) over medium-high heat with a tablespoon of olive oil. Add the shredded beef in batches and cook for a few minutes until some edges are browned and crispy.
Phase 3: Assembling Your Instant Pot Beef Gyros
- Warm the Pita Bread: You can warm the pita bread in a few ways:
- Oven: Wrap pitas in foil and warm in a 300°F (150°C) oven for 5-10 minutes.
- Microwave: Wrap pitas in a damp paper towel and microwave for 20-30 seconds until warm and pliable.
- Skillet: Lightly char on a dry skillet or grill pan for about 30 seconds per side.
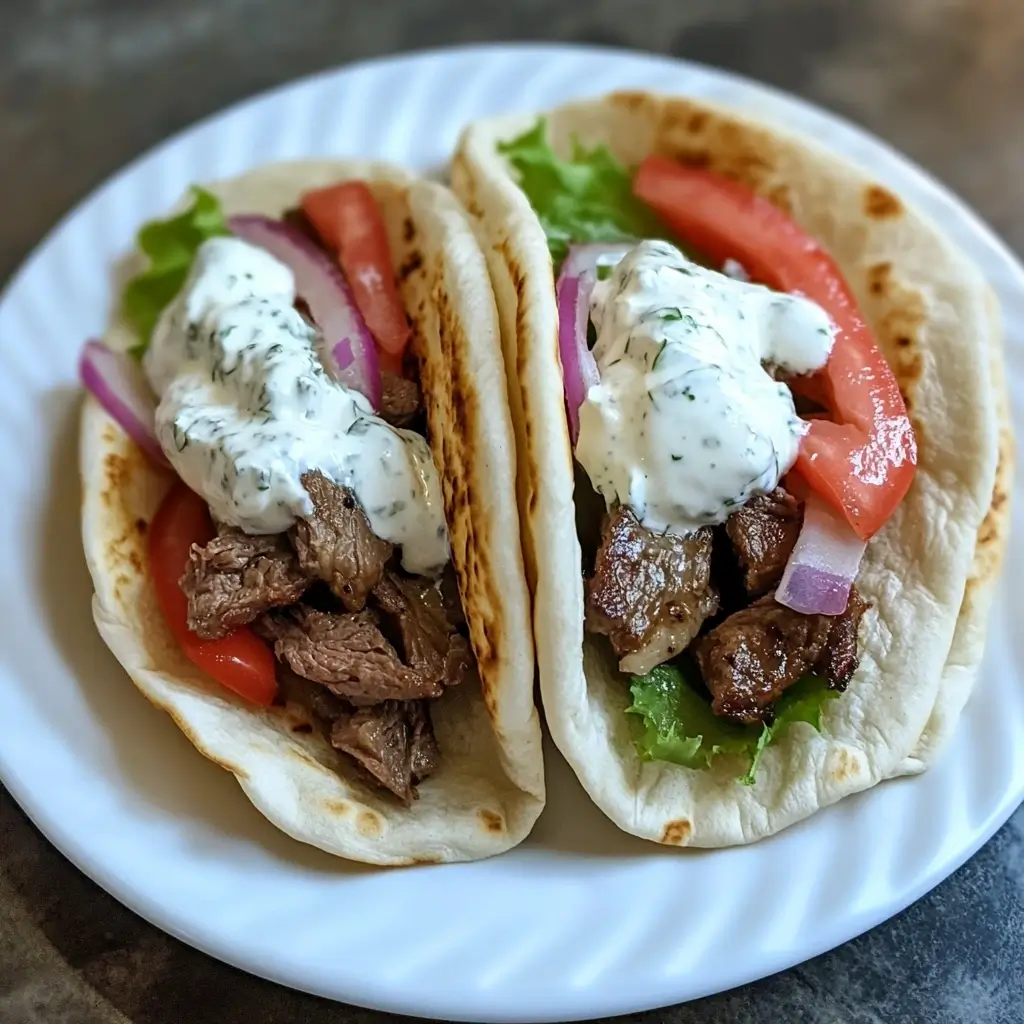
- Layer the Goodness: Lay a warm pita flat. Spread a generous layer of the homemade tzatziki sauce down the center.
- Add the Meat: Pile a hearty portion of the shredded, flavorful beef gyro meat on top of the tzatziki.
- Top with Veggies: Add your desired toppings: sliced tomatoes, thinly sliced red onions, shredded lettuce, and perhaps some crumbled feta cheese or Kalamata olives.
- Garnish & Serve: Sprinkle with fresh chopped parsley, if desired. Fold the pita in half like a taco, or roll it up (you might need to wrap the bottom in foil or parchment paper to hold it together). Serve immediately and enjoy the taste of Greece!
Nutrition Facts (Approximate)
- Servings: This recipe generously serves 6-8 people.
- Calories per serving (Beef Gyro filling and Tzatziki, excluding pita and additional toppings): Approximately 450-550 calories.
Disclaimer: Nutritional information is an estimate and can vary depending on specific ingredients used, exact portion sizes, and optional additions. For precise nutritional data, it’s recommended to use a specialized online calculator with your exact ingredient measurements.
Preparation and Cooking Time Breakdown
Understanding the time commitment helps in planning your meal:
- Tzatziki Sauce Preparation: 15 minutes (plus at least 30 minutes chilling time)
- Beef Preparation (Trimming & Seasoning): 10-15 minutes
- Searing Beef in Instant Pot: 10-15 minutes (in batches)
- Instant Pot Coming to Pressure: 10-15 minutes
- Pressure Cooking Time: 50-60 minutes
- Natural Pressure Release: 15-20 minutes
- Shredding & Optional Crisping: 10-15 minutes
- Assembly: 5-10 minutes
- Total Active Time: Approximately 45-60 minutes
- Total Time (including chilling and pressure building/release): Approximately 2 hours to 2 hours 30 minutes.
While the total time might seem long, a significant portion is hands-off, allowing the Instant Pot to work its magic.
How to Serve Your Delicious Instant Pot Beef Gyros
Serving these gyros is an art form in itself, allowing for personalization and a delightful culinary experience. Here are some popular ways to present and enjoy them:
- The Classic Fold:
- Spread tzatziki on a warm pita.
- Pile high with the shredded beef.
- Top with sliced tomatoes, red onions, and shredded lettuce.
- A sprinkle of feta cheese is a fantastic addition.
- Fold the pita in half and enjoy immediately.
- The Cone Wrap (Street Food Style):
- Lay ingredients as above, slightly off-center on the pita.
- Roll the pita into a cone shape.
- Wrap the bottom half in parchment paper or aluminum foil to catch drips and make it easier to hold.
- Gyro Bowls (Low-Carb/Gluten-Free Option):
- Create a base of shredded lettuce or cauliflower rice.
- Top with a generous portion of the beef gyro meat.
- Drizzle liberally with tzatziki sauce.
- Add all your favorite gyro toppings: tomatoes, red onions, cucumbers, feta, olives.
- Serve with a lemon wedge on the side.
- Gyro Platters (Deconstructed Style for Sharing):
- Arrange the warm shredded beef on a large platter.
- Place bowls of tzatziki sauce, chopped tomatoes, sliced red onions, shredded lettuce, crumbled feta, and olives around the meat.
- Serve with a stack of warm pita bread on the side.
- This allows everyone to build their own gyros to their liking, making it perfect for gatherings.
- Suggested Side Dishes:
- Greek Lemon Potatoes: Roasted potato wedges tossed with lemon juice, oregano, and olive oil.
- Seasoned Fries: Crispy fries, sometimes dusted with oregano or Greek seasoning.
- Greek Salad (Horiatiki): A simple salad of tomatoes, cucumbers, red onion, Kalamata olives, and feta, dressed with olive oil and oregano (no lettuce in traditional Horiatiki).
- Rice Pilaf: A fluffy, seasoned rice side.
- Roasted Vegetables: Zucchini, bell peppers, and eggplant roasted with Greek herbs.
Additional Tips for Gyro Perfection
Elevate your Instant Pot Beef Gyros from great to unforgettable with these expert tips:
- Don’t Skip the Sear: Searing the beef chunks before pressure cooking is crucial. This Maillard reaction creates a depth of flavor that you simply can’t achieve by just pressure cooking. Take the time to get a good, brown crust on all sides of the meat.
- Marinate for Maximum Flavor (If Time Allows): While the Instant Pot infuses flavor well, if you have an extra hour or even up to 4 hours, let the seasoned beef chunks marinate in the refrigerator before searing. This allows the spices to penetrate deeper into the meat.
- The Importance of Draining the Cucumber for Tzatziki: Watery tzatziki is a common pitfall. Grating the cucumber and then diligently squeezing out all excess moisture using a cheesecloth, clean kitchen towel, or even paper towels is key to a thick, creamy, and flavorful sauce.
- Balance Your Spices: The beauty of homemade gyros is a custom spice blend. Taste your spice rub before applying it to the beef. Feel free to adjust quantities. Some like more garlic, others more oregano. Don’t be afraid to experiment to find your perfect balance. A pinch of cumin or coriander can also be a nice addition for a slightly different profile.
- Don’t Overcrowd During Searing or Crisping: Whether searing in the Instant Pot or crisping the shredded beef in a skillet/broiler, work in batches. Overcrowding the pan lowers the temperature, leading to steaming rather than browning and crisping. Give the beef space to achieve that desirable texture.
FAQ: Your Instant Pot Beef Gyro Questions Answered
Q1: Can I use a different cut of beef for these gyros?
A1: Yes, while chuck roast is ideal due to its marbling and ability to become incredibly tender when pressure cooked, you could use other cuts. Beef brisket (cut against the grain after cooking) or even beef round (though it’s leaner and might not be as tender) can work. You might need to adjust cooking times slightly depending on the cut. For a leaner result, trim fat meticulously.
Q2: Can I make the gyro meat or tzatziki sauce ahead of time?
A2: Absolutely! The tzatziki sauce actually benefits from being made ahead – the flavors meld beautifully after a few hours or even overnight in the refrigerator. The cooked and shredded beef gyro meat can be stored in an airtight container in the refrigerator for 3-4 days. Reheat gently in a skillet with a splash of broth or water, or in the microwave, before serving.
Q3: How should I store and reheat leftover beef gyros?
A3: It’s best to store the components separately. Keep the shredded beef in an airtight container in the fridge (3-4 days) or freezer (2-3 months). Store tzatziki sauce separately in the fridge (up to 5 days). Store pita and fresh veggies separately. To reheat the beef, you can use a skillet over medium heat with a little olive oil or broth until warmed through. You can also microwave it. Assemble the gyros fresh just before serving.
Q4: I don’t have an Instant Pot. Can I make this recipe in a slow cooker or on the stovetop?
A4: Yes, you can adapt it!
* Slow Cooker: Sear the beef as directed in a skillet. Transfer to the slow cooker. Deglaze the skillet with the broth/vinegar/lemon juice and pour over the beef. Add remaining ingredients (garlic, bay leaves). Cook on low for 6-8 hours or on high for 3-4 hours, until tender. Shred and proceed.
* Stovetop: Sear beef in a large Dutch oven or heavy-bottomed pot. Deglaze and add remaining ingredients. Bring to a simmer, then cover and cook on low heat for 2.5-3.5 hours, or until the beef is fork-tender. You may need to add a bit more liquid if it reduces too much. Shred and proceed.
Q5: Are these beef gyros spicy? Can I adjust the spice level?
A5: This recipe, as written, is flavorful and aromatic rather than spicy-hot. The “heat” comes primarily from black pepper and potentially the garlic intensity. If you prefer a spicier gyro, you can add a pinch of red pepper flakes (cayenne pepper) to the spice rub for the beef, or even add a dash of your favorite hot sauce to the assembled gyro. Conversely, if you’re sensitive to garlic, you can slightly reduce the amount in both the beef and the tzatziki.

Instant Pot Beef Gyros Recipe
Ingredients
For the Beef Gyro Meat:
- Beef Chuck Roast: 2.5 – 3 lbs, trimmed of excessive fat and cut into 2-inch chunks
- Olive Oil: 2 tablespoons (for searing)
- Beef Broth: 1 cup (low sodium preferred)
- Red Wine Vinegar: 2 tablespoons
- Lemon Juice: 2 tablespoons, freshly squeezed
- Garlic: 4-6 cloves, minced
- Dried Oregano: 2 tablespoons
- Dried Marjoram: 1 tablespoon
- Dried Thyme: 1 teaspoon
- Dried Rosemary: 1 teaspoon, crushed
- Onion Powder: 1 tablespoon
- Garlic Powder: 1 teaspoon
- Smoked Paprika: 1 teaspoon (optional, for color and a hint of smokiness)
- Salt: 1.5 teaspoons (or to taste)
- Black Pepper: 1 teaspoon, freshly ground (or to taste)
- Bay Leaves: 2
For the Homemade Tzatziki Sauce (Highly Recommended):
- Greek Yogurt: 2 cups, plain, full-fat
- Cucumber: 1 large, grated and squeezed dry
- Garlic: 2-3 cloves, minced or pressed
- Lemon Juice: 2 tablespoons, freshly squeezed
- Fresh Dill: 2 tablespoons, chopped (or 2 teaspoons dried dill)
- Fresh Mint: 1 tablespoon, chopped (optional, but adds a lovely freshness)
- Olive Oil: 1 tablespoon, extra virgin
- Salt: ½ teaspoon (or to taste)
- Black Pepper: ¼ teaspoon (or to taste)
For Serving:
- Pita Bread: 6-8 rounds, preferably thick and fluffy
- Tomatoes: 2-3 ripe, thinly sliced or diced
- Red Onion: 1 small, thinly sliced
- Lettuce: Romaine or iceberg, shredded (optional)
- Feta Cheese: Crumbled (optional, for an extra salty kick)
- Kalamata Olives: Pitted and halved (optional)
- Fresh Parsley: Chopped, for garnish (optional)
Instructions
Phase 1: Preparing the Tzatziki Sauce (Do this first or while beef cooks)
- Prep the Cucumber: Grate the cucumber using a box grater. Place the grated cucumber in a clean kitchen towel or several layers of paper towels and squeeze out as much liquid as possible. This step is crucial to prevent a watery tzatziki.
- Combine Ingredients: In a medium bowl, combine the squeezed cucumber, Greek yogurt, minced garlic, fresh lemon juice, chopped dill, chopped mint (if using), extra virgin olive oil, salt, and pepper.
- Mix & Chill: Stir well to combine all ingredients. Taste and adjust seasoning if necessary (more salt, lemon, or dill). Cover and refrigerate for at least 30 minutes to allow the flavors to meld. The longer it chills, the better it tastes. This can be made a day ahead.
Phase 2: Cooking the Beef Gyro Meat in the Instant Pot
- Season the Beef: Pat the beef chuck roast chunks dry with paper towels. In a small bowl, combine the dried oregano, marjoram, thyme, rosemary, onion powder, garlic powder, smoked paprika (if using), salt, and black pepper. Generously rub this spice mixture all over the beef chunks, ensuring they are well-coated.
- Sear the Beef: Set your Instant Pot to “Sauté” mode on high. Once the display reads “Hot,” add the 2 tablespoons of olive oil. Carefully add half of the seasoned beef chunks to the pot in a single layer, being careful not to overcrowd. Sear for 2-3 minutes per side, until nicely browned. This browning step (Maillard reaction) develops a deep, rich flavor. Remove the seared beef and set aside on a plate. Repeat with the remaining beef chunks, adding a little more oil if needed.
- Deglaze the Pot: Turn off the “Sauté” mode. Pour in the beef broth, red wine vinegar, and lemon juice. Use a wooden spoon or spatula to scrape up any browned bits (fond) stuck to the bottom of the pot. This is packed with flavor and essential for preventing a “Burn” notice.
- Pressure Cook: Return all the seared beef to the Instant Pot. Add the minced garlic and bay leaves to the pot. Secure the lid, ensuring the steam release valve is set to the “Sealing” position. Select “Pressure Cook” (or “Manual”) mode and set the timer for 50-60 minutes on high pressure. The exact time will depend on the thickness and marbling of your beef; 55 minutes is a good average for 2-inch chunks.
- Natural Pressure Release (NPR): Once the cooking cycle is complete, allow the pressure to release naturally for at least 15-20 minutes. This helps keep the meat tender and juicy. After 15-20 minutes, you can carefully perform a quick release of any remaining pressure by moving the valve to the “Venting” position.
- Shred the Beef: Carefully remove the lid once the pin has dropped. Remove the beef chunks from the pot and place them on a cutting board or in a large bowl. Discard the bay leaves. Using two forks, shred the beef. It should be incredibly tender and shred easily.
- Reduce Sauce & Combine (Optional but Recommended): If the liquid in the Instant Pot seems too thin, you can turn on the “Sauté” mode and let it simmer for 5-10 minutes to reduce and concentrate the flavors. Once slightly thickened, return the shredded beef to the pot and toss it with the sauce to coat it thoroughly. This step ensures every strand of beef is packed with flavor.
- Optional Crisping Step: For an extra touch of authenticity and texture reminiscent of rotisserie-cooked gyro meat, you can crisp up the shredded beef.
- Oven Broiler Method: Spread the shredded beef (drained of most excess liquid but still moist) in a single layer on a baking sheet. Broil on high for 3-5 minutes, watching carefully to prevent burning, until the edges are slightly crisped.
- Skillet Method: Heat a large skillet (cast iron works best) over medium-high heat with a tablespoon of olive oil. Add the shredded beef in batches and cook for a few minutes until some edges are browned and crispy.
Phase 3: Assembling Your Instant Pot Beef Gyros
- Warm the Pita Bread: You can warm the pita bread in a few ways:
- Oven: Wrap pitas in foil and warm in a 300°F (150°C) oven for 5-10 minutes.
- Microwave: Wrap pitas in a damp paper towel and microwave for 20-30 seconds until warm and pliable.
- Skillet: Lightly char on a dry skillet or grill pan for about 30 seconds per side.
- Layer the Goodness: Lay a warm pita flat. Spread a generous layer of the homemade tzatziki sauce down the center.
- Add the Meat: Pile a hearty portion of the shredded, flavorful beef gyro meat on top of the tzatziki.
- Top with Veggies: Add your desired toppings: sliced tomatoes, thinly sliced red onions, shredded lettuce, and perhaps some crumbled feta cheese or Kalamata olives.
- Garnish & Serve: Sprinkle with fresh chopped parsley, if desired. Fold the pita in half like a taco, or roll it up (you might need to wrap the bottom in foil or parchment paper to hold it together). Serve immediately and enjoy the taste of Greece!
Nutrition
- Serving Size: One Normal Portion
- Calories: 450-550


