

There’s something incredibly satisfying about whipping up a batch of homemade hummus. For years, I was a dedicated buyer of store-bought tubs, convinced that achieving that perfect creamy texture and balanced flavor at home was an art form beyond my reach. Then, one afternoon, armed with a can of chickpeas and a new food processor, I decided to give it a go. The result? Utterly transformative! My family, especially the kids who are usually picky about “healthy” snacks, devoured it. My eldest, who typically turns his nose up at anything bean-related, was caught red-handed scooping up generous dollops with carrot sticks, a proud smile on his face. This homemade hummus recipe isn’t just a dip; it’s become a weekly staple in our household, a testament to how simple, wholesome ingredients can create something truly spectacular. It’s fresher, more vibrant, and infinitely more customizable than anything you can buy. Plus, the pride of saying, “I made this!” is the best seasoning of all.
The Ultimate Homemade Hummus: A Creamy Dream Dip
Hummus, a luscious dip originating from the Middle East, has taken the world by storm, and for good reason. It’s a powerhouse of flavor, packed with plant-based protein, and incredibly versatile. While store-bought versions are convenient, nothing compares to the fresh, vibrant taste and velvety texture of homemade hummus. This recipe will guide you through creating the creamiest, most delicious hummus you’ve ever tasted, perfect for pairing with crisp veggie sticks or warm pita bread. Get ready to ditch the plastic tubs and embrace the joy of homemade!
Ingredients for the Perfect Hummus:
- For the Hummus:
- 1 can (15 ounces / 425g) chickpeas (garbanzo beans), rinsed and drained (reserve the liquid/aquafaba if desired for thinning, or see tip about peeling)
- 1/2 cup (120g) high-quality tahini, well-stirred
- 1/4 cup (60ml) freshly squeezed lemon juice (about 1-2 lemons)
- 1-2 cloves garlic, minced (or more, to taste)
- 1/2 teaspoon ground cumin
- 1/4 teaspoon salt (or more, to taste)
- 2-4 tablespoons ice-cold water (or reserved chickpea liquid/aquafaba)
- 2 tablespoons extra virgin olive oil (plus more for drizzling)
- Optional Garnish:
- A sprinkle of paprika or sumac
- A drizzle of extra virgin olive oil
- Fresh parsley or cilantro, chopped
- A few whole chickpeas
- For the Veggie Sticks:
- 2 large carrots, peeled and cut into sticks
- 2 celery stalks, cut into sticks
- 1 red bell pepper, deseeded and cut into strips
- 1 yellow or orange bell pepper, deseeded and cut into strips
- 1 cucumber, cut into sticks
- A handful of cherry tomatoes
- Broccoli or cauliflower florets (optional)
- Snap peas or snow peas (optional)
Equipment You’ll Need:
- Food processor (essential for smooth hummus)
- Spatula
- Measuring cups and spoons
- Sharp knife and cutting board (for veggies)
Step-by-Step Instructions for Silky Smooth Hummus:
- Prepare the Chickpeas (Optional but Recommended for Extra Creaminess): If you have the time and patience, peeling the chickpeas makes a noticeable difference in the creaminess of your hummus. To do this, gently rub the rinsed chickpeas between your hands or in a clean kitchen towel. The skins will loosen and can be easily picked off. This step can take about 10-15 minutes but is worth it for an ultra-smooth texture. Alternatively, you can simmer the canned chickpeas in water with 1/2 teaspoon of baking soda for 15-20 minutes until very tender; this also helps skins slip off and makes them creamier. Rinse well if using baking soda.
- Combine Tahini and Lemon Juice: In the bowl of your food processor, add the tahini and fresh lemon juice. Process for about 1 minute. Scrape down the sides and bottom of the bowl, then process for another 30 seconds. This step is crucial; “whipping” the tahini and lemon juice helps to create a lighter, creamier base for the hummus. The mixture might seize up or look a bit pasty – this is normal.
- Add Garlic and Spices: Add the minced garlic, ground cumin, and salt to the food processor. Pulse a few times to combine.
- Incorporate the Chickpeas: Add the drained (and peeled, if you opted for that step) chickpeas and the 2 tablespoons of extra virgin olive oil to the food processor. Process continuously for 1-2 minutes until the mixture is thick and fairly smooth. Scrape down the sides of the bowl as needed.
- Achieve Ultimate Creaminess: With the food processor running, slowly drizzle in the ice-cold water, one tablespoon at a time. Continue processing for another 2-4 minutes, or until the hummus is exceptionally smooth and creamy. The ice water helps to emulsify the mixture and create a lighter, fluffier texture. Add more ice water, a little at a time, until you reach your desired consistency. Some like it thicker, others prefer it a bit looser.
- Taste and Adjust: Stop the food processor and taste the hummus. Adjust seasonings as needed – you might want more salt, a bit more lemon juice for tanginess, or even a touch more cumin. If you prefer a stronger garlic flavor, you can add another minced clove, but remember raw garlic can be quite potent.
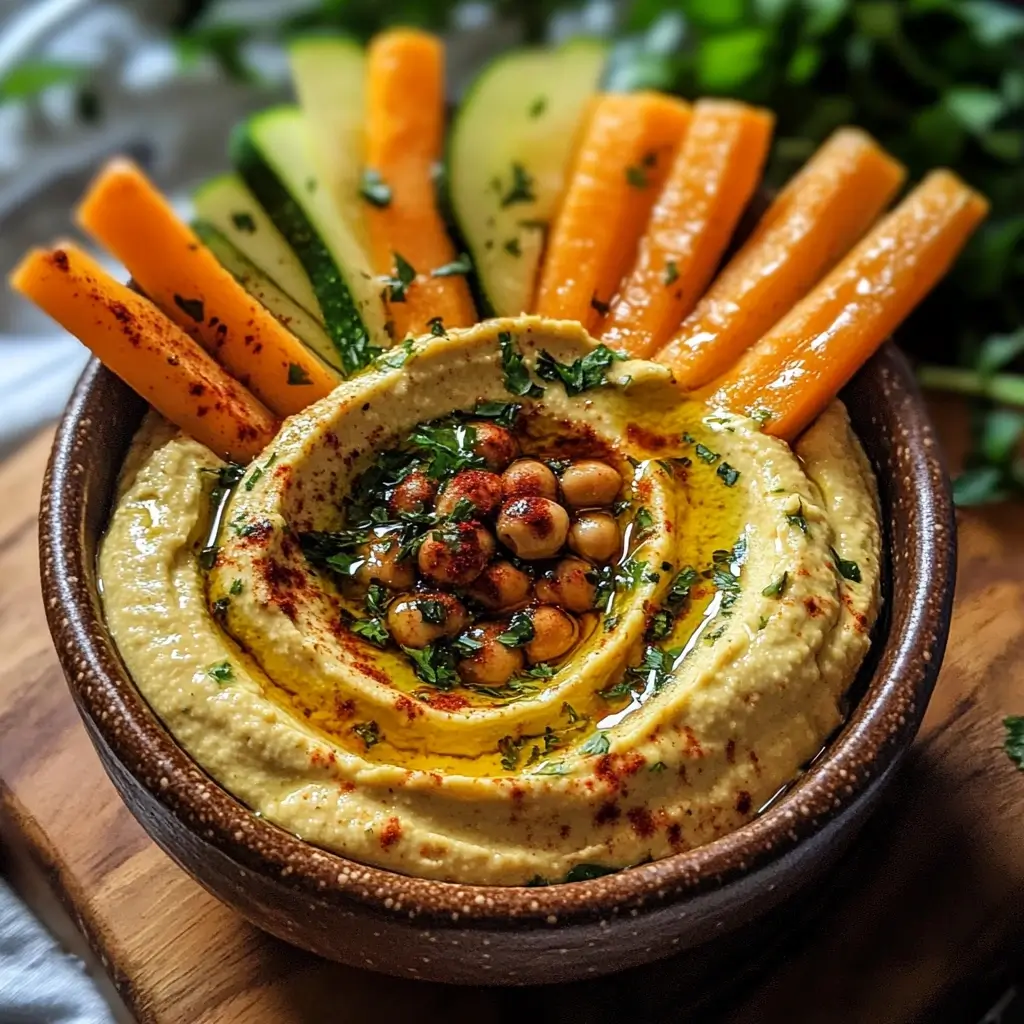
- Serve or Chill: Transfer the hummus to a serving bowl. If serving immediately, you can create a swirl on top with the back of a spoon and drizzle with a little extra virgin olive oil. Garnish with a sprinkle of paprika, sumac, chopped fresh parsley, or a few whole chickpeas, if desired. For the best flavor, cover and chill the hummus in the refrigerator for at least 30 minutes (or up to an hour) before serving. This allows the flavors to meld and develop.
- Prepare Veggie Sticks: While the hummus is chilling (or while it’s processing), wash, peel (if necessary), and chop your vegetables into dippable sticks or florets. Arrange them attractively on a platter around the bowl of hummus.
Diving Deeper into Key Ingredients: The Stars of Your Hummus
Understanding the role of each core ingredient can help you customize your hummus and troubleshoot any issues.
Chickpeas (Garbanzo Beans): The Foundation
- Canned vs. Dried: Canned chickpeas are incredibly convenient and work wonderfully for this recipe. If you prefer to use dried chickpeas, you’ll need to soak them overnight and then cook them until very tender (about 1-2 hours on the stovetop or much faster in a pressure cooker). Roughly 1 cup of dried chickpeas will yield about 3 cups cooked, so you’d use about 1.5 cups of cooked chickpeas for this recipe (equivalent to one 15oz can). Cooked-from-scratch chickpeas often result in even creamier hummus.
- The Peeling Debate: As mentioned, peeling chickpeas is optional but highly recommended for the smoothest, most velvety hummus. It’s a bit tedious, but the textural payoff is significant.
Tahini (Sesame Paste): The Creamy Soul
- What is it? Tahini is a paste made from ground sesame seeds. It’s a cornerstone of Middle Eastern cuisine.
- Quality Matters: Use a high-quality, runny tahini. Brands can vary significantly in flavor and consistency. Look for tahini that is smooth and pourable, not overly thick or bitter. Good tahini should taste nutty and rich.
- Stir it Up: Natural tahini will separate, with oil rising to the top. Always stir it very well before measuring to ensure you get a consistent product.
Lemon Juice: The Bright Spark
- Fresh is Best: Always use freshly squeezed lemon juice. The flavor is far superior to bottled lemon juice, which can have a dull or metallic taste.
- Adjust to Taste: The amount of lemon juice can be adjusted based on your preference for tanginess and the acidity of your lemons.
Garlic: The Pungent Kick
- Raw Power: Raw garlic adds a sharp, pungent kick. If you find raw garlic too overpowering, you can:
- Use fewer cloves.
- Briefly soak the minced garlic in the lemon juice for 10 minutes before adding to the food processor; this mellows its flavor.
- Roast the garlic cloves first for a sweeter, milder flavor.
Olive Oil: The Richness and Sheen
- In the Hummus: A little extra virgin olive oil blended into the hummus adds richness and flavor.
- For Drizzling: A generous drizzle of good quality extra virgin olive oil on top before serving not only looks appealing but adds a lovely fruity note and mouthfeel.
Ice Water: The Secret to Fluffiness
- This might seem like an odd ingredient, but adding ice-cold water while the food processor is running helps to create an incredibly light, airy, and creamy emulsion. Don’t skip this!
Nutritional Snapshot: Healthy & Delicious
Homemade hummus is not only tasty but also a nutritious choice.
Servings & Calories:
- Servings: This recipe makes approximately 2 cups of hummus, which is about 8 servings (assuming 1/4 cup per serving).
- Calories per serving (hummus only, approx.): 120-150 calories, depending on the exact amount of tahini and olive oil used.
Note: Nutritional information is an estimate and can vary based on specific ingredients and portion sizes. Veggie sticks add minimal calories but significant vitamins, minerals, and fiber.
Hummus is a good source of plant-based protein, fiber (which aids digestion and promotes satiety), healthy fats (primarily from tahini and olive oil), and various micronutrients like iron, folate, phosphorus, and B vitamins.
Quick & Easy: Preparation Time
One of the beauties of homemade hummus is how quickly it comes together.
- Active Preparation Time: 10-15 minutes (if using canned chickpeas and not peeling them).
- Optional Chickpea Peeling Time: Add an extra 10-15 minutes.
- Optional Chickpea Cooking from Dried: Add soaking time (overnight) and cooking time (1-2 hours stovetop, or ~20-30 mins active in a pressure cooker).
- Chilling Time (Recommended): At least 30 minutes.
- Total Time (Quick Version): Around 20 minutes (plus chilling).
Serving Your Sensational Homemade Hummus
Hummus is incredibly versatile. Here are some wonderful ways to serve it:
Classic Companions:
- Veggie Sticks: The star of this article!
- Carrot sticks
- Celery sticks
- Cucumber sticks or rounds
- Bell pepper strips (red, yellow, orange, green)
- Cherry or grape tomatoes
- Radishes
- Broccoli florets
- Cauliflower florets
- Snap peas or snow peas
- Asparagus spears (blanched or raw)
- Pita Bread: Warm pita bread, either whole or cut into wedges, is a classic. Try toasting it for extra crunch.
- Pita Chips: Store-bought or homemade baked pita chips.
- Crackers: Whole grain crackers, rice crackers, or your favorite type.
Beyond the Basics: Creative Serving Ideas:
- As a Spread:
- Slather it on sandwiches or wraps instead of mayonnaise or other spreads. It’s fantastic with falafel, grilled chicken, or roasted vegetables.
- Spread it on toast (avocado toast, meet hummus toast!).
- Use it as a base for flatbread pizzas, topped with feta, olives, and sun-dried tomatoes.
- In Bowls:
- Create a “hummus bowl” by topping a generous serving of hummus with roasted vegetables, chickpeas, a sprinkle of feta, olives, and a drizzle of olive oil. Serve with pita for a complete meal.
- Add a dollop to grain bowls or salad bowls for extra protein and creaminess.
- As a Dip for More Than Veggies:
- Serve with grilled halloumi or feta cheese.
- Use as a dip for chicken skewers, lamb kofta, or fish.
- As a Condiment:
- A dollop alongside grilled meats or fish.
- Mix with a little extra lemon juice and water for a creamy salad dressing.
- Deviled Eggs: Replace some of the yolk mayonnaise with hummus for a healthier, flavorful twist.
- Party Platter Star: Make it the centerpiece of a mezze platter with olives, feta, dolmades (stuffed grape leaves), and other small bites.
Flavor Variations: Jazz Up Your Hummus
Once you’ve mastered the classic recipe, feel free to experiment with different flavor profiles:
- Roasted Red Pepper Hummus: Blend in 1-2 jarred roasted red peppers (patted dry) along with the chickpeas.
- Spicy Jalapeño-Cilantro Hummus: Add 1/2 to 1 seeded jalapeño and a handful of fresh cilantro leaves to the food processor.
- Sun-Dried Tomato Hummus: Add 1/4 cup oil-packed sun-dried tomatoes (drained and roughly chopped) and a teaspoon of dried oregano or basil.
- Pesto Hummus: Swirl in 1-2 tablespoons of your favorite pesto after the hummus is blended, or blend it right in.
- Beet Hummus: Add 1 small cooked and peeled beet (roasted or boiled) for a vibrant pink color and earthy flavor.
- Smoky Paprika & Chipotle Hummus: Use smoked paprika instead of regular paprika and add 1/2 – 1 teaspoon of adobo sauce from a can of chipotle peppers.
- Everything Bagel Hummus: Stir in 1-2 tablespoons of everything bagel seasoning at the end, or sprinkle generously on top.
- Avocado Hummus: Blend in half a ripe avocado for extra creaminess and healthy fats. Add a bit more lemon or lime juice to prevent browning.
Pro Tips for Hummus Perfection (5 Top Tips)
- Don’t Skimp on Processing Time: For truly smooth hummus, especially if not peeling chickpeas, let that food processor run! Process for a good 4-5 minutes after adding the ice water. Scrape down the sides frequently.
- Quality Tahini is Key: The flavor of your tahini will significantly impact the final taste of your hummus. Choose a brand you like that is smooth, runny, and not bitter. Soom, Al Arz, or Baron’s are often recommended.
- Fresh Lemon Juice Always: Bottled lemon juice simply doesn’t compare. The bright, zesty flavor of fresh lemon juice is essential for authentic-tasting hummus.
- The Ice Water Trick: This is a game-changer for texture. Adding ice-cold water (not room temperature) while the food processor is running makes the hummus lighter, fluffier, and incredibly creamy.
- Taste and Adjust Fearlessly: This recipe is a great starting point, but don’t be afraid to adjust the seasonings to your personal preference. Want it more garlicky? Add more garlic. Tangier? More lemon. Spicier? A pinch of cayenne.
Frequently Asked Questions (FAQ) About Homemade Hummus
Q1: My hummus is too thick. How can I thin it out?
A1: If your hummus is too thick, simply add more ice-cold water, a tablespoon at a time, with the food processor running, until it reaches your desired consistency. You can also use a little more lemon juice or olive oil if you prefer, but water is usually the best option for thinning without altering the core flavor profile too much.
Q2: Why is my homemade hummus bitter?
A2: Bitterness in hummus usually comes from the tahini. Older tahini or lower-quality brands can sometimes have a bitter aftertaste. Ensure your tahini is fresh and well-stirred. Another culprit could be using too much garlic, especially if the garlic cloves had a green sprout in the middle (which can be bitter). Always remove the green sprout if present.
Q3: How long does homemade hummus last in the refrigerator?
A3: Homemade hummus, stored in an airtight container in the refrigerator, will typically last for 4-5 days. Some say up to a week, but it’s best enjoyed within the first few days for optimal freshness and flavor. A thin layer of olive oil on top can help preserve it slightly longer.
Q4: Can I make hummus without tahini?
A4: While traditional hummus relies heavily on tahini for its characteristic flavor and creamy texture, you can make a chickpea dip without it. You could try substituting with a neutral-flavored nut butter like cashew butter (though the flavor will be different), or simply omit it and perhaps add a little more olive oil and possibly some yogurt for creaminess if you’re not vegan. However, it won’t be classic hummus.
Q5: Can I freeze homemade hummus?
A5: Yes, you can freeze hummus. Place it in a freezer-safe airtight container, leaving a little headspace for expansion. Drizzle a thin layer of olive oil on top before freezing to help prevent it from drying out. Thaw it in the refrigerator overnight. The texture might be slightly different after thawing – it can sometimes become a bit grainier. Give it a good stir, and if needed, you can blend it briefly with a touch more olive oil or a tiny bit of water to restore its creaminess. It’s best consumed within 3-4 months of freezing.

Homemade Hummus with Veggie Sticks Recipe
Ingredients
- For the Hummus:
- 1 can (15 ounces / 425g) chickpeas (garbanzo beans), rinsed and drained (reserve the liquid/aquafaba if desired for thinning, or see tip about peeling)
- 1/2 cup (120g) high-quality tahini, well-stirred
- 1/4 cup (60ml) freshly squeezed lemon juice (about 1–2 lemons)
- 1–2 cloves garlic, minced (or more, to taste)
- 1/2 teaspoon ground cumin
- 1/4 teaspoon salt (or more, to taste)
- 2–4 tablespoons ice-cold water (or reserved chickpea liquid/aquafaba)
- 2 tablespoons extra virgin olive oil (plus more for drizzling)
- Optional Garnish:
- A sprinkle of paprika or sumac
- A drizzle of extra virgin olive oil
- Fresh parsley or cilantro, chopped
- A few whole chickpeas
- For the Veggie Sticks:
- 2 large carrots, peeled and cut into sticks
- 2 celery stalks, cut into sticks
- 1 red bell pepper, deseeded and cut into strips
- 1 yellow or orange bell pepper, deseeded and cut into strips
- 1 cucumber, cut into sticks
- A handful of cherry tomatoes
- Broccoli or cauliflower florets (optional)
- Snap peas or snow peas (optional)
Instructions
- Prepare the Chickpeas (Optional but Recommended for Extra Creaminess): If you have the time and patience, peeling the chickpeas makes a noticeable difference in the creaminess of your hummus. To do this, gently rub the rinsed chickpeas between your hands or in a clean kitchen towel. The skins will loosen and can be easily picked off. This step can take about 10-15 minutes but is worth it for an ultra-smooth texture. Alternatively, you can simmer the canned chickpeas in water with 1/2 teaspoon of baking soda for 15-20 minutes until very tender; this also helps skins slip off and makes them creamier. Rinse well if using baking soda.
- Combine Tahini and Lemon Juice: In the bowl of your food processor, add the tahini and fresh lemon juice. Process for about 1 minute. Scrape down the sides and bottom of the bowl, then process for another 30 seconds. This step is crucial; “whipping” the tahini and lemon juice helps to create a lighter, creamier base for the hummus. The mixture might seize up or look a bit pasty – this is normal.
- Add Garlic and Spices: Add the minced garlic, ground cumin, and salt to the food processor. Pulse a few times to combine.
- Incorporate the Chickpeas: Add the drained (and peeled, if you opted for that step) chickpeas and the 2 tablespoons of extra virgin olive oil to the food processor. Process continuously for 1-2 minutes until the mixture is thick and fairly smooth. Scrape down the sides of the bowl as needed.
- Achieve Ultimate Creaminess: With the food processor running, slowly drizzle in the ice-cold water, one tablespoon at a time. Continue processing for another 2-4 minutes, or until the hummus is exceptionally smooth and creamy. The ice water helps to emulsify the mixture and create a lighter, fluffier texture. Add more ice water, a little at a time, until you reach your desired consistency. Some like it thicker, others prefer it a bit looser.
- Taste and Adjust: Stop the food processor and taste the hummus. Adjust seasonings as needed – you might want more salt, a bit more lemon juice for tanginess, or even a touch more cumin. If you prefer a stronger garlic flavor, you can add another minced clove, but remember raw garlic can be quite potent.
- Serve or Chill: Transfer the hummus to a serving bowl. If serving immediately, you can create a swirl on top with the back of a spoon and drizzle with a little extra virgin olive oil. Garnish with a sprinkle of paprika, sumac, chopped fresh parsley, or a few whole chickpeas, if desired. For the best flavor, cover and chill the hummus in the refrigerator for at least 30 minutes (or up to an hour) before serving. This allows the flavors to meld and develop.
- Prepare Veggie Sticks: While the hummus is chilling (or while it’s processing), wash, peel (if necessary), and chop your vegetables into dippable sticks or florets. Arrange them attractively on a platter around the bowl of hummus.
Nutrition
- Serving Size: One Normal Portion
- Calories: 120-150