


There’s something undeniably comforting and universally loved about a plate of crispy, golden French fries. Forget the limp, lifeless versions from fast-food chains; once you taste truly homemade French fries, you’ll understand the difference. In my kitchen, the quest for the perfect fry ended when I stumbled upon this double-frying technique. My family, notorious fry fanatics, declared these the best they’d ever had – crispy on the outside, fluffy on the inside, and bursting with real potato flavor. The secret, as this recipe brilliantly unveils, lies in a simple yet crucial step: double frying. It’s a game-changer, transforming humble potatoes into addictive, restaurant-quality fries right in your own home. Get ready to elevate your side dish game and experience the pure joy of homemade French fries, done right!
Ingredients
The beauty of homemade French fries lies in their simplicity. You don’t need a pantry full of exotic ingredients; just a few key components, and the right technique, will deliver fry perfection. Let’s break down each ingredient and why it matters.
- 2 large Russet potatoes: Russet potatoes are the gold standard for French fries, and for good reason. Their high starch content and low moisture levels are crucial for achieving that signature crispy exterior and fluffy interior. Think of them as the workhorses of the potato world, perfectly engineered for frying. The starch, when released and then cooked in hot oil, creates a beautiful, golden crust. Less starchy potatoes tend to absorb more oil and become soggy, which is the opposite of what we’re aiming for. Two large Russets should comfortably serve four people as a side dish. Look for firm potatoes, free from blemishes or green spots.
- Coconut oil, Homemade Lard or palm oil, for deep frying: The choice of frying oil is paramount, not just for flavor but also for health and the final texture of your fries. This recipe wisely recommends “Real Food” oils, steering clear of highly processed vegetable oils that can break down at high temperatures and potentially produce unhealthy compounds.
- Coconut oil: Organic coconut oil, especially refined coconut oil, is an excellent choice for deep frying due to its high smoke point and neutral flavor. It imparts a subtle richness without being overpowering. Opt for refined coconut oil if you prefer a completely neutral taste; unrefined (virgin) coconut oil can have a slight coconut aroma, which might not be desirable for traditional fries. Coconut oil is also lauded for its stability at high temperatures, making it a healthier option compared to many conventional vegetable oils.
- Homemade Lard: For those seeking a truly traditional and deeply flavorful fry, homemade lard is a fantastic option. Rendered pork fat, lard has been used for centuries in cooking and frying. It boasts a high smoke point and lends a uniquely rich, savory flavor to the fries that is simply unmatched. If you’re considering lard, ensure it’s high-quality, rendered from pasture-raised pigs for the best flavor and nutritional profile. Making your own lard might seem daunting, but it’s a rewarding process that unlocks a depth of flavor you won’t find elsewhere. You can find tutorials online for rendering lard at home.
- Palm oil: Organic palm oil, specifically red palm oil or sustainably sourced palm oil, is another viable option. Like coconut oil, it has a high smoke point and is stable for deep frying. However, it’s crucial to choose organic and sustainably sourced palm oil. Conventional palm oil production has been linked to deforestation and environmental concerns. Organic and sustainable certifications ensure that the palm oil is harvested in a way that minimizes environmental impact and supports responsible practices. Red palm oil, in particular, is rich in antioxidants and carotenoids, adding a nutritional boost to your fries. However, it can impart a slightly reddish hue and a more distinct flavor than refined coconut oil. If you’re aiming for a neutral flavor, opt for refined palm oil or coconut oil.
- Oils to Avoid: The recipe rightly cautions against using “other vegetable oils.” Many common vegetable oils, such as soybean oil, corn oil, canola oil, and sunflower oil, are highly processed, often extracted using chemical solvents, and are not ideal for high-heat cooking. They tend to have lower smoke points, meaning they can break down and produce unhealthy fumes and compounds when heated to frying temperatures. They can also impart an undesirable flavor and may not result in the crispiest fries. Stick to the recommended “Real Food” oils for both flavor and health benefits.
- Sea salt or homemade All Purpose Seasoning: Simple sea salt is often all you need to enhance the natural flavor of perfectly fried potatoes. The coarse crystals of sea salt provide a pleasant textural contrast and a clean, salty taste. If you want to elevate your fries further, consider using a homemade All-Purpose Seasoning. This allows you to customize the flavor profile to your liking. You can create your own blend using herbs, spices, and other seasonings like garlic powder, onion powder, paprika, black pepper, or even a touch of chili powder for a hint of spice. Experiment and find your signature fry seasoning! Remember to season the fries immediately after they come out of the fryer, while they are still hot and the seasoning will adhere best.
Instructions: The Art of Double Frying for Ultimate Crispness
Making truly exceptional French fries is not just about ingredients; it’s about technique. The double-frying method is the key to achieving that coveted combination of a shatteringly crisp exterior and a fluffy, tender interior. Let’s walk through each step in detail, ensuring you master the art of homemade fries.
- Wash potatoes. Peel, if desired. Start with clean potatoes. Washing them removes any dirt or debris clinging to the skin. Peeling is optional. For a more rustic, slightly more nutritious fry, you can leave the skins on. Potato skins contain fiber and nutrients. However, peeled fries tend to be slightly smoother in texture and some prefer the cleaner look. The choice is yours! If you decide to peel, use a vegetable peeler to remove the skin evenly.
- Cut potatoes into French Fry shapes. They can be thick or thin, as long as they are all about the same. Consistency is key when it comes to cutting fries. Uniformity in size ensures that the fries cook evenly. Whether you prefer thick-cut steak fries or thin, shoestring fries, the important thing is to cut them all roughly the same thickness and length. This ensures that they cook at the same rate during both frying stages.
- Cutting Techniques: To cut fries, first, square off the potato by slicing off a thin piece from each of the four sides. This creates a stable base. Then, slice the potato into slabs of your desired thickness. Stack a few slabs at a time and cut them lengthwise into fry shapes. You can use a sharp chef’s knife or a mandoline with a julienne blade for more precise cuts. Be careful when using a mandoline; always use the safety guard to protect your fingers.
- Place them in cold water, and let sit for 1 to 2 hours. This allows the starch to be extracted, and results in a crisper French Fry. Change the water a couple of times. This soaking step is non-negotiable for truly crispy fries! Potatoes are naturally high in starch. Soaking them in cold water leaches out excess surface starch. This excess starch, if left on the potatoes, can gelatinize during frying and create a sticky, less crispy exterior. Soaking also helps to prevent the fries from sticking together during frying.
- Water Changes: Change the water at least once or twice during the soaking period. You’ll notice the water becoming cloudy as the starch is released. Replacing the water ensures that you’re effectively removing as much starch as possible. The longer you soak (up to 2 hours), the crispier your fries will be. If you’re short on time, even a 30-minute soak is better than skipping this step entirely.
- Drain the fries. Lay them on a kitchen towel to dry. You can pat them with a towel to help them dry faster. The drier they are, the better. Moisture is the enemy of crispy fries. Excess water in the potatoes will lower the temperature of the oil when they are added, leading to steaming rather than frying, and resulting in soggy fries. Thoroughly drying the fries is crucial.
- Drying Methods: After draining the soaked fries, spread them out in a single layer on a clean kitchen towel or paper towels. Gently pat them dry with another towel to absorb surface moisture. You can even let them air dry for a bit longer if you have time. The drier the potatoes are before they hit the hot oil, the crispier they will become.
- In a deep skillet, pot, or deep fryer, melt the coconut oil or Homemade Lard over medium-high heat. You’ll need at least 1 inch of oil in the pan or skillet. You can use more if you have a large enough pot, or are using a deep fryer. Don’t fill a pot more than 1/3 to 1/2 full of oil. When using a deep fryer, follow the directions that came with it. Safety is paramount when deep frying. Always use a deep, heavy-bottomed pot or a deep fryer. Never fill the pot more than halfway full with oil, as this can cause dangerous splattering and boil-over when you add the fries. Ensure you have adequate ventilation in your kitchen.
- Oil Level and Vessel: At least 1 inch of oil depth is needed to properly submerge the fries. Using more oil, especially in a wider pot, helps maintain a consistent oil temperature when you add batches of fries. A deep fryer is specifically designed for this purpose and often comes with temperature controls and safety features. If using a pot or skillet, choose one that is sturdy and has high sides to prevent oil splattering.
- Heat the coconut oil to about 350 to 375 degrees. This is about the smoke point limit for good quality coconut oil. A frying or candy thermometer will give you an exact temperature. You can test that the oil is ready by dropping a small fry into the oil; it will sizzle when the oil is ready. Temperature control is critical for successful frying. Too low, and the fries will be greasy and soggy. Too high, and they will burn on the outside before cooking through on the inside. A frying thermometer or candy thermometer is an invaluable tool for deep frying. Clip it to the side of your pot to constantly monitor the oil temperature.
- Temperature Range: The ideal temperature range for the first frying stage is 350-375°F (175-190°C). This temperature is hot enough to cook the potatoes through without browning them too quickly. The “test fry” method is a good way to check if the oil is hot enough if you don’t have a thermometer. Drop a single fry into the oil; it should sizzle immediately and start to cook.
- Fry the potatoes in small batches, just enough to make a single layer of fries in the pan. Cook until they are just barely starting to brown on the edges. You don’t want to over cook them at this point. When trying one, it should be floppy, and cooked, but not crunchy. The time to cook them will vary greatly depending on your potatoes, the oil, and the thickness, but will range from 10 to 20 minutes. Overcrowding the pot with fries will lower the oil temperature, leading to uneven cooking and greasy fries. Fry in small batches, ensuring that the fries are in a single layer and have enough space around them.
- First Fry Stage: The first fry is primarily about cooking the potatoes through. Don’t aim for golden brown at this stage. Fry them until they are just cooked, slightly softened, and barely starting to turn pale golden around the edges. They should still be floppy and not crispy. The exact cooking time will vary depending on the thickness of your fries and the oil temperature, but it usually takes around 10-20 minutes.
- Use a slotted spoon or tongs and remove the fries to drain on paper towels, or a wire cooling rack placed over a drip dish. Once the fries are lightly cooked from the first fry, remove them from the hot oil using a slotted spoon or tongs. Allow excess oil to drain off.
- Draining Methods: Place the fries on paper towels to absorb excess oil. Alternatively, a wire cooling rack placed over a baking sheet or drip dish allows air to circulate around the fries, helping them stay crispier and preventing them from sitting in any pooled oil.
- Repeat until all the fries are done. Continue frying the fries in batches until all of them have been through the first frying stage.
- Let the fries cool completely; about 1/2 an hour. This cooling period is crucial! After the first fry, the fries need to cool down completely. This allows the moisture inside the potatoes to redistribute and the starches to firm up further. This cooling step is what sets the stage for the second fry and the ultimate crispness.
- Cooling Process: Spread the fries out on a cooling rack or baking sheet to cool completely. Don’t stack them, as this can trap steam and make them soggy. Allow at least 30 minutes for them to cool thoroughly. You can even cool them for longer, up to a few hours, if needed.
- When cool, prepare your oil again, and bring it back up to 350 to 375 degrees. Recook the fries. This time let them cook until they are golden brown. For the second fry, you’ll use the same oil, reheated to the same temperature (350-375°F). The second fry is all about achieving that beautiful golden brown color and crispy texture.
- Second Fry Stage: Fry the cooled fries in batches again, ensuring a single layer in the hot oil. This time, the cooking time will be much shorter, only a few minutes, as the potatoes are already cooked through. Fry until they are deeply golden brown and crispy. Watch them carefully to prevent burning, as they will brown quickly during the second fry.
- Remove from the oil and drain again. Sprinkle with sea salt or homemade All Purpose Seasoning while still hot. Once the fries are beautifully golden brown and crispy, remove them from the oil using a slotted spoon or tongs. Drain them on paper towels or a wire rack again to remove excess oil.
- Seasoning Timing: Season the fries immediately after they come out of the fryer, while they are still hot and slightly oily. This allows the salt or seasoning to adhere better. Sprinkle generously with sea salt or your homemade All-Purpose Seasoning. Toss gently to distribute the seasoning evenly.
- Freezing French Fries: This recipe offers a fantastic tip for making fries ahead of time! You can freeze them after the first round of cooking.
- Freezing Process: After the first fry and cooling completely, lay the fries in a single layer on a cookie sheet lined with parchment paper. Make sure they are not touching to prevent them from freezing together in clumps. Freeze them until solid, which usually takes a few hours. Once frozen solid, transfer them to a freezer-safe bag or container for longer storage. Frozen fries can be stored in the freezer for several weeks.
- Frying from Frozen: When you’re ready to enjoy your frozen fries, you can fry them directly from frozen. No need to thaw them. Heat your oil to 350-375°F and carefully add the frozen fries to the hot oil in batches. Be cautious, as frozen fries contain more moisture and will cause more splattering when they hit the hot oil. Fry them until they are golden brown and crispy, usually a few minutes longer than the second fry for fresh fries. Drain and season as usual.
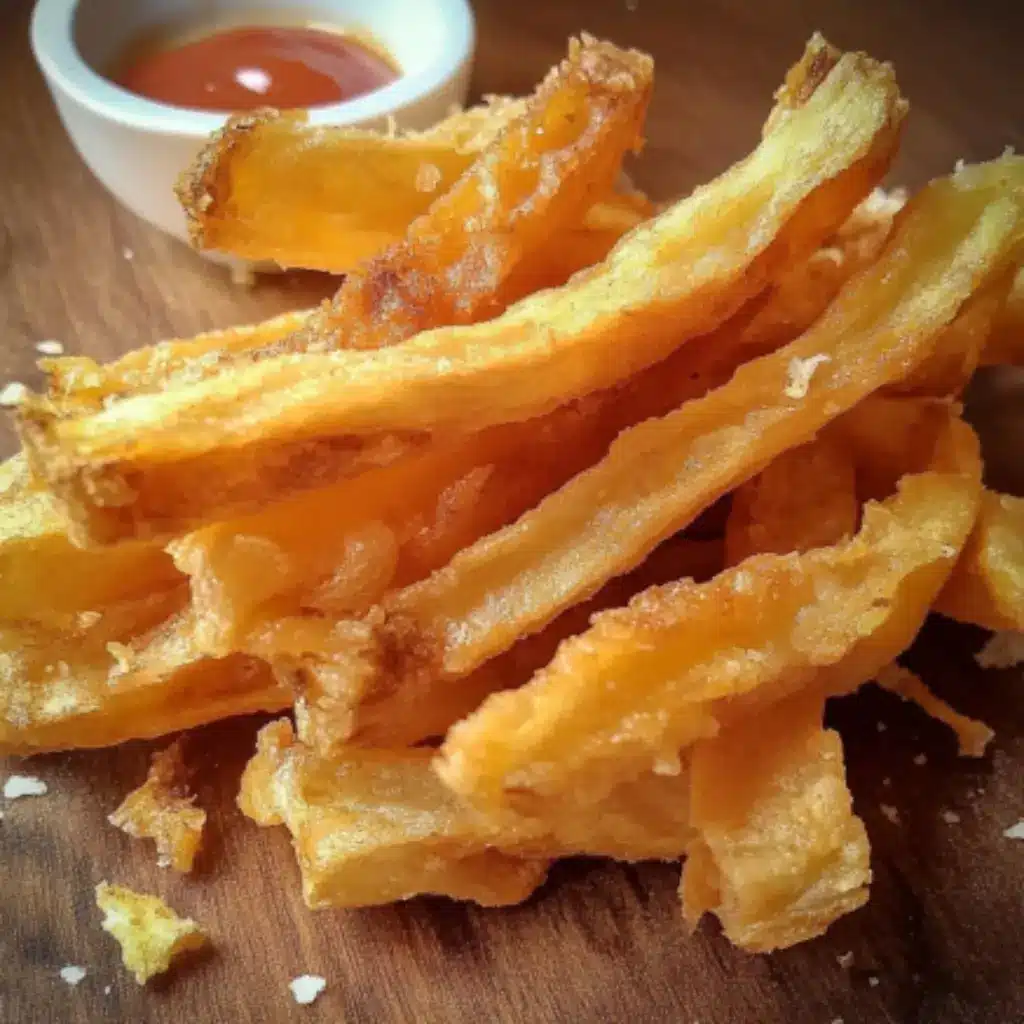
- Enjoy! Serve your perfectly homemade, double-fried French fries immediately while they are hot and crispy.
Nutrition Facts
(Approximate, per serving, using coconut oil and Russet potatoes. Nutritional values can vary based on specific ingredients, oil absorption, and portion sizes.)
- Servings: 4
- Calories per serving: Approximately 350-450 calories
Note: French fries, even homemade ones, are calorie-dense due to the deep-frying process and the carbohydrates in potatoes. Using “Real Food” oils like coconut oil or lard can offer some nutritional benefits compared to highly processed vegetable oils. Enjoy these homemade fries as an occasional treat as part of a balanced diet. Portion control is key.
Preparation Time
- Prep and cooling time: 2 hours 50 minutes (includes soaking and cooling time)
- Cook time: 15 to 30 minutes (total frying time, including both frying stages)
- Total time: Approximately 3 hours 5 minutes
Breakdown:
- Soaking time: 1-2 hours
- Potato prep (washing, peeling, cutting): 15-20 minutes
- First frying stage (per batch): 10-20 minutes
- Cooling time between frying stages: 30 minutes
- Second frying stage (per batch): 2-5 minutes
How to Serve
Homemade French fries are incredibly versatile and can be enjoyed in countless ways. Here are some serving suggestions to inspire you:
- Classic Pairings:
- Ketchup: The quintessential fry dipping sauce. Choose organic ketchup for better ingredients.
- Mayonnaise: Creamy and rich, mayonnaise is another classic fry companion. Try homemade aioli for an elevated experience.
- Mustard: Dijon, yellow, or honey mustard – each offers a different flavor profile that complements fries.
- Vinegar: Malt vinegar is a traditional British pairing for fries, adding a tangy kick.
- Dipping Sauces: Get creative with your dipping sauces!
- Garlic Aioli: Homemade mayonnaise infused with garlic – incredibly flavorful.
- Spicy Mayo: Mix mayonnaise with sriracha, chili garlic sauce, or your favorite hot sauce for a fiery kick.
- Ranch Dressing: A creamy and herby classic that many love with fries.
- BBQ Sauce: Sweet and smoky BBQ sauce is a delicious pairing, especially with steak fries.
- Cheese Sauce: A warm, gooey cheese sauce is decadent and comforting.
- Honey Mustard: Sweet and tangy, honey mustard is a crowd-pleaser.
- Avocado Crema: A healthy and vibrant option made with avocado, lime juice, and cilantro.
- Main Dish Companions:
- Burgers: Fries and burgers are a match made in culinary heaven.
- Sandwiches: Serve fries alongside sandwiches, wraps, or paninis for a satisfying meal.
- Steaks: Steak and fries are a classic bistro pairing.
- Grilled Chicken or Fish: Fries make a delicious side dish for grilled proteins.
- Fried Chicken: A Southern comfort food classic – fried chicken and French fries.
- Fish and Chips: Recreate the iconic British dish at home with your homemade fries and battered fish.
- Loaded Fries: Turn your fries into a meal by loading them up with toppings!
- Chili Cheese Fries: Top with chili, cheese sauce, and onions for a hearty treat.
- Poutine: A Canadian classic – fries topped with cheese curds and gravy.
- Garlic Parmesan Fries: Toss fries with garlic butter, parmesan cheese, and herbs.
- Pizza Fries: Top with pizza sauce, mozzarella cheese, and pepperoni.
- Greek Fries: Top with feta cheese, olives, tomatoes, and a drizzle of olive oil and oregano.
Additional Tips for Perfect Homemade Fries
- Maintain Oil Temperature: Use a frying thermometer and monitor the oil temperature throughout the frying process. If the temperature drops too low when you add fries, allow the oil to reheat to the desired range (350-375°F) before adding more fries. Frying in batches helps maintain consistent oil temperature.
- Don’t Overcrowd the Pot: Fry fries in small, single-layer batches. Overcrowding lowers the oil temperature and results in soggy, unevenly cooked fries. Give the fries space to cook properly and crisp up.
- Use the Right Potatoes: Russet potatoes are the best choice for classic French fries due to their high starch content and low moisture. Yukon Gold potatoes can also work well as a slightly less starchy alternative. Avoid waxy potatoes, which are not suitable for frying.
- Season Generously and Immediately: Season your fries generously with sea salt or your chosen seasoning as soon as they come out of the fryer, while they are still hot and slightly oily. This helps the seasoning adhere better and enhances the flavor.
- Experiment with Seasonings: Don’t be afraid to get creative with your seasonings! Beyond salt and pepper, try garlic powder, onion powder, paprika, chili powder, herbs like rosemary or thyme, or even a sprinkle of parmesan cheese for added flavor complexity.
FAQ Section
Q1: What are the best potatoes to use for homemade French fries?
A: Russet potatoes are widely considered the best choice for classic French fries. Their high starch content and low moisture levels are ideal for achieving a crispy exterior and fluffy interior. Yukon Gold potatoes are a good second choice, offering a slightly creamier texture. Avoid waxy potatoes like red potatoes or fingerling potatoes, as they have too much moisture and not enough starch for crispy fries.
Q2: Can I use olive oil for deep frying French fries?
A: While olive oil is healthy for many cooking applications, it’s generally not recommended for deep frying French fries due to its relatively low smoke point. Extra virgin olive oil has a smoke point around 375°F (190°C), which is at the upper end of the desired frying temperature range for fries. However, heating olive oil to its smoke point can degrade its flavor and nutritional properties. For deep frying, it’s better to use oils with higher smoke points, such as refined coconut oil, palm oil, or lard, as recommended in the recipe. Light olive oil or refined olive oil has a higher smoke point and might be used, but the flavor profile might not be ideal for traditional fries.
Q3: What if I don’t have coconut oil, lard, or palm oil? Are there other suitable oils I can use?
A: If you don’t have coconut oil, lard, or palm oil, you can consider using other oils with high smoke points and neutral flavors. Refined peanut oil, avocado oil, or grapeseed oil are decent alternatives. However, always prioritize “Real Food” oils and avoid highly processed vegetable oils like soybean oil, corn oil, canola oil, and sunflower oil, which are not ideal for high-heat cooking and can be less healthy.
Q4: Can I use different seasonings besides sea salt and All-Purpose Seasoning?
A: Absolutely! Feel free to experiment with different seasonings to customize your French fries. Garlic powder, onion powder, smoked paprika, chili powder, cayenne pepper, dried herbs like rosemary, thyme, or oregano, and even parmesan cheese are all delicious options. You can create your own signature seasoning blend to match your taste preferences. Consider the flavor profile you want to achieve and choose seasonings accordingly.
Q5: Are these homemade French fries vegan and gluten-free?
A: Yes, these homemade French fries are naturally vegan, gluten-free, dairy-free, egg-free, grain-free, and soy-free, as stated in the recipe’s dietary information. They rely on simple, whole-food ingredients: potatoes, oil, and seasonings. As long as you use certified gluten-free seasonings and ensure your chosen frying oil is plant-based (if strictly vegan), these fries fit within various dietary restrictions and preferences. They are a naturally inclusive and delicious side dish for everyone to enjoy.
Print
Homemade Deep-Fried French Fries Recipe
Ingredients
- 2 large Russet potatoes: Russet potatoes are the gold standard for French fries, and for good reason. Their high starch content and low moisture levels are crucial for achieving that signature crispy exterior and fluffy interior. Think of them as the workhorses of the potato world, perfectly engineered for frying. The starch, when released and then cooked in hot oil, creates a beautiful, golden crust. Less starchy potatoes tend to absorb more oil and become soggy, which is the opposite of what we’re aiming for. Two large Russets should comfortably serve four people as a side dish. Look for firm potatoes, free from blemishes or green spots.
- Coconut oil, Homemade Lard or palm oil, for deep frying: The choice of frying oil is paramount, not just for flavor but also for health and the final texture of your fries. This recipe wisely recommends “Real Food” oils, steering clear of highly processed vegetable oils that can break down at high temperatures and potentially produce unhealthy compounds.
- Coconut oil: Organic coconut oil, especially refined coconut oil, is an excellent choice for deep frying due to its high smoke point and neutral flavor. It imparts a subtle richness without being overpowering. Opt for refined coconut oil if you prefer a completely neutral taste; unrefined (virgin) coconut oil can have a slight coconut aroma, which might not be desirable for traditional fries. Coconut oil is also lauded for its stability at high temperatures, making it a healthier option compared to many conventional vegetable oils.
- Homemade Lard: For those seeking a truly traditional and deeply flavorful fry, homemade lard is a fantastic option. Rendered pork fat, lard has been used for centuries in cooking and frying. It boasts a high smoke point and lends a uniquely rich, savory flavor to the fries that is simply unmatched. If you’re considering lard, ensure it’s high-quality, rendered from pasture-raised pigs for the best flavor and nutritional profile. Making your own lard might seem daunting, but it’s a rewarding process that unlocks a depth of flavor you won’t find elsewhere. You can find tutorials online for rendering lard at home.
- Palm oil: Organic palm oil, specifically red palm oil or sustainably sourced palm oil, is another viable option. Like coconut oil, it has a high smoke point and is stable for deep frying. However, it’s crucial to choose organic and sustainably sourced palm oil. Conventional palm oil production has been linked to deforestation and environmental concerns. Organic and sustainable certifications ensure that the palm oil is harvested in a way that minimizes environmental impact and supports responsible practices. Red palm oil, in particular, is rich in antioxidants and carotenoids, adding a nutritional boost to your fries. However, it can impart a slightly reddish hue and a more distinct flavor than refined coconut oil. If you’re aiming for a neutral flavor, opt for refined palm oil or coconut oil.
- Oils to Avoid: The recipe rightly cautions against using “other vegetable oils.” Many common vegetable oils, such as soybean oil, corn oil, canola oil, and sunflower oil, are highly processed, often extracted using chemical solvents, and are not ideal for high-heat cooking. They tend to have lower smoke points, meaning they can break down and produce unhealthy fumes and compounds when heated to frying temperatures. They can also impart an undesirable flavor and may not result in the crispiest fries. Stick to the recommended “Real Food” oils for both flavor and health benefits.
- Sea salt or homemade All Purpose Seasoning: Simple sea salt is often all you need to enhance the natural flavor of perfectly fried potatoes. The coarse crystals of sea salt provide a pleasant textural contrast and a clean, salty taste. If you want to elevate your fries further, consider using a homemade All-Purpose Seasoning. This allows you to customize the flavor profile to your liking. You can create your own blend using herbs, spices, and other seasonings like garlic powder, onion powder, paprika, black pepper, or even a touch of chili powder for a hint of spice. Experiment and find your signature fry seasoning! Remember to season the fries immediately after they come out of the fryer, while they are still hot and the seasoning will adhere best.
Instructions
- Wash potatoes. Peel, if desired. Start with clean potatoes. Washing them removes any dirt or debris clinging to the skin. Peeling is optional. For a more rustic, slightly more nutritious fry, you can leave the skins on. Potato skins contain fiber and nutrients. However, peeled fries tend to be slightly smoother in texture and some prefer the cleaner look. The choice is yours! If you decide to peel, use a vegetable peeler to remove the skin evenly.
- Cut potatoes into French Fry shapes. They can be thick or thin, as long as they are all about the same. Consistency is key when it comes to cutting fries. Uniformity in size ensures that the fries cook evenly. Whether you prefer thick-cut steak fries or thin, shoestring fries, the important thing is to cut them all roughly the same thickness and length. This ensures that they cook at the same rate during both frying stages.
- Cutting Techniques: To cut fries, first, square off the potato by slicing off a thin piece from each of the four sides. This creates a stable base. Then, slice the potato into slabs of your desired thickness. Stack a few slabs at a time and cut them lengthwise into fry shapes. You can use a sharp chef’s knife or a mandoline with a julienne blade for more precise cuts. Be careful when using a mandoline; always use the safety guard to protect your fingers.
- Place them in cold water, and let sit for 1 to 2 hours. This allows the starch to be extracted, and results in a crisper French Fry. Change the water a couple of times. This soaking step is non-negotiable for truly crispy fries! Potatoes are naturally high in starch. Soaking them in cold water leaches out excess surface starch. This excess starch, if left on the potatoes, can gelatinize during frying and create a sticky, less crispy exterior. Soaking also helps to prevent the fries from sticking together during frying.
- Water Changes: Change the water at least once or twice during the soaking period. You’ll notice the water becoming cloudy as the starch is released. Replacing the water ensures that you’re effectively removing as much starch as possible. The longer you soak (up to 2 hours), the crispier your fries will be. If you’re short on time, even a 30-minute soak is better than skipping this step entirely.
- Drain the fries. Lay them on a kitchen towel to dry. You can pat them with a towel to help them dry faster. The drier they are, the better. Moisture is the enemy of crispy fries. Excess water in the potatoes will lower the temperature of the oil when they are added, leading to steaming rather than frying, and resulting in soggy fries. Thoroughly drying the fries is crucial.
- Drying Methods: After draining the soaked fries, spread them out in a single layer on a clean kitchen towel or paper towels. Gently pat them dry with another towel to absorb surface moisture. You can even let them air dry for a bit longer if you have time. The drier the potatoes are before they hit the hot oil, the crispier they will become.
- In a deep skillet, pot, or deep fryer, melt the coconut oil or Homemade Lard over medium-high heat. You’ll need at least 1 inch of oil in the pan or skillet. You can use more if you have a large enough pot, or are using a deep fryer. Don’t fill a pot more than 1/3 to 1/2 full of oil. When using a deep fryer, follow the directions that came with it. Safety is paramount when deep frying. Always use a deep, heavy-bottomed pot or a deep fryer. Never fill the pot more than halfway full with oil, as this can cause dangerous splattering and boil-over when you add the fries. Ensure you have adequate ventilation in your kitchen.
- Oil Level and Vessel: At least 1 inch of oil depth is needed to properly submerge the fries. Using more oil, especially in a wider pot, helps maintain a consistent oil temperature when you add batches of fries. A deep fryer is specifically designed for this purpose and often comes with temperature controls and safety features. If using a pot or skillet, choose one that is sturdy and has high sides to prevent oil splattering.
- Heat the coconut oil to about 350 to 375 degrees. This is about the smoke point limit for good quality coconut oil. A frying or candy thermometer will give you an exact temperature. You can test that the oil is ready by dropping a small fry into the oil; it will sizzle when the oil is ready. Temperature control is critical for successful frying. Too low, and the fries will be greasy and soggy. Too high, and they will burn on the outside before cooking through on the inside. A frying thermometer or candy thermometer is an invaluable tool for deep frying. Clip it to the side of your pot to constantly monitor the oil temperature.
- Temperature Range: The ideal temperature range for the first frying stage is 350-375°F (175-190°C). This temperature is hot enough to cook the potatoes through without browning them too quickly. The “test fry” method is a good way to check if the oil is hot enough if you don’t have a thermometer. Drop a single fry into the oil; it should sizzle immediately and start to cook.
- Fry the potatoes in small batches, just enough to make a single layer of fries in the pan. Cook until they are just barely starting to brown on the edges. You don’t want to over cook them at this point. When trying one, it should be floppy, and cooked, but not crunchy. The time to cook them will vary greatly depending on your potatoes, the oil, and the thickness, but will range from 10 to 20 minutes. Overcrowding the pot with fries will lower the oil temperature, leading to uneven cooking and greasy fries. Fry in small batches, ensuring that the fries are in a single layer and have enough space around them.
- First Fry Stage: The first fry is primarily about cooking the potatoes through. Don’t aim for golden brown at this stage. Fry them until they are just cooked, slightly softened, and barely starting to turn pale golden around the edges. They should still be floppy and not crispy. The exact cooking time will vary depending on the thickness of your fries and the oil temperature, but it usually takes around 10-20 minutes.
- Use a slotted spoon or tongs and remove the fries to drain on paper towels, or a wire cooling rack placed over a drip dish. Once the fries are lightly cooked from the first fry, remove them from the hot oil using a slotted spoon or tongs. Allow excess oil to drain off.
- Draining Methods: Place the fries on paper towels to absorb excess oil. Alternatively, a wire cooling rack placed over a baking sheet or drip dish allows air to circulate around the fries, helping them stay crispier and preventing them from sitting in any pooled oil.
- Repeat until all the fries are done. Continue frying the fries in batches until all of them have been through the first frying stage.
- Let the fries cool completely; about 1/2 an hour. This cooling period is crucial! After the first fry, the fries need to cool down completely. This allows the moisture inside the potatoes to redistribute and the starches to firm up further. This cooling step is what sets the stage for the second fry and the ultimate crispness.
- Cooling Process: Spread the fries out on a cooling rack or baking sheet to cool completely. Don’t stack them, as this can trap steam and make them soggy. Allow at least 30 minutes for them to cool thoroughly. You can even cool them for longer, up to a few hours, if needed.
- When cool, prepare your oil again, and bring it back up to 350 to 375 degrees. Recook the fries. This time let them cook until they are golden brown. For the second fry, you’ll use the same oil, reheated to the same temperature (350-375°F). The second fry is all about achieving that beautiful golden brown color and crispy texture.
- Second Fry Stage: Fry the cooled fries in batches again, ensuring a single layer in the hot oil. This time, the cooking time will be much shorter, only a few minutes, as the potatoes are already cooked through. Fry until they are deeply golden brown and crispy. Watch them carefully to prevent burning, as they will brown quickly during the second fry.
- Remove from the oil and drain again. Sprinkle with sea salt or homemade All Purpose Seasoning while still hot. Once the fries are beautifully golden brown and crispy, remove them from the oil using a slotted spoon or tongs. Drain them on paper towels or a wire rack again to remove excess oil.
- Seasoning Timing: Season the fries immediately after they come out of the fryer, while they are still hot and slightly oily. This allows the salt or seasoning to adhere better. Sprinkle generously with sea salt or your homemade All-Purpose Seasoning. Toss gently to distribute the seasoning evenly.
- Freezing French Fries: This recipe offers a fantastic tip for making fries ahead of time! You can freeze them after the first round of cooking.
- Freezing Process: After the first fry and cooling completely, lay the fries in a single layer on a cookie sheet lined with parchment paper. Make sure they are not touching to prevent them from freezing together in clumps. Freeze them until solid, which usually takes a few hours. Once frozen solid, transfer them to a freezer-safe bag or container for longer storage. Frozen fries can be stored in the freezer for several weeks.
- Frying from Frozen: When you’re ready to enjoy your frozen fries, you can fry them directly from frozen. No need to thaw them. Heat your oil to 350-375°F and carefully add the frozen fries to the hot oil in batches. Be cautious, as frozen fries contain more moisture and will cause more splattering when they hit the hot oil. Fry them until they are golden brown and crispy, usually a few minutes longer than the second fry for fresh fries. Drain and season as usual.
- Enjoy! Serve your perfectly homemade, double-fried French fries immediately while they are hot and crispy.
Nutrition
- Serving Size: One Normal Portion
- Calories: 350-450


