


Okay, let’s get ready to craft the ultimate guide to making absolutely irresistible Chicken Chimichangas! This isn’t just a recipe; it’s an experience, a journey into crispy, savory, and deeply satisfying Tex-Mex heaven. The first time I made these for a family game night, they vanished from the platter in minutes. The sound of contented crunches, followed by requests for “just one more,” was all the proof I needed. My youngest, usually a picky eater, declared them “the best crunchy chicken burritos ever!” – high praise indeed. The beauty of this recipe is its versatility; you can adjust the spice, the fillings, and the toppings to make it uniquely yours. But follow this guide, and you’re guaranteed a crowd-pleaser that will have everyone asking for your secret. Prepare for a culinary adventure that will leave your taste buds singing and your guests begging for more!
The Ultimate Homemade Chicken Chimichangas: Crispy, Savory Perfection
Dive into the world of deep-fried delights with this comprehensive guide to crafting the perfect Chicken Chimichangas. This recipe breaks down every step, ensuring a golden, crispy exterior and a warm, flavorful, cheesy chicken filling that will transport you straight to your favorite Tex-Mex restaurant, but even better – because it’s homemade with love!
Ingredients: What You’ll Need for Chicken Chimichanga Bliss
This recipe is designed to yield hearty, flavor-packed chimichangas.
For the Chicken Filling:
- Cooked Chicken: 3 cups, shredded (rotisserie chicken works wonderfully, or about 1.5 lbs boneless, skinless chicken breasts or thighs, cooked and shredded)
- Olive Oil: 2 tablespoons
- Yellow Onion: 1 large, finely chopped
- Bell Pepper: 1 medium (any color, e.g., green, red, or yellow), finely chopped
- Garlic: 3-4 cloves, minced
- Jalapeño Pepper: 1 small, minced (optional, for a kick – remove seeds for less heat)
- Taco Seasoning: 2 tablespoons (or use a mix of 1 tbsp chili powder, 1.5 tsp cumin, 1 tsp smoked paprika, 1/2 tsp oregano, 1/2 tsp salt, 1/4 tsp black pepper)
- Salsa: 1/2 cup (your favorite kind – mild, medium, or hot)
- Chicken Broth: 1/4 cup (if needed, to moisten the filling)
- Lime Juice: 1 tablespoon, freshly squeezed
- Cilantro: 1/4 cup, freshly chopped (plus more for garnish)
- Shredded Cheese: 2 cups (Monterey Jack, Cheddar, Colby Jack, or a Mexican blend)
For Assembling and Frying:
- Flour Tortillas: 8 large (10-12 inch burrito size)
- Vegetable Oil or Canola Oil: 4-6 cups, for frying (enough for at least 1-1.5 inches depth in your pan)
- Toothpicks: To secure the chimichangas (optional but helpful)
Optional Toppings (Highly Recommended!):
- Sour Cream or Mexican Crema
- Guacamole or Sliced Avocado
- Pico de Gallo or more Salsa
- Shredded Lettuce
- Diced Tomatoes
- Extra Shredded Cheese
- Cotija Cheese, crumbled
- Hot Sauce
Instructions: Crafting Your Crispy Chicken Chimichangas Step-by-Step
Follow these detailed instructions for chimichanga success. Take your time with the folding process; it’s key to preventing blowouts during frying.
Step 1: Prepare the Chicken Filling
- Sauté Aromatics: Heat the 2 tablespoons of olive oil in a large skillet or Dutch oven over medium heat. Add the chopped onion and bell pepper. Sauté for 5-7 minutes, or until softened and translucent.
- Add Garlic & Jalapeño: Stir in the minced garlic and optional jalapeño. Cook for another 1-2 minutes until fragrant, being careful not to burn the garlic.
- Incorporate Chicken & Seasonings: Add the shredded cooked chicken to the skillet. Sprinkle with the taco seasoning (or your custom spice blend). Stir well to ensure the chicken is evenly coated. Cook for 2-3 minutes, allowing the spices to toast slightly.
- Add Liquids & Simmer: Pour in the salsa and chicken broth (if using). Stir to combine. Bring the mixture to a gentle simmer. Reduce the heat to low, cover, and let it cook for 10-15 minutes, stirring occasionally. This allows the flavors to meld beautifully. If the mixture looks too dry, add a little more broth or water. If it’s too wet, uncover and simmer for a few extra minutes to allow some liquid to evaporate. The goal is a moist but not soupy filling.
- Finish the Filling: Remove the skillet from the heat. Stir in the fresh lime juice and chopped cilantro. Taste and adjust seasonings if necessary (more salt, pepper, or a pinch of cayenne for extra heat). Allow the filling to cool for at least 15-20 minutes. This is crucial – a hot filling can make tortillas tear and melt cheese prematurely.
Step 2: Assemble the Chimichangas
- Warm Tortillas (Optional but Recommended): Slightly warming the tortillas makes them more pliable and less prone to cracking. You can do this by microwaving them in a damp paper towel for 20-30 seconds, or quickly warming them one by one in a dry skillet over medium heat.
- Set Up Your Assembly Station: Lay out your warmed tortillas, the cooled chicken filling, and the shredded cheese.
- Fill and Fold:
- Place a tortilla on a clean, flat surface.
- Spoon about 1/8th of the chicken filling (approximately 1/2 to 3/4 cup) in a line across the lower third of the tortilla, leaving a 1-2 inch border on the sides.
- Sprinkle generously with about 1/4 cup of shredded cheese over the chicken.
- Fold the bottom edge of the tortilla up and over the filling, tucking it in snugly.
- Fold in the two sides of the tortilla towards the center.
- Tightly roll the tortilla upwards from the bottom to form a compact, sealed burrito shape.
- If desired, secure the seam with one or two toothpicks. This is especially helpful for beginners.
- Repeat: Continue this process with the remaining tortillas and filling. Place the assembled chimichangas seam-side down on a baking sheet or large plate as you work.
Step 3: Fry the Chimichangas to Golden Perfection
- Heat the Oil: Pour the vegetable or canola oil into a large, heavy-bottomed pot, Dutch oven, or deep skillet to a depth of at least 1-1.5 inches. Heat the oil over medium-high heat until it reaches 350-375°F (175-190°C). Use a deep-fry thermometer for accuracy. If you don’t have one, a small piece of tortilla dropped into the oil should sizzle immediately and turn golden brown in about 30-45 seconds. If it browns too quickly, the oil is too hot; if it sinks and doesn’t sizzle much, it’s too cool.
- Fry in Batches: Carefully place 2-3 chimichangas at a time into the hot oil, seam-side down first. Do not overcrowd the pan, as this will lower the oil temperature and result in greasy chimichangas.
- Cook Until Golden: Fry for about 2-4 minutes per side, or until they are beautifully golden brown and crispy all over. Use tongs or a spider skimmer to gently turn them.
- Drain Excess Oil: Once golden and crisp, carefully remove the chimichangas from the oil using tongs or a spider skimmer. Allow any excess oil to drip back into the pot. Transfer the fried chimichangas to a wire rack set over a baking sheet lined with paper towels to drain. This helps keep them crispy. If you used toothpicks, remove them carefully once the chimichangas have cooled slightly.
- Keep Warm (Optional): If frying in multiple batches, you can keep the cooked chimichangas warm in a preheated oven at 200°F (93°C) on the wire rack while you finish frying the rest.
Step 4: Serve and Enjoy!
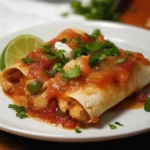
Serve the hot, crispy chicken chimichangas immediately with your favorite toppings.
Nutrition Facts
- Servings: 8 chimichangas
- Calories per serving (chimichanga only, without toppings): Approximately 550-750 calories.
Disclaimer: Nutritional information is an estimate and can vary significantly based on specific ingredients used (e.g., type of chicken, amount of cheese, type of oil, tortilla brand) and exact portion sizes. Toppings will add additional calories, fat, and carbohydrates.
Preparation Time
- Prep Time (Filling & Assembly): 40-50 minutes (includes cooling time for filling)
- Cook Time (Frying in Batches): 20-30 minutes
- Total Time: Approximately 1 hour to 1 hour 20 minutes
How to Serve Your Masterpiece Chicken Chimichangas
Serving chimichangas is all about the accompaniments! They transform a simple fried burrito into a fiesta on a plate. Here are some classic and creative ways to serve them:
- The Classic Platter:
- Place one or two chimichangas on each plate.
- Generously dollop with sour cream or Mexican crema.
- Add a scoop of fresh guacamole or slices of ripe avocado.
- Spoon over some vibrant pico de gallo or your favorite salsa.
- Sprinkle with finely shredded lettuce and diced tomatoes for freshness and crunch.
- A final flourish of extra shredded cheese or crumbled Cotija cheese adds a salty, savory note.
- Smothered “Wet” Style:
- Place chimichangas on a plate.
- Ladle a generous amount of warm enchilada sauce (red or green), queso sauce, or even a savory chili con carne over the top.
- Melt more shredded cheese on top under the broiler for a few seconds or in the microwave.
- Then, add your cold toppings like sour cream and guacamole.
- Side Dish Pairings:
- Mexican Rice (Spanish Rice): A classic, flavorful accompaniment.
- Refried Beans or Black Beans: Creamy refried beans or seasoned black beans are a must.
- Cilantro-Lime Rice: A lighter, brighter rice option.
- Simple Green Salad: A crisp salad with a light vinaigrette can balance the richness.
- Corn Salad (Esquites-style): Grilled or roasted corn with lime, chili, and cotija.
- Presentation Tips:
- Garnish Power: A sprinkle of fresh chopped cilantro or thinly sliced green onions adds a pop of color and freshness.
- Lime Wedges: Serve with lime wedges on the side for guests to squeeze over their chimichangas for an extra zing.
- Hot Sauce Bar: Offer a selection of hot sauces so everyone can customize their heat level.
Additional Tips for Chimichanga Perfection
- Don’t Overstuff: It’s tempting to load up the tortillas, but overstuffing makes them difficult to fold tightly and increases the risk of them bursting open during frying. Aim for a balanced amount of filling.
- Cool the Filling: This is a critical step often overlooked. A hot filling will steam the tortilla from the inside, making it prone to tearing. It can also melt the cheese too quickly, causing it to ooze out before frying. Let the chicken mixture cool to lukewarm or room temperature.
- Oil Temperature is Key: Maintaining the correct oil temperature (350-375°F or 175-190°C) is crucial. Too low, and the chimichangas will absorb too much oil and become greasy. Too high, and the outside will burn before the inside is heated through and the cheese is melted. Use a thermometer!
- Secure the Seam: Fold your chimichangas tightly. Placing them seam-side down first in the hot oil helps to seal the edge. If you’re still worried, don’t hesitate to use one or two plain wooden toothpicks to secure the final flap. Just remember to remove them before serving!
- Drain Well for Maximum Crispness: After frying, immediately transfer the chimichangas to a wire rack set over a baking sheet. This allows air to circulate around them, preventing the bottoms from becoming soggy from trapped steam and excess oil. Avoid placing them directly on paper towels for more than a minute, as they can stick and lose crispness.
FAQ Section: Your Chicken Chimichanga Questions Answered
Q1: Can I bake or air fry chicken chimichangas instead of deep frying them?
A1: Absolutely! While deep frying yields the classic ultra-crispy texture, baking or air frying are healthier alternatives.
* For Baking: Preheat your oven to 400°F (200°C). Assemble the chimichangas as directed. Lightly brush or spray them all over with oil (vegetable, canola, or even olive oil spray). Place them seam-side down on a baking sheet. Bake for 20-25 minutes, flipping halfway through, until golden brown and crispy. The texture will be a bit different—less uniformly crisp than fried, but still delicious.
* For Air Frying: Preheat your air fryer to 380-400°F (190-200°C). Lightly spray the assembled chimichangas with oil. Place them in the air fryer basket in a single layer (you’ll likely need to work in batches). Air fry for 8-12 minutes, flipping halfway, until golden and crispy. Air frying gets them quite crispy, closer to the deep-fried version.
Q2: What’s the best type of cheese to use in chicken chimichangas?
A2: The best cheese is a good melting cheese that you enjoy! Popular choices include:
* Monterey Jack: Melts beautifully and has a mild, creamy flavor.
* Cheddar (Medium or Sharp): Adds a more pronounced tangy flavor and melts well.
* Colby Jack: A blend that offers good meltability and mild flavor.
* Mexican Cheese Blend: Often a mix of Monterey Jack, Cheddar, Asadero, and Queso Quesadilla cheeses, designed for melting in Mexican dishes.
* Pepper Jack: If you like a bit of spice, Pepper Jack is a great option.
You can use pre-shredded cheese for convenience, but shredding your own block of cheese often results in better melting as pre-shredded cheeses can contain anti-caking agents.
Q3: Can I make chicken chimichangas ahead of time?
A3: Yes, with a few considerations:
* Filling: The chicken filling can be made up to 2-3 days in advance and stored in an airtight container in the refrigerator.
* Assembled (Unfried): You can assemble the chimichangas, wrap them individually in plastic wrap or place them in an airtight container (separated by parchment paper if stacking), and refrigerate for up to 24 hours before frying.
* Fried (Reheating): For the best texture, chimichangas are best fried just before serving. However, you can fry them, let them cool completely, and then store them in the refrigerator. To reheat, bake them in a 350°F (175°C) oven for 10-15 minutes or in an air fryer for 5-8 minutes until heated through and re-crisped. Microwaving will make them soggy.
Q4: How do I prevent my chimichangas from unraveling or bursting in the oil?
A4: This is a common concern! Here’s how to minimize it:
* Don’t Overstuff: Less filling is easier to manage.
* Warm Tortillas: Makes them more pliable and less likely to crack.
* Fold Tightly: Practice your burrito-folding technique. Tuck in the sides securely.
* Seam-Side Down First: Place the chimichanga into the hot oil with the final flap (seam) facing down. The heat helps to quickly seal it.
* Toothpicks: Use one or two plain wooden toothpicks to secure the seam if you’re unsure. Remember to remove them!
* Gentle Handling: Use tongs to gently place them in the oil and turn them. Avoid aggressive movements.
* Correct Oil Temperature: If the oil is too hot, the outside cooks too fast and can cause expansion leading to bursts.
Q5: My chimichangas turned out soggy/greasy. What went wrong?
A5: Soggy or greasy chimichangas are usually due to issues with oil temperature or draining:
* Oil Too Cool: If the oil isn’t hot enough (below 350°F/175°C), the chimichangas will absorb oil rather than quickly crisping up on the outside. Use a thermometer!
* Overcrowding the Pan: Adding too many chimichangas at once significantly drops the oil temperature, leading to oil absorption. Fry in small batches.
* Insufficient Draining: After frying, immediately place them on a wire rack over a baking sheet. This allows air to circulate and excess oil to drip away. Don’t let them sit directly on paper towels for too long or on a flat plate, as steam and oil will get trapped underneath, making them soggy.
* Filling Too Wet: If your chicken filling was very liquidy, the excess moisture can steam the tortilla from the inside, preventing it from getting fully crisp. Ensure your filling is moist but not watery.
Homemade Chicken Chimichangas Recipe
Ingredients
For the Chicken Filling:
- Cooked Chicken: 3 cups, shredded (rotisserie chicken works wonderfully, or about 1.5 lbs boneless, skinless chicken breasts or thighs, cooked and shredded)
- Olive Oil: 2 tablespoons
- Yellow Onion: 1 large, finely chopped
- Bell Pepper: 1 medium (any color, e.g., green, red, or yellow), finely chopped
- Garlic: 3-4 cloves, minced
- Jalapeño Pepper: 1 small, minced (optional, for a kick – remove seeds for less heat)
- Taco Seasoning: 2 tablespoons (or use a mix of 1 tbsp chili powder, 1.5 tsp cumin, 1 tsp smoked paprika, 1/2 tsp oregano, 1/2 tsp salt, 1/4 tsp black pepper)
- Salsa: 1/2 cup (your favorite kind – mild, medium, or hot)
- Chicken Broth: 1/4 cup (if needed, to moisten the filling)
- Lime Juice: 1 tablespoon, freshly squeezed
- Cilantro: 1/4 cup, freshly chopped (plus more for garnish)
- Shredded Cheese: 2 cups (Monterey Jack, Cheddar, Colby Jack, or a Mexican blend)
For Assembling and Frying:
- Flour Tortillas: 8 large (10-12 inch burrito size)
- Vegetable Oil or Canola Oil: 4-6 cups, for frying (enough for at least 1-1.5 inches depth in your pan)
- Toothpicks: To secure the chimichangas (optional but helpful)
Instructions
Step 1: Prepare the Chicken Filling
- Sauté Aromatics: Heat the 2 tablespoons of olive oil in a large skillet or Dutch oven over medium heat. Add the chopped onion and bell pepper. Sauté for 5-7 minutes, or until softened and translucent.
- Add Garlic & Jalapeño: Stir in the minced garlic and optional jalapeño. Cook for another 1-2 minutes until fragrant, being careful not to burn the garlic.
- Incorporate Chicken & Seasonings: Add the shredded cooked chicken to the skillet. Sprinkle with the taco seasoning (or your custom spice blend). Stir well to ensure the chicken is evenly coated. Cook for 2-3 minutes, allowing the spices to toast slightly.
- Add Liquids & Simmer: Pour in the salsa and chicken broth (if using). Stir to combine. Bring the mixture to a gentle simmer. Reduce the heat to low, cover, and let it cook for 10-15 minutes, stirring occasionally. This allows the flavors to meld beautifully. If the mixture looks too dry, add a little more broth or water. If it’s too wet, uncover and simmer for a few extra minutes to allow some liquid to evaporate. The goal is a moist but not soupy filling.
- Finish the Filling: Remove the skillet from the heat. Stir in the fresh lime juice and chopped cilantro. Taste and adjust seasonings if necessary (more salt, pepper, or a pinch of cayenne for extra heat). Allow the filling to cool for at least 15-20 minutes. This is crucial – a hot filling can make tortillas tear and melt cheese prematurely.
Step 2: Assemble the Chimichangas
- Warm Tortillas (Optional but Recommended): Slightly warming the tortillas makes them more pliable and less prone to cracking. You can do this by microwaving them in a damp paper towel for 20-30 seconds, or quickly warming them one by one in a dry skillet over medium heat.
- Set Up Your Assembly Station: Lay out your warmed tortillas, the cooled chicken filling, and the shredded cheese.
- Fill and Fold:
- Place a tortilla on a clean, flat surface.
- Spoon about 1/8th of the chicken filling (approximately 1/2 to 3/4 cup) in a line across the lower third of the tortilla, leaving a 1-2 inch border on the sides.
- Sprinkle generously with about 1/4 cup of shredded cheese over the chicken.
- Fold the bottom edge of the tortilla up and over the filling, tucking it in snugly.
- Fold in the two sides of the tortilla towards the center.
- Tightly roll the tortilla upwards from the bottom to form a compact, sealed burrito shape.
- If desired, secure the seam with one or two toothpicks. This is especially helpful for beginners.
- Repeat: Continue this process with the remaining tortillas and filling. Place the assembled chimichangas seam-side down on a baking sheet or large plate as you work.
Step 3: Fry the Chimichangas to Golden Perfection
- Heat the Oil: Pour the vegetable or canola oil into a large, heavy-bottomed pot, Dutch oven, or deep skillet to a depth of at least 1-1.5 inches. Heat the oil over medium-high heat until it reaches 350-375°F (175-190°C). Use a deep-fry thermometer for accuracy. If you don’t have one, a small piece of tortilla dropped into the oil should sizzle immediately and turn golden brown in about 30-45 seconds. If it browns too quickly, the oil is too hot; if it sinks and doesn’t sizzle much, it’s too cool.
- Fry in Batches: Carefully place 2-3 chimichangas at a time into the hot oil, seam-side down first. Do not overcrowd the pan, as this will lower the oil temperature and result in greasy chimichangas.
- Cook Until Golden: Fry for about 2-4 minutes per side, or until they are beautifully golden brown and crispy all over. Use tongs or a spider skimmer to gently turn them.
- Drain Excess Oil: Once golden and crisp, carefully remove the chimichangas from the oil using tongs or a spider skimmer. Allow any excess oil to drip back into the pot. Transfer the fried chimichangas to a wire rack set over a baking sheet lined with paper towels to drain. This helps keep them crispy. If you used toothpicks, remove them carefully once the chimichangas have cooled slightly.
- Keep Warm (Optional): If frying in multiple batches, you can keep the cooked chimichangas warm in a preheated oven at 200°F (93°C) on the wire rack while you finish frying the rest.
Step 4: Serve and Enjoy!
Serve the hot, crispy chicken
Nutrition
- Serving Size: One Normal Portion
- Calories: 550-750


