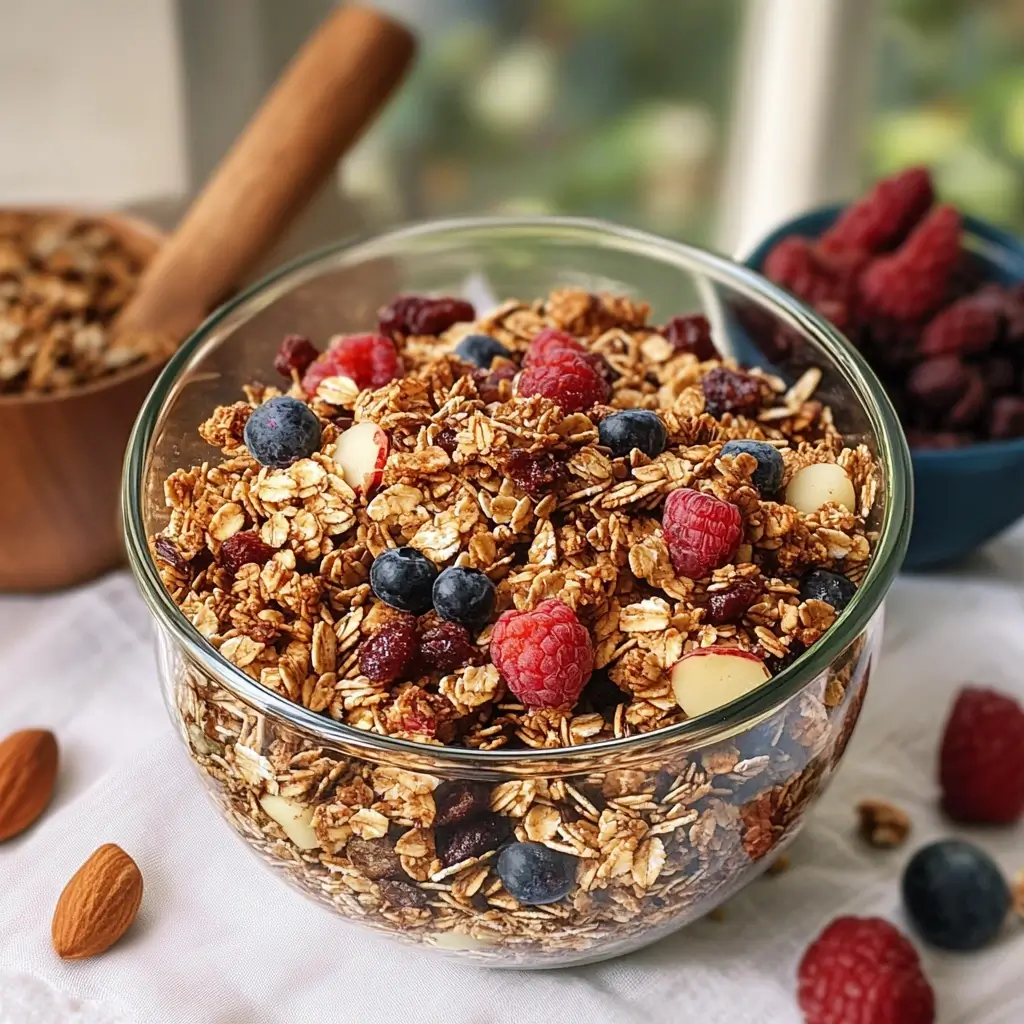

I remember the first time I decided to ditch the oil in my homemade granola. I was skeptical, to say the least. Granola, by its very nature, seemed to need that richness, that coating of oil to achieve its signature crunch and golden hue. My family, avid granola consumers, eyed my experiment with suspicion. My husband, a lover of all things crunchy, was convinced it would be a bland, chewy disappointment. My kids, who usually devour my regular granola by the handful, simply asked, “But why, Mom?” My “why” was a desire for an even healthier start to our day, a way to cut down on processed fats without sacrificing flavor or that all-important texture. The first batch emerged from the oven, fragrant with cinnamon and toasted nuts. The moment of truth came after it cooled completely – and to everyone’s astonishment, especially mine, it was perfectly crunchy! The secret, I discovered, lay in the right combination of natural binders and a patient baking process. My husband crunched his way through a bowl with yogurt and admitted it was “surprisingly good… actually, really good!” The kids, after a tentative first bite, were soon back for more, sprinkling it on their oatmeal and even sneaking handfuls as an afternoon snack. This Healthy Oil-Free Granola has since become a staple in our home. It’s a recipe I’m incredibly proud of, not just because it’s delicious, but because it proves that “healthy” and “indulgent” can absolutely go hand-in-hand. It’s packed with wholesome ingredients, customizable to your heart’s content, and so much better (and cheaper!) than store-bought varieties. Get ready to transform your breakfast game!
Healthy Oil-Free Granola: Your Go-To Recipe
This recipe focuses on whole food ingredients, natural sweetness, and achieving that irresistible crunch without a drop of added oil. Prepare to be amazed by its simplicity and deliciousness.
Yields: Approximately 8 cups
Prep time: 15 minutes
Bake time: 35-45 minutes
Cooling time: At least 1 hour (crucial for crunchiness)
Ingredients: The Building Blocks of Crunch
- Rolled Oats (Old-Fashioned): 4 cups (Use certified gluten-free if needed. Avoid instant oats as they will result in a mushy texture.)
- Mixed Raw Nuts: 1 ½ cups (e.g., almonds, walnuts, pecans, cashews), roughly chopped. This adds protein, healthy fats, and fantastic texture.
- Mixed Raw Seeds: ½ cup (e.g., pumpkin seeds, sunflower seeds, chia seeds, flax seeds). These are nutritional powerhouses.
- Unsweetened Shredded Coconut: ½ cup (Optional, but adds a lovely flavor and texture. Use flakes for a chewier bite.)
- Ground Cinnamon: 2 teaspoons (A warming spice that is synonymous with granola.)
- Ground Ginger: ½ teaspoon (Optional, for a little extra warmth and spice.)
- Fine Sea Salt: ½ teaspoon (Enhances all the other flavors.)
- Unsweetened Applesauce: ½ cup (This is our primary oil replacer, providing moisture and binding.)
- Pure Maple Syrup: ½ cup (For natural sweetness. You can adjust to ¼ cup for less sweetness, or substitute with date paste or agave nectar.)
- Vanilla Extract: 2 teaspoons (Adds depth of flavor.)
- Dried Fruit: 1 cup (e.g., raisins, cranberries, chopped apricots, dates – add after baking to prevent burning and chewiness.)
Instructions: Crafting Your Perfect Batch
Follow these steps carefully for the best oil-free granola experience. The magic is in the method!
- Preheat and Prepare: Preheat your oven to 300°F (150°C). Line a large, rimmed baking sheet (or two smaller ones) with parchment paper. This prevents sticking and makes cleanup a breeze. Avoid using aluminum foil directly, as it can cause the granola to burn more easily.
- Combine Dry Ingredients: In a very large mixing bowl, add the rolled oats, chopped nuts, seeds, shredded coconut (if using), ground cinnamon, ground ginger (if using), and sea salt. Whisk everything together thoroughly. This ensures the spices and smaller seeds are evenly distributed, leading to a consistently flavored granola.
- Combine Wet Ingredients: In a separate, smaller bowl, whisk together the unsweetened applesauce, pure maple syrup, and vanilla extract until well combined. The applesauce is key here; its natural pectin helps bind the ingredients and provides moisture without the need for oil.
- Marry Wet and Dry: Pour the wet mixture over the dry ingredients in the large bowl. Using a sturdy spatula or your clean hands, mix everything together exceptionally well. Ensure every oat, nut, and seed is lightly coated with the wet mixture. Don’t rush this step; proper coating is essential for even baking and flavor.
- Spread on Baking Sheet: Transfer the granola mixture to the prepared baking sheet(s). Spread it out in a thin, even layer. If you’re using one large sheet, make sure it’s not too crowded. If it seems piled up, it’s better to use two sheets. Overcrowding will cause the granola to steam rather than toast, resulting in a less crunchy product. Lightly press the granola down with the back of the spatula – this can help create some lovely clumps.
- Bake to Golden Perfection: Place the baking sheet(s) in the preheated oven. Bake for 35-45 minutes. Stir the granola gently every 15 minutes to promote even browning and prevent the edges from burning. Keep a close eye on it during the last 10-15 minutes, as oven temperatures can vary. The granola is ready when it’s lightly golden brown and fragrant. It will not feel super crispy straight out of the oven – don’t worry!
- The Crucial Cool-Down: Remove the granola from the oven and let it cool completely on the baking sheet on a wire rack. This step is non-negotiable for achieving maximum crunchiness. As it cools, the sugars will harden, and the moisture will evaporate, transforming it into the crispy delight you’re aiming for. This can take at least 1 hour, sometimes longer depending on humidity. Resist the urge to stir it while it’s cooling if you want to encourage larger clumps.
- Add Dried Fruit (Optional): Once the granola is completely cool and wonderfully crisp, gently break it apart into your desired cluster size. Now is the time to stir in your chosen dried fruits. Adding them after baking prevents them from becoming overly hard, burnt, or overly chewy.
- Store for Freshness: Transfer the cooled oil-free granola to an airtight container. Store it at room temperature for up to 2 weeks for optimal freshness and crunch. It can last longer, but the texture might gradually soften.
Nutrition Facts
- Servings: This recipe makes approximately 16 servings.
- Serving Size: ½ cup (approximately 50-60g).
- Calories per serving (approximate): 220-260 calories.
Disclaimer: The nutritional information is an estimate and can vary significantly based on the exact brands, types of nuts, seeds, and dried fruits used, as well as precise serving sizes. For specific dietary needs, it’s always best to calculate based on your actual ingredients using a nutritional calculator.
This granola is a good source of fiber, healthy fats (from nuts and seeds, not added oils), and plant-based protein.
Preparation Time
- Active Preparation Time: 15 minutes (chopping nuts, measuring, mixing)
- Baking Time: 35-45 minutes
- Cooling Time: Minimum 1 hour (essential for crispiness)
- Total Time (excluding cooling): 50-60 minutes
- Total Time (including essential cooling): Approximately 2 hours
While the cooling time might seem long, it’s passive time where the granola works its magic to become perfectly crisp. The hands-on time is minimal, making this an easy recipe to fit into your schedule.
How to Serve Your Delicious Oil-Free Granola
This healthy oil-free granola is incredibly versatile! Here are some delightful ways to enjoy your homemade creation:
- Classic Cereal Style:
- Serve in a bowl with your favorite milk (dairy, almond, soy, oat, or coconut milk all work wonderfully).
- Add fresh berries like blueberries, raspberries, or sliced strawberries for extra vitamins and a burst of freshness.
- A sliced banana on top adds natural sweetness and potassium.
- Yogurt Parfait Perfection:
- Layer the granola with plain or flavored yogurt (Greek yogurt, coconut yogurt, or any plant-based yogurt).
- Alternate layers with fresh or stewed fruit, a drizzle of honey or maple syrup (if desired), or a sprinkle of chia seeds for an elegant and satisfying breakfast or dessert.
- Smoothie Bowl Topping:
- Give your smoothie bowls a much-needed textural contrast by generously sprinkling this granola on top.
- It pairs beautifully with acai bowls, green smoothies, or fruit-based smoothie bowls.
- As a Standalone Snack:
- Portion it out into small containers or bags for a healthy, energizing snack on the go.
- It’s perfect for work, school lunchboxes, hiking, or road trips.
- Elevated Fruit Salads:
- Add a crunchy element to your fruit salads. The nutty, spiced flavor complements fresh fruits beautifully.
- On Top of Baked or Stewed Fruit:
- Sprinkle over warm baked apples, pears, or a compote of berries for a comforting and healthy dessert. The contrast of warm fruit and crunchy granola is divine.
- Ice Cream or Nice Cream Topping:
- For a healthier indulgence, use it as a topping for your favorite ice cream or homemade banana “nice” cream.
- With Cottage Cheese:
- For a protein-packed breakfast or snack, pair it with cottage cheese and a drizzle of honey or a few berries.
- Mixed into Oatmeal or Porridge:
- Stir a spoonful or two into your morning oatmeal or porridge just before serving to add texture and flavor.
The possibilities are truly endless! Get creative and find your favorite way to enjoy this wholesome, crunchy treat.
Additional Tips for Oil-Free Granola Success
Take your oil-free granola from great to absolutely phenomenal with these extra pointers:
- Don’t Overcrowd the Pan – Spread it Thin!
This is perhaps the most crucial tip for achieving crispy granola, especially without oil. When the granola mixture is spread too thickly or the pan is overcrowded, it traps steam. Steaming leads to a chewy, soft granola rather than a toasted, crispy one. If your mixture looks like it will be more than about ½ inch thick on your largest baking sheet, divide it between two baking sheets. A thinner layer allows hot air to circulate freely around the oat clusters, promoting even drying and browning. - Low and Slow Baking is Your Friend:
Resist the temptation to crank up the oven temperature to speed up the baking process. Baking oil-free granola at a lower temperature (around 300°F or 150°C) for a longer period allows the moisture to evaporate gradually and the natural sugars to caramelize slowly without burning the delicate nuts and seeds. This gentle baking method is key to developing a deep, toasted flavor and a uniformly crisp texture. - The Magic of the Complete Cool-Down:
We’ve mentioned it before, but it bears repeating because it’s that important. Granola, especially oil-free versions, crisps up significantly as it cools. When you pull it from the oven, it might still feel slightly soft or pliable. That’s normal! As the granola sits on the baking sheet at room temperature, the residual heat continues to cook it slightly, and the sugars solidify, creating that sought-after crunch. Avoid disturbing it too much during this cooling phase, especially if you like larger clumps. - Embrace Customization – Make it Your Own! This recipe is a fantastic base, but feel free to experiment with different nuts, seeds, spices, and extracts.
- Nuts: Try hazelnuts, Brazil nuts, or pistachios.
- Seeds: Hemp hearts or sesame seeds can add unique flavors and nutrients.
- Spices: Consider adding cardamom, nutmeg, allspice, or even a pinch of cayenne for a spicy kick. Orange or lemon zest can add a bright, citrusy note (add with wet ingredients).
- Extracts: Almond extract or orange extract can offer different flavor profiles.
- Sweetness Level: Adjust the maple syrup to your preference. For a less sweet version, reduce it, or for a different flavor, try date syrup or blackstrap molasses (which will give a richer, darker flavor).
- Storage Savvy for Lasting Crunch:
To maintain that hard-earned crispiness, proper storage is essential. Once the granola is completely cool (any residual warmth can create condensation and lead to sogginess), transfer it to a genuinely airtight container. Glass jars with good seals or high-quality plastic containers work best. Store it at room temperature in a cool, dry place, like a pantry. Avoid storing it in the refrigerator, as this can sometimes introduce moisture and make it less crunchy. Stored correctly, your oil-free granola should stay delightfully crisp for up to two weeks.
FAQ: Your Oil-Free Granola Questions Answered
Here are answers to some common questions you might have about making and enjoying this healthy oil-free granola:
- Q: Can I make this granola gluten-free?
A: Absolutely! The primary ingredient that could contain gluten is the rolled oats. To make this recipe gluten-free, simply ensure you use certified gluten-free rolled oats. Oats are naturally gluten-free but are often contaminated with wheat during processing. Checking for a “certified gluten-free” label guarantees they are safe for those with celiac disease or gluten sensitivity. All other typical ingredients like nuts, seeds, maple syrup, and applesauce are naturally gluten-free, but always double-check labels if you have severe allergies. - Q: My granola isn’t very clumpy. How can I get bigger clusters?A: Several factors contribute to clump formation:
- Binder Power: Ensure your applesauce isn’t too watery. You can also add a “flax egg” (1 tablespoon ground flaxseed mixed with 3 tablespoons water, let sit for 5-10 minutes to thicken) to the wet ingredients for extra binding power.
- Press it Down: Before baking, gently but firmly press the granola mixture down onto the baking sheet with the back of a spatula. This encourages the pieces to stick together.
- Minimal Stirring: While stirring during baking is necessary for even cooking, try to stir gently and less frequently if clumps are a priority. Perhaps just once, halfway through.
- Don’t Break it Up Too Soon: Let the granola cool completely on the baking sheet without disturbing it. Once fully cool and crisp, you can then break it into larger chunks.
- Slightly More Sweetener: A little extra maple syrup can also help with stickiness and clumping, but be mindful of the overall sugar content.
- Q: Can I use a different sweetener instead of maple syrup?A: Yes, you have options, but they may slightly alter the flavor and texture.
- Date Paste/Syrup: A great whole-food sweetener. It will give a slightly darker color and a richer, caramel-like flavor. You might need to adjust the amount slightly.
- Agave Nectar: Similar in consistency to maple syrup and will work as a 1:1 substitute. It has a more neutral flavor.
- Unsweetened Applesauce (for more sweetness): If you want to reduce refined sugars further, you can increase the applesauce and reduce or omit the maple syrup, but the granola will be less sweet and potentially less crispy.
- Mashed Banana: Can be used as part of the binder and sweetener, but it will impart a distinct banana flavor.
Avoid granulated sugars unless you dissolve them into the wet mixture, as they won’t distribute as well.
- Q: What are the main benefits of making oil-free granola compared to traditional granola?A: The primary benefits are:
- Reduced Processed Fats: Commercial granolas and many homemade recipes use significant amounts of added oils (like vegetable, canola, or coconut oil). While some oils have benefits, consuming them in large quantities, especially highly processed ones, isn’t always ideal. Oil-free granola focuses on whole-food sources of fats from nuts and seeds.
- Lower Overall Fat Content: By omitting added oil, you generally reduce the overall fat and calorie content per serving, which can be beneficial for weight management or specific dietary goals.
- Whole Food Focus: Oil-free recipes often rely more on whole food binders like applesauce or mashed fruit, increasing the overall nutrient density with vitamins, minerals, and fiber from these sources.
- Better Control Over Ingredients: Making it at home means you control the type and amount of sweeteners, the quality of nuts and seeds, and you can avoid preservatives or artificial flavors often found in store-bought versions.
- Q: My granola turned out chewy instead of crispy. What did I do wrong?A: This is a common issue, but usually fixable! Here are the likely culprits:
- Insufficient Cooling Time: This is the #1 reason. The granola must cool completely on the baking sheet to crisp up.
- Not Baked Long Enough: It might have needed a few more minutes in the oven to dry out sufficiently. Look for a nice golden-brown color.
- Oven Temperature Too Low/High: If too low, it won’t dry out. If too high, the outside might brown before the inside is dry. An oven thermometer can help check accuracy.
- Too Much Moisture in Binders: If your applesauce was very watery, or if you added too much liquid in general, it will take longer to crisp or might remain chewy.
- Overcrowded Pan: As mentioned in the tips, this leads to steaming instead of toasting.
- High Humidity: On very humid days, it can be harder for things to crisp up and stay crisp. Ensure it’s stored in a truly airtight container.
- Added Dried Fruit Too Early: If you baked the dried fruit with the granola, it can release moisture and make the granola softer. Always add it after cooling.
You can try re-crisping chewy granola by spreading it on a baking sheet and baking it in a low oven (250-275°F or 120-135°C) for 10-15 minutes, then letting it cool completely again.

Healthy Oil-Free Granola Recipe
Ingredients
- Rolled Oats (Old-Fashioned): 4 cups (Use certified gluten-free if needed. Avoid instant oats as they will result in a mushy texture.)
- Mixed Raw Nuts: 1 ½ cups (e.g., almonds, walnuts, pecans, cashews), roughly chopped. This adds protein, healthy fats, and fantastic texture.
- Mixed Raw Seeds: ½ cup (e.g., pumpkin seeds, sunflower seeds, chia seeds, flax seeds). These are nutritional powerhouses.
- Unsweetened Shredded Coconut: ½ cup (Optional, but adds a lovely flavor and texture. Use flakes for a chewier bite.)
- Ground Cinnamon: 2 teaspoons (A warming spice that is synonymous with granola.)
- Ground Ginger: ½ teaspoon (Optional, for a little extra warmth and spice.)
- Fine Sea Salt: ½ teaspoon (Enhances all the other flavors.)
- Unsweetened Applesauce: ½ cup (This is our primary oil replacer, providing moisture and binding.)
- Pure Maple Syrup: ½ cup (For natural sweetness. You can adjust to ¼ cup for less sweetness, or substitute with date paste or agave nectar.)
- Vanilla Extract: 2 teaspoons (Adds depth of flavor.)
- Dried Fruit: 1 cup (e.g., raisins, cranberries, chopped apricots, dates – add after baking to prevent burning and chewiness.)
Instructions
- Preheat and Prepare: Preheat your oven to 300°F (150°C). Line a large, rimmed baking sheet (or two smaller ones) with parchment paper. This prevents sticking and makes cleanup a breeze. Avoid using aluminum foil directly, as it can cause the granola to burn more easily.
- Combine Dry Ingredients: In a very large mixing bowl, add the rolled oats, chopped nuts, seeds, shredded coconut (if using), ground cinnamon, ground ginger (if using), and sea salt. Whisk everything together thoroughly. This ensures the spices and smaller seeds are evenly distributed, leading to a consistently flavored granola.
- Combine Wet Ingredients: In a separate, smaller bowl, whisk together the unsweetened applesauce, pure maple syrup, and vanilla extract until well combined. The applesauce is key here; its natural pectin helps bind the ingredients and provides moisture without the need for oil.
- Marry Wet and Dry: Pour the wet mixture over the dry ingredients in the large bowl. Using a sturdy spatula or your clean hands, mix everything together exceptionally well. Ensure every oat, nut, and seed is lightly coated with the wet mixture. Don’t rush this step; proper coating is essential for even baking and flavor.
- Spread on Baking Sheet: Transfer the granola mixture to the prepared baking sheet(s). Spread it out in a thin, even layer. If you’re using one large sheet, make sure it’s not too crowded. If it seems piled up, it’s better to use two sheets. Overcrowding will cause the granola to steam rather than toast, resulting in a less crunchy product. Lightly press the granola down with the back of the spatula – this can help create some lovely clumps.
- Bake to Golden Perfection: Place the baking sheet(s) in the preheated oven. Bake for 35-45 minutes. Stir the granola gently every 15 minutes to promote even browning and prevent the edges from burning. Keep a close eye on it during the last 10-15 minutes, as oven temperatures can vary. The granola is ready when it’s lightly golden brown and fragrant. It will not feel super crispy straight out of the oven – don’t worry!
- The Crucial Cool-Down: Remove the granola from the oven and let it cool completely on the baking sheet on a wire rack. This step is non-negotiable for achieving maximum crunchiness. As it cools, the sugars will harden, and the moisture will evaporate, transforming it into the crispy delight you’re aiming for. This can take at least 1 hour, sometimes longer depending on humidity. Resist the urge to stir it while it’s cooling if you want to encourage larger clumps.
- Add Dried Fruit (Optional): Once the granola is completely cool and wonderfully crisp, gently break it apart into your desired cluster size. Now is the time to stir in your chosen dried fruits. Adding them after baking prevents them from becoming overly hard, burnt, or overly chewy.
- Store for Freshness: Transfer the cooled oil-free granola to an airtight container. Store it at room temperature for up to 2 weeks for optimal freshness and crunch. It can last longer, but the texture might gradually soften.
Nutrition
- Serving Size: One Normal Portion
- Calories: 220-260