


Of all the treats that transport me back to childhood bake sales and festive gatherings, the classic Coconut Ice Slice holds a special place. Its iconic pink and white layers were a beacon of sugary delight. But as my own family grew and our focus shifted towards more wholesome, nourishing foods, the traditional recipe, loaded with icing sugar and sweetened condensed milk, fell by the wayside. I missed that nostalgic, chewy, coconut-packed goodness, but not the inevitable sugar crash that followed. That’s what sparked the mission: to reinvent this beloved classic into something I could feel genuinely good about serving. After countless batches and a kitchen dusted in a permanent layer of fine coconut, this Healthy Coconut Ice Slice was born. The first time I served it, my kids’ eyes lit up with the same joy I felt as a child, and my husband, a discerning critic of “healthy” desserts, went back for a second piece. It has all the charm of the original—the vibrant color, the dense, chewy texture, the intense coconut flavor—but it’s crafted with whole-food ingredients that nourish rather than deplete. This is more than just a recipe; it’s a revival of a cherished memory, made better for our modern lives.
What Makes This Coconut Ice Slice Healthy?
Before we dive into the recipe itself, let’s break down what elevates this version from a simple confection to a genuinely wholesome treat. The magic lies in a few key ingredient swaps that boost nutritional value without sacrificing that classic taste and texture. Traditional coconut ice is primarily icing sugar and condensed milk, offering very little beyond a quick sugar hit. Our version turns that on its head.
The Power of Coconut
The star of the show, coconut, is a nutritional powerhouse in its own right. We use unsweetened desiccated coconut, which is simply dried and shredded coconut flesh.
- Healthy Fats: Coconut is rich in Medium-Chain Triglycerides (MCTs), a type of saturated fat that the body metabolizes differently from long-chain fatty acids. MCTs are transported directly to the liver and can be used as a rapid source of energy or turned into ketones, which can have therapeutic effects on the brain.
- Fiber: This recipe is packed with dietary fiber from the coconut. Fiber is crucial for digestive health, promoting regular bowel movements and feeding the beneficial bacteria in your gut. It also helps to slow the absorption of sugar into the bloodstream, preventing sharp spikes and crashes in blood sugar levels.
- Minerals: Coconut is an excellent source of manganese, an essential mineral for bone health, metabolism, and antioxidant function. It also provides copper and selenium, important trace minerals for various bodily functions.
Refined Sugar-Free Sweetness
The biggest health overhaul in this recipe is the elimination of refined icing sugar and sweetened condensed milk. Instead, we turn to natural, unrefined sweeteners that bring their own benefits.
- Pure Maple Syrup: We use pure maple syrup as our primary sweetener. Unlike refined white sugar, which is stripped of all nutrients, maple syrup contains minerals like manganese and zinc, as well as a variety of antioxidants. While it is still a sugar, its lower glycemic index and nutrient profile make it a superior choice.
- Full-Fat Coconut Milk: In place of condensed milk, we use full-fat coconut milk (the kind from a can). This provides the creamy, binding richness we need. It contributes more of those beneficial MCTs and creates a wonderfully luscious texture, all without the added sugar and dairy of its traditional counterpart.
The Role of Virgin Coconut Oil
To help the slice set firmly and add another layer of coconut flavor and healthy fats, we use virgin coconut oil.
- Lauric Acid: About 50% of the fatty acids in coconut oil are lauric acid. This compound has been shown to have antimicrobial properties, helping to fight off harmful bacteria, viruses, and fungi.
- No-Bake Binding: From a culinary perspective, coconut oil is solid at cool room temperature and below. This property is what allows our no-bake slice to firm up in the refrigerator, creating a perfectly dense, sliceable texture without the need for any baking or chemical setting agents.
By making these intentional choices, we transform the coconut ice slice from an empty-calorie indulgence into a satisfying, fiber-rich, and nutrient-denser treat you can enjoy with peace of mind.
The Ultimate Healthy Coconut Ice Slice Recipe
This recipe is designed to be straightforward, forgiving, and incredibly delicious. It’s a no-bake wonder that comes together with minimal fuss and is perfect for making with kids.
A Closer Look at Your Ingredients
Understanding the role of each ingredient will help you achieve the best possible result.
- Unsweetened Desiccated Coconut: This is the fine, dry type of coconut. Do not use sweetened coconut flakes or larger shredded coconut, as they will alter the texture and sweetness of the final product. The fine texture is key to getting that dense, classic mouthfeel.
- Full-Fat Canned Coconut Milk: This is non-negotiable for a creamy, firm slice. Use the thick, creamy part that rises to the top of the can. Light coconut milk or coconut milk from a carton will not have enough fat content to help the slice set properly, resulting in a crumbly texture.
- Pure Maple Syrup: For the best flavor and nutritional profile, use 100% pure maple syrup, not pancake syrup, which is just corn syrup with artificial flavoring. Agave nectar or brown rice syrup can also work as substitutes.
- Virgin Coconut Oil: This helps bind the slice and gives it a firm texture when chilled. Using virgin or unrefined coconut oil will also add a more pronounced, natural coconut flavor.
- Vanilla Extract: A touch of pure vanilla extract enhances the other flavors and adds a beautiful aromatic warmth to the slice.
- Natural Pink Food Coloring: To create the iconic pink layer, we opt for a natural food coloring. Beetroot powder is an excellent choice as it provides a vibrant pink/red hue and is entirely natural. Start with a tiny amount and add more until you reach your desired shade. Alternatively, you can use natural liquid food colorings found in most health food stores.
- Pinch of Salt: Salt is a flavor enhancer. A tiny pinch will balance the sweetness and make the coconut flavor pop.
Required Equipment
- Large mixing bowl
- Small bowl
- Spatula or wooden spoon
- 8×8 inch (20×20 cm) square baking dish
- Parchment paper
- Measuring cups and spoons
Ingredient List
For the Base Layer (White):
- 2 cups (200g) Unsweetened Desiccated Coconut
- 1/4 cup (60ml) Full-Fat Coconut Milk (the thick cream part from the top of the can)
- 3 tablespoons (45ml) Pure Maple Syrup
- 2 tablespoons (30ml) Virgin Coconut Oil, melted
- 1/2 teaspoon Pure Vanilla Extract
- A tiny pinch of sea salt
For the Top Layer (Pink):
- 2 cups (200g) Unsweetened Desiccated Coconut
- 1/4 cup (60ml) Full-Fat Coconut Milk (the thick cream part)
- 3 tablespoons (45ml) Pure Maple Syrup
- 2 tablespoons (30ml) Virgin Coconut Oil, melted
- 1/2 teaspoon Pure Vanilla Extract
- 1/4 teaspoon Beetroot Powder (or a few drops of natural pink food coloring)
Step-by-Step Instructions
Follow these instructions carefully for a flawless Healthy Coconut Ice Slice.
Step 1: Prepare Your Pan
- Line your 8×8 inch square baking dish with parchment paper. Leave some overhang on two opposite sides to act as “handles.” This will make it incredibly easy to lift the entire slice out of the pan for cutting later.
Step 2: Make the White Base Layer
- In a large mixing bowl, combine all the ingredients for the white base layer: 2 cups of desiccated coconut, 1/4 cup of coconut milk cream, 3 tablespoons of maple syrup, 2 tablespoons of melted coconut oil, 1/2 teaspoon of vanilla extract, and a pinch of salt.
- Use a spatula to mix everything together thoroughly. Keep mixing until every flake of coconut is moistened and the mixture starts to clump together. It should feel slightly sticky and hold its shape when you press it.
Step 3: Press the Base Layer into the Pan
- Transfer the white coconut mixture into your prepared pan.
- Using the back of the spatula or your clean hands, press the mixture down firmly and evenly across the entire base of the pan. The key to a slice that holds together is a firm, compact layer. Use the bottom of a glass or measuring cup to help you get it really flat and packed down.
- Place the pan in the freezer for about 10-15 minutes to allow this layer to start setting while you prepare the pink layer.
Step 4: Make the Pink Top Layer
- There’s no need to wash your bowl. In the same large mixing bowl, combine all the ingredients for the pink top layer: another 2 cups of desiccated coconut, 1/4 cup of coconut milk cream, 3 tablespoons of maple syrup, 2 tablespoons of melted coconut oil, and 1/2 teaspoon of vanilla extract.
- Mix well until combined. Now, add your natural coloring. Start with 1/4 teaspoon of beetroot powder. Mix it in completely. The color will seem subtle at first but will deepen as it hydrates. If you want a more vibrant pink, add another 1/4 teaspoon until you reach your desired shade. If using liquid coloring, add a few drops and mix.
Step 5: Add the Pink Layer and Chill
- Retrieve your pan from the freezer. The white layer should be firm to the touch.
- Carefully spoon the pink mixture over the white layer. Spread it out gently to the edges.
- Once again, press this layer down firmly and evenly. You want the two layers to fuse together, so don’t be afraid to apply some pressure.
- Cover the pan with plastic wrap or a reusable cover and place it in the refrigerator to set completely. This will take at least 4 hours, but for the best, cleanest slices, I highly recommend chilling it overnight.
Step 6: Slice and Serve
- Once the slice is completely firm, use the parchment paper handles to lift it out of the pan and onto a cutting board.
- For the cleanest cuts, use a large, sharp knife. You can run the knife under hot water and wipe it dry between each cut to ensure perfectly smooth edges.
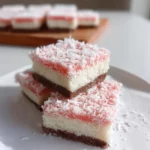
- Cut the block into 16 small squares or 8 larger bars, depending on your preference.
Nutrition Facts
This nutritional information is an estimate and can vary based on the specific brands of ingredients used.
- Servings: 16 small squares
- Calories per serving: Approximately 145 kcal
This slice is high in healthy fats, which provide satiety and lasting energy, and it contains a good amount of fiber. While it contains natural sugars from the maple syrup, it is significantly lower in sugar than its traditional counterpart.
Preparation Time
One of the best things about this recipe is how quick the active preparation is.
- Active Prep Time: 15 minutes
- Chilling Time: 4 hours minimum (overnight recommended for best results)
- Total Time: 4 hours 15 minutes
How to Serve
This Healthy Coconut Ice Slice is wonderfully versatile. It’s perfect on its own, but here are some creative ways to serve and present it for any occasion:
- The Afternoon Pick-Me-Up:
- Serve a square alongside a hot cup of black coffee or an herbal tea like peppermint or chamomile. The rich coconut pairs beautifully with the bitterness of coffee or the fresh notes of tea.
- Elegant Dessert Platter:
- For parties or gatherings, arrange the squares on a platter.
- Drizzle the entire platter with melted high-quality dark chocolate (85% cacao or higher) for a stunning look and a delicious flavor contrast.
- Sprinkle with a few toasted coconut flakes or finely chopped pistachios for extra texture and color.
- Kid-Friendly Treat:
- Cut into smaller, bite-sized cubes for little hands.
- Serve with a glass of milk or a fresh fruit smoothie for a balanced and satisfying snack.
- Post-Workout Fuel:
- The combination of quick-energy MCTs from the coconut and natural sugars from the maple syrup makes this a great option for a small, replenishing post-workout snack.
- Gift-Giving:
- Line a beautiful tin or box with parchment paper and fill it with squares of coconut ice. It makes a thoughtful and delicious homemade gift for holidays, birthdays, or as a thank-you gesture.
Additional Tips (5 Pro Tips)
- Get the Texture Right: The key to the perfect dense, chewy texture is using desiccated coconut and pressing the layers down very firmly. Don’t be shy! Using the flat bottom of a drinking glass can help you apply even pressure across the entire surface.
- The Parchment Sling is Your Best Friend: Don’t skip the step of leaving parchment paper overhang on two sides. This simple trick makes removing the slice from the pan completely effortless and prevents you from having to dig out the first piece, ensuring every square looks perfect.
- For Ultra-Clean Slices: The hot knife trick is a game-changer. Fill a tall glass with hot water. Dip a long, sharp knife into the water, wipe it clean and dry with a towel, and make a cut. Repeat for every single cut. The gentle heat from the blade melts the coconut oil just enough to glide through without dragging or crumbling the slice.
- Achieve Uniform Color: When adding the beetroot powder or food coloring for the pink layer, mix it in thoroughly before you decide to add more. Beetroot powder, in particular, can take a moment to fully dissolve and release its color. Mix for a solid minute to see the true shade before adding more, preventing an overly intense or patchy color.
- Taste and Adjust Before You Press: Before you press the white layer into the pan, take a tiny taste of the mixture. Is it sweet enough for you? Does it need a bit more vanilla? This is your only chance to adjust the flavor profile. The same goes for the pink layer. A quick taste test ensures the final product is perfectly suited to your palate.
FAQ Section (5 Q/A)
1. Why is my coconut ice slice crumbly and not holding together?
This is the most common issue and it almost always comes down to one of two things: moisture or pressure. First, ensure you used full-fat canned coconut milk and scraped up the thickest cream from the top. Light coconut milk doesn’t have enough fat to bind the ingredients. Second, you may not have pressed the layers down firmly enough in the pan. Compacting the mixture is crucial for it to set into a solid, sliceable block. If it’s still crumbly, your mixture might be a bit dry. Next time, try adding an extra teaspoon of melted coconut oil or coconut milk to the mixture.
2. Can I use fresh or frozen shredded coconut instead of desiccated coconut?
You can, but it will significantly change the texture. Fresh or frozen coconut contains much more water. This will result in a much softer, wetter, and less dense slice that may not hold its shape as well. Desiccated coconut is dry and fine, allowing it to absorb the liquids (coconut milk, oil, syrup) and create that classic, firm, chewy texture. If you only have larger coconut flakes, you can try pulsing them a few times in a food processor to break them down into a finer consistency.
3. My coconut ice seems a bit oily after setting. What went wrong?
This can happen if the coconut oil separates slightly. It might be that your coconut oil was too hot when you mixed it in, or it could be due to temperature fluctuations during setting. It doesn’t affect the taste or safety, just the appearance. You can gently blot the surface with a paper towel to absorb any excess oil. To prevent this, make sure your melted coconut oil has cooled slightly before you mix it with the other ingredients.
4. Is this recipe suitable for a vegan or dairy-free diet?
Absolutely! This recipe is naturally vegan, dairy-free, and gluten-free. All the ingredients—coconut, coconut milk, maple syrup, and coconut oil—are plant-based. This makes it a fantastic dessert option for those with various dietary restrictions, unlike the traditional version which relies on dairy-based condensed milk.
5. How long does this keep, and what is the best way to store it?
This slice must be stored in the refrigerator. The coconut oil that helps it set will become soft at room temperature, especially in warmer climates.
- In the Refrigerator: Store the slices in an airtight container in the fridge for up to 7-10 days. Separating layers with parchment paper can prevent them from sticking together.
- In the Freezer: This recipe freezes beautifully! Place the cut squares on a parchment-lined baking sheet and freeze until solid. Then, transfer them to a freezer-safe bag or container. They will last for up to 3 months. You can eat them straight from the freezer for a very firm, chewy treat, or let them thaw in the fridge for 20-30 minutes before enjoying.
Healthy Coconut Ice Slice Recipe
Ingredients
For the Base Layer (White):
- 2 cups (200g) Unsweetened Desiccated Coconut
- 1/4 cup (60ml) Full-Fat Coconut Milk (the thick cream part from the top of the can)
- 3 tablespoons (45ml) Pure Maple Syrup
- 2 tablespoons (30ml) Virgin Coconut Oil, melted
- 1/2 teaspoon Pure Vanilla Extract
- A tiny pinch of sea salt
For the Top Layer (Pink):
- 2 cups (200g) Unsweetened Desiccated Coconut
- 1/4 cup (60ml) Full-Fat Coconut Milk (the thick cream part)
- 3 tablespoons (45ml) Pure Maple Syrup
- 2 tablespoons (30ml) Virgin Coconut Oil, melted
- 1/2 teaspoon Pure Vanilla Extract
- 1/4 teaspoon Beetroot Powder (or a few drops of natural pink food coloring)
Instructions
Step 1: Prepare Your Pan
- Line your 8×8 inch square baking dish with parchment paper. Leave some overhang on two opposite sides to act as “handles.” This will make it incredibly easy to lift the entire slice out of the pan for cutting later.
Step 2: Make the White Base Layer
- In a large mixing bowl, combine all the ingredients for the white base layer: 2 cups of desiccated coconut, 1/4 cup of coconut milk cream, 3 tablespoons of maple syrup, 2 tablespoons of melted coconut oil, 1/2 teaspoon of vanilla extract, and a pinch of salt.
- Use a spatula to mix everything together thoroughly. Keep mixing until every flake of coconut is moistened and the mixture starts to clump together. It should feel slightly sticky and hold its shape when you press it.
Step 3: Press the Base Layer into the Pan
- Transfer the white coconut mixture into your prepared pan.
- Using the back of the spatula or your clean hands, press the mixture down firmly and evenly across the entire base of the pan. The key to a slice that holds together is a firm, compact layer. Use the bottom of a glass or measuring cup to help you get it really flat and packed down.
- Place the pan in the freezer for about 10-15 minutes to allow this layer to start setting while you prepare the pink layer.
Step 4: Make the Pink Top Layer
- There’s no need to wash your bowl. In the same large mixing bowl, combine all the ingredients for the pink top layer: another 2 cups of desiccated coconut, 1/4 cup of coconut milk cream, 3 tablespoons of maple syrup, 2 tablespoons of melted coconut oil, and 1/2 teaspoon of vanilla extract.
- Mix well until combined. Now, add your natural coloring. Start with 1/4 teaspoon of beetroot powder. Mix it in completely. The color will seem subtle at first but will deepen as it hydrates. If you want a more vibrant pink, add another 1/4 teaspoon until you reach your desired shade. If using liquid coloring, add a few drops and mix.
Step 5: Add the Pink Layer and Chill
- Retrieve your pan from the freezer. The white layer should be firm to the touch.
- Carefully spoon the pink mixture over the white layer. Spread it out gently to the edges.
- Once again, press this layer down firmly and evenly. You want the two layers to fuse together, so don’t be afraid to apply some pressure.
- Cover the pan with plastic wrap or a reusable cover and place it in the refrigerator to set completely. This will take at least 4 hours, but for the best, cleanest slices, I highly recommend chilling it overnight.
Step 6: Slice and Serve
- Once the slice is completely firm, use the parchment paper handles to lift it out of the pan and onto a cutting board.
- For the cleanest cuts, use a large, sharp knife. You can run the knife under hot water and wipe it dry between each cut to ensure perfectly smooth edges.
- Cut the block into 16 small squares or 8 larger bars, depending on your preference.
Nutrition
- Serving Size: One Normal Portion
- Calories: 145


