


Of all the treats that grace our kitchen counter during the bewitching season, none disappear quite as magically as this Halloween Bark. The first time I made it, I had a vision of a pristine, artfully scattered masterpiece. What I got was a delightful, chaotic mess created by my two little goblins, their hands sticky with chocolate and their faces beaming with pride. They threw candy corn with abandon, meticulously placed gummy worms as if they were prized jewels, and giggled uncontrollably as they dotted the entire creation with dozens of candy eyeballs. The result wasn’t a picture-perfect magazine cover, but it was something far better: a memory baked (or rather, chilled) into every bite. When we brought it to the neighborhood Halloween potluck, it was the first platter to be emptied. The combination of creamy, rich chocolate, the satisfying crunch of pretzels, and the chewy surprise of gummy candies was an absolute sensation. It’s more than a recipe; it’s a canvas for creativity, a perfect family activity, and the undisputed star of our Halloween celebrations.
The Ultimate Halloween Bark: Ingredients for a Spooky Masterpiece
Crafting the perfect Halloween Bark is all about layering flavors, textures, and colors. This recipe is a fantastic starting point, but feel free to let your imagination run wild. Here is the carefully selected arsenal of goodies you’ll need to create a truly spectacular and spooky treat.
The Chocolate Foundation
The base of your bark is the most crucial element. The quality and type of chocolate you choose will define the entire flavor profile. We use a combination of white and semi-sweet chocolate to create a visually stunning marbled effect and a balanced taste that isn’t overly sweet.
- Semi-Sweet or Dark Chocolate: 16 ounces (about 450g). Using high-quality baking chocolate bars (like Ghirardelli or Baker’s) or chocolate wafers (callets) is highly recommended. These are designed for melting and will give you a smooth, glossy finish and a satisfying “snap” when broken. Chocolate chips contain stabilizers to hold their shape, so they may not melt as fluidly. If using chips, you can add a teaspoon of coconut oil or vegetable shortening to help them smooth out.
- White Chocolate: 12 ounces (about 340g). Again, opt for high-quality white chocolate bars or wafers specifically for baking. True white chocolate contains cocoa butter, which gives it a creamy texture and rich flavor. Avoid “white baking chips” or “vanilla-flavored melts” that don’t contain cocoa butter, as their texture and taste can be waxy.
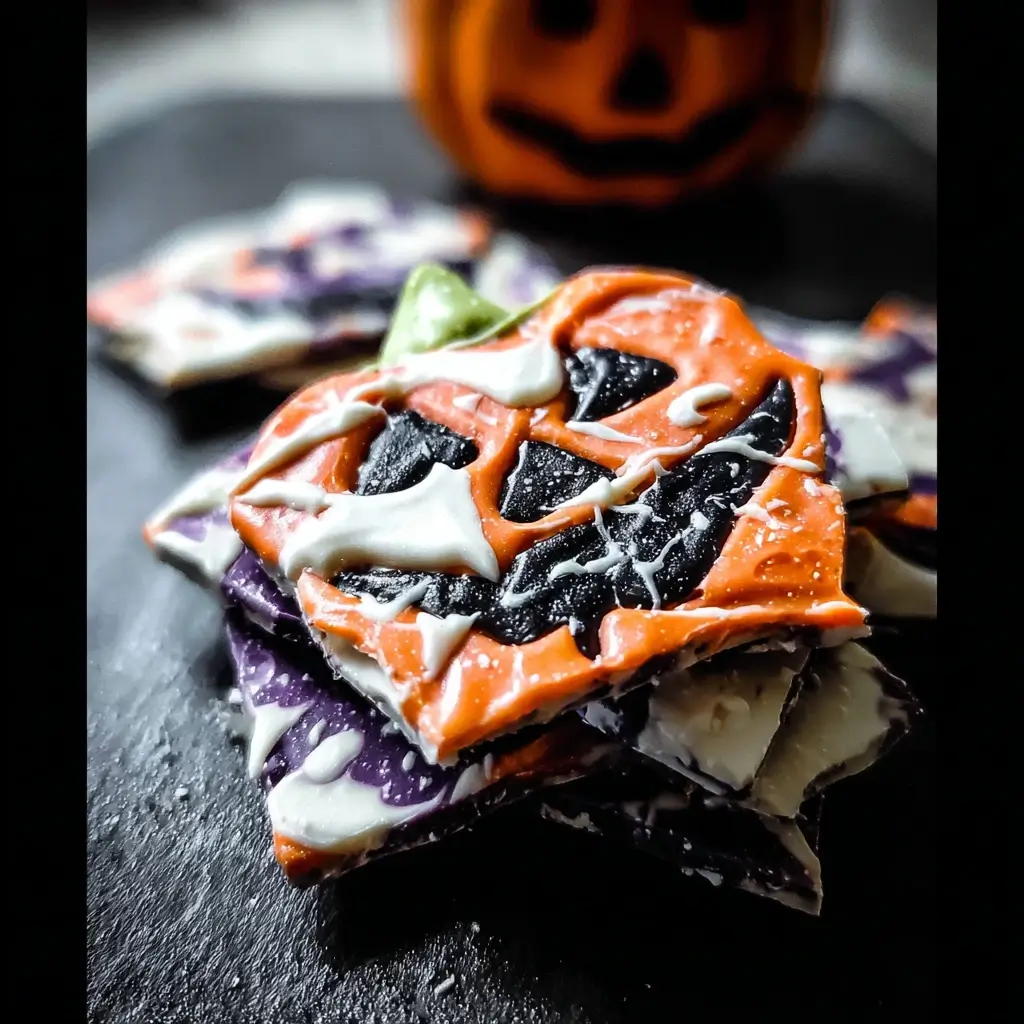
- Orange and Green Candy Melts: 1/4 cup of each color. These are essential for creating those vibrant, festive Halloween swirls. Candy melts are designed to melt easily and set up hard without tempering, making them perfect for decorative drizzles. You can find these in the baking aisle of most craft or grocery stores.
- Black Food Coloring (Oil-Based): A few drops (optional). If you want to create a dramatic, dark gray or near-black swirl for a more gothic look, a touch of oil-based food coloring is key. Water-based coloring will cause your chocolate to seize and become grainy, so ensure it is specifically designed for use with candy or chocolate.
The Spooky Toppings & Textural Add-ins
This is where the real fun begins! The variety of toppings is what makes Halloween Bark so unique and exciting to eat. We’re aiming for a mix of salty, sweet, crunchy, and chewy.
- Candy Eyeballs: 1/4 cup (or more!). These are non-negotiable for a truly spooky bark. They instantly give your treat personality and a fun, creepy vibe. Use a mix of sizes if you can find them.
- Halloween Sprinkles: 1/4 cup. Look for a festive mix that includes black, orange, purple, and green jimmies, nonpareils, or even tiny bat and ghost-shaped quinns. These add color and a delicate crunch.
- Mini Pretzel Twists: 1 cup, roughly broken. The salty crunch of pretzels is the perfect counterbalance to the sweet chocolate. Breaking them into smaller pieces ensures you get a bit of pretzel in every bite.
- Candy Corn & Mellowcreme Pumpkins: 1/2 cup. It wouldn’t be Halloween without this iconic, waxy candy. Its unique texture and classic colors are a must-have for visual appeal.
- Gummy Worms or Spiders: 1/2 cup. The chewy, fruity nature of gummy candies provides a wonderful textural contrast to the hard chocolate. Gummy worms can be artfully draped across the bark, while gummy spiders add an extra creepy-crawly element.
- Mini Peanut Butter Cups: 1/2 cup, chopped. The combination of chocolate and peanut butter is a classic for a reason. Chopping them up reveals the creamy center and distributes that beloved flavor throughout the bark.
- Crushed Oreo Cookies: 1/2 cup. The dark chocolate cookie and sweet creme filling add a fantastic crunch and a “dirt” or “graveyard” aesthetic to the bark.
Step-by-Step Instructions for Frightfully Good Bark
Follow these detailed instructions to ensure your Halloween Bark is a smashing success. The process is simple, but a few key techniques will elevate your bark from good to ghoulishly great.
Step 1: Prepare Your Cauldron (and Workstation)
Before you begin melting anything, get all your components ready. Chocolate waits for no one once it’s melted!
- Line Your Pan: Take a large, rimmed baking sheet (approximately 13×18 inches) and line it with parchment paper or a silicone baking mat. This is crucial for easy removal and cleanup. Ensure the parchment paper goes up the sides slightly to contain the chocolate.
- Prep Your Toppings: Open all your candy packages. Roughly chop the mini peanut butter cups and break the pretzels into bite-sized pieces. Place all your toppings in small, separate bowls. This “mise en place” approach will allow you to work quickly and decorate the bark before the chocolate begins to set.
Step 2: The Art of Melting Chocolate
The key to great bark is perfectly melted, smooth chocolate. We will use the microwave method for speed and simplicity, but you can also use a double boiler.
- Melt the Semi-Sweet Chocolate: Place your 16 ounces of chopped semi-sweet or dark chocolate in a microwave-safe bowl. Microwave on 50% power for 1-minute intervals. Stir thoroughly after each interval, even if it doesn’t look fully melted. The residual heat will continue to melt the chocolate. Continue this process until the chocolate is about 90% melted, then simply stir until the remaining lumps dissolve completely. This prevents the chocolate from overheating and scorching.
- Melt the White Chocolate: In a separate microwave-safe bowl, repeat the process with your 12 ounces of white chocolate. White chocolate is more delicate and prone to burning, so it’s even more important to use 50% power and stir frequently. Stop when it’s almost, but not completely, melted, and stir until smooth.
Step 3: Creating the Spooky Canvas
Now it’s time to assemble the base of your bark.
- Pour the Base Layer: Pour the melted semi-sweet chocolate onto your prepared baking sheet. Use an offset spatula or the back of a spoon to spread it into a thin, even layer across the entire surface. It doesn’t need to be perfectly smooth or reach every single corner.
- Add the White Chocolate: Immediately dollop the melted white chocolate over the top of the dark chocolate layer. Drop spoonfuls randomly all over the surface.
- Create the Marbled Effect: Take a toothpick, a skewer, or the tip of a knife and gently drag it through the two chocolates. Create swirls, zig-zags, and spiderweb-like patterns. Be careful not to over-mix, or the colors will become muddled. You want distinct streaks of dark and light chocolate.
Step 4: The Decoration Frenzy
This is the most fun part! You need to work fairly quickly before the chocolate starts to set.
- Drizzle the Colors: If using, melt your orange and green candy melts in separate small bowls according to package directions. Drizzle these colors over the marbled chocolate base for an extra pop of Halloween spirit.
- Scatter the Toppings: Now, let your creativity shine! Begin sprinkling the toppings all over the surface of the wet chocolate. Start with the larger items like broken pretzels and chopped peanut butter cups. Follow with the candy corn and gummy worms.
- Add the Final Touches: Finish by generously scattering the Halloween sprinkles and, most importantly, placing the candy eyeballs. Press them gently into the chocolate to ensure they stick. Don’t be shy—the more eyeballs, the spookier!
Step 5: Chill and Set
Patience is a virtue, even on Halloween.
- Refrigerate: Carefully transfer the baking sheet to the refrigerator. Let the bark chill for at least 1-2 hours, or until it is completely firm to the touch. Avoid the freezer, as it can cause the chocolate to become brittle and “sweat” (develop condensation) when it comes back to room temperature.
- Break into Pieces: Once the bark is fully hardened, lift it from the baking sheet using the parchment paper. Place it on a cutting board. You can either use a large knife to cut it into rustic shards or simply use your hands to break it apart into pieces of various sizes.
Nutrition Facts
- Servings: This recipe makes approximately 24 servings.
- Calories per serving: Approximately 250-300 kcal.
Disclaimer: The nutritional information provided is a rough estimate and will vary significantly based on the specific brands of chocolate and types of candy toppings used.
Preparation Time
- Active Time: 20-25 minutes
- Chilling Time: 1-2 hours
- Total Time: Approximately 1 hour 45 minutes
How to Serve Your Spooky Creation
Presentation can make your delicious bark even more appealing. Here are a few fun and festive ways to serve it:
- On a Themed Platter: Arrange the bark shards on a black, orange, or skeleton-themed platter. Garnish with a few plastic spiders or a light dusting of fake cobwebs (for decoration only!) around the base of the plate to enhance the spooky atmosphere.
- As Party Favors: Place a few pieces of bark into small, clear cellophane bags. Tie them shut with festive orange and black ribbon. This makes for a perfect, easy takeaway treat for guests at a Halloween party or for trick-or-treaters.
- On a Dessert “Char-BOO-terie” Board: Create an epic Halloween dessert board. Use the bark as the centerpiece and surround it with other treats like chocolate-covered strawberries decorated like ghosts, mandarin oranges drawn on like jack-o’-lanterns, and a bowl of caramel dip for apple slices.
- As a “Graveyard” Garnish: Crumble some of the bark into smaller bits and use it as a “rocky soil” topping for a “dirt pudding” graveyard. Stick Milano cookies into the pudding as tombstones for a fully-fledged edible cemetery scene.
- With Ice Cream: Serve a large shard of bark alongside a scoop of vanilla bean or pumpkin spice ice cream. The contrast of the cold, creamy ice cream with the crunchy, room-temperature bark is divine.
Additional Tips for Bark Perfection
- Tip 1: Quality Over Quantity with Chocolate. The final taste of your bark is 90% dependent on the chocolate you use. While it can be tempting to grab the cheapest bag of chocolate chips, investing in good quality baking chocolate (like Callebaut, Ghirardelli, or Scharffen Berger) will yield a far superior flavor and texture. It melts more smoothly and has a satisfying snap that defines excellent bark.
- Tip 2: Control the Chill. Don’t leave the bark in the refrigerator for too long (e.g., overnight). Over-chilling can make the chocolate brittle and prone to blooming (getting a chalky, white film). Just chill it until it’s firm, then break it and store it at cool room temperature. This will preserve its perfect texture and glossy sheen.
- Tip 3: The Salty-Sweet Secret. The magic of a truly addictive treat often lies in the balance of salty and sweet. Don’t skip the pretzels! For an even bigger flavor punch, consider adding a sprinkle of flaky sea salt (like Maldon) over the top of the chocolate right before you chill it. It enhances the chocolate’s flavor and cuts through the sweetness beautifully.
- Tip 4: Work in a Cool, Dry Place. Chocolate is sensitive to its environment. Avoid making bark on a very hot or humid day if possible. Humidity is the enemy of melted chocolate and can cause it to seize. Ensure your bowls and utensils are bone dry before you begin, as even a tiny drop of water can ruin your melted chocolate.
- Tip 5: Get Creative with Colors and Flavors. Don’t feel confined to this recipe. Use it as a launchpad! Try adding a few drops of peppermint extract to the dark chocolate for a minty-ghoul bark. Use butterscotch chips for a different flavor profile. For a “monster mash” theme, use purple and lime green candy melts. The possibilities are endless, so raid your baking aisle and pantry for inspiration.
Frequently Asked Questions (FAQ)
Q1: Can I use regular chocolate chips instead of baking chocolate bars?
A: Yes, you can, but with a caveat. Chocolate chips are formulated with emulsifiers and stabilizers (like soy lecithin) to help them hold their shape during baking. This means they don’t melt into as fluid and smooth of a consistency as baking chocolate. If you use chips, your bark might have a slightly softer set. To help them melt more smoothly, you can add 1 teaspoon of coconut oil or vegetable shortening per cup of chocolate chips. For the best possible texture and “snap,” baking bars or chocolate wafers (callets) are always the superior choice.
Q2: My chocolate got thick and grainy when I melted it! What went wrong?
A: This dreaded phenomenon is called “seizing.” It happens for two main reasons: overheating or contact with water. If you melt chocolate too quickly or at too high a temperature, it will burn and become a clumpy mess. Always use low power on your microwave and stir frequently. The second, and more common, culprit is water. Even a minuscule drop of water from a wet spoon or a bit of steam getting into the bowl can cause the chocolate to instantly tighten up and become unusable. Always ensure your bowls and utensils are perfectly dry.
Q3: How far in advance can I make Halloween Bark, and how do I store it?
A: This is a fantastic make-ahead treat! You can make Halloween Bark up to one week in advance. After breaking it into pieces, store it in an airtight container at a cool room temperature (like in a pantry). Do not store it in the refrigerator, as this can cause condensation to form, which can make your toppings soggy and affect the chocolate’s texture. If your house is particularly warm, the fridge is a last resort, but be sure to bring the bark to room temperature before serving.
Q4: What are some other fun topping ideas for Halloween Bark?
A: The sky’s the limit! Here are a few more ideas to get you started:
- Salty: Crushed potato chips, salted peanuts or almonds, popcorn.
- Sweet & Crunchy: Toffee bits, chopped Heath bars, crushed Butterfinger bars, M&Ms (in Halloween colors).
- Chewy: Mini marshmallows, chopped caramel squares, dried cranberries or cherries for a bloody look.
- Themed: Ghost-shaped Peeps, bone-shaped candies, or even a sprinkle of edible glitter for a “potion” effect.
Q5: How can I make this recipe gluten-free?
A: It’s very easy to make this recipe gluten-free! The base chocolate and most candies are naturally gluten-free, but you must check the labels to be sure. The main swaps you’ll need to make are:
- Pretzels: Use your favorite brand of gluten-free pretzels.
- Cookies: If using crushed cookies, swap Oreos for a gluten-free chocolate sandwich cookie.
- Check All Candies: Double-check the packaging on all your candies (like peanut butter cups and sprinkles) to ensure they are certified gluten-free and not produced in a facility with cross-contamination risks if you are serving someone with Celiac disease.

Halloween Bark Recipe
Ingredients
The Chocolate Foundation
The base of your bark is the most crucial element. The quality and type of chocolate you choose will define the entire flavor profile. We use a combination of white and semi-sweet chocolate to create a visually stunning marbled effect and a balanced taste that isn’t overly sweet.
- Semi-Sweet or Dark Chocolate: 16 ounces (about 450g). Using high-quality baking chocolate bars (like Ghirardelli or Baker’s) or chocolate wafers (callets) is highly recommended. These are designed for melting and will give you a smooth, glossy finish and a satisfying “snap” when broken. Chocolate chips contain stabilizers to hold their shape, so they may not melt as fluidly. If using chips, you can add a teaspoon of coconut oil or vegetable shortening to help them smooth out.
- White Chocolate: 12 ounces (about 340g). Again, opt for high-quality white chocolate bars or wafers specifically for baking. True white chocolate contains cocoa butter, which gives it a creamy texture and rich flavor. Avoid “white baking chips” or “vanilla-flavored melts” that don’t contain cocoa butter, as their texture and taste can be waxy.
- Orange and Green Candy Melts: 1/4 cup of each color. These are essential for creating those vibrant, festive Halloween swirls. Candy melts are designed to melt easily and set up hard without tempering, making them perfect for decorative drizzles. You can find these in the baking aisle of most craft or grocery stores.
- Black Food Coloring (Oil-Based): A few drops (optional). If you want to create a dramatic, dark gray or near-black swirl for a more gothic look, a touch of oil-based food coloring is key. Water-based coloring will cause your chocolate to seize and become grainy, so ensure it is specifically designed for use with candy or chocolate.
The Spooky Toppings & Textural Add-ins
This is where the real fun begins! The variety of toppings is what makes Halloween Bark so unique and exciting to eat. We’re aiming for a mix of salty, sweet, crunchy, and chewy.
- Candy Eyeballs: 1/4 cup (or more!). These are non-negotiable for a truly spooky bark. They instantly give your treat personality and a fun, creepy vibe. Use a mix of sizes if you can find them.
- Halloween Sprinkles: 1/4 cup. Look for a festive mix that includes black, orange, purple, and green jimmies, nonpareils, or even tiny bat and ghost-shaped quinns. These add color and a delicate crunch.
- Mini Pretzel Twists: 1 cup, roughly broken. The salty crunch of pretzels is the perfect counterbalance to the sweet chocolate. Breaking them into smaller pieces ensures you get a bit of pretzel in every bite.
- Candy Corn & Mellowcreme Pumpkins: 1/2 cup. It wouldn’t be Halloween without this iconic, waxy candy. Its unique texture and classic colors are a must-have for visual appeal.
- Gummy Worms or Spiders: 1/2 cup. The chewy, fruity nature of gummy candies provides a wonderful textural contrast to the hard chocolate. Gummy worms can be artfully draped across the bark, while gummy spiders add an extra creepy-crawly element.
- Mini Peanut Butter Cups: 1/2 cup, chopped. The combination of chocolate and peanut butter is a classic for a reason. Chopping them up reveals the creamy center and distributes that beloved flavor throughout the bark.
- Crushed Oreo Cookies: 1/2 cup. The dark chocolate cookie and sweet creme filling add a fantastic crunch and a “dirt” or “graveyard” aesthetic to the bark.
Instructions
Step 1: Prepare Your Cauldron (and Workstation)
Before you begin melting anything, get all your components ready. Chocolate waits for no one once it’s melted!
- Line Your Pan: Take a large, rimmed baking sheet (approximately 13×18 inches) and line it with parchment paper or a silicone baking mat. This is crucial for easy removal and cleanup. Ensure the parchment paper goes up the sides slightly to contain the chocolate.
- Prep Your Toppings: Open all your candy packages. Roughly chop the mini peanut butter cups and break the pretzels into bite-sized pieces. Place all your toppings in small, separate bowls. This “mise en place” approach will allow you to work quickly and decorate the bark before the chocolate begins to set.
Step 2: The Art of Melting Chocolate
The key to great bark is perfectly melted, smooth chocolate. We will use the microwave method for speed and simplicity, but you can also use a double boiler.
- Melt the Semi-Sweet Chocolate: Place your 16 ounces of chopped semi-sweet or dark chocolate in a microwave-safe bowl. Microwave on 50% power for 1-minute intervals. Stir thoroughly after each interval, even if it doesn’t look fully melted. The residual heat will continue to melt the chocolate. Continue this process until the chocolate is about 90% melted, then simply stir until the remaining lumps dissolve completely. This prevents the chocolate from overheating and scorching.
- Melt the White Chocolate: In a separate microwave-safe bowl, repeat the process with your 12 ounces of white chocolate. White chocolate is more delicate and prone to burning, so it’s even more important to use 50% power and stir frequently. Stop when it’s almost, but not completely, melted, and stir until smooth.
Step 3: Creating the Spooky Canvas
Now it’s time to assemble the base of your bark.
- Pour the Base Layer: Pour the melted semi-sweet chocolate onto your prepared baking sheet. Use an offset spatula or the back of a spoon to spread it into a thin, even layer across the entire surface. It doesn’t need to be perfectly smooth or reach every single corner.
- Add the White Chocolate: Immediately dollop the melted white chocolate over the top of the dark chocolate layer. Drop spoonfuls randomly all over the surface.
- Create the Marbled Effect: Take a toothpick, a skewer, or the tip of a knife and gently drag it through the two chocolates. Create swirls, zig-zags, and spiderweb-like patterns. Be careful not to over-mix, or the colors will become muddled. You want distinct streaks of dark and light chocolate.
Step 4: The Decoration Frenzy
This is the most fun part! You need to work fairly quickly before the chocolate starts to set.
- Drizzle the Colors: If using, melt your orange and green candy melts in separate small bowls according to package directions. Drizzle these colors over the marbled chocolate base for an extra pop of Halloween spirit.
- Scatter the Toppings: Now, let your creativity shine! Begin sprinkling the toppings all over the surface of the wet chocolate. Start with the larger items like broken pretzels and chopped peanut butter cups. Follow with the candy corn and gummy worms.
- Add the Final Touches: Finish by generously scattering the Halloween sprinkles and, most importantly, placing the candy eyeballs. Press them gently into the chocolate to ensure they stick. Don’t be shy—the more eyeballs, the spookier!
Step 5: Chill and Set
Patience is a virtue, even on Halloween.
- Refrigerate: Carefully transfer the baking sheet to the refrigerator. Let the bark chill for at least 1-2 hours, or until it is completely firm to the touch. Avoid the freezer, as it can cause the chocolate to become brittle and “sweat” (develop condensation) when it comes back to room temperature.
- Break into Pieces: Once the bark is fully hardened, lift it from the baking sheet using the parchment paper. Place it on a cutting board. You can either use a large knife to cut it into rustic shards or simply use your hands to break it apart into pieces of various sizes.
Nutrition
- Serving Size: One Normal Portion
- Calories: 250-300


