


The first time I made these Greek Pita Pockets, it was a revelation. I’d always loved Greek food – the vibrant flavors, the fresh ingredients, the way it just feels healthy and satisfying. But assembling them at home, with my own choice of fillings and that incredible homemade (or even good quality store-bought) tzatziki, took it to a whole new level. My family, who can sometimes be picky, were instant converts. The kids loved the “build-your-own” aspect, carefully stuffing their pitas with their favorite bits, while my partner and I savored the explosion of Mediterranean tastes. The aroma of the seasoned chicken grilling, mixed with the cool cucumber and tangy yogurt of the tzatziki, filled the kitchen and promised a meal that was both exciting and comforting. It’s become a regular in our meal rotation, perfect for a quick weeknight dinner but special enough for a weekend lunch with friends. They’re surprisingly easy, incredibly versatile, and always, always a crowd-pleaser. Trust me, once you try these, you’ll be looking for excuses to make them again and again.
The Ultimate Guide to Crafting Irresistible Greek Pita Pockets
Greek Pita Pockets are more than just a sandwich; they’re a vibrant tapestry of Mediterranean flavors and textures, all cozily nestled within a warm, soft pita. Imagine succulent, seasoned protein, crisp, fresh vegetables, and a creamy, tangy tzatziki sauce working in perfect harmony. This recipe will guide you through creating an authentic and mouth-watering Greek street food experience right in your own kitchen. Whether you’re a seasoned cook or new to Greek cuisine, these pita pockets are a culinary adventure you won’t want to miss. They are perfect for a healthy lunch, a quick and satisfying dinner, or even as a fun, interactive meal for gatherings.
Ingredients for Authentic Greek Pita Pockets
This recipe aims for a balance of classic Greek flavors. Feel free to adjust quantities based on your preference. We’ll focus on a delicious chicken filling, but offer vegetarian alternatives later.
For the Chicken Marinade & Filling (Serves 4):
- Chicken: 1.5 lbs (approx. 680g) boneless, skinless chicken thighs or breasts, cut into 1-inch pieces
- Olive Oil: 3 tablespoons, extra virgin
- Lemon Juice: 2 tablespoons, freshly squeezed
- Red Wine Vinegar: 1 tablespoon
- Garlic: 3 cloves, minced
- Dried Oregano: 2 teaspoons
- Dried Thyme: 1 teaspoon
- Smoked Paprika: 1 teaspoon (optional, for color and smoky flavor)
- Salt: 1 teaspoon, or to taste
- Black Pepper: 1/2 teaspoon, freshly ground, or to taste
For the Tzatziki Sauce:
- Greek Yogurt: 1.5 cups, full-fat plain (essential for creaminess)
- Cucumber: 1 medium, grated and squeezed of excess water (about 1 cup grated)
- Garlic: 1-2 cloves, minced or grated very finely
- Lemon Juice: 1 tablespoon, freshly squeezed
- Fresh Dill: 1 tablespoon, finely chopped (or 1 teaspoon dried)
- Fresh Mint: 1 tablespoon, finely chopped (optional, but adds lovely freshness)
- Olive Oil: 1 tablespoon, extra virgin
- Salt: 1/2 teaspoon, or to taste
For Assembling the Pita Pockets:
- Pita Bread: 4-6 large, good quality pita breads (whole wheat or white)
- Tomatoes: 2 medium ripe tomatoes, diced
- Cucumber: 1/2 medium English cucumber, diced (or 2-3 Persian cucumbers)
- Red Onion: 1/4 medium red onion, thinly sliced (soak in cold water for 10 mins to mellow flavor, then drain)
- Kalamata Olives: 1/2 cup, pitted and halved (optional)
- Feta Cheese: 1/2 cup, crumbled (optional, but highly recommended)
- Fresh Parsley: 1/4 cup, chopped (for garnish)
- Lettuce: Romaine or iceberg, shredded (optional, for extra crunch)
- Lemon Wedges: For serving
Step-by-Step Instructions: Crafting Your Perfect Pita Pocket
Follow these instructions carefully for the best results. The key is well-marinated chicken and fresh components.
1. Prepare the Chicken Marinade:
* In a medium bowl, combine the olive oil, lemon juice, red wine vinegar, minced garlic, dried oregano, dried thyme, smoked paprika (if using), salt, and black pepper. Whisk well to combine.
* Add the cut chicken pieces to the marinade, ensuring each piece is well-coated.
* Cover the bowl and refrigerate for at least 30 minutes, or ideally for 2-4 hours to allow the flavors to penetrate deeply. Overnight marination is even better for maximum flavor.
2. Make the Tzatziki Sauce:
* Grate the cucumber using the large holes of a box grater. Place the grated cucumber in a clean kitchen towel or several layers of paper towels and squeeze out as much excess liquid as possible. This step is crucial for a thick, creamy tzatziki and prevents it from becoming watery.
* In a separate bowl, combine the squeezed cucumber, Greek yogurt, minced garlic, lemon juice, chopped dill, chopped mint (if using), olive oil, and salt.
* Stir everything together until well combined. Taste and adjust seasoning if necessary (more salt, lemon, or garlic).
* Cover and refrigerate for at least 30 minutes to allow the flavors to meld. Tzatziki tastes even better when made a few hours ahead.
3. Prepare the Vegetables:
* While the chicken is marinating and the tzatziki is chilling, prepare your fresh toppings.
* Dice the tomatoes and cucumber. Thinly slice the red onion (and soak if desired). Halve the Kalamata olives. Crumble the feta cheese. Chop the parsley. Shred the lettuce if using.
* Keep these ingredients separate or combine them into a simple Greek-style salad if preferred.
4. Cook the Chicken:
* You have several options for cooking the chicken:
* Stovetop (Skillet/Grill Pan): Heat 1 tablespoon of olive oil in a large skillet or grill pan over medium-high heat. Once hot, add the marinated chicken pieces in a single layer (you may need to do this in batches to avoid overcrowding the pan, which can steam the chicken instead of browning it). Cook for 4-6 minutes per side, or until golden brown, slightly charred, and cooked through (internal temperature should reach 165°F or 74°C).
* Outdoor Grill: Preheat your grill to medium-high. If using wooden skewers, soak them in water for 30 minutes prior to grilling. Thread the chicken onto skewers. Grill for 8-12 minutes, turning occasionally, until cooked through and nicely charred.
* Oven Broiler: Preheat your broiler. Arrange chicken pieces in a single layer on a baking sheet lined with foil. Broil for 5-7 minutes per side, watching carefully to prevent burning, until cooked through and slightly charred.
5. Warm the Pita Bread:
* Warming the pitas makes them softer and more pliable, preventing them from tearing when stuffed.
* Oven: Wrap pitas in foil and warm in a 350°F (175°C) oven for 5-7 minutes.
* Microwave: Wrap pitas in a slightly damp paper towel and microwave for 20-30 seconds until warm and soft.
* Grill/Pan: Briefly warm pitas on the grill or a dry skillet for about 30 seconds per side.
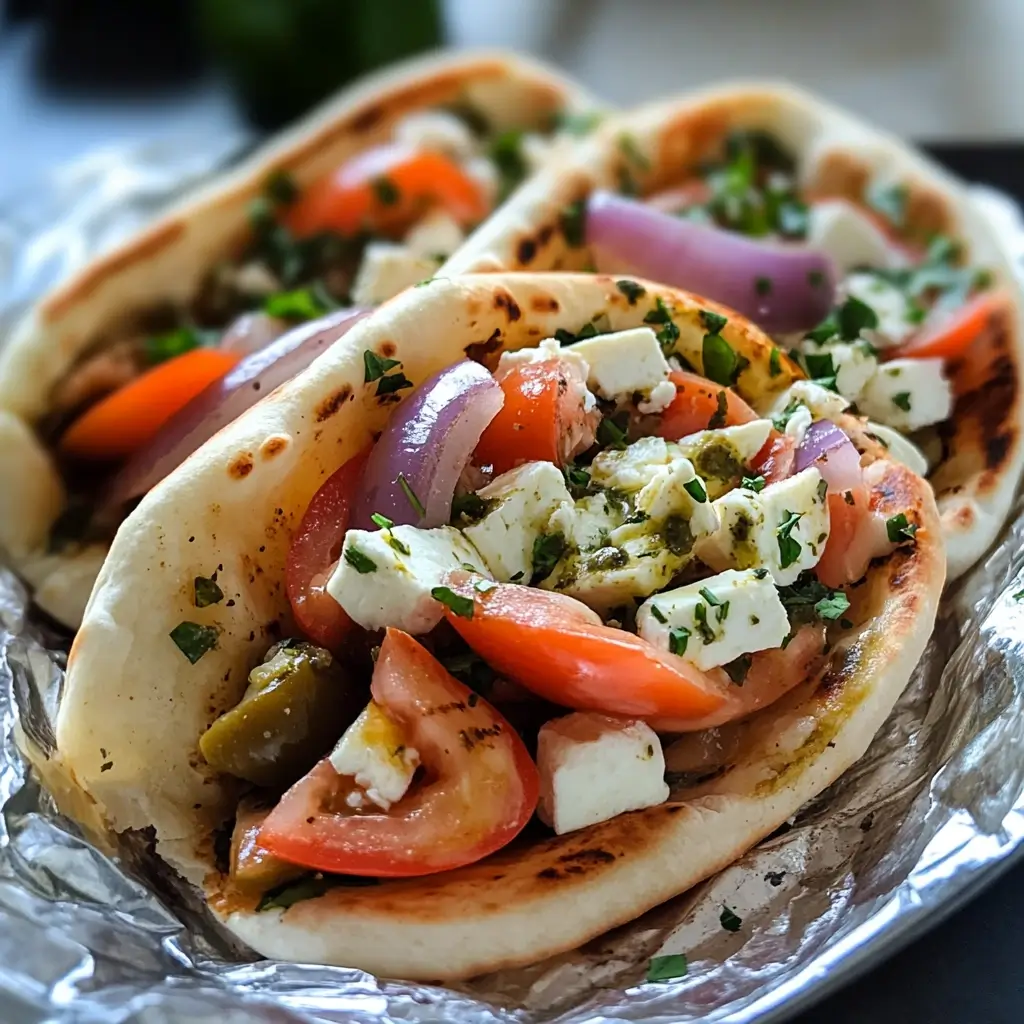
6. Assemble Your Greek Pita Pockets:
* Carefully cut off the top third of each warm pita bread to create a pocket, or simply fold it in half like a taco.
* Spread a generous spoonful of tzatziki sauce inside each pita pocket.
* Layer in the cooked chicken.
* Add your desired fresh vegetables: diced tomatoes, cucumbers, sliced red onions, and shredded lettuce.
* Sprinkle with Kalamata olives and crumbled feta cheese.
* Garnish with fresh chopped parsley.
* Serve immediately with extra tzatziki sauce on the side and lemon wedges for squeezing.
Nutrition Facts (Per Serving)
- Servings: 4
- Calories per serving (approximate): 550-650 calories.
Disclaimer: Nutritional information is an estimate and can vary significantly based on specific ingredient choices, brands, portion sizes, and preparation methods. This estimate includes one large pita, a generous portion of chicken, vegetables, and tzatziki.
- Protein: ~45-55g
- Fat: ~25-35g (largely from olive oil, chicken thighs if used, and feta)
- Carbohydrates: ~35-45g (mainly from pita bread)
This meal provides a good source of lean protein, healthy fats (especially if using olive oil and chicken thighs), and complex carbohydrates. The fresh vegetables contribute essential vitamins, minerals, and fiber.
Preparation & Cooking Time
- Preparation Time (Marinating & Chopping): 20-30 minutes (excluding marinating time for chicken and chilling time for tzatziki)
- Chicken Marinating Time: Minimum 30 minutes, ideally 2-4 hours, or up to overnight.
- Tzatziki Chilling Time: Minimum 30 minutes, ideally 1-2 hours.
- Cooking Time (Chicken): 10-15 minutes
- Assembly Time: 5-10 minutes
- Total Active Time: Approximately 45-55 minutes
- Total Time (including minimum marinating/chilling): Approximately 1 hour 45 minutes to 2 hours.
How to Serve Your Greek Pita Pockets Like a Pro
Presentation can elevate this simple dish into a truly appealing meal. Here are some ways to serve your delicious Greek Pita Pockets:
- Classic Pocket Style:
- Stuff the pitas as instructed and serve them standing up in a basket lined with parchment paper or on individual plates.
- Provide extra tzatziki sauce in a small bowl on the side for dipping or adding more.
- Offer lemon wedges for a fresh citrusy spritz.
- Deconstructed “Build-Your-Own” Bar:
- This is fantastic for families or gatherings.
- Arrange all the components in separate bowls: cooked chicken, warm pitas, tzatziki sauce, diced tomatoes, cucumbers, red onions, olives, feta, lettuce, and parsley.
- Let everyone assemble their own pita pocket according to their preference. This caters to different tastes and dietary restrictions.
- With Side Dishes:
- Greek Salad: A classic pairing. A simple mix of tomatoes, cucumbers, red onion, Kalamata olives, and feta, dressed with olive oil and oregano.
- Lemon Roasted Potatoes: Crispy, lemony potatoes complement the flavors perfectly.
- Orzo Pasta Salad: A light pasta salad with Mediterranean vegetables and a lemon-herb vinaigrette.
- Seasoned Fries: Especially if you’re aiming for a “street food” vibe, some crispy fries (perhaps seasoned with oregano and sea salt) are a great addition.
- For a Lighter Meal:
- Serve the chicken and salad components over a bed of lettuce, with a piece of pita on the side for dipping into the tzatziki, rather than a fully stuffed pocket.
- Garnish Generously:
- Don’t underestimate the power of a final sprinkle of fresh parsley or dill.
- A drizzle of good quality extra virgin olive oil over the assembled pita can also add a touch of richness and shine.
Elevate Your Pita Pockets: Additional Tips for Success
- Don’t Skip Marinating the Chicken: This is where the depth of flavor comes from. Even 30 minutes makes a difference, but a few hours or overnight is transformative. The acidity from the lemon juice and vinegar also helps to tenderize the chicken.
- Squeeze That Cucumber for Tzatziki: Excess water will make your tzatziki runny and dilute its flavor. Take the time to thoroughly squeeze out the liquid from the grated cucumber. Using a cheesecloth or a sturdy paper towel works best.
- Warm Your Pitas Properly: Cold or stiff pitas are prone to cracking and tearing when you try to stuff them. Gently warming them makes them soft, pliable, and much more enjoyable.
- Fresh Herbs Make a Difference: While dried oregano and thyme are great for the marinade, using fresh dill and mint in the tzatziki, and fresh parsley for garnish, will elevate the freshness and aroma of your pita pockets significantly.
- Don’t Overcrowd the Pan: When cooking the chicken, ensure it’s in a single layer with some space between pieces. Overcrowding lowers the pan’s temperature, leading to steamed rather than seared chicken. Cook in batches if necessary for that beautiful golden-brown crust.
Your Greek Pita Pocket Questions Answered: FAQ
Q1: Can I make Greek Pita Pockets vegetarian or vegan?
A1: Absolutely! For a vegetarian version, substitute the chicken with grilled halloumi cheese, roasted chickpeas (seasoned like the chicken), pan-fried falafel, or a mix of roasted Mediterranean vegetables like bell peppers, zucchini, and eggplant. For a vegan version, use the roasted chickpeas or falafel, ensure your pita bread is vegan, and use a vegan Greek yogurt alternative for the tzatziki (or a tahini-based sauce). Omit feta or use a vegan feta alternative.
Q2: What’s the best way to store and reheat leftovers?
A2: It’s best to store the components separately if possible. Cooked chicken can be stored in an airtight container in the refrigerator for up to 3-4 days. Tzatziki sauce will keep for 3-5 days. Chopped vegetables are best fresh but can be stored for a day or two. To reheat, warm the chicken in a skillet or microwave. Warm the pitas separately. Assemble just before eating. Avoid reheating assembled pita pockets as the fresh components will wilt and the pita can become soggy.
Q3: Can I make the components ahead of time?
A3: Yes, many components can be made ahead, making assembly quick.
* Chicken: Marinate overnight. Cooked chicken can be made a day ahead and reheated.
* Tzatziki Sauce: Tastes even better made a day or two in advance as flavors meld.
* Vegetables: Chop most vegetables (tomatoes, cucumbers, onions) a few hours ahead and store in the fridge. Dress or combine just before serving.
Q4: My pitas always tear. Any tips?
A4: The key is to use good quality, fresh pita bread and to warm it properly (as mentioned in Tip #3 and the instructions). Don’t overstuff them either. If you’re still having trouble, try using pocketless pitas (Greek flatbread style) and serving it more like a gyro wrap or taco, folding it over the fillings.
Q5: What if I don’t have all the specific herbs or spices?
A5: Greek cooking is flexible! If you don’t have dried thyme, you can increase the oregano slightly. If you don’t have fresh dill for tzatziki, dried dill works (use about 1/3 the amount). Smoked paprika is optional. The core flavors often revolve around garlic, lemon, and oregano, so try to have those on hand. Don’t be afraid to experiment a little based on what’s in your pantry.
Greek Pita Pockets Recipe
Ingredients
For the Chicken Marinade & Filling (Serves 4):
- Chicken: 1.5 lbs (approx. 680g) boneless, skinless chicken thighs or breasts, cut into 1-inch pieces
- Olive Oil: 3 tablespoons, extra virgin
- Lemon Juice: 2 tablespoons, freshly squeezed
- Red Wine Vinegar: 1 tablespoon
- Garlic: 3 cloves, minced
- Dried Oregano: 2 teaspoons
- Dried Thyme: 1 teaspoon
- Smoked Paprika: 1 teaspoon (optional, for color and smoky flavor)
- Salt: 1 teaspoon, or to taste
- Black Pepper: 1/2 teaspoon, freshly ground, or to taste
For the Tzatziki Sauce:
- Greek Yogurt: 1.5 cups, full-fat plain (essential for creaminess)
- Cucumber: 1 medium, grated and squeezed of excess water (about 1 cup grated)
- Garlic: 1-2 cloves, minced or grated very finely
- Lemon Juice: 1 tablespoon, freshly squeezed
- Fresh Dill: 1 tablespoon, finely chopped (or 1 teaspoon dried)
- Fresh Mint: 1 tablespoon, finely chopped (optional, but adds lovely freshness)
- Olive Oil: 1 tablespoon, extra virgin
- Salt: 1/2 teaspoon, or to taste
For Assembling the Pita Pockets:
- Pita Bread: 4-6 large, good quality pita breads (whole wheat or white)
- Tomatoes: 2 medium ripe tomatoes, diced
- Cucumber: 1/2 medium English cucumber, diced (or 2-3 Persian cucumbers)
- Red Onion: 1/4 medium red onion, thinly sliced (soak in cold water for 10 mins to mellow flavor, then drain)
- Kalamata Olives: 1/2 cup, pitted and halved (optional)
- Feta Cheese: 1/2 cup, crumbled (optional, but highly recommended)
- Fresh Parsley: 1/4 cup, chopped (for garnish)
- Lettuce: Romaine or iceberg, shredded (optional, for extra crunch)
- Lemon Wedges: For serving
Instructions
1. Prepare the Chicken Marinade:
* In a medium bowl, combine the olive oil, lemon juice, red wine vinegar, minced garlic, dried oregano, dried thyme, smoked paprika (if using), salt, and black pepper. Whisk well to combine.
* Add the cut chicken pieces to the marinade, ensuring each piece is well-coated.
* Cover the bowl and refrigerate for at least 30 minutes, or ideally for 2-4 hours to allow the flavors to penetrate deeply. Overnight marination is even better for maximum flavor.
2. Make the Tzatziki Sauce:
* Grate the cucumber using the large holes of a box grater. Place the grated cucumber in a clean kitchen towel or several layers of paper towels and squeeze out as much excess liquid as possible. This step is crucial for a thick, creamy tzatziki and prevents it from becoming watery.
* In a separate bowl, combine the squeezed cucumber, Greek yogurt, minced garlic, lemon juice, chopped dill, chopped mint (if using), olive oil, and salt.
* Stir everything together until well combined. Taste and adjust seasoning if necessary (more salt, lemon, or garlic).
* Cover and refrigerate for at least 30 minutes to allow the flavors to meld. Tzatziki tastes even better when made a few hours ahead.
3. Prepare the Vegetables:
* While the chicken is marinating and the tzatziki is chilling, prepare your fresh toppings.
* Dice the tomatoes and cucumber. Thinly slice the red onion (and soak if desired). Halve the Kalamata olives. Crumble the feta cheese. Chop the parsley. Shred the lettuce if using.
* Keep these ingredients separate or combine them into a simple Greek-style salad if preferred.
4. Cook the Chicken:
* You have several options for cooking the chicken:
* Stovetop (Skillet/Grill Pan): Heat 1 tablespoon of olive oil in a large skillet or grill pan over medium-high heat. Once hot, add the marinated chicken pieces in a single layer (you may need to do this in batches to avoid overcrowding the pan, which can steam the chicken instead of browning it). Cook for 4-6 minutes per side, or until golden brown, slightly charred, and cooked through (internal temperature should reach 165°F or 74°C).
* Outdoor Grill: Preheat your grill to medium-high. If using wooden skewers, soak them in water for 30 minutes prior to grilling. Thread the chicken onto skewers. Grill for 8-12 minutes, turning occasionally, until cooked through and nicely charred.
* Oven Broiler: Preheat your broiler. Arrange chicken pieces in a single layer on a baking sheet lined with foil. Broil for 5-7 minutes per side, watching carefully to prevent burning, until cooked through and slightly charred.
5. Warm the Pita Bread:
* Warming the pitas makes them softer and more pliable, preventing them from tearing when stuffed.
* Oven: Wrap pitas in foil and warm in a 350°F (175°C) oven for 5-7 minutes.
* Microwave: Wrap pitas in a slightly damp paper towel and microwave for 20-30 seconds until warm and soft.
* Grill/Pan: Briefly warm pitas on the grill or a dry skillet for about 30 seconds per side.
6. Assemble Your Greek Pita Pockets:
* Carefully cut off the top third of each warm pita bread to create a pocket, or simply fold it in half like a taco.
* Spread a generous spoonful of tzatziki sauce inside each pita pocket.
* Layer in the cooked chicken.
* Add your desired fresh vegetables: diced tomatoes, cucumbers, sliced red onions, and shredded lettuce.
* Sprinkle with Kalamata olives and crumbled feta cheese.
* Garnish with fresh chopped parsley.
* Serve immediately with extra tzatziki sauce on the side and lemon wedges for squeezing.
Nutrition
- Serving Size: One Normal Portion
- Calories: 550-650
- Fat: 25-35g
- Carbohydrates: 35-45g
- Protein: 45-55g


