
Let me tell you, finding a truly delicious gluten-free soft pretzel recipe has been a quest in my household. We’ve tried countless recipes, each promising that authentic pretzel taste and texture, only to be met with disappointment – dry, crumbly, or just plain… off. Then, I stumbled upon this recipe, and everything changed. From the moment the aroma of baking pretzels filled my kitchen, I knew this was different. And the taste? Oh my goodness, these are it. Soft, chewy on the outside, pillowy on the inside, with that unmistakable pretzel flavor thanks to the baking soda bath – these gluten-free soft pretzels are a game-changer. My family devoured them straight out of the oven, dipping them in everything from classic mustard to a creamy homemade cheese sauce. Even my pretzel-purist husband, who was skeptical about gluten-free versions, declared them “amazing” and “just like the real thing!” If you’ve been searching for a gluten-free pretzel recipe that doesn’t compromise on taste or texture, look no further. This is the one. Get ready to experience pretzel perfection, completely gluten-free!
Ingredients: The Gluten-Free Magic Behind Soft Pretzels
Crafting truly delicious gluten-free soft pretzels hinges on a carefully balanced blend of flours and starches. Unlike traditional wheat-based pretzels, which rely on gluten for their characteristic chew and structure, gluten-free baking requires a thoughtful approach to mimic these properties. Let’s delve into each ingredient and understand its crucial role in creating these exceptional gluten-free pretzels:
- 1½ cups Whole Milk: Milk serves multiple vital functions in this recipe. Firstly, it provides the necessary liquid to hydrate the dry ingredients and form the dough. Secondly, the warmth of the milk is essential for activating the active dry yeast, kickstarting the fermentation process that contributes to the pretzel’s rise and airy texture. Using whole milk, as opposed to lower-fat versions, adds richness and a subtle sweetness to the dough, enhancing the overall flavor profile of the pretzels. The fats in whole milk also contribute to a softer, more tender crumb in the final baked pretzel. If you are dairy-free, you can substitute with a plant-based milk like almond or oat milk, ensuring it’s warmed to the correct temperature.
- 3 tablespoons Light or Dark Brown Sugar: Sugar isn’t just for sweetness in this recipe; it plays a critical role in yeast activation. Yeast feeds on sugar, and the small amount included here provides the initial nourishment needed for the yeast to become active and produce carbon dioxide, which is responsible for the dough’s rise. Brown sugar, whether light or dark, adds a subtle molasses-like depth of flavor that complements the pretzel’s savory profile. The slight acidity of brown sugar can also contribute to a more tender crumb. While granulated sugar could be used, brown sugar is preferred for its nuanced flavor and moisture-retention properties.
- ¼ ounce (2¼ teaspoons) Active Dry Yeast (Not Instant): Yeast is the heart of any good pretzel recipe. Active dry yeast, unlike instant yeast, requires “proofing” or activation in warm liquid to ensure it’s alive and ready to leaven the dough. This step is crucial for achieving the desired rise and airy texture in gluten-free pretzels, which can sometimes be denser than their wheat-based counterparts. Using the correct amount and ensuring the yeast is properly activated is paramount for success. Make sure to check the expiration date of your yeast to guarantee its potency. If your yeast doesn’t foam after 10 minutes in the warm milk and sugar mixture, it may be inactive, and you’ll need to start again with fresh yeast.
- 1¼ cup (140 g) Bob’s Red Mill Tapioca Flour: Tapioca flour, also known as tapioca starch, is a cornerstone of gluten-free baking, and it’s particularly essential for achieving the chewy texture characteristic of soft pretzels. Tapioca flour is incredibly effective at absorbing moisture and creating a gel-like consistency when heated. This “gelatinization” process is what gives gluten-free baked goods their desirable chewiness and prevents them from becoming dry and crumbly. In these pretzels, tapioca flour works in tandem with the other flours to create a dough that’s both pliable and structurally sound, capable of holding its pretzel shape during baking. It also contributes to a slightly glossy crust.
- 1½ cups + 2 tablespoons (180 g) Bob’s Red Mill Gluten-Free Oat Flour: Oat flour brings a delicate sweetness and a slightly nutty flavor to these gluten-free pretzels. More importantly, oat flour contributes to the soft and tender crumb of the pretzels. It’s less starchy than some other gluten-free flours, which helps prevent the pretzels from becoming overly dense. Make sure to use certified gluten-free oat flour to ensure it’s safe for those with celiac disease or gluten sensitivities. Oat flour also adds a touch of moisture, contributing to the overall soft texture of the pretzels.
- ½ cup + 2 tablespoons (80 g) Bob’s Red Mill Sorghum Flour: Sorghum flour is another key player in this gluten-free flour blend. It’s known for its mild flavor and its ability to mimic the texture of wheat flour in baked goods. Sorghum flour provides structure to the dough, helping the pretzels hold their shape and preventing them from spreading too much during baking. It contributes to a slightly springy texture and prevents the pretzels from becoming overly dense or gummy. Sorghum flour is also a good source of fiber and nutrients, adding a subtle nutritional boost to these pretzels.
- ½ cup + 1 tablespoon (74 g) Bob’s Red Mill Cornstarch: Cornstarch acts as a tenderizing agent in this recipe. It inhibits gluten development (which is irrelevant here since we are gluten-free, but still relevant in terms of dough structure) and contributes to a softer, more delicate texture. Cornstarch also helps to create a slightly crisp exterior while maintaining a soft interior. It works synergistically with the tapioca flour to achieve the perfect balance of chewiness and tenderness in these gluten-free pretzels. It also helps to prevent the pretzels from becoming too dense or heavy.
- 2 teaspoons Kosher Salt: Salt is not just about flavor; it’s essential for controlling yeast activity and strengthening the gluten-free dough structure. Salt enhances the flavors of all the other ingredients, bringing out the subtle sweetness of the oat flour and the savory notes of the pretzel itself. Kosher salt is preferred by many bakers for its clean taste and consistent grain size, but sea salt or table salt can also be used. Ensure you measure accurately, as too much or too little salt can affect the dough’s texture and rise.
- 1 teaspoon Xanthan Gum: Xanthan gum is the unsung hero of gluten-free baking. It’s a polysaccharide that acts as a binder and stabilizer, mimicking the role of gluten in traditional doughs. Xanthan gum provides structure, elasticity, and chewiness to gluten-free baked goods. In these pretzels, it’s crucial for preventing the dough from becoming crumbly and for giving it the necessary strength to be rolled and shaped into pretzels. Without xanthan gum, gluten-free pretzel dough would be significantly more fragile and difficult to work with, and the final pretzels would likely be less cohesive and chewy.
- ¼ cup Unsalted Butter, Melted: Melted butter adds richness, flavor, and tenderness to the pretzel dough. The fat in butter contributes to a softer crumb and helps to create a more moist and flavorful pretzel. Melted butter is incorporated into the dough to ensure it’s evenly distributed and contributes to a smooth and pliable dough. Unsalted butter is preferred to control the overall salt content of the recipe. If using salted butter, you may need to slightly reduce the amount of kosher salt added separately.
- 8 cups Water: Water is the base for the crucial baking soda bath. This alkaline bath is what gives pretzels their characteristic dark brown color, chewy crust, and distinctive pretzel flavor. The baking soda bath reacts with the surface of the pretzels during boiling, creating a chemical reaction that alters the texture and flavor. Using the correct amount of water and baking soda is essential for achieving the authentic pretzel taste and appearance.
- ⅓ cup Baking Soda: Baking soda, when dissolved in boiling water, creates an alkaline solution that is key to the pretzel’s signature characteristics. This baking soda bath gelatinizes the starches on the surface of the pretzel dough, creating a smooth, chewy crust. It also raises the pH of the dough’s surface, which promotes the Maillard reaction during baking, leading to the beautiful dark brown color and the characteristic pretzel flavor. It’s important to measure the baking soda accurately and to boil the pretzels for the specified time (25-30 seconds) to avoid a metallic taste, which can occur if they are boiled for too long.
- 1 Egg Whisked with 1 tablespoon Water, for Brushing: The egg wash creates a beautiful golden-brown, shiny crust on the pretzels as they bake. The egg proteins coagulate in the oven’s heat, resulting in a glossy finish. Whisking the egg with a tablespoon of water thins it slightly, making it easier to brush evenly over the pretzels and preventing it from being too thick or clumpy. The egg wash also helps the pretzel salt adhere to the surface of the pretzels.
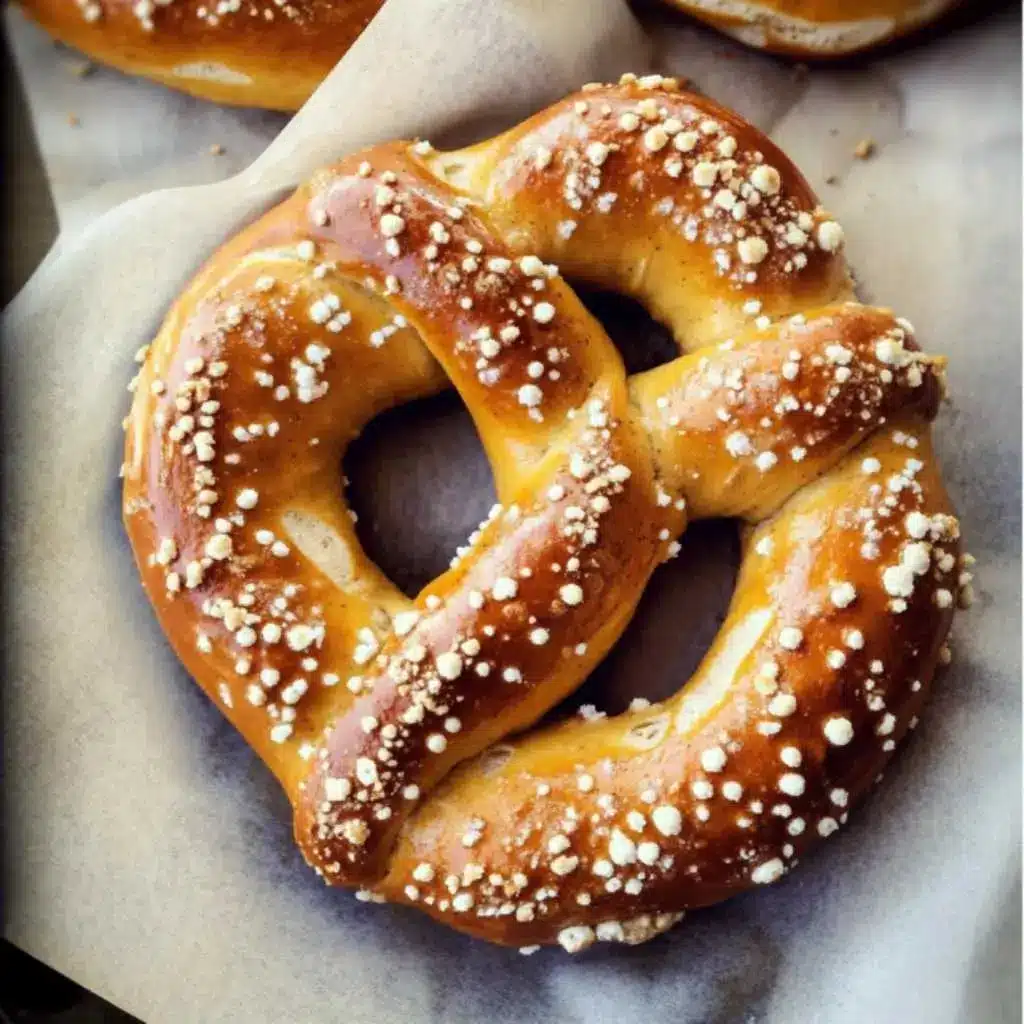
- Pretzel Salt or Coarse Sea Salt: Pretzel salt, with its large, coarse crystals, is the traditional choice for topping soft pretzels. Its size and shape provide a satisfying salty crunch and visual appeal. Coarse sea salt is a good substitute if pretzel salt is not readily available. Avoid using fine table salt, as it can dissolve into the pretzel and result in an overly salty taste without the desired texture. Sprinkling the salt generously over the egg-washed pretzels before baking ensures it adheres properly and provides that essential salty pretzel flavor.
Instructions: Mastering the Art of Gluten-Free Soft Pretzels
Creating these delectable gluten-free soft pretzels is a rewarding process, broken down into manageable steps. Follow these detailed instructions for pretzel perfection:
- Activate the Yeast: Begin by gently warming the milk. Using a small saucepan, heat the whole milk over low heat to a temperature between 105-115°F (40-46°C). This temperature range is crucial for optimal yeast activation. Too cold, and the yeast won’t activate; too hot, and you risk killing the yeast. If you accidentally overheat the milk, simply let it cool down until it reaches the correct temperature range. A kitchen thermometer is highly recommended for accuracy. Once warmed, transfer the milk to a wide medium-sized bowl. Stir in the brown sugar until dissolved. Slowly and evenly sprinkle the active dry yeast over the warm milk and sugar mixture. Use a spoon to gently mix it in completely, ensuring all the yeast granules are moistened. Now, the crucial step: let the yeast mixture sit undisturbed for 10 minutes. During this time, the yeast will activate and begin to foam. This “proofing” process is a visual confirmation that your yeast is alive and active. If, after 10 minutes, your yeast mixture hasn’t become foamy, it’s likely that your yeast is inactive or expired. In this case, it’s best to discard the mixture and start again with a fresh packet of active dry yeast to avoid a failed dough.
- Combine Dry Ingredients: While the yeast is activating, prepare the dry ingredients. In the bowl of a stand mixer fitted with the dough hook attachment (or in a large mixing bowl if mixing by hand), combine all the dry flours and starches: Bob’s Red Mill gluten-free oat flour, Bob’s Red Mill tapioca flour, Bob’s Red Mill sorghum flour, Bob’s Red Mill cornstarch, kosher salt, and xanthan gum. Whisk these ingredients together thoroughly to ensure they are evenly distributed. This step is important for consistent texture and flavor throughout the pretzels. The xanthan gum, in particular, needs to be well dispersed to work effectively as a binder.
- Form the Dough: Once the yeast mixture is foamy and ready, add it to the bowl of dry ingredients, along with the melted unsalted butter. If using a stand mixer, start mixing on low speed to combine the wet and dry ingredients. If mixing by hand, use a wooden spoon or spatula to stir until a thick, shaggy dough begins to form. As the dough comes together, it will be quite sticky, which is perfectly normal for gluten-free dough. Increase the mixer speed to medium and knead the dough for 4-5 minutes. If kneading by hand, turn the dough out onto a lightly floured (with tapioca flour) surface and knead for 5-7 minutes. The dough should become noticeably smoother and start to pull away from the sides of the bowl (or your hands if kneading by hand). It will still be slightly sticky, but much more cohesive. Don’t be tempted to add more flour, as this can result in dry pretzels. The stickiness is part of the recipe’s success.
- First Rise (Proofing): Lightly oil a large bowl with vegetable oil or cooking spray. With tapioca-flour dusted hands (this is crucial to prevent sticking), gently transfer the sticky dough to the oiled bowl. Shape the dough into a ball. Don’t worry about perfection; just ensure it’s roughly rounded. Cover the bowl tightly with plastic wrap to create a humid environment, which is beneficial for rising. Place the bowl in a warm, draft-free place to rise for 50-60 minutes, or until the dough has roughly doubled in size. A warm oven (turned off or on a “proof” setting if your oven has one) is an ideal place for rising. If your kitchen is cold, you can also place the bowl in a slightly warmed oven (turned off) with the oven light on. The rise time can vary depending on the warmth of your environment.
- Prepare for Baking: While the dough is rising, preheat your oven to 450°F (232°C). Line two large baking sheets with parchment paper or silicone baking mats (Silpat mats). Liberally brush the parchment paper or Silpat mats with vegetable oil. This prevents the pretzels from sticking and ensures they release easily after baking. If you used the proof setting in your oven for rising, make absolutely sure to remove the dough from the oven before preheating! In a large, wide pot, bring 8 cups of water to a rolling boil. Once boiling, carefully add the baking soda. Be cautious, as the mixture will foam up vigorously when baking soda is added. Reduce the heat slightly to maintain a gentle boil. Prepare the egg wash by whisking together the egg and 1 tablespoon of water in a small bowl. Set aside a pastry brush for applying the egg wash.
- Shape the Pretzels: Lightly wipe your rolling surface (cutting board, marble slab, or countertop) with a thin layer of vegetable oil. This will prevent the sticky dough from adhering too much. Turn the risen dough out onto the oiled surface. Gently pat the dough into a disc shape and use a bench scraper or knife to cut it into 8 equal wedges. Work with one dough wedge at a time, keeping the others covered to prevent them from drying out. Roll each dough wedge into a long rope, approximately 16-18 inches in length. Gluten-free dough is more delicate than traditional wheat dough, so be gentle but firm. To shape the pretzel, form the rope into a U-shape. Cross the ends of the U over each other twice, creating a twist. Then, fold the twisted ends down and press them firmly into the bottom curve of the U, forming the classic pretzel knot. Refer to visual guides online or in the original recipe if you are unsure about the shaping technique. Carefully transfer each shaped pretzel to the prepared baking sheet. Repeat the shaping process with all 8 dough wedges.
- Baking Soda Bath: This is the critical step that gives pretzels their characteristic flavor and texture. Working one pretzel at a time, gently use a spatula to lower a pretzel into the boiling baking soda bath. Boil for 25-30 seconds per pretzel. Do not boil for longer than 30 seconds, as this can impart a metallic taste to the pretzels. After 25-30 seconds, carefully lift the pretzel out of the water using the spatula. Give it a gentle tap over the pot to remove excess water. Immediately return the boiled pretzel to the prepared baking sheet. Repeat this baking soda bath process for all 8 pretzels.
- Egg Wash and Salt: Once all the pretzels have been boiled and placed on the baking sheets, use the pastry brush to generously brush each pretzel with the prepared egg wash. Ensure you cover the tops, sides, and all the grooves and crevices of the pretzels for an even golden-brown color. Immediately after brushing with egg wash, sprinkle each pretzel generously with pretzel salt or coarse sea salt. The egg wash helps the salt adhere to the surface.
- Bake to Golden Perfection: Transfer the baking sheets to the preheated oven. Bake for 15-17 minutes, or until the pretzels are a deep, dark golden brown color. Keep a close eye on them towards the end of the baking time to prevent burning. The baking time may vary slightly depending on your oven.
- Cool and Serve: Once baked, remove the baking sheets from the oven and let the pretzels cool on the baking sheets for about 5 minutes. This allows them to firm up slightly and makes them easier to handle. After 5 minutes of cooling, transfer the gluten-free soft pretzels to a wire rack to cool further, or serve them warm immediately with your favorite dipping sauces or toppings. Enjoy!
Nutrition Facts (Approximate)
Servings: 8 pretzels
Serving Size: 1 pretzel
(Please note: Nutritional information is an estimate and can vary based on specific ingredient brands and measurement accuracy.)
- Calories per serving: Approximately 250-300 calories
(Detailed nutritional breakdown would require specific analysis tools, but this provides a general estimate. Factors like topping choices will also affect the final calorie count.)
Preparation Time Breakdown
- Prep Time: 35 minutes
- Includes: Warming milk, activating yeast, mixing dry ingredients, making dough, kneading.
- Rise Time: 1 hour
- Includes: First proofing of the dough.
- Cook Time: 15 minutes
- Includes: Baking time in the oven.
- Total Time: 1 hour and 50 minutes
How to Serve Your Gluten-Free Soft Pretzels: Endless Delicious Options
These gluten-free soft pretzels are incredibly versatile and can be enjoyed in countless ways. Here are some delicious serving suggestions to elevate your pretzel experience:
- Classic Mustard Dip: For a traditional pretzel experience, serve with a variety of mustards.
- Dijon Mustard: Adds a tangy and sophisticated kick.
- Yellow Mustard: The classic, mild, and kid-friendly choice.
- Honey Mustard: A sweet and savory combination that complements the pretzel’s saltiness.
- Spicy Brown Mustard: Offers a bolder, more robust flavor.
- Homemade Cheese Dip: Elevate your pretzels with a rich and creamy cheese dip.
- Classic Cheddar Cheese Dip: A simple and satisfying dip made with melted cheddar cheese, milk, and seasonings.
- Spicy Queso Dip: Add some heat with a queso dip made with pepper jack cheese, jalapeños, and tomatoes.
- Beer Cheese Dip: Infuse your cheese dip with beer for a more complex and savory flavor.
- Sweet and Savory Butter: For a simple yet indulgent treat, brush with melted butter.
- Plain Melted Butter: Enhances the pretzel’s flavor and adds richness.
- Garlic Butter: Infuse melted butter with garlic for a savory and aromatic topping.
- Cinnamon Sugar Butter: Create a sweet and delightful twist by mixing cinnamon and sugar into melted butter.
- Soup and Salad Companion: Soft pretzels are a fantastic accompaniment to soups and salads.
- Serve alongside hearty soups: Like chili, tomato soup, or French onion soup for dipping.
- Pair with a fresh salad: For a balanced and satisfying lunch or light dinner.
- Pizza Pretzel Bites: Get creative and transform your pretzels into pizza bites!
- Top with pizza sauce, mozzarella cheese, and pepperoni before baking for a fun and cheesy appetizer.
- Dessert Pretzels: Turn pretzels into a sweet treat.
- Dip in melted chocolate: For a decadent dessert pretzel.
- Drizzle with caramel sauce: For a sweet and sticky indulgence.
- Sprinkle with cinnamon sugar instead of pretzel salt for a sweet pretzel variation.
- Charcuterie Board Addition: Add soft pretzels to your charcuterie board for a unique and crowd-pleasing element.
- Pair with cheeses, cured meats, olives, and dips for a sophisticated appetizer spread.
Additional Tips for Gluten-Free Pretzel Perfection
Mastering gluten-free baking takes practice, but these tips will help you achieve soft pretzel success every time:
- Accurate Measurement is Key: Gluten-free baking is more sensitive to ingredient ratios than traditional baking. Use a kitchen scale to measure your flours and starches in grams for the most accurate results. This will ensure consistent texture and prevent dry or crumbly pretzels.
- Don’t Overmix the Dough: Overmixing gluten-free dough can lead to tough pretzels. Mix just until the dough comes together and is smooth. Kneading for the recommended time (4-5 minutes in a mixer, 5-7 minutes by hand) is sufficient to develop the dough’s structure.
- Warm and Humid Rise Environment: Gluten-free dough often benefits from a slightly warmer and more humid environment for rising than traditional wheat dough. If your kitchen is cool, consider using the “proof” setting on your oven, placing the dough in a slightly warmed (turned off) oven with the oven light on, or even placing the bowl in a warm water bath to encourage a good rise.
- Gentle Shaping is Crucial: Gluten-free dough can be more delicate than wheat dough. Be gentle when rolling and shaping the pretzels to prevent tearing. Dust your hands and rolling surface lightly with tapioca flour to prevent sticking and make handling easier.
- Don’t Skip the Baking Soda Bath: The baking soda bath is non-negotiable for authentic pretzel flavor and texture. It’s what gives pretzels their characteristic chewiness, dark brown color, and distinctive taste. Ensure you use the correct amount of baking soda and boil the pretzels for the recommended time (25-30 seconds) for the best results and to avoid any metallic taste.
Frequently Asked Questions (FAQ) About Gluten-Free Soft Pretzels
Q1: Can I use instant yeast instead of active dry yeast?
A: While you can technically substitute instant yeast, active dry yeast is recommended for this recipe. Active dry yeast requires proofing, which gives you a visual confirmation that it’s active and ready to leaven the dough. This is especially helpful in gluten-free baking, where successful rising can be more critical. If you do use instant yeast, you can skip the initial proofing step and add it directly to the dry ingredients. However, it’s still advisable to warm the milk as it aids in overall dough development.
Q2: Can I make these pretzels ahead of time?
A: For the best texture and flavor, it’s recommended to enjoy these gluten-free soft pretzels fresh out of the oven. However, you can prepare the dough ahead of time. After the first rise, you can punch down the dough, wrap it tightly in plastic wrap, and store it in the refrigerator for up to 24 hours. When ready to bake, let the dough come to room temperature for about 30 minutes before proceeding with shaping and baking. Baked pretzels are best eaten the same day but can be stored in an airtight container at room temperature for up to a day. Reheat briefly in a warm oven or microwave to refresh them slightly, but note that they will be best fresh.
Q3: Can I freeze gluten-free soft pretzels?
A: Yes, you can freeze baked gluten-free soft pretzels. Allow the pretzels to cool completely after baking. Then, wrap each pretzel individually in plastic wrap and place them in a freezer-safe bag or container. Freeze for up to 2-3 months. To reheat, you can thaw them at room temperature or directly reheat them from frozen in a warm oven (350°F/175°C) for about 5-10 minutes, or until heated through. Freezing may slightly alter the texture, but they will still be enjoyable.
Q4: My pretzel dough is very sticky. Is this normal?
A: Yes, gluten-free pretzel dough, especially this recipe, is naturally quite sticky. This is due to the nature of gluten-free flours and starches. Don’t be tempted to add extra flour, as this can result in dry and dense pretzels. Using tapioca flour to dust your hands and rolling surface is helpful for managing the stickiness. Oiling your hands and rolling surface lightly can also aid in handling the dough. Embrace the stickiness – it’s part of what makes these pretzels so soft and chewy!
Q5: Can I use a different gluten-free flour blend?
A: While this recipe is specifically formulated with Bob’s Red Mill gluten-free flours for optimal results, you might be able to experiment with other gluten-free flour blends. However, be aware that different blends have varying starch and protein ratios, which can significantly impact the texture and outcome of the pretzels. If you choose to use a different blend, it’s recommended to use a blend that is designed for all-purpose baking and contains a mix of starches and flours, including a binder like xanthan gum. You may need to adjust the liquid content slightly depending on the blend’s absorbency. For best results, and especially when making this recipe for the first time, stick to the recommended flours.

Gluten-Free Soft Pretzels Recipe
Ingredients
-
- 1½ cups Whole Milk: Milk serves multiple vital functions in this recipe. Firstly, it provides the necessary liquid to hydrate the dry ingredients and form the dough. Secondly, the warmth of the milk is essential for activating the active dry yeast, kickstarting the fermentation process that contributes to the pretzel’s rise and airy texture. Using whole milk, as opposed to lower-fat versions, adds richness and a subtle sweetness to the dough, enhancing the overall flavor profile of the pretzels. The fats in whole milk also contribute to a softer, more tender crumb in the final baked pretzel. If you are dairy-free, you can substitute with a plant-based milk like almond or oat milk, ensuring it’s warmed to the correct temperature.
-
- 3 tablespoons Light or Dark Brown Sugar: Sugar isn’t just for sweetness in this recipe; it plays a critical role in yeast activation. Yeast feeds on sugar, and the small amount included here provides the initial nourishment needed for the yeast to become active and produce carbon dioxide, which is responsible for the dough’s rise. Brown sugar, whether light or dark, adds a subtle molasses-like depth of flavor that complements the pretzel’s savory profile. The slight acidity of brown sugar can also contribute to a more tender crumb. While granulated sugar could be used, brown sugar is preferred for its nuanced flavor and moisture-retention properties.
-
- ¼ ounce (2¼ teaspoons) Active Dry Yeast (Not Instant): Yeast is the heart of any good pretzel recipe. Active dry yeast, unlike instant yeast, requires “proofing” or activation in warm liquid to ensure it’s alive and ready to leaven the dough. This step is crucial for achieving the desired rise and airy texture in gluten-free pretzels, which can sometimes be denser than their wheat-based counterparts. Using the correct amount and ensuring the yeast is properly activated is paramount for success. Make sure to check the expiration date of your yeast to guarantee its potency. If your yeast doesn’t foam after 10 minutes in the warm milk and sugar mixture, it may be inactive, and you’ll need to start again with fresh yeast.
-
- 1¼ cup (140 g) Bob’s Red Mill Tapioca Flour: Tapioca flour, also known as tapioca starch, is a cornerstone of gluten-free baking, and it’s particularly essential for achieving the chewy texture characteristic of soft pretzels. Tapioca flour is incredibly effective at absorbing moisture and creating a gel-like consistency when heated. This “gelatinization” process is what gives gluten-free baked goods their desirable chewiness and prevents them from becoming dry and crumbly. In these pretzels, tapioca flour works in tandem with the other flours to create a dough that’s both pliable and structurally sound, capable of holding its pretzel shape during baking. It also contributes to a slightly glossy crust.
-
- 1½ cups + 2 tablespoons (180 g) Bob’s Red Mill Gluten-Free Oat Flour: Oat flour brings a delicate sweetness and a slightly nutty flavor to these gluten-free pretzels. More importantly, oat flour contributes to the soft and tender crumb of the pretzels. It’s less starchy than some other gluten-free flours, which helps prevent the pretzels from becoming overly dense. Make sure to use certified gluten-free oat flour to ensure it’s safe for those with celiac disease or gluten sensitivities. Oat flour also adds a touch of moisture, contributing to the overall soft texture of the pretzels.
-
- ½ cup + 2 tablespoons (80 g) Bob’s Red Mill Sorghum Flour: Sorghum flour is another key player in this gluten-free flour blend. It’s known for its mild flavor and its ability to mimic the texture of wheat flour in baked goods. Sorghum flour provides structure to the dough, helping the pretzels hold their shape and preventing them from spreading too much during baking. It contributes to a slightly springy texture and prevents the pretzels from becoming overly dense or gummy. Sorghum flour is also a good source of fiber and nutrients, adding a subtle nutritional boost to these pretzels.
-
- ½ cup + 1 tablespoon (74 g) Bob’s Red Mill Cornstarch: Cornstarch acts as a tenderizing agent in this recipe. It inhibits gluten development (which is irrelevant here since we are gluten-free, but still relevant in terms of dough structure) and contributes to a softer, more delicate texture. Cornstarch also helps to create a slightly crisp exterior while maintaining a soft interior. It works synergistically with the tapioca flour to achieve the perfect balance of chewiness and tenderness in these gluten-free pretzels. It also helps to prevent the pretzels from becoming too dense or heavy.
-
- 2 teaspoons Kosher Salt: Salt is not just about flavor; it’s essential for controlling yeast activity and strengthening the gluten-free dough structure. Salt enhances the flavors of all the other ingredients, bringing out the subtle sweetness of the oat flour and the savory notes of the pretzel itself. Kosher salt is preferred by many bakers for its clean taste and consistent grain size, but sea salt or table salt can also be used. Ensure you measure accurately, as too much or too little salt can affect the dough’s texture and rise.
-
- 1 teaspoon Xanthan Gum: Xanthan gum is the unsung hero of gluten-free baking. It’s a polysaccharide that acts as a binder and stabilizer, mimicking the role of gluten in traditional doughs. Xanthan gum provides structure, elasticity, and chewiness to gluten-free baked goods. In these pretzels, it’s crucial for preventing the dough from becoming crumbly and for giving it the necessary strength to be rolled and shaped into pretzels. Without xanthan gum, gluten-free pretzel dough would be significantly more fragile and difficult to work with, and the final pretzels would likely be less cohesive and chewy.
-
- ¼ cup Unsalted Butter, Melted: Melted butter adds richness, flavor, and tenderness to the pretzel dough. The fat in butter contributes to a softer crumb and helps to create a more moist and flavorful pretzel. Melted butter is incorporated into the dough to ensure it’s evenly distributed and contributes to a smooth and pliable dough. Unsalted butter is preferred to control the overall salt content of the recipe. If using salted butter, you may need to slightly reduce the amount of kosher salt added separately.
-
- 8 cups Water: Water is the base for the crucial baking soda bath. This alkaline bath is what gives pretzels their characteristic dark brown color, chewy crust, and distinctive pretzel flavor. The baking soda bath reacts with the surface of the pretzels during boiling, creating a chemical reaction that alters the texture and flavor. Using the correct amount of water and baking soda is essential for achieving the authentic pretzel taste and appearance.
-
- ⅓ cup Baking Soda: Baking soda, when dissolved in boiling water, creates an alkaline solution that is key to the pretzel’s signature characteristics. This baking soda bath gelatinizes the starches on the surface of the pretzel dough, creating a smooth, chewy crust. It also raises the pH of the dough’s surface, which promotes the Maillard reaction during baking, leading to the beautiful dark brown color and the characteristic pretzel flavor. It’s important to measure the baking soda accurately and to boil the pretzels for the specified time (25–30 seconds) to avoid a metallic taste, which can occur if they are boiled for too long.
-
- 1 Egg Whisked with 1 tablespoon Water, for Brushing: The egg wash creates a beautiful golden-brown, shiny crust on the pretzels as they bake. The egg proteins coagulate in the oven’s heat, resulting in a glossy finish. Whisking the egg with a tablespoon of water thins it slightly, making it easier to brush evenly over the pretzels and preventing it from being too thick or clumpy. The egg wash also helps the pretzel salt adhere to the surface of the pretzels.
-
- Pretzel Salt or Coarse Sea Salt: Pretzel salt, with its large, coarse crystals, is the traditional choice for topping soft pretzels. Its size and shape provide a satisfying salty crunch and visual appeal. Coarse sea salt is a good substitute if pretzel salt is not readily available. Avoid using fine table salt, as it can dissolve into the pretzel and result in an overly salty taste without the desired texture. Sprinkling the salt generously over the egg-washed pretzels before baking ensures it adheres properly and provides that essential salty pretzel flavor.
Instructions
-
- Activate the Yeast: Begin by gently warming the milk. Using a small saucepan, heat the whole milk over low heat to a temperature between 105-115°F (40-46°C). This temperature range is crucial for optimal yeast activation. Too cold, and the yeast won’t activate; too hot, and you risk killing the yeast. If you accidentally overheat the milk, simply let it cool down until it reaches the correct temperature range. A kitchen thermometer is highly recommended for accuracy. Once warmed, transfer the milk to a wide medium-sized bowl. Stir in the brown sugar until dissolved. Slowly and evenly sprinkle the active dry yeast over the warm milk and sugar mixture. Use a spoon to gently mix it in completely, ensuring all the yeast granules are moistened. Now, the crucial step: let the yeast mixture sit undisturbed for 10 minutes. During this time, the yeast will activate and begin to foam. This “proofing” process is a visual confirmation that your yeast is alive and active. If, after 10 minutes, your yeast mixture hasn’t become foamy, it’s likely that your yeast is inactive or expired. In this case, it’s best to discard the mixture and start again with a fresh packet of active dry yeast to avoid a failed dough.
-
- Combine Dry Ingredients: While the yeast is activating, prepare the dry ingredients. In the bowl of a stand mixer fitted with the dough hook attachment (or in a large mixing bowl if mixing by hand), combine all the dry flours and starches: Bob’s Red Mill gluten-free oat flour, Bob’s Red Mill tapioca flour, Bob’s Red Mill sorghum flour, Bob’s Red Mill cornstarch, kosher salt, and xanthan gum. Whisk these ingredients together thoroughly to ensure they are evenly distributed. This step is important for consistent texture and flavor throughout the pretzels. The xanthan gum, in particular, needs to be well dispersed to work effectively as a binder.
-
- Form the Dough: Once the yeast mixture is foamy and ready, add it to the bowl of dry ingredients, along with the melted unsalted butter. If using a stand mixer, start mixing on low speed to combine the wet and dry ingredients. If mixing by hand, use a wooden spoon or spatula to stir until a thick, shaggy dough begins to form. As the dough comes together, it will be quite sticky, which is perfectly normal for gluten-free dough. Increase the mixer speed to medium and knead the dough for 4-5 minutes. If kneading by hand, turn the dough out onto a lightly floured (with tapioca flour) surface and knead for 5-7 minutes. The dough should become noticeably smoother and start to pull away from the sides of the bowl (or your hands if kneading by hand). It will still be slightly sticky, but much more cohesive. Don’t be tempted to add more flour, as this can result in dry pretzels. The stickiness is part of the recipe’s success.
-
- First Rise (Proofing): Lightly oil a large bowl with vegetable oil or cooking spray. With tapioca-flour dusted hands (this is crucial to prevent sticking), gently transfer the sticky dough to the oiled bowl. Shape the dough into a ball. Don’t worry about perfection; just ensure it’s roughly rounded. Cover the bowl tightly with plastic wrap to create a humid environment, which is beneficial for rising. Place the bowl in a warm, draft-free place to rise for 50-60 minutes, or until the dough has roughly doubled in size. A warm oven (turned off or on a “proof” setting if your oven has one) is an ideal place for rising. If your kitchen is cold, you can also place the bowl in a slightly warmed oven (turned off) with the oven light on. The rise time can vary depending on the warmth of your environment.
-
- Prepare for Baking: While the dough is rising, preheat your oven to 450°F (232°C). Line two large baking sheets with parchment paper or silicone baking mats (Silpat mats). Liberally brush the parchment paper or Silpat mats with vegetable oil. This prevents the pretzels from sticking and ensures they release easily after baking. If you used the proof setting in your oven for rising, make absolutely sure to remove the dough from the oven before preheating! In a large, wide pot, bring 8 cups of water to a rolling boil. Once boiling, carefully add the baking soda. Be cautious, as the mixture will foam up vigorously when baking soda is added. Reduce the heat slightly to maintain a gentle boil. Prepare the egg wash by whisking together the egg and 1 tablespoon of water in a small bowl. Set aside a pastry brush for applying the egg wash.
-
- Shape the Pretzels: Lightly wipe your rolling surface (cutting board, marble slab, or countertop) with a thin layer of vegetable oil. This will prevent the sticky dough from adhering too much. Turn the risen dough out onto the oiled surface. Gently pat the dough into a disc shape and use a bench scraper or knife to cut it into 8 equal wedges. Work with one dough wedge at a time, keeping the others covered to prevent them from drying out. Roll each dough wedge into a long rope, approximately 16-18 inches in length. Gluten-free dough is more delicate than traditional wheat dough, so be gentle but firm. To shape the pretzel, form the rope into a U-shape. Cross the ends of the U over each other twice, creating a twist. Then, fold the twisted ends down and press them firmly into the bottom curve of the U, forming the classic pretzel knot. Refer to visual guides online or in the original recipe if you are unsure about the shaping technique. Carefully transfer each shaped pretzel to the prepared baking sheet. Repeat the shaping process with all 8 dough wedges.
-
- Baking Soda Bath: This is the critical step that gives pretzels their characteristic flavor and texture. Working one pretzel at a time, gently use a spatula to lower a pretzel into the boiling baking soda bath. Boil for 25-30 seconds per pretzel. Do not boil for longer than 30 seconds, as this can impart a metallic taste to the pretzels. After 25-30 seconds, carefully lift the pretzel out of the water using the spatula. Give it a gentle tap over the pot to remove excess water. Immediately return the boiled pretzel to the prepared baking sheet. Repeat this baking soda bath process for all 8 pretzels.
-
- Egg Wash and Salt: Once all the pretzels have been boiled and placed on the baking sheets, use the pastry brush to generously brush each pretzel with the prepared egg wash. Ensure you cover the tops, sides, and all the grooves and crevices of the pretzels for an even golden-brown color. Immediately after brushing with egg wash, sprinkle each pretzel generously with pretzel salt or coarse sea salt. The egg wash helps the salt adhere to the surface.
-
- Bake to Golden Perfection: Transfer the baking sheets to the preheated oven. Bake for 15-17 minutes, or until the pretzels are a deep, dark golden brown color. Keep a close eye on them towards the end of the baking time to prevent burning. The baking time may vary slightly depending on your oven.
-
- Cool and Serve: Once baked, remove the baking sheets from the oven and let the pretzels cool on the baking sheets for about 5 minutes. This allows them to firm up slightly and makes them easier to handle. After 5 minutes of cooling, transfer the gluten-free soft pretzels to a wire rack to cool further, or serve them warm immediately with your favorite dipping sauces or toppings. Enjoy!
Nutrition
- Serving Size: one normal portion
- Calories: 250-300