


As the leaves turn golden and the crisp breeze of autumn fills the air, there’s nothing quite as comforting as indulging in a warm, spiced treat. Enter the Gluten-Free Pumpkin Roll—a dessert that perfectly encapsulates the flavors of fall in every bite. This delightful roll combines the rich taste of pumpkin with the aromatic spices of cinnamon and nutmeg, all wrapped around a creamy filling. Not only is it a feast for the taste buds, but it’s also a gluten-free treat that everyone can enjoy. Whether you’re hosting a cozy gathering or simply looking to satisfy your sweet cravings, this pumpkin roll is sure to impress.
Ingredients
Creating this delectable gluten-free pumpkin roll is a breeze with the following ingredients:
- Pumpkin Roll:
- 1 cup pumpkin puree
- 3 large eggs
- 1 cup sugar (or coconut sugar)
- 1 tsp vanilla extract
- 1 tsp baking soda
- 1 tsp cinnamon
- 1/2 tsp nutmeg
- 1/4 tsp salt
- 1 cup gluten-free all-purpose flour
- Cream Cheese Filling:
- 8 oz cream cheese (or dairy-free alternative)
- 1/4 cup powdered sugar (or coconut powdered sugar)
- 1 tsp vanilla extract
Instructions
Crafting this pumpkin roll involves a few simple steps. Follow this guide to ensure a perfect result every time:
- Preheat and Prepare:
- Preheat your oven to 350°F (175°C).
- Line a baking sheet with parchment paper to prevent sticking.
- Mix the Wet Ingredients:
- In a large mixing bowl, combine the pumpkin puree, eggs, sugar, and vanilla extract.
- Whisk until the mixture is smooth and well blended.
- Combine the Dry Ingredients:
- In another bowl, whisk together the baking soda, cinnamon, nutmeg, salt, and gluten-free flour.
- Blend Wet and Dry Ingredients:
- Gradually add the dry ingredients to the wet mixture.
- Stir until the batter is smooth and there are no lumps.
- Spread and Bake:
- Pour the batter onto the prepared baking sheet.
- Spread it evenly to ensure even baking.
- Bake for 15-20 minutes or until the cake is cooked through and springs back when touched.
- Roll and Cool:
- While the cake is still warm, carefully roll it in the parchment paper.
- Allow it to cool completely, maintaining its shape.
- Prepare the Filling:
- Beat the cream cheese, powdered sugar, and vanilla extract in a bowl until smooth and creamy.
- Assemble the Roll:
- Once the cake is cooled, gently unroll it.
- Spread the cream cheese filling evenly over the surface.
- Carefully roll the cake back up, using the parchment paper to guide you.
- Chill and Serve:
- Chill the roll in the refrigerator for at least 1 hour.
- Slice and serve this delightful treat to your eagerly awaiting guests.
Nutrition Facts
Understanding the nutritional content of your food is important. Here are the nutrition facts for this gluten-free pumpkin roll, per slice (approx. 12 slices):
- Calories: 150
- Protein: 3g
- Carbs: 22g
- Fat: 6g
- Fiber: 1g
How to Serve
Serving this gluten-free pumpkin roll is as enjoyable as making it, and there are various ways to enhance both its visual appeal and flavor profile. Here are some delightful ideas to elevate your presentation and create an unforgettable experience for your guests:
Dust with Powdered Sugar
A simple yet effective way to add a touch of elegance to your pumpkin roll is by lightly dusting it with powdered sugar just before serving. This not only enhances the visual appeal but also creates a beautiful contrast against the rich, warm tones of the pumpkin roll. For an added twist, consider using a fine mesh sieve or a decorative sifter for an even distribution of sugar. You can also mix in a pinch of cinnamon or nutmeg with the powdered sugar for a subtle spice infusion that complements the flavors of the pumpkin roll.
Pair with Coffee or Tea
The warm spices in the pumpkin roll, such as cinnamon, nutmeg, and ginger, create a perfect harmony with a steaming cup of coffee or tea. A medium roast coffee with its nutty undertones can enhance the flavors of the roll, while a spicy chai tea can elevate the experience with its aromatic spices. Consider serving your pumpkin roll alongside a seasonal flavored latte, such as pumpkin spice or vanilla, for a cozy autumn treat. Additionally, for a caffeine-free option, a spiced herbal tea could provide a soothing complement to the rich flavors of the dessert.
Garnish with Nuts
To add texture and flavor, consider garnishing the pumpkin roll with chopped nuts, such as pecans or walnuts. These nuts can be sprinkled on top of the roll before serving or served on the side for guests to add according to their preferences. Chopping the nuts coarsely will allow for a satisfying crunch that contrasts beautifully with the soft, spongy texture of the pumpkin roll. You could even toast the nuts lightly before garnishing to bring out their natural oils and enhance their flavor. Another idea is to create a nutty topping by mixing the chopped nuts with a bit of melted butter and brown sugar, then broiling for a few minutes to create a caramelized finish.
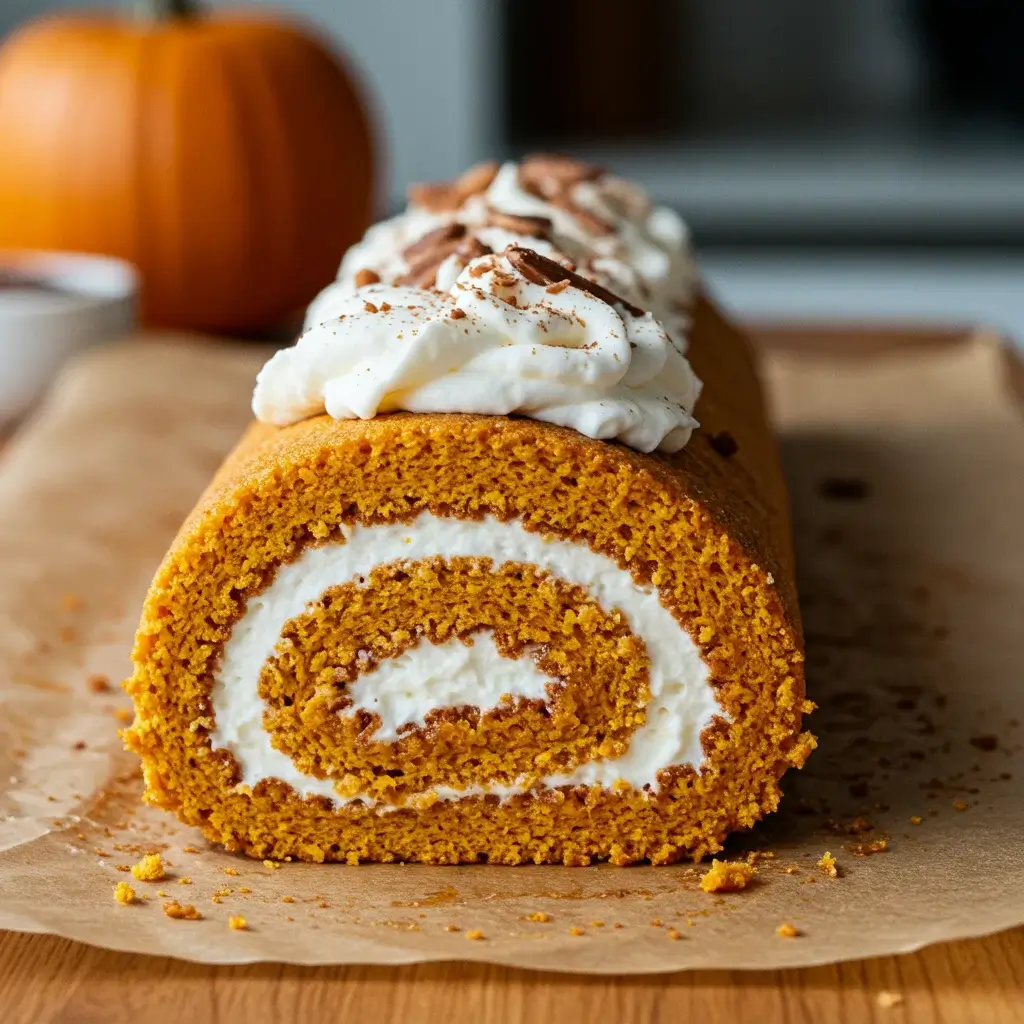
Add a Dollop of Whipped Cream
For those looking to take their pumpkin roll to the next level of indulgence, serving each slice with a dollop of freshly whipped cream is a must. The light and airy texture of whipped cream contrasts wonderfully with the dense, moist roll. You can elevate this classic pairing by infusing the whipped cream with flavors such as vanilla extract, maple syrup, or even a hint of bourbon for a sophisticated touch. Alternatively, for a decadent twist, consider pairing each slice with a scoop of vanilla ice cream or even a pumpkin-flavored ice cream to reinforce the seasonal theme. Adding a drizzle of caramel or chocolate sauce over the whipped cream can also provide an extra layer of richness and visual appeal.
Serve with Seasonal Fruits
Incorporating seasonal fruits into your presentation can add freshness and a pop of color to your pumpkin roll. Slices of pear or apple, lightly sautéed in butter and cinnamon, can add a warm, fruity element that complements the spices in the roll. Additionally, a side of pomegranate seeds or cranberries can introduce a tartness that balances the sweetness of the dessert. For a more elaborate presentation, consider creating a fruit compote or coulis to drizzle on the plate alongside the roll, adding both flavor and aesthetic appeal.
Create a Beautiful Presentation
Finally, the way you present your pumpkin roll can make all the difference. Use a decorative platter or cake stand to elevate the roll, and consider layering it with elements like fresh herbs (such as mint or sage) for a pop of green. Arrange slices of the roll in an overlapping pattern on the platter for a visual feast, and add additional garnishes like edible flowers or citrus slices for a festive touch. A simple yet effective trick is to serve the roll on a wooden cutting board, which adds a rustic charm that complements the autumn theme.
With these thoughtful serving suggestions, not only will you delight your guests with the flavor of your gluten-free pumpkin roll, but you’ll also impress them with a beautiful presentation that enhances the overall experience. Enjoy the process of serving as much as you do the making, and allow your creativity to shine!
Additional Tips
Creating a delightful pumpkin roll is an art that can be perfected with a few extra tips. Here’s a comprehensive guide to ensure your pumpkin roll turns out perfectly every time, enhancing both its flavor and presentation.
Use Fresh Ingredients
The quality of your ingredients can dramatically affect the final taste of your pumpkin roll. Here are some key points to consider:
- Spices: Opt for fresh spices rather than pre-ground versions. Whole spices like cinnamon, nutmeg, and ginger can be freshly grated or ground to release their essential oils, resulting in a more vibrant flavor profile. If possible, buy whole spices in small quantities and grind them just before use for maximum potency.
- Pumpkin Puree: Choose high-quality pumpkin puree, preferably made from sugar pumpkins, which are sweeter and have a richer flavor than regular carving pumpkins. If you’re feeling adventurous, consider making your own puree by roasting fresh pumpkins. Simply cut the pumpkin in half, remove the seeds, roast until soft, and blend until smooth for a fresher taste.
- Dairy Products: Use fresh cream cheese and eggs, as they contribute to the overall texture and taste of the filling. Room temperature eggs will also blend more easily into the batter, ensuring even distribution of ingredients.
Roll While Warm
Rolling the cake while it’s still warm is a crucial step in preventing cracks. Here’s how to do it effectively:
- Timing: Immediately after baking, remove the cake from the oven and let it cool for just a few minutes in the pan. This brief cooling period allows the cake to firm up slightly, making it easier to handle.
- Prepare Your Surface: Before rolling, dust a clean kitchen towel with powdered sugar to prevent sticking. Once the cake is out of the pan, carefully invert it onto the towel. This technique not only helps with rolling but also gives the cake a slight sweetness from the powdered sugar.
- Rolling Technique: Starting from one end, gently lift the towel and begin to roll the cake away from you, using the towel to help shape it. Be gentle to avoid creating cracks, and roll tightly but not too tightly, allowing some space for the filling.
Chill Thoroughly
Chilling your pumpkin roll is essential for achieving the perfect slice. Here’s why it matters and how to do it right:
- Setting the Shape: After rolling the cake in the towel, place it seam-side down on a wire rack or a plate to cool completely. This step helps the roll maintain its shape and prevents it from unrolling during slicing.
- Refrigeration: Once the roll is at room temperature, wrap it tightly in plastic wrap and refrigerate for at least 2 hours, or preferably overnight. This chilling period allows the filling to set and meld with the cake, enhancing the overall flavor and texture.
- Slicing: When it’s time to slice, remove the roll from the refrigerator. Use a sharp, serrated knife to cut into even pieces, wiping the knife with a damp cloth between cuts to maintain clean edges.
Experiment with Fillings
While the traditional cream cheese filling is delightful on its own, branching out to different fillings can elevate your pumpkin roll to new heights. Here are some creative ideas:
- Apple Butter: Spreading a layer of homemade or store-bought apple butter can add a sweet, spiced richness that complements the pumpkin beautifully. The apple flavor pairs well with the warm spices typically used in pumpkin rolls.
- Spiced Pear Jam: For a unique twist, try using spiced pear jam. The subtle sweetness and soft texture of the jam will enhance the roll without overpowering the pumpkin flavor.
- Nut Variations: Consider adding finely chopped nuts, such as pecans or walnuts, to the filling for added texture. Toasting the nuts beforehand can enhance their flavor and provide a delightful crunch to each bite.
- Chocolate or Caramel Swirls: For a decadent variation, you can swirl in chocolate or caramel sauce into the cream cheese filling before rolling. This not only looks stunning but also adds a rich, indulgent flavor to the classic recipe.
By incorporating these additional tips into your pumpkin roll-making process, you’ll not only achieve a visually appealing dessert but also a deliciously memorable one that’s bound to impress at any gathering. Happy baking!
FAQs
Q: Can I use regular flour instead of gluten-free flour?
A: Yes, you can substitute regular all-purpose flour if gluten is not a concern.
Q: How long can I store the pumpkin roll?
A: The pumpkin roll can be stored in the refrigerator for up to 3 days. Ensure it is wrapped tightly to maintain freshness.
Q: Can I freeze the pumpkin roll?
A: Yes, you can freeze the pumpkin roll. Wrap it tightly in plastic wrap and then in aluminum foil. Thaw in the refrigerator before serving.
Q: What can I use as a dairy-free alternative to cream cheese?
A: There are several dairy-free cream cheese options available in stores. You can also use a mixture of coconut cream and a dash of lemon juice for a similar tangy flavor.
Conclusion
Incorporating the rich, warm flavors of pumpkin, cinnamon, and nutmeg, this gluten-free pumpkin roll is a delightful treat perfect for any autumn occasion. With its creamy filling and moist cake, it promises a burst of flavor in every bite. Easy to make and even easier to enjoy, this dessert is a must-try for both gluten-free eaters and those who love traditional baking. So, gather your ingredients, follow the simple steps, and indulge in the comforting taste of fall. Happy baking!
Print
Gluten-Free Pumpkin Roll Recipe
Ingredients
- Pumpkin Roll:
- 1 cup pumpkin puree
- 3 large eggs
- 1 cup sugar (or coconut sugar)
- 1 tsp vanilla extract
- 1 tsp baking soda
- 1 tsp cinnamon
- 1/2 tsp nutmeg
- 1/4 tsp salt
- 1 cup gluten-free all-purpose flour
- Cream Cheese Filling:
- 8 oz cream cheese (or dairy-free alternative)
- 1/4 cup powdered sugar (or coconut powdered sugar)
- 1 tsp vanilla extract
Instructions
- Preheat and Prepare:
- Preheat your oven to 350°F (175°C).
- Line a baking sheet with parchment paper to prevent sticking.
- Mix the Wet Ingredients:
- In a large mixing bowl, combine the pumpkin puree, eggs, sugar, and vanilla extract.
- Whisk until the mixture is smooth and well blended.
- Combine the Dry Ingredients:
- In another bowl, whisk together the baking soda, cinnamon, nutmeg, salt, and gluten-free flour.
- Blend Wet and Dry Ingredients:
- Gradually add the dry ingredients to the wet mixture.
- Stir until the batter is smooth and there are no lumps.
- Spread and Bake:
- Pour the batter onto the prepared baking sheet.
- Spread it evenly to ensure even baking.
- Bake for 15-20 minutes or until the cake is cooked through and springs back when touched.
- Roll and Cool:
- While the cake is still warm, carefully roll it in the parchment paper.
- Allow it to cool completely, maintaining its shape.
- Prepare the Filling:
- Beat the cream cheese, powdered sugar, and vanilla extract in a bowl until smooth and creamy.
- Assemble the Roll:
- Once the cake is cooled, gently unroll it.
- Spread the cream cheese filling evenly over the surface.
- Carefully roll the cake back up, using the parchment paper to guide you.
- Chill and Serve:
- Chill the roll in the refrigerator for at least 1 hour.
- Slice and serve this delightful treat to your eagerly awaiting guests.
Nutrition
- Serving Size: One Normal Portion
- Calories: 150
- Fat: 6g
- Carbohydrates: 22g
- Fiber: 1g
- Protein: 3g


