Introduction
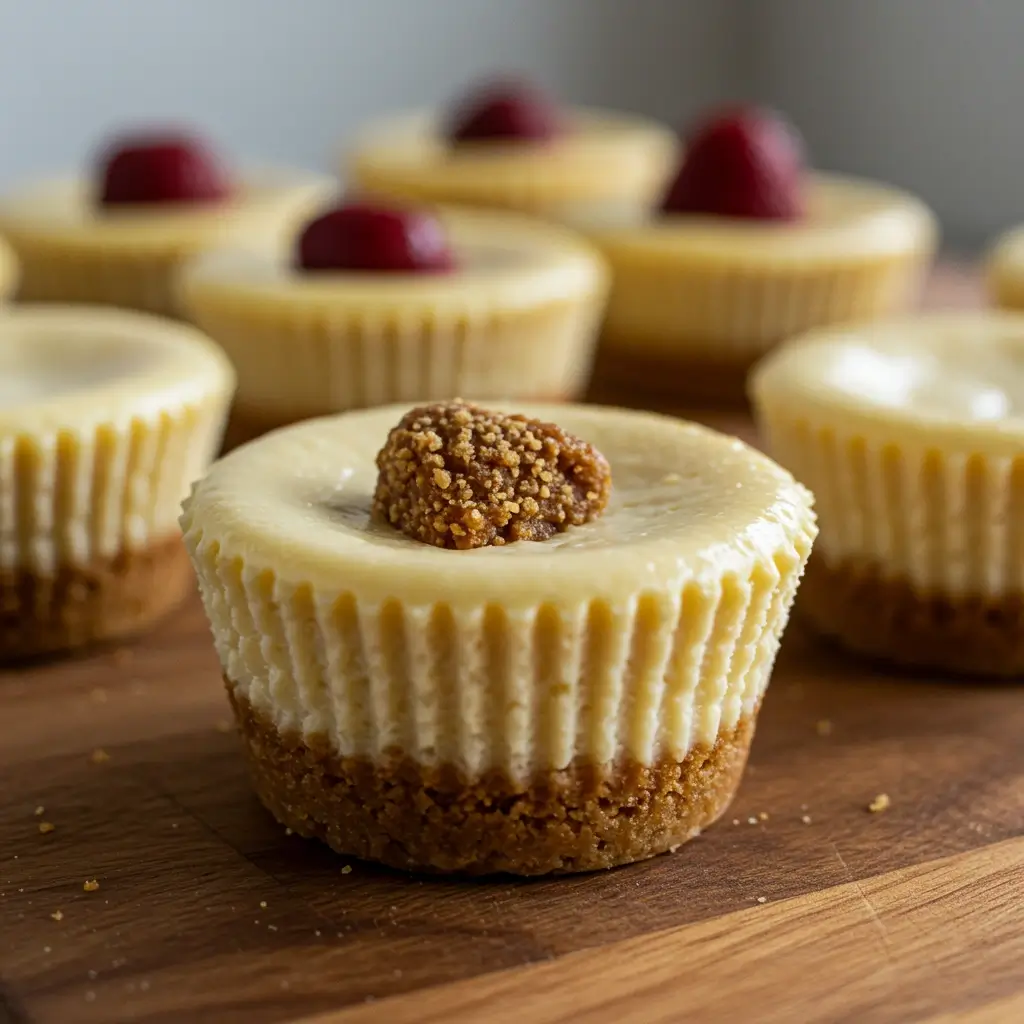
In today’s culinary landscape, dietary preferences and restrictions have become increasingly important. Among these, the gluten-free diet has gained significant attention, not only for those with gluten sensitivities or celiac disease but also for those seeking a healthier lifestyle. In this context, desserts often pose a challenge. Fear not, for this recipe for gluten-free mini cheesecakes is here to save the day! These delightful treats are perfect for any occasion, offering a delicious, creamy indulgence without the gluten. Whether you’re hosting a party or simply craving a sweet treat, these mini cheesecakes are sure to impress.
Ingredients
Creating these delectable mini cheesecakes is a simple process using readily available ingredients. Here’s what you’ll need:
- 1 cup gluten-free graham cracker crumbs
- 3 tablespoons melted coconut oil
- 2 tablespoons sugar
- 16 ounces cream cheese, softened
- 1 cup sugar
- 1 teaspoon vanilla extract
- 2 large eggs
- 1 cup sour cream or Greek yogurt
These ingredients come together to form the perfect blend of flavors and textures, ensuring a memorable dessert experience.
Instructions
Crafting these gluten-free mini cheesecakes is as easy as pie—or, in this case, cheesecake! Follow these straightforward steps for a flawless result:
- Preheat the Oven
Preheat your oven to 325°F (165°C) to ensure the perfect baking environment. - Prepare the Crust
In a bowl, mix the gluten-free graham cracker crumbs, melted coconut oil, and 2 tablespoons of sugar. This creates a flavorful base for your cheesecakes. Press the mixture into the bottom of mini muffin tins, ensuring a firm and even layer. - Create the Cheesecake Filling
In another bowl, beat the softened cream cheese and 1 cup of sugar until smooth and creamy. Add the vanilla extract and mix well to enhance the flavor profile. - Incorporate the Eggs
Add the eggs one at a time, mixing thoroughly after each addition. This ensures a smooth and homogeneous filling. Fold in the sour cream or Greek yogurt, providing a rich and velvety texture. - Assemble the Cheesecakes
Pour the cheesecake mixture over the prepared crusts in the muffin tins, filling each one to the brim for a generous serving. - Bake to Perfection
Bake the mini cheesecakes for 15-20 minutes until set. The tops should be slightly firm, but the centers can remain a bit jiggly. This ensures a creamy texture once chilled. - Cool and Refrigerate
Allow the cheesecakes to cool at room temperature, then refrigerate for at least 2 hours before serving. This chilling period is crucial for achieving the perfect texture and flavor.
Following these steps will lead to mini cheesecakes that are not only gluten-free but also irresistibly delicious.
Nutrition Facts
Understanding the nutritional content of your food is essential, especially for those with dietary restrictions. Here’s a breakdown of the nutrition facts for each mini cheesecake:
- Calories: 150
- Protein: 3g
- Carbohydrates: 16g
- Fat: 9g
- Sugar: 8g
These mini cheesecakes provide a balanced treat, allowing you to indulge without compromising your dietary goals.
How to Serve
Presentation is key when serving these delightful mini cheesecakes, as it not only enhances their visual appeal but also elevates the overall dining experience. Here are some detailed ideas to enhance your serving experience:
Simple and Elegant
For those who appreciate minimalism, serving the mini cheesecakes plain is a wonderful option. This allows the natural flavors of the cheesecake to take center stage. To enhance this presentation, consider using decorative serving plates or cupcake stands. A white plate can create a beautiful contrast with the golden-brown crust and creamy filling, making the mini cheesecakes stand out. You can also garnish each cheesecake with a small mint leaf or a sprinkle of powdered sugar for a touch of sophistication without overwhelming the palate.
Fruit Topping
Adding fresh fruits as a topping not only introduces a pop of color but also infuses the mini cheesecakes with vibrant flavors that contrast beautifully with the creamy texture. Fresh berries such as strawberries, blueberries, or raspberries are excellent choices. You can serve the fruits whole for a rustic look or slice them for a more refined presentation. To maximize flavor, consider macerating the berries in a bit of sugar and lemon juice for about 30 minutes before serving. This process enhances their sweetness and adds a touch of syrupy goodness that complements the cheesecake perfectly. For an added layer of elegance, arrange the fruits artfully atop each cheesecake, creating a visually stunning pattern.
Drizzle of Chocolate or Caramel
For those with a penchant for indulgence, drizzling melted chocolate or caramel sauce over the mini cheesecakes adds a rich and decadent touch. Choose high-quality chocolate for a deep flavor—dark chocolate works particularly well, while milk chocolate offers a sweeter profile. To create a beautiful drizzle, melt the chocolate or caramel in a microwave or double boiler, then use a spoon or squeeze bottle to create artistic patterns over the cheesecakes. Consider using both chocolate and caramel for a delightful dual drizzle effect, which not only looks appealing but also provides varying flavors in each bite.
Whipped Cream
A dollop of freshly whipped cream adds a light and airy contrast to the rich, dense texture of the cheesecake. To make your whipped cream, simply whip heavy cream with a bit of sugar and vanilla extract until soft peaks form. For an extra touch, you can infuse the whipped cream with flavors like almond extract or citrus zest, which can complement the cheesecake’s profile. When serving, either pipe the whipped cream onto the cheesecakes using a decorative nozzle for a fancy touch or simply spoon it on top. For an added flourish, consider sprinkling some crushed graham crackers or finely chopped nuts on top of the whipped cream for an appealing texture and an extra layer of flavor.
Serving Suggestions
To enhance the experience even further, consider the following serving suggestions:
- Themed Platter: Arrange the mini cheesecakes on a themed platter, such as a rustic wooden board for a farmhouse vibe or a sleek glass cake stand for a modern touch. You can even create a mixed platter with different cheesecake flavors or other desserts for variety.
- Personalized Touches: For special occasions, consider adding personalized touches, such as custom name tags or little flags to each mini cheesecake, indicating flavors or special messages for guests.
- Pairings: Suggest beverage pairings to accompany the mini cheesecakes. A rich, full-bodied coffee or a dessert wine can beautifully complement the sweetness of the cheesecake, while a refreshing fruit-infused iced tea can provide a delightful contrast.
By paying attention to presentation and thoughtful serving ideas, you can transform your mini cheesecakes from simple treats into an impressive and memorable dessert experience that will delight your guests and leave a lasting impression.
These serving suggestions ensure a visually appealing and delicious dessert experience.
Additional Tips for Perfect Gluten-Free Mini Cheesecakes
To elevate your gluten-free mini cheesecake experience to the next level, consider incorporating the following comprehensive tips and techniques. These suggestions not only enhance the overall flavor and texture of your cheesecakes but also ensure that they turn out perfectly every time.
1. Room Temperature Ingredients
One of the key secrets to achieving that luxurious, creamy texture in your mini cheesecakes is to ensure that all your ingredients, particularly the cream cheese and eggs, are at room temperature before you begin mixing. When these ingredients are warmed to room temperature, they blend together more smoothly, reducing the risk of lumps in your batter.
- Why Room Temperature Matters: Cold ingredients can cause the batter to be unevenly mixed, leading to a dense or grainy texture. Allowing your cream cheese and eggs to sit out for about 30 minutes before you start will help them reach the ideal temperature. If you’re short on time, you can cut the cream cheese into smaller cubes to speed up the warming process.
2. Avoid Overbaking
Baking mini cheesecakes requires careful attention to time and temperature. Overbaking can cause undesirable results, such as cracks on the surface and a dry, crumbly texture.
- How to Prevent Overbaking: To avoid this, start checking your cheesecakes a few minutes before the recommended baking time is up. The cheesecakes should be set around the edges but still slightly jiggly in the center. They will continue to firm up as they cool. A good rule of thumb is to look for a slight quiver in the center when you gently shake the pan.
- Cooling Tips: Once removed from the oven, allow the cheesecakes to cool in the pan for about 10-15 minutes before transferring them to a wire rack. This gradual cooling process helps to minimize the risk of cracking.
3. Use a Water Bath
For an extra touch of professionalism in your baking, consider utilizing a water bath (or bain-marie) when making your mini cheesecakes. This technique involves placing your cheesecake pan inside a larger pan filled with hot water during baking.
- Benefits of a Water Bath: The water bath helps to regulate the temperature around the cheesecakes, providing gentle and even heat. This method not only helps to prevent the tops from cracking but also results in a creamier texture by ensuring that the cheesecakes cook evenly.
- How to Set Up a Water Bath: Wrap the outside of your cheesecake pan with aluminum foil to prevent water from seeping in. Place the pan in a larger baking dish and fill the outer dish with hot water until it reaches halfway up the sides of the cheesecake pan. Bake as directed, but keep an eye on the water level, adding more if necessary.
4. Experiment with Flavors
While the classic cheesecake flavor is always a crowd-pleaser, don’t hesitate to get creative and experiment with different flavor profiles to personalize your mini cheesecakes.
- Flavoring Techniques: Consider adding extracts like almond, lemon, or vanilla to your batter for an extra layer of flavor. You can also incorporate citrus zest, such as lemon or orange, which can brighten the flavor and add a refreshing zing.
- Mix-Ins and Toppings: Beyond extracts, think about incorporating mix-ins like chocolate chips, fruit purees, or crushed cookies into the batter. Toppings such as fresh fruit, whipped cream, or a drizzle of chocolate sauce can further enhance the presentation and taste of your cheesecakes.
- Seasonal Variations: Take advantage of seasonal ingredients! For instance, pumpkin puree and spices can create a delicious fall-inspired cheesecake, while fresh berries can be perfect for a summer treat.
By following these tips, you can ensure that your gluten-free mini cheesecakes are not only delicious but also visually appealing and perfectly textured. Happy baking!
These tips will help you perfect your mini cheesecakes and elevate your baking skills.
FAQs
1. Can I use a different type of crust?
Yes, you can experiment with different gluten-free crust options, such as almond meal or crushed gluten-free cookies, to suit your taste preferences.
2. What is the best substitute for sour cream?
Greek yogurt is an excellent substitute for sour cream in this recipe. It provides a similar tangy flavor and creamy texture.
3. How long can these mini cheesecakes be stored?
These mini cheesecakes can be stored in the refrigerator for up to five days. Ensure they are covered to maintain freshness.
4. Can I freeze the mini cheesecakes?
Yes, you can freeze them for up to three months. Wrap each cheesecake individually and store in an airtight container. Thaw in the refrigerator before serving.
5. Are there any dairy-free alternatives?
For a dairy-free version, consider using dairy-free cream cheese and yogurt. Ensure all other ingredients are also dairy-free.
Conclusion
Gluten-free mini cheesecakes are a delightful treat that caters to a variety of dietary needs without compromising on taste. With their rich, creamy texture and customizable flavor options, they are perfect for any occasion. Whether you’re following a gluten-free diet or simply exploring new dessert options, these mini cheesecakes offer a delectable solution. The best part? You can easily adjust the recipe to suit your preferences, from adding fresh fruit toppings to infusing them with chocolate, caramel, or other decadent flavors.
These mini cheesecakes are not only gluten-free but also make for an impressive and visually appealing dessert for parties, family gatherings, or special celebrations. They offer the same satisfying experience as traditional cheesecakes but with the added benefit of being a healthier, allergen-friendly option. The crust, made from gluten-free cookies or alternative flours, creates the perfect base that complements the creamy filling.
You can even experiment with different toppings to elevate the cheesecakes further. A drizzle of raspberry sauce, a sprinkle of crushed nuts, or even a dollop of whipped cream can enhance the flavor and presentation. So gather your ingredients, follow the instructions, and indulge in the sweet satisfaction of homemade gluten-free mini cheesecakes. Happy baking!
Print
Gluten-Free Mini Cheesecakes Recipe
Ingredients
- 1 cup gluten-free graham cracker crumbs
- 3 tablespoons melted coconut oil
- 2 tablespoons sugar
- 16 ounces cream cheese, softened
- 1 cup sugar
- 1 teaspoon vanilla extract
- 2 large eggs
- 1 cup sour cream or Greek yogurt
Instructions
- Preheat the Oven
Preheat your oven to 325°F (165°C) to ensure the perfect baking environment. - Prepare the Crust
In a bowl, mix the gluten-free graham cracker crumbs, melted coconut oil, and 2 tablespoons of sugar. This creates a flavorful base for your cheesecakes. Press the mixture into the bottom of mini muffin tins, ensuring a firm and even layer. - Create the Cheesecake Filling
In another bowl, beat the softened cream cheese and 1 cup of sugar until smooth and creamy. Add the vanilla extract and mix well to enhance the flavor profile. - Incorporate the Eggs
Add the eggs one at a time, mixing thoroughly after each addition. This ensures a smooth and homogeneous filling. Fold in the sour cream or Greek yogurt, providing a rich and velvety texture. - Assemble the Cheesecakes
Pour the cheesecake mixture over the prepared crusts in the muffin tins, filling each one to the brim for a generous serving. - Bake to Perfection
Bake the mini cheesecakes for 15-20 minutes until set. The tops should be slightly firm, but the centers can remain a bit jiggly. This ensures a creamy texture once chilled. - Cool and Refrigerate
Allow the cheesecakes to cool at room temperature, then refrigerate for at least 2 hours before serving. This chilling period is crucial for achieving the perfect texture and flavor.
Nutrition
- Serving Size: One Normal Portion
- Calories: 150
- Sugar: 8g
- Fat: 9g
- Carbohydrates: 16g
- Protein: 3g


