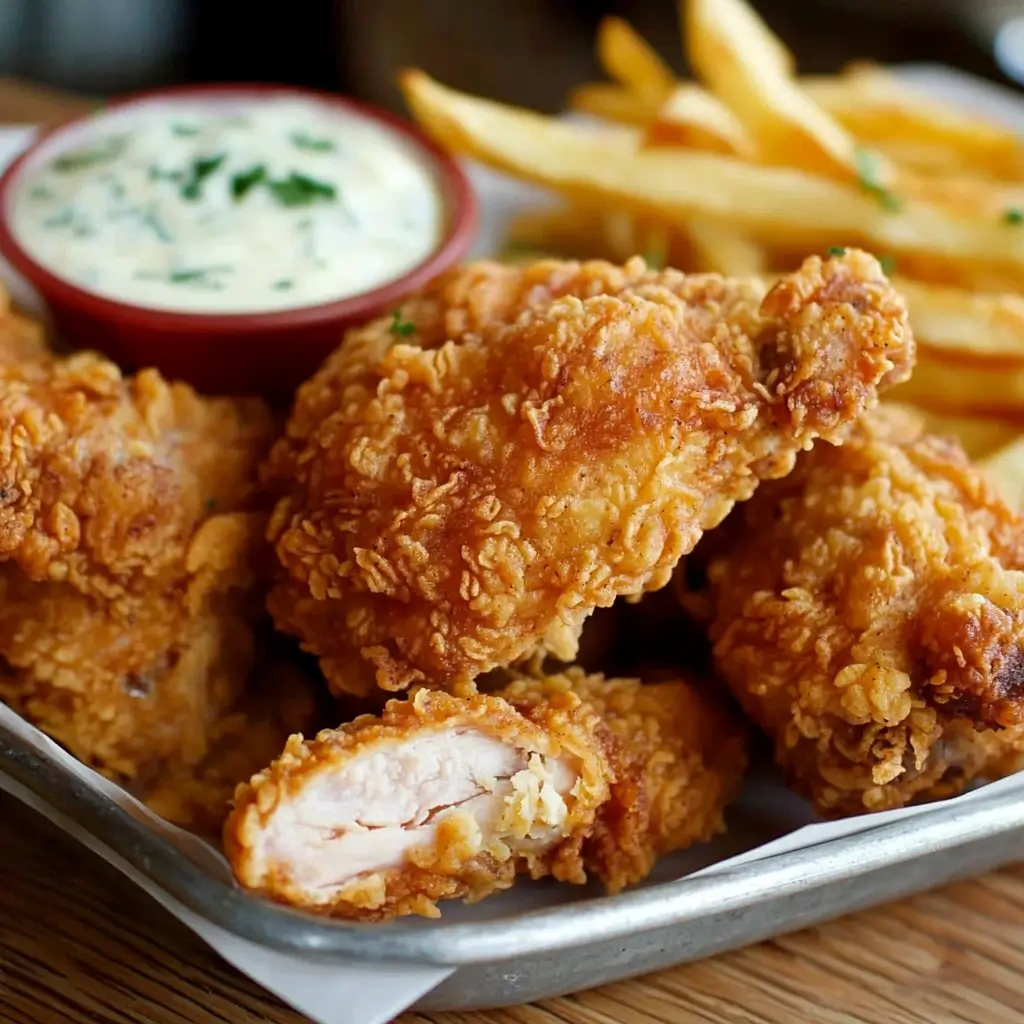
Let me tell you, finding truly amazing gluten-free fried chicken has been a journey. For years, I resigned myself to missing out on that classic, crispy comfort food. Store-bought versions were often disappointing – either bland, dry, or with a coating that was more crumbly than crispy. Then, I stumbled upon this recipe, and everything changed. My family, who are big fried chicken fans (gluten-free or not!), devoured it. The golden, crunchy crust gave way to incredibly juicy and flavorful chicken inside. It was a revelation! Honestly, you wouldn’t believe it was gluten-free. This isn’t just good gluten-free fried chicken; it’s simply outstanding fried chicken, period. Get ready to experience the satisfying crunch and mouthwatering taste that will make this your go-to recipe for years to come. Prepare to be amazed at how simple ingredients and a few key techniques can deliver fried chicken perfection that everyone can enjoy, regardless of dietary needs.
Ingredients
This recipe keeps things surprisingly simple, focusing on quality ingredients and proper technique to achieve that signature fried chicken magic, all while being entirely gluten-free. Here’s what you’ll need to gather:
Marinade:
- 8-10 pieces Bone-in chicken of your choice: You can use a mix of chicken pieces like thighs, drumsticks, breasts (cut in half or thirds for even cooking), and wings. Bone-in, skin-on chicken is crucial for the best flavor and juicy results. The bone helps to insulate the meat, keeping it moist during frying, while the skin crisps up beautifully. Feel free to choose your favorite cuts or use a variety pack for a diverse fried chicken feast.
- 1 cup buttermilk (*see note below for substitutions): Buttermilk is the secret weapon for tender and flavorful fried chicken. Its acidity helps to break down the chicken proteins, resulting in incredibly juicy and tender meat. It also adds a subtle tang that complements the savory flavors of the chicken and spices. If you don’t have buttermilk on hand, don’t worry! You can easily make a substitute by adding 1 tablespoon of lemon juice or white vinegar to 1 cup of milk (dairy or non-dairy) and letting it sit for 5-10 minutes until it thickens slightly. The slight tang is what we are aiming for.
- ¼ teaspoon cayenne pepper: A touch of cayenne pepper adds a gentle warmth and subtle spice to the marinade, enhancing the overall flavor profile without making it overly spicy. If you prefer a milder flavor, you can reduce or omit the cayenne pepper. For those who love a bit more heat, feel free to increase it to ½ teaspoon or even add a pinch of red pepper flakes to the marinade.
- ¼ tablespoon red wine vinegar: Red wine vinegar, similar to buttermilk, contributes to tenderizing the chicken and adding a layer of complex flavor. Its acidity brightens the marinade and balances the richness of the fried chicken. You can substitute with apple cider vinegar or white wine vinegar if needed, though red wine vinegar provides a slightly more robust flavor.
- Dash of salt and pepper to taste: Don’t underestimate the importance of salt and pepper! They are fundamental seasonings that enhance the natural flavor of the chicken and all the other ingredients in the marinade. Use a generous dash of both, tasting the marinade before adding the chicken to ensure it’s well-seasoned. Remember, seasoning in layers is key to flavorful fried chicken.
Prep:
- 1 cup tapioca starch (*see note below for substitutions): Tapioca starch is the star ingredient in our gluten-free crispy coating. It’s a fantastic gluten-free alternative to wheat flour that provides an incredibly light, crispy, and delicate crust when fried. It also browns beautifully and holds its crispness for longer than some other gluten-free flours. If you cannot find tapioca starch, you can substitute with cornstarch or arrowroot starch. While tapioca starch is preferred for its superior crispness, these alternatives will still work well and provide a gluten-free coating. Avoid using gluten-free flour blends as they can sometimes result in a heavier, less crispy crust.
Cook:
- 2 cups hot oil for frying (*see note below for oil choices): Choosing the right oil is crucial for successful fried chicken. You need an oil with a high smoke point, meaning it can withstand high temperatures without breaking down and producing acrid flavors. Good options include:
- Canola oil: A neutral-flavored and readily available option with a high smoke point.
- Peanut oil: A classic choice for fried chicken, known for its high smoke point and slightly nutty flavor that complements chicken beautifully. However, be mindful of peanut allergies.
- Vegetable oil: Another neutral-flavored oil with a high smoke point, a good all-purpose choice for frying.
- Avocado oil: A healthier option with a very high smoke point and neutral flavor, though it can be more expensive.
- Lard or rendered chicken fat: For a truly traditional and deeply flavorful fried chicken, consider using lard or rendered chicken fat. These fats have a high smoke point and impart a rich, savory flavor to the chicken.
Important Notes:
- Buttermilk Substitutes: As mentioned earlier, if you don’t have buttermilk, you can make a quick substitute by combining 1 cup of milk (dairy or non-dairy) with 1 tablespoon of lemon juice or white vinegar. Let it sit for 5-10 minutes until slightly thickened.
- Tapioca Starch Substitutes: Cornstarch or arrowroot starch can be used as substitutes for tapioca starch, although tapioca starch is recommended for optimal crispiness.
- Oil Temperature: Maintaining the correct oil temperature (350-375°F) is essential for perfectly cooked fried chicken. Too low, and the chicken will be greasy and soggy. Too high, and the outside will burn before the inside is cooked through. Use a kitchen thermometer to monitor the oil temperature throughout the frying process.
- Chicken Pieces: Choose bone-in, skin-on chicken pieces for the best flavor and juiciness. If using chicken breasts, consider cutting them into smaller, more even pieces to ensure they cook through without drying out.
Instructions
Making this incredible gluten-free fried chicken is easier than you might think! Follow these step-by-step instructions to achieve crispy, juicy perfection every time:
Marinade – The Flavor Foundation
- Whisk Marinade Ingredients: In a medium-sized bowl, combine the buttermilk, cayenne pepper, red wine vinegar, salt, and pepper. Whisk vigorously until the mixture is well combined and slightly fluffy. This step ensures that the spices are evenly distributed throughout the marinade and helps to aerate the buttermilk, contributing to a lighter texture.
- Prepare the Chicken: Place the raw chicken pieces in a large, non-reactive dish (glass or ceramic works well). Avoid using metal dishes as they can react with the acidity of the marinade.
- Pour Marinade Over Chicken: Pour the prepared buttermilk marinade over the chicken pieces in the dish.
- Ensure Chicken is Fully Coated: Use your hands or tongs to gently toss and move the chicken pieces around in the marinade, making sure that every piece is completely submerged and coated. This ensures that the marinade can work its magic on all surfaces of the chicken, tenderizing and flavoring it evenly.
- Marinate in the Refrigerator: Cover the dish tightly with plastic wrap or a lid. Refrigerate the chicken for at least 12 hours, or ideally up to 24 hours. This extended marinating time allows the buttermilk to deeply tenderize the chicken and infuse it with flavor, resulting in incredibly juicy and flavorful fried chicken. Don’t rush this step – it makes a huge difference!
Prep – Setting Up for Crispy Coating
- Drain Marinaded Chicken: After marinating, remove the chicken from the refrigerator. Place a large strainer or colander over a bowl and carefully pour the chicken and marinade into the strainer. Allow the chicken to drain for a few minutes, removing excess marinade. This step is important as too much marinade clinging to the chicken can make the coating soggy.
- Tapioca Starch Dredge: Place the tapioca starch in a shallow dish or baking pan.
- Coat Chicken in Tapioca Starch: Take each piece of drained chicken and place it in the tapioca starch. Toss and turn the chicken to ensure it is completely and evenly coated in the starch. Press the starch gently onto the chicken to help it adhere. A generous and even coating is key to achieving a crispy crust.
- Rest on Baking Pan: Place the coated chicken pieces on a wire rack set over a baking sheet or directly onto a baking pan lined with parchment paper. Let the chicken rest for 2-3 minutes at room temperature. This resting period allows the tapioca starch to adhere better to the chicken and helps to create a crispier crust during frying.
Cook – Achieving Golden Perfection
- Heat Oil in Skillet or Deep Fryer: In a large, pre-seasoned cast iron skillet or a deep fryer, pour in the oil for frying (about 2 cups, or enough to come about 1-2 inches up the sides of the skillet, or according to your deep fryer instructions). Gently heat the oil over medium-high heat. If using a skillet, ensure the oil is evenly distributed and deep enough to partially submerge the chicken.
- Monitor Oil Temperature: Use a kitchen thermometer to monitor the oil temperature. The ideal temperature range is 350-375°F (175-190°C). Maintaining this temperature is crucial for even cooking and crispy results. If the oil is too cold, the chicken will be greasy. If it’s too hot, the outside will burn before the inside is cooked through.
- Fry Chicken in Batches: Once the oil reaches the correct temperature, carefully and gently place the chicken pieces into the hot oil, being careful not to overcrowd the skillet or deep fryer. Overcrowding will lower the oil temperature and result in soggy chicken. Fry in batches, leaving enough space between the pieces for even cooking and browning.
- Fry One Side: Fry the chicken for approximately 10 minutes on one side, or until it is golden brown and crispy. If you are not fully submerging the chicken, you will need to flip it.
- Flip and Fry Other Side (if needed): If not deep frying, carefully flip the chicken pieces using tongs. Cook the other side for another 10 minutes, or until golden brown and crispy and the chicken is cooked through. If deep frying, the cooking time may be slightly shorter.
- Check Internal Temperature: Regardless of your frying method, it is crucial to ensure the chicken is cooked through. The internal temperature of the thickest part of the chicken should reach 165°F (74°C). Use a meat thermometer to check the temperature.
- Remove and Drain: Once the chicken is cooked through and golden brown, carefully remove it from the hot oil using tongs. Place the fried chicken on a wire rack set over a baking sheet lined with paper towels to drain excess oil and maintain crispiness. Avoid placing the chicken directly on paper towels as this can make the bottom soggy.
- Season Immediately: While the chicken is still hot, season it generously with salt and pepper to taste. Seasoning immediately after frying allows the salt and pepper to adhere better to the crispy crust.
Repeat: Continue frying the remaining chicken pieces in batches, maintaining the oil temperature and ensuring each batch is cooked through and golden brown.
Serve and Enjoy! Serve your delicious, crispy, gluten-free fried chicken immediately while it’s hot and at its absolute best.
Nutrition Facts
This recipe yields approximately 8 servings.
- Serving Size: 1 piece of fried chicken (approximate, depending on chicken piece size)
- Calories per Serving: Approximately 566 kcal
Please Note: Nutritional information is an estimate and can vary based on specific ingredients used, chicken piece size, and cooking methods. For more precise nutritional information, you can use a nutrition calculator with the specific brands and quantities of ingredients you use. Keep in mind that frying adds calories and fat to the chicken.
Preparation Time
- Prep Time: 10 minutes (for marinade preparation and chicken prep)
- Cook Time: 15 minutes (approximate frying time per batch, total cook time will depend on batch size and chicken pieces)
- Total Time: 25 minutes (excluding marinating time)
- Marinating Time: 12-24 hours (refrigerated)
Important Note: While the active preparation and cooking time is relatively short, remember to factor in the essential marinating time of at least 12 hours for the best flavor and tenderness. Planning ahead is key to enjoying this incredible gluten-free fried chicken.
How to Serve
This gluten-free fried chicken is incredibly versatile and can be enjoyed in so many delicious ways! Here are some serving suggestions to inspire your next fried chicken feast:
- Classic Southern Style:
- Mashed Potatoes and Gravy: A timeless pairing! Creamy mashed potatoes and rich gravy complement the crispy chicken perfectly.
- Coleslaw: A cool and crunchy coleslaw provides a refreshing contrast to the richness of the fried chicken.
- Biscuits or Cornbread: Warm, fluffy biscuits or crumbly cornbread are essential sides for a true Southern-style meal.
- Green Beans or Collard Greens: Add some greens to your plate for a balanced meal.
- Picnic Perfect:
- Potato Salad or Pasta Salad: Classic picnic sides that travel well and pair wonderfully with fried chicken.
- Watermelon or Corn on the Cob: Seasonal summer favorites that complement the savory chicken.
- Deviled Eggs: Another picnic staple that’s always a crowd-pleaser.
- Lemonade or Iced Tea: Refreshing drinks to complete your picnic spread.
- Family Dinner Delight:
- Mac and Cheese: A cheesy and comforting side dish that kids and adults alike will love.
- Roasted Vegetables: Balance the richness of the fried chicken with healthy roasted vegetables like broccoli, carrots, or sweet potatoes.
- Dinner Rolls: Warm dinner rolls are perfect for soaking up any delicious juices.
- Fruit Salad or Apple Pie: A light and refreshing fruit salad or a slice of warm apple pie for dessert.
- Fried Chicken Sandwiches:
- Brioche Buns or Gluten-Free Buns: Use soft brioche buns or your favorite gluten-free buns.
- Lettuce, Tomato, Onion, Pickles: Classic sandwich toppings.
- Mayonnaise, Mustard, or Special Sauce: Choose your favorite condiments.
- French Fries or Onion Rings: Complete your fried chicken sandwich meal with crispy fries or onion rings.
- Creative Twists:
- Fried Chicken and Waffles: A trendy and delicious combination, especially with a drizzle of maple syrup.
- Fried Chicken Salad: Dice up leftover fried chicken and add it to a fresh green salad with your favorite dressing.
- Spicy Fried Chicken: Increase the cayenne pepper in the marinade or add a spicy dry rub to the tapioca starch coating for a fiery kick.
- Honey-Glazed Fried Chicken: Brush the fried chicken with a honey-soy glaze for a sweet and savory flavor combination.
No matter how you choose to serve it, this gluten-free fried chicken is guaranteed to be a hit!
Additional Tips for Fried Chicken Perfection
To ensure your gluten-free fried chicken is absolutely irresistible, consider these helpful tips:
- Don’t Skip the Marinating: The buttermilk marinade is crucial for both tenderizing the chicken and infusing it with flavor. Don’t be tempted to shorten the marinating time – the longer, the better! Aim for at least 12 hours, and up to 24 hours for maximum tenderness and flavor.
- Maintain Oil Temperature: Consistent oil temperature is key to crispy, evenly cooked fried chicken. Use a kitchen thermometer to monitor the oil and adjust the heat as needed to keep it within the 350-375°F range. If the oil temperature drops too low when you add the chicken, wait for it to come back up to temperature before adding more pieces.
- Don’t Overcrowd the Skillet/Deep Fryer: Fry the chicken in batches, leaving enough space between the pieces. Overcrowding will lower the oil temperature, resulting in greasy, soggy chicken and uneven cooking. Work in smaller batches to maintain the oil temperature and achieve optimal crispiness.
- Double Dredge for Extra Crispiness (Optional): For an even thicker and crispier crust, you can double dredge the chicken. After the initial tapioca starch coating, dip the chicken back into the buttermilk marinade, then dredge again in the tapioca starch. This creates a thicker layer of coating that fries up extra crispy.
- Let the Chicken Rest After Frying: Once you remove the fried chicken from the oil, place it on a wire rack to drain excess oil and allow it to rest for a few minutes before serving. This resting period allows the juices to redistribute throughout the chicken, resulting in more tender and flavorful meat. It also helps the crust to set and become even crispier.
Frequently Asked Questions (FAQ)
Q1: Can I use other types of gluten-free flour instead of tapioca starch?
A: While tapioca starch is highly recommended for its superior crispiness, you can use cornstarch or arrowroot starch as substitutes. Avoid using general gluten-free flour blends as they can sometimes result in a heavier, less crispy crust for fried chicken.
Q2: I don’t have buttermilk. Can I still make this recipe?
A: Absolutely! You can easily make a buttermilk substitute by combining 1 cup of milk (dairy or non-dairy) with 1 tablespoon of lemon juice or white vinegar. Let it sit for 5-10 minutes until it thickens slightly. This tangy mixture will work just as well to tenderize and flavor your chicken.
Q3: What’s the best oil for frying chicken?
A: The best oils for frying chicken have a high smoke point and neutral flavor. Good options include canola oil, vegetable oil, peanut oil (if no allergies), and avocado oil. For a more traditional and flavorful option, you can use lard or rendered chicken fat.
Q4: How do I know when the fried chicken is cooked through?
A: The most accurate way to ensure your fried chicken is cooked through is to use a meat thermometer. Insert the thermometer into the thickest part of the chicken (avoiding the bone) and ensure the internal temperature reaches 165°F (74°C). The chicken should also be golden brown and crispy on the outside, and the juices should run clear when pierced with a fork.
Q5: Can I reheat leftover fried chicken and keep it crispy?
A: Reheating fried chicken while maintaining crispiness can be tricky, but it’s possible! The best method is to reheat it in the oven or air fryer. Preheat your oven or air fryer to 350°F (175°C). Place the fried chicken on a wire rack set over a baking sheet and bake for 15-20 minutes, or until heated through and crispy again. Avoid microwaving, as this will make the chicken soggy.
Print
Gluten-Free Fried Chicken Recipe
Ingredients
Marinade:
- 8–10 pieces Bone-in chicken of your choice: You can use a mix of chicken pieces like thighs, drumsticks, breasts (cut in half or thirds for even cooking), and wings. Bone-in, skin-on chicken is crucial for the best flavor and juicy results. The bone helps to insulate the meat, keeping it moist during frying, while the skin crisps up beautifully. Feel free to choose your favorite cuts or use a variety pack for a diverse fried chicken feast.
- 1 cup buttermilk (*see note below for substitutions): Buttermilk is the secret weapon for tender and flavorful fried chicken. Its acidity helps to break down the chicken proteins, resulting in incredibly juicy and tender meat. It also adds a subtle tang that complements the savory flavors of the chicken and spices. If you don’t have buttermilk on hand, don’t worry! You can easily make a substitute by adding 1 tablespoon of lemon juice or white vinegar to 1 cup of milk (dairy or non-dairy) and letting it sit for 5-10 minutes until it thickens slightly. The slight tang is what we are aiming for.
- ¼ teaspoon cayenne pepper: A touch of cayenne pepper adds a gentle warmth and subtle spice to the marinade, enhancing the overall flavor profile without making it overly spicy. If you prefer a milder flavor, you can reduce or omit the cayenne pepper. For those who love a bit more heat, feel free to increase it to ½ teaspoon or even add a pinch of red pepper flakes to the marinade.
- ¼ tablespoon red wine vinegar: Red wine vinegar, similar to buttermilk, contributes to tenderizing the chicken and adding a layer of complex flavor. Its acidity brightens the marinade and balances the richness of the fried chicken. You can substitute with apple cider vinegar or white wine vinegar if needed, though red wine vinegar provides a slightly more robust flavor.
- Dash of salt and pepper to taste: Don’t underestimate the importance of salt and pepper! They are fundamental seasonings that enhance the natural flavor of the chicken and all the other ingredients in the marinade. Use a generous dash of both, tasting the marinade before adding the chicken to ensure it’s well-seasoned. Remember, seasoning in layers is key to flavorful fried chicken.
Prep:
- 1 cup tapioca starch (*see note below for substitutions): Tapioca starch is the star ingredient in our gluten-free crispy coating. It’s a fantastic gluten-free alternative to wheat flour that provides an incredibly light, crispy, and delicate crust when fried. It also browns beautifully and holds its crispness for longer than some other gluten-free flours. If you cannot find tapioca starch, you can substitute with cornstarch or arrowroot starch. While tapioca starch is preferred for its superior crispness, these alternatives will still work well and provide a gluten-free coating. Avoid using gluten-free flour blends as they can sometimes result in a heavier, less crispy crust.
Cook:
- 2 cups hot oil for frying (*see note below for oil choices): Choosing the right oil is crucial for successful fried chicken. You need an oil with a high smoke point, meaning it can withstand high temperatures without breaking down and producing acrid flavors. Good options include:
- Canola oil: A neutral-flavored and readily available option with a high smoke point.
- Peanut oil: A classic choice for fried chicken, known for its high smoke point and slightly nutty flavor that complements chicken beautifully. However, be mindful of peanut allergies.
- Vegetable oil: Another neutral-flavored oil with a high smoke point, a good all-purpose choice for frying.
- Avocado oil: A healthier option with a very high smoke point and neutral flavor, though it can be more expensive.
- Lard or rendered chicken fat: For a truly traditional and deeply flavorful fried chicken, consider using lard or rendered chicken fat. These fats have a high smoke point and impart a rich, savory flavor to the chicken.
Instructions
Marinade – The Flavor Foundation
- Whisk Marinade Ingredients: In a medium-sized bowl, combine the buttermilk, cayenne pepper, red wine vinegar, salt, and pepper. Whisk vigorously until the mixture is well combined and slightly fluffy. This step ensures that the spices are evenly distributed throughout the marinade and helps to aerate the buttermilk, contributing to a lighter texture.
- Prepare the Chicken: Place the raw chicken pieces in a large, non-reactive dish (glass or ceramic works well). Avoid using metal dishes as they can react with the acidity of the marinade.
- Pour Marinade Over Chicken: Pour the prepared buttermilk marinade over the chicken pieces in the dish.
- Ensure Chicken is Fully Coated: Use your hands or tongs to gently toss and move the chicken pieces around in the marinade, making sure that every piece is completely submerged and coated. This ensures that the marinade can work its magic on all surfaces of the chicken, tenderizing and flavoring it evenly.
- Marinate in the Refrigerator: Cover the dish tightly with plastic wrap or a lid. Refrigerate the chicken for at least 12 hours, or ideally up to 24 hours. This extended marinating time allows the buttermilk to deeply tenderize the chicken and infuse it with flavor, resulting in incredibly juicy and flavorful fried chicken. Don’t rush this step – it makes a huge difference!
Prep – Setting Up for Crispy Coating
- Drain Marinaded Chicken: After marinating, remove the chicken from the refrigerator. Place a large strainer or colander over a bowl and carefully pour the chicken and marinade into the strainer. Allow the chicken to drain for a few minutes, removing excess marinade. This step is important as too much marinade clinging to the chicken can make the coating soggy.
- Tapioca Starch Dredge: Place the tapioca starch in a shallow dish or baking pan.
- Coat Chicken in Tapioca Starch: Take each piece of drained chicken and place it in the tapioca starch. Toss and turn the chicken to ensure it is completely and evenly coated in the starch. Press the starch gently onto the chicken to help it adhere. A generous and even coating is key to achieving a crispy crust.
- Rest on Baking Pan: Place the coated chicken pieces on a wire rack set over a baking sheet or directly onto a baking pan lined with parchment paper. Let the chicken rest for 2-3 minutes at room temperature. This resting period allows the tapioca starch to adhere better to the chicken and helps to create a crispier crust during frying.
Cook – Achieving Golden Perfection
- Heat Oil in Skillet or Deep Fryer: In a large, pre-seasoned cast iron skillet or a deep fryer, pour in the oil for frying (about 2 cups, or enough to come about 1-2 inches up the sides of the skillet, or according to your deep fryer instructions). Gently heat the oil over medium-high heat. If using a skillet, ensure the oil is evenly distributed and deep enough to partially submerge the chicken.
- Monitor Oil Temperature: Use a kitchen thermometer to monitor the oil temperature. The ideal temperature range is 350-375°F (175-190°C). Maintaining this temperature is crucial for even cooking and crispy results. If the oil is too cold, the chicken will be greasy. If it’s too hot, the outside will burn before the inside is cooked through.
- Fry Chicken in Batches: Once the oil reaches the correct temperature, carefully and gently place the chicken pieces into the hot oil, being careful not to overcrowd the skillet or deep fryer. Overcrowding will lower the oil temperature and result in soggy chicken. Fry in batches, leaving enough space between the pieces for even cooking and browning.
- Fry One Side: Fry the chicken for approximately 10 minutes on one side, or until it is golden brown and crispy. If you are not fully submerging the chicken, you will need to flip it.
- Flip and Fry Other Side (if needed): If not deep frying, carefully flip the chicken pieces using tongs. Cook the other side for another 10 minutes, or until golden brown and crispy and the chicken is cooked through. If deep frying, the cooking time may be slightly shorter.
- Check Internal Temperature: Regardless of your frying method, it is crucial to ensure the chicken is cooked through. The internal temperature of the thickest part of the chicken should reach 165°F (74°C). Use a meat thermometer to check the temperature.
- Remove and Drain: Once the chicken is cooked through and golden brown, carefully remove it from the hot oil using tongs. Place the fried chicken on a wire rack set over a baking sheet lined with paper towels to drain excess oil and maintain crispiness. Avoid placing the chicken directly on paper towels as this can make the bottom soggy.
- Season Immediately: While the chicken is still hot, season it generously with salt and pepper to taste. Seasoning immediately after frying allows the salt and pepper to adhere better to the crispy crust.
Nutrition
- Serving Size: One Normal Portion
- Calories: 566 kcal