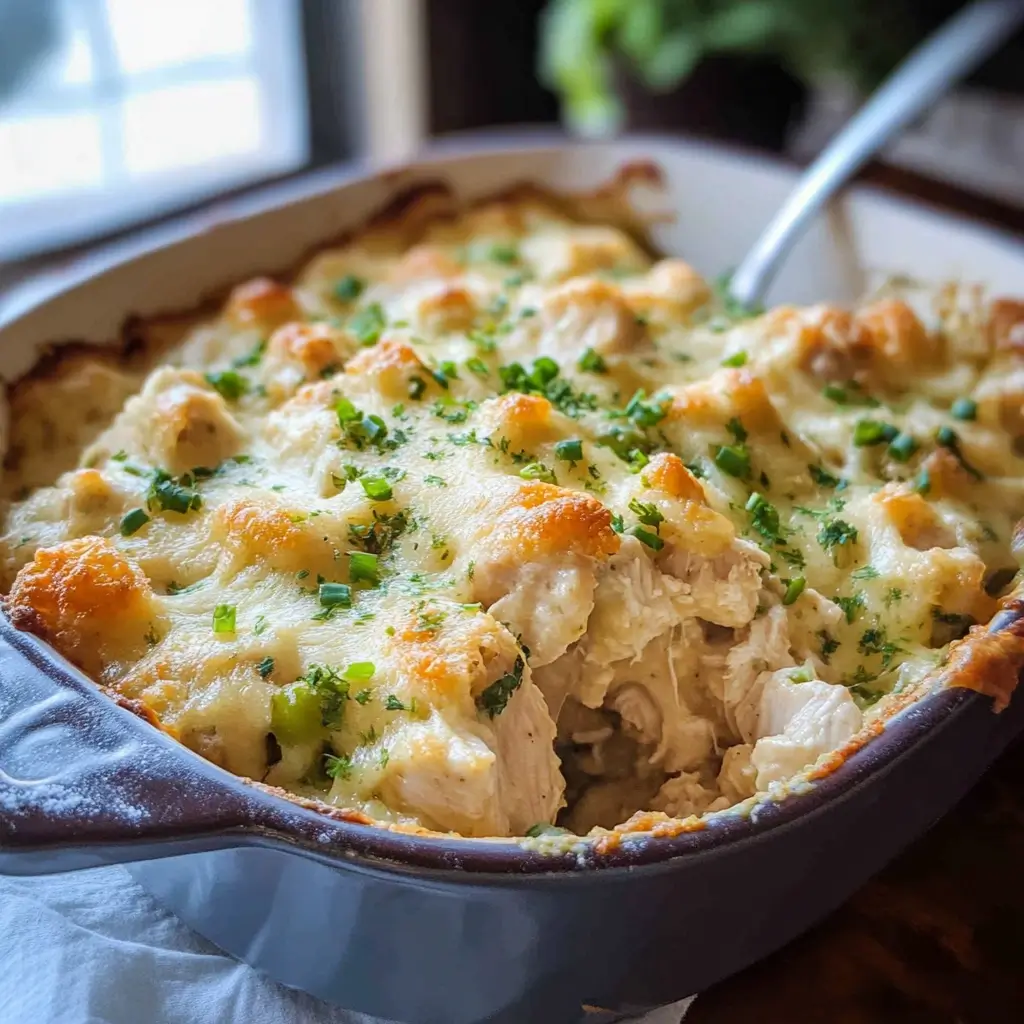

There’s something incredibly comforting about a casserole, isn’t there? That bubbly, golden-brown top promising a warm, savoury hug in a dish. For years, after my family needed to transition to a gluten-free lifestyle due to sensitivities, I thought those classic, creamy casseroles were a thing of the past. So many relied on canned “cream of” soups (often containing gluten) or flour-based roux. I missed that simple, satisfying weeknight staple. That’s why developing this Gluten-Free Chicken Casserole recipe felt like such a triumph! It wasn’t just about making a casserole; it was about recreating that specific feeling of comfort and ease, without compromise. The first time I served this, the reaction was pure delight. My kids, notoriously picky eaters, devoured it without a second thought, asking for seconds. My partner, who often misses those gluten-filled comfort classics, declared it “even better than the original.” It’s become a regular in our rotation – perfect for busy weeknights, cozy Sunday dinners, or even bringing to a potluck where you need a guaranteed crowd-pleaser that caters to dietary needs. It proves that gluten-free cooking doesn’t mean sacrificing flavour, texture, or that heartwarming feeling we all crave. This recipe is creamy, flavourful, packed with tender chicken and veggies, and topped with a satisfyingly cheesy, slightly crunchy layer – all completely gluten-free and surprisingly simple to whip up.
Complete Gluten-Free Chicken Casserole Recipe
This recipe focuses on creating a rich, creamy sauce from scratch using gluten-free ingredients, ensuring a delicious and safe meal for those avoiding gluten. It combines tender chicken, vegetables, and rice (or quinoa) in a harmonious blend, baked to perfection.
Yields: 6-8 servings
Prep time: 25 minutes
Cook time: 35-40 minutes
Ingredients:
- For the Casserole Base:
- 3 cups cooked, shredded or diced chicken (rotisserie chicken works great, or use poached/baked chicken breasts/thighs)
- 2 cups cooked rice (white or brown) or cooked quinoa (ensure rice/quinoa is cooked according to package directions beforehand)
- 1 cup frozen peas, thawed
- 1 cup frozen corn, thawed (optional, can substitute with other vegetables like steamed broccoli florets)
- 1/2 cup chopped celery (about 1 large stalk)
- 1/2 cup chopped carrots (about 1 medium carrot)
- 1/4 cup chopped fresh parsley, plus more for garnish
- For the Creamy Gluten-Free Sauce:
- 3 tablespoons unsalted butter (or dairy-free butter alternative)
- 1 medium onion, finely chopped (about 1 cup)
- 2 cloves garlic, minced
- 1/3 cup gluten-free all-purpose flour blend (one containing xanthan gum is usually best for sauces, or use 3 tablespoons cornstarch or arrowroot starch whisked into a little cold broth/milk first to make a slurry)
- 3 cups gluten-free chicken broth (carefully check labels to ensure it’s certified GF)
- 1 cup milk (whole, low-fat, or unsweetened almond/soy/oat milk for dairy-free – check oat milk is certified GF)
- 1 teaspoon salt (or to taste)
- 1/2 teaspoon black pepper (or to taste)
- 1/2 teaspoon dried thyme
- 1/4 teaspoon garlic powder
- 1/4 teaspoon onion powder
- Pinch of nutmeg (optional, enhances creaminess)
- For the Topping:
- 1 cup shredded sharp cheddar cheese (or dairy-free cheddar alternative)
- 1/2 cup gluten-free breadcrumbs or crushed gluten-free crackers/cornflakes (check labels carefully)
- 1 tablespoon melted unsalted butter (or dairy-free butter/olive oil) – optional, for browning breadcrumbs
Ingredient Notes & Considerations:
- Chicken: Using a pre-cooked rotisserie chicken is a fantastic time-saver. If cooking chicken yourself, poaching or baking boneless, skinless breasts or thighs works well. Ensure it’s cooked through before shredding or dicing. Leftover cooked turkey from holidays is also an excellent substitute.
- Rice/Quinoa: This recipe assumes you have already cooked rice or quinoa. If you need to cook it, factor that time into your preparation. Using pre-cooked rice makes this a much faster weeknight meal. Brown rice adds a nuttier flavour and more fibre. Quinoa boosts the protein content.
- Vegetables: Peas, corn, celery, and carrots are classic choices. Feel free to customize! Steamed broccoli florets, sautéed mushrooms, diced bell peppers (any colour), or green beans are wonderful additions or substitutions. Ensure any harder vegetables (like carrots and celery) are chopped relatively small so they soften nicely during the sauce-making and baking process. Using frozen vegetables is convenient, just ensure they are thawed so they don’t release excess water into the casserole.
- Gluten-Free Flour Blend: The key to a successful creamy sauce without gluten! Choose a reputable blend designed for all-purpose use, preferably one containing xanthan gum, which helps mimic gluten’s thickening and binding properties. If you only have cornstarch or arrowroot starch, don’t add it directly with the butter and onions like flour. Instead, whisk it into about 1/2 cup of the cold chicken broth until smooth (make a slurry), then whisk this slurry into the simmering broth/milk mixture to thicken. This prevents lumps.
- Chicken Broth: This is a critical ingredient to double-check for hidden gluten. Many broths contain yeast extract, flavourings, or thickeners that may not be gluten-free. Look for brands explicitly labelled or certified “Gluten-Free.” Low-sodium broth is a good option if you’re watching your salt intake, allowing you more control over the final seasoning.
- Milk: Use whatever milk you prefer or have on hand. Whole milk creates the richest sauce, but low-fat works well too. For a dairy-free version, unsweetened almond, soy, or cashew milk are good substitutes. Ensure oat milk is certified gluten-free, as cross-contamination during processing is common.
- Cheese: Sharp cheddar provides a lovely tangy flavour that complements the chicken. Monterey Jack, Colby, or a blend would also be delicious. For dairy-free, use your favourite brand of shredded cheddar-style alternative. The meltability can vary between brands.
- Topping: Gluten-free breadcrumbs provide a classic crunchy topping. Crushed gluten-free crackers (like rice crackers or GF saltines) or even crushed gluten-free cornflakes cereal also work well for texture. Tossing them with a little melted butter or oil helps them brown nicely, but it’s optional. You can also simply top with cheese if you prefer.
Instructions
- Preheat and Prepare: Preheat your oven to 375°F (190°C). Lightly grease a 9×13 inch baking dish (or a similar 3-quart capacity casserole dish).
- Cook Aromatics: In a large saucepan or Dutch oven, melt the 3 tablespoons of butter over medium heat. Add the chopped onion and cook, stirring occasionally, for about 5-7 minutes, or until softened and translucent. Add the minced garlic and cook for another minute until fragrant, being careful not to burn it.
- Make the Roux (Flour Method): If using gluten-free all-purpose flour blend, sprinkle it evenly over the cooked onions and garlic. Cook, whisking constantly, for 1-2 minutes. This helps cook out the raw flour taste and prevents lumps. It should form a thick paste (a gluten-free roux).
- Gradually Add Liquids: Slowly pour in the gluten-free chicken broth, whisking constantly and vigorously to incorporate the flour mixture smoothly. Start with about half a cup, whisk until smooth, then gradually add the remaining broth while continuing to whisk. Once all the broth is incorporated, slowly whisk in the milk.
- Thicken the Sauce: Bring the mixture to a gentle simmer over medium heat, whisking frequently. Continue to simmer for 3-5 minutes, or until the sauce has thickened enough to coat the back of a spoon. (If using the cornstarch/arrowroot slurry method instead of flour, bring the broth/milk mixture to a simmer first, then whisk in the prepared cold slurry. Continue simmering and whisking until thickened, usually 1-2 minutes).
- Season the Sauce: Remove the sauce from the heat. Stir in the salt, black pepper, dried thyme, garlic powder, onion powder, and pinch of nutmeg (if using). Taste and adjust seasonings as needed. Remember that the chicken and cheese will also add saltiness.
- Combine Ingredients: In a large mixing bowl, combine the cooked shredded chicken, cooked rice (or quinoa), thawed peas, thawed corn (if using), chopped celery, chopped carrots, and chopped fresh parsley.
- Add Sauce: Pour the prepared gluten-free cream sauce over the chicken, rice, and vegetable mixture in the bowl. Stir gently but thoroughly until everything is evenly coated.
- Assemble Casserole: Transfer the mixture into the prepared baking dish, spreading it out evenly.
- Prepare Topping: In a small bowl, combine the shredded cheddar cheese and the gluten-free breadcrumbs (or crushed crackers/cornflakes). If desired, drizzle the 1 tablespoon of melted butter or oil over the breadcrumbs and toss to coat – this enhances browning.
- Top and Bake: Sprinkle the cheese and breadcrumb mixture evenly over the top of the casserole.
- Bake: Place the casserole dish in the preheated oven. Bake for 30-35 minutes, or until the casserole is heated through, bubbly around the edges, and the topping is golden brown and melted. If the topping browns too quickly, you can loosely tent the dish with aluminum foil for the last 10-15 minutes of baking.
- Rest: Let the casserole rest for 5-10 minutes before serving. This allows the sauce to set slightly and makes it easier to serve.
- Garnish and Serve: Garnish with additional fresh chopped parsley, if desired, and serve hot.
Nutrition Facts
- Servings: 6-8 servings
- Calories per serving: Approximately 400-550 calories (This is an estimate and will vary significantly based on the specific ingredients used, such as the type of milk, amount and type of cheese, fat content of the chicken, and whether rice or quinoa is used).
Note: For a precise nutritional breakdown, it’s recommended to use an online nutrition calculator and input your specific ingredients and quantities. This estimate assumes moderate use of cheese and standard ingredients. Using lower-fat milk, less cheese, leaner chicken, and incorporating more vegetables can reduce the calorie count.
Preparation Time
- Active Preparation Time: Approximately 25 minutes (includes chopping vegetables, measuring ingredients, making the sauce, and assembling the casserole, assuming chicken and rice/quinoa are already cooked).
- Cooking Time: 35-40 minutes (baking time in the oven).
- Resting Time: 5-10 minutes.
- Total Time: Approximately 1 hour 5 minutes to 1 hour 15 minutes (if chicken and rice/quinoa are pre-cooked). If you need to cook the chicken and rice/quinoa from scratch, add that time accordingly (potentially another 30-60 minutes depending on the method).
How to Serve Gluten-Free Chicken Casserole
This versatile casserole can be served in various ways to suit different occasions and preferences. Here are some ideas:
- Classic Comfort Meal:
- Serve generous portions directly from the baking dish.
- Pair with a simple side salad with a light vinaigrette to provide a fresh contrast to the creamy casserole. A mix of leafy greens, cucumber, and cherry tomatoes works perfectly.
- Offer warm, buttered gluten-free rolls or bread on the side for soaking up any extra sauce.
- With Steamed Vegetables:
- Complement the casserole with a side of brightly coloured steamed vegetables like:
- Broccoli florets
- Green beans (plain or amandine)
- Asparagus spears
- A medley of carrots and zucchini ribbons
- Complement the casserole with a side of brightly coloured steamed vegetables like:
- Enhanced Presentation:
- Garnish individual servings with a sprinkle of fresh herbs like:
- Chopped parsley (as suggested in the recipe)
- Fresh chives
- A tiny pinch of paprika for colour
- A dollop of sour cream or plain Greek yogurt (ensure GF) can add extra tang and creaminess if desired.
- Garnish individual servings with a sprinkle of fresh herbs like:
- Potluck Perfect:
- This casserole travels well. Bake it in a dish with a secure lid or cover tightly with foil.
- Reheat gently at the event if necessary, or serve warm if transported soon after baking. It’s a guaranteed crowd-pleaser that accommodates gluten-free guests.
- Lunch Leftovers:
- Portion cooled leftovers into individual microwave-safe containers for easy grab-and-go lunches throughout the week. Reheats beautifully.
Additional Tips for the Best Gluten-Free Chicken Casserole
- Make-Ahead Convenience: This casserole is ideal for making ahead. Assemble the entire casserole up to the point of baking (steps 1-9), cover tightly with plastic wrap or foil, and refrigerate for up to 24 hours. When ready to bake, remove it from the refrigerator about 30 minutes before baking to take the chill off (this promotes even heating). You may need to add 5-10 minutes to the baking time if baking directly from cold. Add the topping (step 10-11) just before placing it in the oven to prevent it from becoming soggy.
- Freezer-Friendly Meal Prep: Bake the casserole completely and allow it to cool thoroughly. Cover the dish tightly with a layer of plastic wrap followed by a layer of heavy-duty aluminum foil, or transfer portions to freezer-safe containers. Label with the date and contents. Freeze for up to 2-3 months. To reheat, thaw overnight in the refrigerator. Remove the plastic wrap, cover loosely with foil, and bake in a preheated 350°F (175°C) oven for 20-30 minutes, or until heated through. You can remove the foil for the last 10 minutes and add a little extra fresh cheese on top if desired.
- Vegetable Variety Power-Up: Don’t be afraid to swap or add vegetables based on preference or what’s in season. Sautéed mushrooms add umami depth. Diced bell peppers (red or yellow add sweetness and colour). Steamed broccoli florets or chopped green beans can replace or supplement the peas and corn. Ensure any added vegetables are pre-cooked (steamed or sautéed briefly) if they are harder varieties, so they become tender during baking. Adding more vegetables is also a great way to boost the nutritional value.
- Dairy-Free Deliciousness: This recipe is easily adaptable for a dairy-free diet. Use a good quality plant-based butter alternative for sautéing and in the topping. Substitute the milk with an unsweetened, unflavoured plant-based milk like almond, soy (if tolerated), or certified gluten-free oat milk. Use your favourite brand of dairy-free shredded cheddar-style cheese alternative for the topping. The creaminess and flavour will be slightly different but still delicious.
- Sauce Consistency Control: The thickness of your sauce can depend on the specific gluten-free flour blend used or how long you simmer it. If your sauce seems too thick after adding the chicken and veggies, stir in a splash more gluten-free broth or milk until it reaches the desired consistency before transferring to the baking dish. Conversely, if it seems too thin, let it simmer for a few extra minutes while whisking before combining it with the other ingredients. Remember it will thicken slightly more as it bakes and cools.
Frequently Asked Questions (FAQ)
- Q: Can I use something other than rice or quinoa?
- A: Absolutely! Cooked gluten-free pasta shapes, like rotini, penne, or elbow macaroni, work wonderfully as a substitute for rice or quinoa. Cook the pasta according to package directions, usually aiming for slightly al dente (slightly undercooked), as it will cook further in the oven. Drain it well before adding it to the chicken and vegetable mixture. You might need slightly less pasta than cooked rice (around 3-4 cups cooked pasta). Small, cubed, pre-cooked potatoes (boiled or roasted) could also work for a different texture.
- Q: How can I ensure my ingredients are truly gluten-free? This is important for celiac disease.
- A: Diligence is key, especially for those with celiac disease. Always check labels. Look for products explicitly certified “Gluten-Free” by a reputable organization (like GFCO, NSF). Pay close attention to:
- Broths/Stocks: Can contain wheat derivatives or barley-based yeast extract.
- Sauces/Condiments: Check any pre-made sauces or seasonings.
- Flour Blends: Ensure it’s a dedicated gluten-free blend.
- Oats/Oat Milk: Must be certified gluten-free due to high cross-contamination risk.
- Processed Meats/Seasonings: Sometimes contain gluten fillers.
- Breadcrumbs/Crackers: Must be specified gluten-free.
When in doubt, contact the manufacturer or choose a different, clearly labelled product. Assume nothing is safe unless verified.
- A: Diligence is key, especially for those with celiac disease. Always check labels. Look for products explicitly certified “Gluten-Free” by a reputable organization (like GFCO, NSF). Pay close attention to:
- Q: My sauce didn’t thicken properly. What went wrong?
- A: There are a few potential reasons.
- Not enough simmering time: The sauce needs to gently simmer for several minutes to allow the starch (from the GF flour or cornstarch/arrowroot) to fully hydrate and thicken.
- Incorrect starch amount: You might need slightly more GF flour blend or slurry, depending on the brand and desired thickness. You can try whisking a little more slurry (1 tbsp cornstarch/arrowroot + 2 tbsp cold water/broth) into the simmering sauce.
- Old/Ineffective starch: Cornstarch and some GF flours can lose potency over time.
- Ratio of liquid to thickener: Ensure you measured accurately.
Remember it continues to thicken upon baking and resting. If it’s slightly thin going into the oven, it will likely be fine.
- A: There are a few potential reasons.
- Q: Can I add other seasonings or herbs?
- A: Definitely! This recipe provides a classic, versatile base. Feel free to customize the seasonings. Consider adding:
- Smoked paprika: For a smoky flavour.
- Dried rosemary: Pairs well with chicken.
- A pinch of cayenne pepper or red pepper flakes: For a little heat.
- Poultry seasoning: A classic blend that works well.
- Fresh herbs: Stirring in fresh dill or tarragon along with the parsley can add unique flavour dimensions. Adjust salt and pepper levels accordingly after adding other seasonings.
- A: Definitely! This recipe provides a classic, versatile base. Feel free to customize the seasonings. Consider adding:
- Q: How long will leftovers last, and what’s the best way to reheat them?
- A: Leftover Gluten-Free Chicken Casserole, stored properly in an airtight container in the refrigerator, will last for 3-4 days. To reheat, you have a couple of options:
- Microwave: Place an individual portion on a microwave-safe plate, cover loosely, and heat on medium-high power for 1.5 – 3 minutes, stirring halfway through, until heated through.
- Oven: Place the desired amount in an oven-safe dish, cover loosely with foil (to prevent drying out), and heat in a preheated 350°F (175°C) oven for 15-25 minutes (depending on the portion size) until hot and bubbly. You can add a splash of milk or broth if it seems dry before reheating. Adding a little fresh cheese on top before oven reheating can help refresh the topping.
- A: Leftover Gluten-Free Chicken Casserole, stored properly in an airtight container in the refrigerator, will last for 3-4 days. To reheat, you have a couple of options:

Gluten-Free Chicken Casserole Recipe
Ingredients
- For the Casserole Base:
- 3 cups cooked, shredded or diced chicken (rotisserie chicken works great, or use poached/baked chicken breasts/thighs)
- 2 cups cooked rice (white or brown) or cooked quinoa (ensure rice/quinoa is cooked according to package directions beforehand)
- 1 cup frozen peas, thawed
- 1 cup frozen corn, thawed (optional, can substitute with other vegetables like steamed broccoli florets)
- 1/2 cup chopped celery (about 1 large stalk)
- 1/2 cup chopped carrots (about 1 medium carrot)
- 1/4 cup chopped fresh parsley, plus more for garnish
- For the Creamy Gluten-Free Sauce:
- 3 tablespoons unsalted butter (or dairy-free butter alternative)
- 1 medium onion, finely chopped (about 1 cup)
- 2 cloves garlic, minced
- 1/3 cup gluten-free all-purpose flour blend (one containing xanthan gum is usually best for sauces, or use 3 tablespoons cornstarch or arrowroot starch whisked into a little cold broth/milk first to make a slurry)
- 3 cups gluten-free chicken broth (carefully check labels to ensure it’s certified GF)
- 1 cup milk (whole, low-fat, or unsweetened almond/soy/oat milk for dairy-free – check oat milk is certified GF)
- 1 teaspoon salt (or to taste)
- 1/2 teaspoon black pepper (or to taste)
- 1/2 teaspoon dried thyme
- 1/4 teaspoon garlic powder
- 1/4 teaspoon onion powder
- Pinch of nutmeg (optional, enhances creaminess)
- For the Topping:
- 1 cup shredded sharp cheddar cheese (or dairy-free cheddar alternative)
- 1/2 cup gluten-free breadcrumbs or crushed gluten-free crackers/cornflakes (check labels carefully)
- 1 tablespoon melted unsalted butter (or dairy-free butter/olive oil) – optional, for browning breadcrumbs
Instructions
- Preheat and Prepare: Preheat your oven to 375°F (190°C). Lightly grease a 9×13 inch baking dish (or a similar 3-quart capacity casserole dish).
- Cook Aromatics: In a large saucepan or Dutch oven, melt the 3 tablespoons of butter over medium heat. Add the chopped onion and cook, stirring occasionally, for about 5-7 minutes, or until softened and translucent. Add the minced garlic and cook for another minute until fragrant, being careful not to burn it.
- Make the Roux (Flour Method): If using gluten-free all-purpose flour blend, sprinkle it evenly over the cooked onions and garlic. Cook, whisking constantly, for 1-2 minutes. This helps cook out the raw flour taste and prevents lumps. It should form a thick paste (a gluten-free roux).
- Gradually Add Liquids: Slowly pour in the gluten-free chicken broth, whisking constantly and vigorously to incorporate the flour mixture smoothly. Start with about half a cup, whisk until smooth, then gradually add the remaining broth while continuing to whisk. Once all the broth is incorporated, slowly whisk in the milk.
- Thicken the Sauce: Bring the mixture to a gentle simmer over medium heat, whisking frequently. Continue to simmer for 3-5 minutes, or until the sauce has thickened enough to coat the back of a spoon. (If using the cornstarch/arrowroot slurry method instead of flour, bring the broth/milk mixture to a simmer first, then whisk in the prepared cold slurry. Continue simmering and whisking until thickened, usually 1-2 minutes).
- Season the Sauce: Remove the sauce from the heat. Stir in the salt, black pepper, dried thyme, garlic powder, onion powder, and pinch of nutmeg (if using). Taste and adjust seasonings as needed. Remember that the chicken and cheese will also add saltiness.
- Combine Ingredients: In a large mixing bowl, combine the cooked shredded chicken, cooked rice (or quinoa), thawed peas, thawed corn (if using), chopped celery, chopped carrots, and chopped fresh parsley.
- Add Sauce: Pour the prepared gluten-free cream sauce over the chicken, rice, and vegetable mixture in the bowl. Stir gently but thoroughly until everything is evenly coated.
- Assemble Casserole: Transfer the mixture into the prepared baking dish, spreading it out evenly.
- Prepare Topping: In a small bowl, combine the shredded cheddar cheese and the gluten-free breadcrumbs (or crushed crackers/cornflakes). If desired, drizzle the 1 tablespoon of melted butter or oil over the breadcrumbs and toss to coat – this enhances browning.
- Top and Bake: Sprinkle the cheese and breadcrumb mixture evenly over the top of the casserole.
- Bake: Place the casserole dish in the preheated oven. Bake for 30-35 minutes, or until the casserole is heated through, bubbly around the edges, and the topping is golden brown and melted. If the topping browns too quickly, you can loosely tent the dish with aluminum foil for the last 10-15 minutes of baking.
- Rest: Let the casserole rest for 5-10 minutes before serving. This allows the sauce to set slightly and makes it easier to serve.
- Garnish and Serve: Garnish with additional fresh chopped parsley, if desired, and serve hot.
Nutrition
- Serving Size: One Normal Portion
- Calories: 400-550