Of all the dishes in my comfort food arsenal, this Gluten-Free Broccoli and Cheddar Rice holds a special, almost sacred place. It began as a weeknight experiment, an attempt to recreate the soul-soothing flavors of that famous broccoli cheddar soup in a heartier, meal-worthy form. I needed something that would satisfy the whole family—a picky toddler, a perpetually hungry teenager, and a husband who appreciates a good, cheesy casserole. The first time I served it, the silence that fell over the dinner table was a testament to its success. All I could hear was the clinking of forks against plates. My son, who usually pushes broccoli around his plate like a tiny green enemy, asked for a second helping. It was a victory. This dish has since become our go-to for chilly evenings, busy weeknights, and any time we need a culinary hug. It’s creamy without being heavy, cheesy without being overwhelming, and packed with enough green goodness to make me feel like a responsible parent. It’s more than just a recipe; it’s a bowl of pure, unadulterated comfort that just happens to be completely gluten-free.
The Ultimate Gluten-Free Broccoli and Cheddar Rice
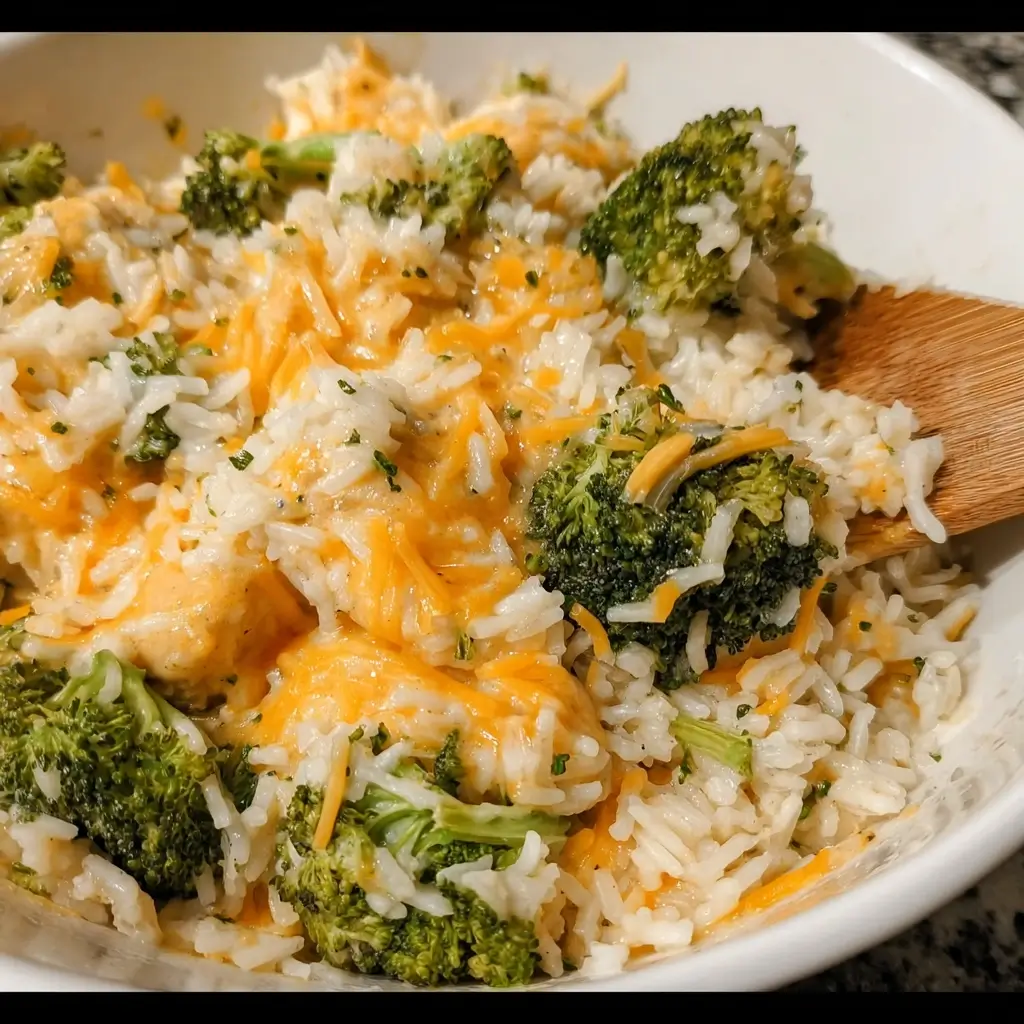
This recipe is designed to be a one-pot wonder, minimizing cleanup while maximizing flavor. It perfectly balances the creamy texture of the rice, the sharp tang of cheddar cheese, and the earthy freshness of broccoli. We are building layers of flavor from the ground up, starting with an aromatic base and finishing with a rich, velvety cheese sauce that coats every single grain of rice and floret of broccoli.
Ingredients
Here is everything you will need to create this masterpiece. The key to success lies in using quality ingredients, especially the cheese.
- For the Rice Base:
- 2 tablespoons Unsalted Butter or Olive Oil: This is the foundation for our flavor. Butter adds richness, while olive oil is a great dairy-free alternative.
- 1 medium Yellow Onion, finely diced: Provides a sweet, aromatic base that mellows as it cooks.
- 2 cloves Garlic, minced: Adds a pungent, savory depth. Don’t use pre-minced from a jar if you can help it; fresh garlic makes a world of difference.
- 1 ½ cups Long-Grain White Rice: Long-grain rice, like Jasmine or Basmati, holds its shape well and cooks up fluffy, preventing a mushy final product. Be sure to rinse it thoroughly to remove excess starch.
- 4 cups Gluten-Free Chicken or Vegetable Broth, low-sodium: Using broth instead of water infuses every grain of rice with savory flavor from the inside out. Using a certified gluten-free brand is crucial for those with celiac disease.
- ½ teaspoon Smoked Paprika: Adds a subtle smokiness that beautifully complements the cheddar.
- ¼ teaspoon Dried Mustard Powder: A secret weapon that enhances the “cheesiness” of the cheese.
- Salt and Freshly Ground Black Pepper, to taste: Essential for seasoning every layer.
- For the Broccoli and Cheese Sauce:
- 4 cups Broccoli Florets, cut into small, bite-sized pieces (about 1 large head): Using small pieces ensures they cook evenly and you get broccoli in every bite.
- 1 cup Milk (whole milk recommended for creaminess): This will be the base of our creamy cheese sauce. For dairy-free options, see the tips section.
- 3 cups (about 12 oz) Sharp Cheddar Cheese, freshly grated: Do not use pre-shredded cheese. Pre-shredded cheese is coated in starches like potato starch or cellulose to prevent clumping, which will result in a grainy, separated cheese sauce. Grating your own from a block is the single most important step for a smooth sauce.
Step-by-Step Instructions
Follow these instructions closely for a foolproof result. The process is straightforward, focusing on building flavor at each stage.
Step 1: Build the Aromatic Base
In a large pot or Dutch oven with a tight-fitting lid, melt the 2 tablespoons of butter or olive oil over medium heat. Add the finely diced yellow onion and a pinch of salt. Sauté for 5-7 minutes, stirring occasionally, until the onion becomes soft, translucent, and slightly sweet. Add the minced garlic and cook for another minute until fragrant. Be careful not to burn the garlic, as it will turn bitter.
Step 2: Toast the Rice
Add the rinsed and drained long-grain white rice to the pot. Stir constantly for about 2 minutes, allowing the rice to “toast” in the butter and aromatics. This step is crucial; it gives the rice a slightly nutty flavor and helps the grains remain separate and fluffy after cooking.
Step 3: Deglaze and Simmer
Pour in about a half-cup of the gluten-free broth to deglaze the pot, scraping up any browned bits from the bottom with a wooden spoon. This is where a lot of the flavor is. Stir in the remaining broth, smoked paprika, and dried mustard powder. Increase the heat to high and bring the mixture to a rolling boil.
Step 4: Cook the Rice
Once boiling, give it one final stir, then reduce the heat to the lowest possible setting. Cover the pot with a tight-fitting lid and let it simmer for 15 minutes. Do not lift the lid during this time. The steam trapped inside is essential for cooking the rice evenly.
Step 5: Steam the Broccoli
After 15 minutes, the rice should have absorbed most of the liquid. Quickly remove the lid and scatter the bite-sized broccoli florets evenly over the top of the rice. Immediately replace the lid and let it continue to cook on low for another 5-7 minutes. The residual steam will perfectly cook the broccoli, leaving it tender-crisp and bright green.
Step 6: Create the Velvety Cheese Sauce
Turn off the heat completely. Remove the lid and gently pour the 1 cup of milk over the broccoli and rice. Now, add the freshly grated sharp cheddar cheese.
Step 7: The Final Stir
Using a spatula or wooden spoon, gently fold everything together. Stir until the cheese is completely melted and has formed a creamy, luscious sauce that coats every ingredient. The residual heat from the rice and the pot is all you need to melt the cheese perfectly. Overheating at this stage can cause the cheese to become oily or grainy.
Step 8: Rest and Serve
Let the dish rest for 5 minutes off the heat. This allows the sauce to thicken slightly and the flavors to meld together. Taste and adjust seasoning with additional salt and freshly ground black pepper if needed before serving warm.
Nutrition Facts
Please note that these values are an estimate and can vary based on the specific ingredients used (e.g., type of milk, brand of broth, etc.).
- Servings: 6-8 hearty servings
- Calories per serving (approximate): 450-550 kcal
This dish provides a good balance of carbohydrates for energy, protein from the cheese and milk, and essential vitamins and fiber from the broccoli and onion.
Preparation Time
This recipe is designed for efficiency, making it perfect for a weeknight.
- Prep Time: 15 minutes (chopping vegetables, grating cheese)
- Cook Time: 25-30 minutes
- Total Time: 40-45 minutes
How to Serve This Cheesy Delight
This versatile dish can be the star of the show or a stunning supporting actor. Here are some of our favorite ways to serve it:
- As a Complete Vegetarian Main Course:
- Serve a generous portion in a bowl on its own.
- Top with a sprinkle of fresh chives, a dollop of sour cream or plain Greek yogurt for a tangy contrast.
- Add a crunchy element by sprinkling toasted, gluten-free breadcrumbs or crushed nuts (like almonds or pecans) on top.
- As a Hearty and Satisfying Side Dish:
- With Grilled or Roasted Meats: The creamy rice is a perfect counterpoint to the smoky char of grilled proteins.
- Grilled Chicken Breast or Thighs
- Perfectly Roasted Salmon
- Juicy Pork Chops or a Roasted Pork Loin
- A simple pan-seared steak
- With a Simple Salad: Pair it with a crisp green salad dressed in a light vinaigrette. The acidity of the dressing will cut through the richness of the cheese, cleansing the palate between bites.
- With Grilled or Roasted Meats: The creamy rice is a perfect counterpoint to the smoky char of grilled proteins.
- Creative Serving Transformations:
- Stuffed Bell Peppers: Halve bell peppers (any color works!), remove the seeds, and stuff them with the finished broccoli cheddar rice. Top with a little extra cheese and bake at 375°F (190°C) for 20-25 minutes, or until the peppers are tender.
- Broccoli Cheddar “Bowls”: Use the rice as a base for a build-your-own bowl night. Set out toppings like shredded rotisserie chicken, crispy bacon bits, sautéed mushrooms, black beans, and diced tomatoes.
- As a Filling for Wraps: Spoon the cooled rice into a large gluten-free tortilla for a delicious and portable lunch.
Additional Tips for Recipe Perfection
These five tips will elevate your dish from great to absolutely unforgettable.
- The Rice Rinse is Non-Negotiable: Rinsing your long-grain white rice under cold running water until the water runs clear is a critical step. This removes the excess surface starch that can make the final dish sticky, gummy, or mushy. It ensures each grain remains distinct and fluffy, which is the ideal texture for this creamy casserole.
- Master the Cheese Melt: The secret to a luxuriously smooth, non-grainy cheese sauce is heat management. Never add the cheese over direct heat. Turn the burner off completely before adding the milk and cheese. The residual heat in the pot and the rice is more than enough to melt the cheese gently and effectively. Stirring constantly but gently helps it emulsify into a perfect sauce rather than separating into an oily mess.
- Unlock Flavor with Broth Choice: While any gluten-free broth works, choosing a high-quality, flavorful one makes a significant impact. A robust chicken broth adds a savory depth that is classic comfort food. A rich vegetable broth, especially one with mushroom or mirepoix notes, can add a wonderful umami complexity. Always opt for low-sodium so you can control the final saltiness of the dish yourself.
- Don’t Overcook the Broccoli: The goal is tender-crisp broccoli, not mushy, army-green broccoli. By adding the florets on top of the mostly-cooked rice and letting them steam for just 5-7 minutes, they retain their vibrant color, a slight bite, and more of their nutritional value. If you prefer very soft broccoli, you can add it a couple of minutes earlier.
- Let it Rest Before Serving: It can be tempting to dive right in the moment the cheese melts, but patience pays off. Allowing the dish to rest, covered and off the heat, for 5-10 minutes is a game-changer. This brief period lets the starches in the rice settle, the sauce to thicken to its ideal consistency, and all the individual flavors to meld and marry into a cohesive, delicious whole.
Frequently Asked Questions (FAQ)
Here are answers to some common questions you might have about this recipe.
1. Can I use brown rice instead of white rice?
Yes, you absolutely can use brown rice for a healthier, more fiber-rich version. However, you will need to adjust the cooking time and liquid amount. Brown rice typically requires more liquid (add an extra ½ to ¾ cup of broth) and a much longer simmering time (around 40-45 minutes). Follow the recipe as written, but cook the brown rice in the broth for about 30-35 minutes before adding the broccoli on top to steam for the final 10 minutes.
2. What makes this recipe specifically gluten-free?
This recipe is naturally gluten-free by design, as its core ingredients (rice, broccoli, cheese, milk, onions, garlic) do not contain gluten. The critical point for someone with celiac disease or a severe intolerance is to ensure you are using a certified gluten-free chicken or vegetable broth. Some broth brands contain hidden gluten from flavorings or yeast extract, so always check the label.
3. My cheese sauce became grainy/oily. What did I do wrong?
This is the most common issue when making cheese sauces and it almost always comes down to two things: heat and the type of cheese. If the heat is too high when you add the cheese, the proteins in the dairy will tighten up and separate, squeezing out the fat and creating a grainy, oily texture. The other culprit is using pre-shredded cheese, which contains anti-caking agents that prevent a smooth melt. To fix this, always turn the heat OFF before adding cheese, and always grate your own cheese from a block.
4. How can I make this recipe dairy-free or vegan?
It’s definitely possible with a few smart substitutions!
- For Butter: Use a quality olive oil or a vegan butter substitute.
- For Milk: Use an unsweetened, unflavored, creamy plant-based milk like oat milk or cashew milk. Almond milk can work but is often thinner.
- For Cheese: This is the trickiest part. Use a high-quality brand of vegan cheddar shreds that you know melts well. Brands like Violife or Daiya Cutting Board Shreds are popular choices. Be aware that the texture and flavor will be different from dairy cheese, but still delicious.
- Broth: Ensure you use vegetable broth.
5. How do I properly store and reheat leftovers?
Leftovers are fantastic! Store them in an airtight container in the refrigerator for up to 4 days. The rice will absorb more of the liquid as it sits. To reheat, you can use a microwave, but the best method is on the stovetop. Place the desired amount in a small saucepan over low heat. Add a splash of milk or broth (about 1-2 tablespoons per cup of rice) and stir gently as it heats. This will rehydrate the rice and bring the sauce back to its original creamy glory.

Gluten-Free Broccoli and Cheddar Rice Recipe
Ingredients
- For the Rice Base:
- 2 tablespoons Unsalted Butter or Olive Oil: This is the foundation for our flavor. Butter adds richness, while olive oil is a great dairy-free alternative.
- 1 medium Yellow Onion, finely diced: Provides a sweet, aromatic base that mellows as it cooks.
- 2 cloves Garlic, minced: Adds a pungent, savory depth. Don’t use pre-minced from a jar if you can help it; fresh garlic makes a world of difference.
- 1 ½ cups Long-Grain White Rice: Long-grain rice, like Jasmine or Basmati, holds its shape well and cooks up fluffy, preventing a mushy final product. Be sure to rinse it thoroughly to remove excess starch.
- 4 cups Gluten-Free Chicken or Vegetable Broth, low-sodium: Using broth instead of water infuses every grain of rice with savory flavor from the inside out. Using a certified gluten-free brand is crucial for those with celiac disease.
- ½ teaspoon Smoked Paprika: Adds a subtle smokiness that beautifully complements the cheddar.
- ¼ teaspoon Dried Mustard Powder: A secret weapon that enhances the “cheesiness” of the cheese.
- Salt and Freshly Ground Black Pepper, to taste: Essential for seasoning every layer.
- For the Broccoli and Cheese Sauce:
- 4 cups Broccoli Florets, cut into small, bite-sized pieces (about 1 large head): Using small pieces ensures they cook evenly and you get broccoli in every bite.
- 1 cup Milk (whole milk recommended for creaminess): This will be the base of our creamy cheese sauce. For dairy-free options, see the tips section.
- 3 cups (about 12 oz) Sharp Cheddar Cheese, freshly grated: Do not use pre-shredded cheese. Pre-shredded cheese is coated in starches like potato starch or cellulose to prevent clumping, which will result in a grainy, separated cheese sauce. Grating your own from a block is the single most important step for a smooth sauce.
Instructions
Step 1: Build the Aromatic Base
In a large pot or Dutch oven with a tight-fitting lid, melt the 2 tablespoons of butter or olive oil over medium heat. Add the finely diced yellow onion and a pinch of salt. Sauté for 5-7 minutes, stirring occasionally, until the onion becomes soft, translucent, and slightly sweet. Add the minced garlic and cook for another minute until fragrant. Be careful not to burn the garlic, as it will turn bitter.
Step 2: Toast the Rice
Add the rinsed and drained long-grain white rice to the pot. Stir constantly for about 2 minutes, allowing the rice to “toast” in the butter and aromatics. This step is crucial; it gives the rice a slightly nutty flavor and helps the grains remain separate and fluffy after cooking.
Step 3: Deglaze and Simmer
Pour in about a half-cup of the gluten-free broth to deglaze the pot, scraping up any browned bits from the bottom with a wooden spoon. This is where a lot of the flavor is. Stir in the remaining broth, smoked paprika, and dried mustard powder. Increase the heat to high and bring the mixture to a rolling boil.
Step 4: Cook the Rice
Once boiling, give it one final stir, then reduce the heat to the lowest possible setting. Cover the pot with a tight-fitting lid and let it simmer for 15 minutes. Do not lift the lid during this time. The steam trapped inside is essential for cooking the rice evenly.
Step 5: Steam the Broccoli
After 15 minutes, the rice should have absorbed most of the liquid. Quickly remove the lid and scatter the bite-sized broccoli florets evenly over the top of the rice. Immediately replace the lid and let it continue to cook on low for another 5-7 minutes. The residual steam will perfectly cook the broccoli, leaving it tender-crisp and bright green.
Step 6: Create the Velvety Cheese Sauce
Turn off the heat completely. Remove the lid and gently pour the 1 cup of milk over the broccoli and rice. Now, add the freshly grated sharp cheddar cheese.
Step 7: The Final Stir
Using a spatula or wooden spoon, gently fold everything together. Stir until the cheese is completely melted and has formed a creamy, luscious sauce that coats every ingredient. The residual heat from the rice and the pot is all you need to melt the cheese perfectly. Overheating at this stage can cause the cheese to become oily or grainy.
Step 8: Rest and Serve
Let the dish rest for 5 minutes off the heat. This allows the sauce to thicken slightly and the flavors to meld together. Taste and adjust seasoning with additional salt and freshly ground black pepper if needed before serving warm
Nutrition
- Serving Size: One Normal Portion
- Calories: 450-550