


In our house, weeknights are often a whirlwind of activities. Between school runs, after-school clubs, and the general hustle of daily life, finding time to cook a delicious and satisfying dinner can feel like a Herculean task. That’s why recipes that are both easy to execute and genuinely crowd-pleasing are absolute lifesavers. This recipe for Glazed Chicken Drumsticks has become a staple in our rotation for precisely those reasons. From the moment the sweet and savory aroma starts to fill the kitchen, to the contented silence as everyone devours their sticky, flavorful chicken, this dish is a guaranteed winner. Even my pickiest eater, who usually shies away from anything “saucy,” happily asks for seconds. The secret lies in the simple yet incredibly effective marinade that transforms humble chicken drumsticks into a restaurant-worthy meal, all with minimal effort on your part. If you’re searching for a weeknight dinner that’s both effortless and exciting, look no further. These Glazed Chicken Drumsticks are about to become your new go-to recipe.
Ingredients: The Building Blocks of Flavor
The magic of these Glazed Chicken Drumsticks lies in the harmonious blend of simple yet impactful ingredients. Each component plays a crucial role in creating the signature sweet, savory, and slightly tangy flavor profile that makes this dish so irresistible. Let’s delve into each ingredient and understand its contribution to the overall culinary symphony.
- 3 pounds (about 14) Chicken Drumsticks: The star of the show! Chicken drumsticks are an excellent choice for this recipe due to their affordability, inherent juiciness, and robust flavor. They hold up beautifully to marinating and baking, ensuring tender and flavorful results every time. When selecting your drumsticks, opt for those that are plump and have a healthy pink color. For optimal browning and even cooking, try to choose drumsticks that are roughly similar in size. You can easily adjust the quantity based on your family size or desired servings. If you are feeding a larger crowd, simply double or even triple the recipe, ensuring you have a large enough baking dish and rack to accommodate all the chicken without overcrowding. Remember, overcrowding can lead to steaming instead of browning, so give your drumsticks some breathing room!
- 3 tablespoons Soy Sauce: Soy sauce is the backbone of the savory element in our glaze. It provides a rich umami depth that balances the sweetness of the honey and adds complexity to the overall flavor profile. Using soy sauce not only seasons the chicken from within but also contributes to a beautiful, glossy glaze as it caramelizes in the oven. For a richer, more intense flavor, consider using low-sodium soy sauce and adding a pinch of salt separately, allowing you to control the saltiness more precisely. If you are watching your sodium intake, low-sodium soy sauce is definitely the way to go, without compromising on the essential savory note. For those seeking a gluten-free alternative, tamari can be used as a direct substitute for soy sauce, offering a similar depth of flavor.
- 2 tablespoons Honey: Honey is the key to the “glazed” aspect of this recipe. It brings a natural sweetness that beautifully complements the savory soy sauce and chili sauce. Honey also helps to create that desirable sticky, caramelized coating as it bakes, giving the drumsticks a wonderful texture and visual appeal. You can experiment with different types of honey to subtly alter the flavor profile. A wildflower honey will impart a delicate floral note, while buckwheat honey will offer a bolder, more robust flavor. If you prefer a less intense sweetness, you can reduce the amount of honey slightly. For a vegan alternative, agave nectar or maple syrup can be used, although they may result in a slightly different flavor and texture.
- 1 tablespoon Canola or Vegetable Oil: Oil is essential for both flavor and texture. In the marinade, oil helps to carry the flavors of the other ingredients and penetrate the chicken, ensuring it’s flavorful throughout. During baking, the oil aids in browning and crisping the skin (or what’s left of it if you choose to remove it). Canola or vegetable oil are neutral in flavor, allowing the other ingredients to shine. However, you can also use olive oil for a slightly richer flavor, or even sesame oil for an added layer of nutty aroma, especially if you want to lean into an Asian-inspired flavor profile. The choice of oil can subtly influence the final taste of the dish.
- 1 tablespoon Chili Sauce: Chili sauce adds a touch of heat and tanginess that elevates the glaze from simply sweet and savory to something truly dynamic. It provides a pleasant kick that balances the sweetness and cuts through the richness of the chicken. The level of spiciness can be adjusted by choosing different types of chili sauce. For a mild heat, use a sweet chili sauce or a mild sriracha. For a more pronounced kick, opt for a spicier sriracha or sambal oelek. If you prefer to control the heat even more precisely, you can use a pinch of red pepper flakes instead, allowing you to customize the spiciness to your exact preference. Alternatively, for those who are completely averse to spice, you can omit the chili sauce altogether, although it does contribute significantly to the overall flavor complexity.
- ½ teaspoon Salt: Salt is a fundamental seasoning that enhances all the other flavors and brings them into balance. It’s crucial for drawing out the natural flavors of the chicken and ensuring the glaze is well-seasoned and not just sweet. The amount of salt can be adjusted to taste, especially if you are using regular soy sauce, which already contains a significant amount of sodium. Always taste the marinade before adding it to the chicken and adjust the salt accordingly. Using kosher salt is recommended for its clean flavor and ease of dissolving.
- ¼ teaspoon Ground Ginger: Ground ginger introduces a warm, aromatic spice that adds another layer of complexity to the glaze. It complements the honey and soy sauce beautifully, contributing to the overall depth of flavor. Freshly grated ginger can also be used for a brighter, more pungent ginger flavor. About ½ teaspoon of freshly grated ginger would be equivalent to ¼ teaspoon of ground ginger. Ginger powder can also be substituted in a pinch, although fresh or ground ginger offers a more nuanced flavor. Ginger not only adds flavor but also has digestive benefits, making it a wonderful addition to richer dishes like glazed chicken.
- ⅛ teaspoon Freshly Ground Black Pepper: Black pepper provides a subtle bite and enhances the other flavors, adding a final touch of seasoning. Freshly ground black pepper is always preferred for its superior flavor and aroma compared to pre-ground pepper. The amount of pepper can be adjusted to taste. A pinch more can be added for those who enjoy a more peppery flavor. Black pepper is a versatile spice that complements both sweet and savory flavors, making it a perfect addition to this glaze.
Instructions: Step-by-Step to Glazed Perfection
Creating these Glazed Chicken Drumsticks is remarkably straightforward, making it ideal for busy weeknights. Follow these detailed instructions to achieve perfectly cooked, flavorful chicken every time.
- Prepare the Chicken: Begin by rinsing the chicken drumsticks under cold water. This step is primarily for hygiene and to remove any potential surface bacteria. After rinsing, pat the drumsticks thoroughly dry with paper towels. Removing excess moisture is crucial for achieving a good sear and ensuring the marinade adheres properly. Place the dried drumsticks in a large, ungreased baking dish. Choosing the right baking dish is important. A dish that is too small will overcrowd the chicken, leading to steaming instead of browning. A 9×13 inch baking dish is usually suitable for this amount of chicken. If you prefer leaner chicken, or are following a Weight Watchers plan, you can remove the skin from the drumsticks at this stage. Removing the skin will reduce the fat content and calories, but it will also result in slightly less crispy chicken. If you choose to remove the skin, do so before marinating, as it will be easier to handle the chicken at this point.
- Whisk Together the Marinade: In a medium-sized bowl, whisk together the soy sauce, honey, canola or vegetable oil, chili sauce, salt, ground ginger, and freshly ground black pepper. Whisking ensures that all the ingredients are thoroughly combined and emulsified, creating a homogenous marinade. Taste the marinade at this point and adjust seasonings as needed. If you prefer a sweeter glaze, add a touch more honey. If you want more heat, add a pinch more chili sauce or red pepper flakes. If you prefer a saltier flavor, add a little more soy sauce or salt. Remember, the flavors will intensify slightly as the chicken marinates and bakes.
- Marinate the Chicken: Pour the prepared marinade evenly over the drumsticks in the baking dish. Use your hands or tongs to ensure that each drumstick is well coated with the marinade. Cover the baking dish tightly with aluminum foil. This step is crucial for allowing the chicken to marinate properly and absorb all the delicious flavors. Refrigerate the chicken for at least 1 hour. For even deeper flavor penetration, you can marinate the chicken for up to 4 hours, or even overnight. The longer the marinating time, the more flavorful and tender the chicken will become. However, even a minimum of 1 hour of marinating will make a significant difference. Make sure the chicken is refrigerated during marinating for food safety reasons.
- Preheat the Oven and Prepare for Baking: When you are ready to bake the chicken, preheat your oven to 375°F (190°C). This temperature is ideal for baking chicken drumsticks, ensuring they cook through without drying out too quickly. While the oven is preheating, prepare a broiler pan. Line the bottom of the broiler pan with aluminum foil for easy cleanup. Place a rack on top of the broiler pan. Using a rack is essential for allowing air to circulate around the chicken, promoting even cooking and browning on all sides. The broiler pan catches any drippings, preventing them from burning in the oven and making cleanup easier.
- Bake the Chicken: Using tongs, carefully lift the marinated drumsticks from the baking dish and place them onto the rack set above the broiler pan. Arrange the drumsticks in a single layer, ensuring they are not overcrowded. Brush the drumsticks generously with the sauce remaining in the baking pan. This step is important for adding extra flavor and glaze during baking. Place the broiler pan with the chicken in the preheated oven and bake for 50 to 60 minutes. The baking time may vary slightly depending on the size of your drumsticks and the accuracy of your oven. To check for doneness, pierce a drumstick with a fork in the thickest part. The juices should run clear, not pink, and the internal temperature should reach 165°F (74°C). The drumsticks should also be tender when pierced with a fork.
- Baste and Glaze (Optional but Recommended): For an even more glazed and flavorful finish, you can baste the chicken with the pan drippings halfway through baking, around the 30-minute mark. Carefully remove the broiler pan from the oven, brush the drumsticks again with the pan sauce, and return to the oven to continue baking. For extra caramelization and a stickier glaze in the last 10-15 minutes of baking, you can increase the oven temperature to 400°F (200°C). Keep a close eye on the chicken to prevent burning, especially if you have increased the temperature. The glaze will become beautifully caramelized and sticky during this final stage.
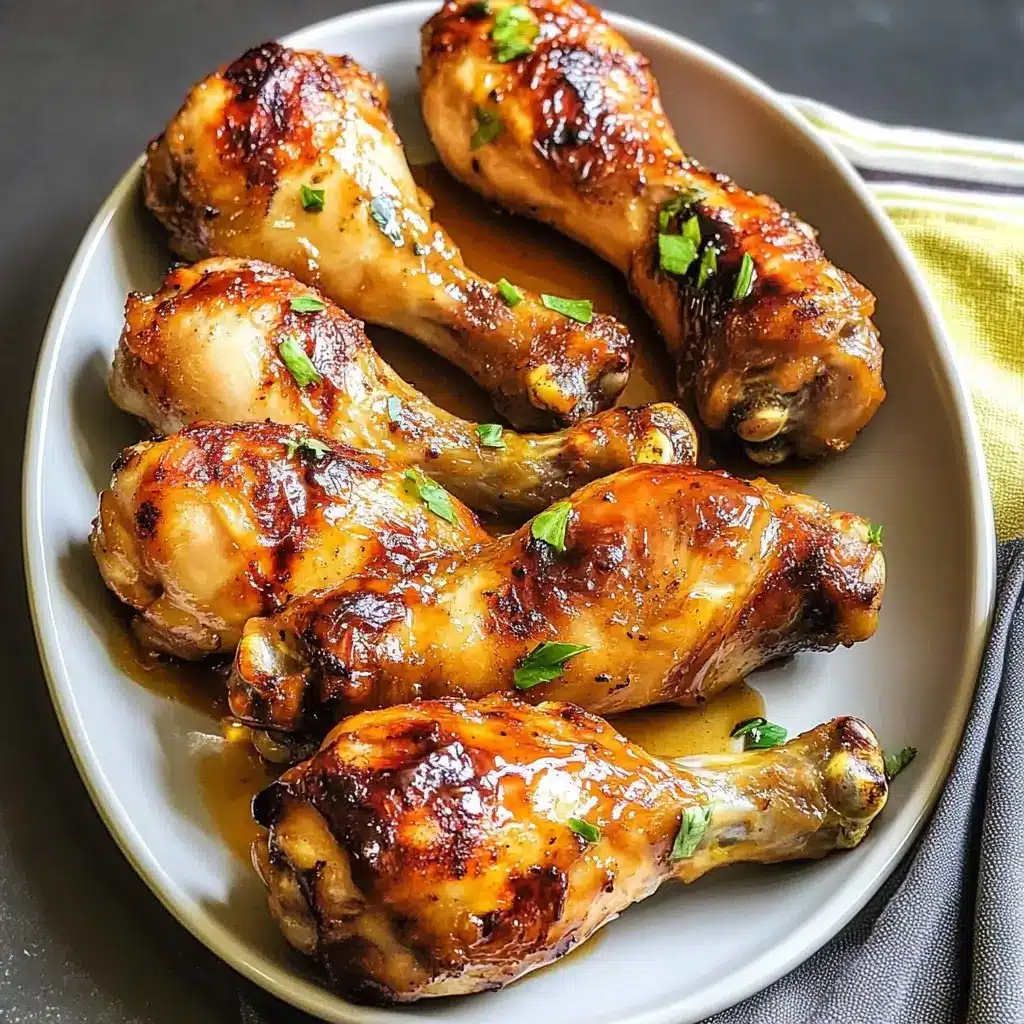
- Rest and Serve: Once the drumsticks are cooked through and beautifully glazed, remove them from the oven and let them rest for 5-10 minutes before serving. Resting allows the juices to redistribute throughout the chicken, resulting in more tender and flavorful meat. Serve the Glazed Chicken Drumsticks hot, garnished with fresh herbs like chopped parsley or green onions, if desired.
Nutrition Facts: A Deliciously Balanced Meal
While indulgence is part of the joy of cooking, it’s also helpful to have a general idea of the nutritional profile of what we’re eating. Please note that these are estimated values and can vary based on specific ingredient brands and portion sizes.
- Servings: Approximately 14 drumsticks (recipe as written)
- Calories per Serving (estimated, per drumstick): Around 250-350 calories (This can vary depending on the size of the drumsticks and whether skin is removed. Removing the skin will significantly reduce calorie and fat content).
Important Note: These are rough estimations. For precise nutritional information, you can use online nutritional calculators, inputting the exact brands and quantities of ingredients you use. Keep in mind that the glaze contains honey and soy sauce, which contribute to the calorie and carbohydrate content. However, chicken is a good source of lean protein, making this dish a reasonably balanced option, especially when served with vegetables and whole grains.
Preparation Time: Quick and Efficient
One of the biggest advantages of this recipe is its efficiency. Here’s a breakdown of the time commitment:
- Prep Time: 15 minutes (This includes rinsing and drying the chicken, and whisking together the marinade.)
- Cook Time: 50-60 minutes (Baking time in the oven.)
- Marinating Time: 1 hour (Minimum, can be extended up to 4 hours or overnight for enhanced flavor.)
- Total Time: 2 hours 5 minutes (Including minimum marinating time.)
As you can see, the active cooking time is minimal. Most of the time is hands-off marinating and baking, making it perfect for weeknights when you need to get dinner on the table without spending hours in the kitchen. You can even prepare the marinade and chicken in the morning or the night before, and simply bake it when you get home from work.
How to Serve: Complete Your Glazed Chicken Feast
These Glazed Chicken Drumsticks are incredibly versatile and pair well with a wide variety of side dishes. Here are some serving suggestions to create a complete and satisfying meal:
- Classic Comfort Sides:
- Mashed Potatoes: Creamy mashed potatoes are a perfect complement to the sticky glaze and savory chicken.
- Roasted Vegetables: Roasted broccoli, carrots, Brussels sprouts, or asparagus add a healthy and flavorful element.
- Corn on the Cob: A summer favorite that adds a touch of sweetness and freshness.
- Mac and Cheese: For a truly indulgent and kid-friendly meal, mac and cheese is always a hit.
- Coleslaw: A crunchy and refreshing coleslaw provides a nice contrast to the richness of the chicken.
- Healthy and Lighter Options:
- Quinoa or Brown Rice: These whole grains provide fiber and nutrients, making for a balanced meal.
- Steamed Green Beans: A simple and healthy side that pairs well with the glaze.
- Salad: A fresh green salad with a light vinaigrette provides a refreshing counterpoint.
- Sweet Potato Fries: For a healthier take on fries, baked sweet potato fries offer a delicious and nutritious option.
- Cauliflower Rice: A low-carb alternative to rice that absorbs the glaze beautifully.
- Asian-Inspired Pairings:
- Steamed Rice: Fluffy steamed rice is a classic accompaniment to Asian-inspired flavors.
- Stir-Fried Vegetables: A quick stir-fry with broccoli, bell peppers, and snap peas complements the chicken beautifully.
- Noodles: Lo mein or chow mein noodles tossed with vegetables and a light sauce.
- Edamame: Steamed edamame pods sprinkled with salt for a healthy and fun appetizer or side.
- Kimchi or Pickled Vegetables: The tangy and spicy flavors of kimchi or pickled vegetables cut through the richness of the chicken and provide a refreshing contrast.
- For a Crowd or Party:
- Serve with a variety of dipping sauces: Offer extra chili sauce, sriracha mayo, or a honey-mustard dipping sauce for guests to customize their chicken.
- Make it a buffet: Set up a buffet-style dinner with the Glazed Chicken Drumsticks as the centerpiece, along with a selection of sides and salads.
- Serve as appetizers: Cut the drumsticks in half (after cooking) and serve as bite-sized appetizers for a party or gathering.
Additional Tips for Glazed Chicken Drumstick Perfection
To ensure your Glazed Chicken Drumsticks are a resounding success every time, consider these helpful tips:
- Marinate for Maximum Flavor: While the recipe calls for a minimum of 1 hour of marinating, extending the marinating time to 4 hours or even overnight will significantly enhance the flavor penetration and tenderness of the chicken. The longer it marinates, the more flavorful it will become. Just ensure it’s always refrigerated during marinating for food safety.
- Don’t Overcrowd the Pan: When baking the chicken, make sure to arrange the drumsticks in a single layer on the rack. Overcrowding will lead to steaming instead of browning, resulting in chicken that is less crispy and may not cook evenly. If you are making a larger batch, bake in batches or use two broiler pans to ensure proper spacing.
- Baste for Extra Glaze and Moisture: Basting the chicken with the pan drippings during baking adds an extra layer of glaze and helps to keep the chicken moist. Baste halfway through cooking and again in the last 15 minutes for optimal results. This will create a beautiful, sticky, and flavorful glaze.
- Adjust the Spice Level to Your Preference: The recipe uses chili sauce for a touch of heat. If you prefer a milder flavor, use a sweet chili sauce or reduce the amount of chili sauce. For a spicier kick, use a hotter chili sauce like sriracha or add a pinch of red pepper flakes to the marinade. You can also serve extra chili sauce on the side for those who like to add more heat to their chicken.
- Use a Meat Thermometer for Perfect Doneness: The best way to ensure your chicken is cooked through and safe to eat is to use a meat thermometer. Insert the thermometer into the thickest part of a drumstick, avoiding the bone. The internal temperature should reach 165°F (74°C). Overcooking chicken can make it dry, so checking for doneness with a thermometer is crucial for juicy and tender results.
Frequently Asked Questions (FAQ) About Glazed Chicken Drumsticks
Here are some common questions you might have about making Glazed Chicken Drumsticks:
Q1: Can I use chicken thighs instead of drumsticks?
A: Absolutely! Chicken thighs are a great substitute for drumsticks in this recipe. They are equally flavorful and stay moist during baking. The cooking time might be slightly longer for thighs, so make sure to check for doneness with a meat thermometer. You can follow the same marinating and baking instructions as for drumsticks.
Q2: Can I make this recipe ahead of time?
A: Yes, you can definitely prepare the chicken ahead of time. You can marinate the chicken overnight in the refrigerator. Then, when you’re ready to cook, simply bake it as per the instructions. You can also bake the chicken ahead of time and reheat it gently in the oven or microwave. However, freshly baked chicken is always best for optimal texture and flavor.
Q3: How do I store leftover Glazed Chicken Drumsticks?
A: Store leftover chicken drumsticks in an airtight container in the refrigerator for up to 3-4 days. To reheat, you can bake them in the oven at 350°F (175°C) until heated through, or microwave them in short intervals until warm. Adding a little water or chicken broth while reheating in the oven can help keep them moist.
Q4: Can I grill these Glazed Chicken Drumsticks instead of baking them?
A: Yes, grilling is a fantastic alternative! Marinate the chicken as directed. Preheat your grill to medium heat. Grill the drumsticks for about 25-30 minutes, turning them occasionally and brushing with the remaining marinade during the last 10 minutes of grilling, until they are cooked through and nicely glazed. Grilling will impart a smoky flavor that complements the glaze beautifully.
Q5: Can I make a larger batch of the glaze to have extra for serving?
A: Definitely! If you love the glaze and want extra for drizzling over rice or vegetables, or for dipping, you can easily double the glaze recipe. Simply whisk together double the quantities of all the glaze ingredients. You can warm up the extra glaze in a saucepan on the stovetop or in the microwave before serving.
These Glazed Chicken Drumsticks are more than just a recipe; they are a gateway to easy, flavorful, and satisfying weeknight dinners. With simple ingredients and straightforward instructions, you can consistently create a meal that your family will love. So, gather your ingredients, get marinating, and prepare to enjoy the deliciousness of these perfectly glazed chicken drumsticks!
Print
Glazed Chicken Drumsticks Recipe
Ingredients
- 3 pounds (about 14) Chicken Drumsticks: The star of the show! Chicken drumsticks are an excellent choice for this recipe due to their affordability, inherent juiciness, and robust flavor. They hold up beautifully to marinating and baking, ensuring tender and flavorful results every time. When selecting your drumsticks, opt for those that are plump and have a healthy pink color. For optimal browning and even cooking, try to choose drumsticks that are roughly similar in size. You can easily adjust the quantity based on your family size or desired servings. If you are feeding a larger crowd, simply double or even triple the recipe, ensuring you have a large enough baking dish and rack to accommodate all the chicken without overcrowding. Remember, overcrowding can lead to steaming instead of browning, so give your drumsticks some breathing room!
- 3 tablespoons Soy Sauce: Soy sauce is the backbone of the savory element in our glaze. It provides a rich umami depth that balances the sweetness of the honey and adds complexity to the overall flavor profile. Using soy sauce not only seasons the chicken from within but also contributes to a beautiful, glossy glaze as it caramelizes in the oven. For a richer, more intense flavor, consider using low-sodium soy sauce and adding a pinch of salt separately, allowing you to control the saltiness more precisely. If you are watching your sodium intake, low-sodium soy sauce is definitely the way to go, without compromising on the essential savory note. For those seeking a gluten-free alternative, tamari can be used as a direct substitute for soy sauce, offering a similar depth of flavor.
- 2 tablespoons Honey: Honey is the key to the “glazed” aspect of this recipe. It brings a natural sweetness that beautifully complements the savory soy sauce and chili sauce. Honey also helps to create that desirable sticky, caramelized coating as it bakes, giving the drumsticks a wonderful texture and visual appeal. You can experiment with different types of honey to subtly alter the flavor profile. A wildflower honey will impart a delicate floral note, while buckwheat honey will offer a bolder, more robust flavor. If you prefer a less intense sweetness, you can reduce the amount of honey slightly. For a vegan alternative, agave nectar or maple syrup can be used, although they may result in a slightly different flavor and texture.
- 1 tablespoon Canola or Vegetable Oil: Oil is essential for both flavor and texture. In the marinade, oil helps to carry the flavors of the other ingredients and penetrate the chicken, ensuring it’s flavorful throughout. During baking, the oil aids in browning and crisping the skin (or what’s left of it if you choose to remove it). Canola or vegetable oil are neutral in flavor, allowing the other ingredients to shine. However, you can also use olive oil for a slightly richer flavor, or even sesame oil for an added layer of nutty aroma, especially if you want to lean into an Asian-inspired flavor profile. The choice of oil can subtly influence the final taste of the dish.
- 1 tablespoon Chili Sauce: Chili sauce adds a touch of heat and tanginess that elevates the glaze from simply sweet and savory to something truly dynamic. It provides a pleasant kick that balances the sweetness and cuts through the richness of the chicken. The level of spiciness can be adjusted by choosing different types of chili sauce. For a mild heat, use a sweet chili sauce or a mild sriracha. For a more pronounced kick, opt for a spicier sriracha or sambal oelek. If you prefer to control the heat even more precisely, you can use a pinch of red pepper flakes instead, allowing you to customize the spiciness to your exact preference. Alternatively, for those who are completely averse to spice, you can omit the chili sauce altogether, although it does contribute significantly to the overall flavor complexity.
- ½ teaspoon Salt: Salt is a fundamental seasoning that enhances all the other flavors and brings them into balance. It’s crucial for drawing out the natural flavors of the chicken and ensuring the glaze is well-seasoned and not just sweet. The amount of salt can be adjusted to taste, especially if you are using regular soy sauce, which already contains a significant amount of sodium. Always taste the marinade before adding it to the chicken and adjust the salt accordingly. Using kosher salt is recommended for its clean flavor and ease of dissolving.
- ¼ teaspoon Ground Ginger: Ground ginger introduces a warm, aromatic spice that adds another layer of complexity to the glaze. It complements the honey and soy sauce beautifully, contributing to the overall depth of flavor. Freshly grated ginger can also be used for a brighter, more pungent ginger flavor. About ½ teaspoon of freshly grated ginger would be equivalent to ¼ teaspoon of ground ginger. Ginger powder can also be substituted in a pinch, although fresh or ground ginger offers a more nuanced flavor. Ginger not only adds flavor but also has digestive benefits, making it a wonderful addition to richer dishes like glazed chicken.
- ⅛ teaspoon Freshly Ground Black Pepper: Black pepper provides a subtle bite and enhances the other flavors, adding a final touch of seasoning. Freshly ground black pepper is always preferred for its superior flavor and aroma compared to pre-ground pepper. The amount of pepper can be adjusted to taste. A pinch more can be added for those who enjoy a more peppery flavor. Black pepper is a versatile spice that complements both sweet and savory flavors, making it a perfect addition to this glaze.
Instructions
- Prepare the Chicken: Begin by rinsing the chicken drumsticks under cold water. This step is primarily for hygiene and to remove any potential surface bacteria. After rinsing, pat the drumsticks thoroughly dry with paper towels. Removing excess moisture is crucial for achieving a good sear and ensuring the marinade adheres properly. Place the dried drumsticks in a large, ungreased baking dish. Choosing the right baking dish is important. A dish that is too small will overcrowd the chicken, leading to steaming instead of browning. A 9×13 inch baking dish is usually suitable for this amount of chicken. If you prefer leaner chicken, or are following a Weight Watchers plan, you can remove the skin from the drumsticks at this stage. Removing the skin will reduce the fat content and calories, but it will also result in slightly less crispy chicken. If you choose to remove the skin, do so before marinating, as it will be easier to handle the chicken at this point.
- Whisk Together the Marinade: In a medium-sized bowl, whisk together the soy sauce, honey, canola or vegetable oil, chili sauce, salt, ground ginger, and freshly ground black pepper. Whisking ensures that all the ingredients are thoroughly combined and emulsified, creating a homogenous marinade. Taste the marinade at this point and adjust seasonings as needed. If you prefer a sweeter glaze, add a touch more honey. If you want more heat, add a pinch more chili sauce or red pepper flakes. If you prefer a saltier flavor, add a little more soy sauce or salt. Remember, the flavors will intensify slightly as the chicken marinates and bakes.
- Marinate the Chicken: Pour the prepared marinade evenly over the drumsticks in the baking dish. Use your hands or tongs to ensure that each drumstick is well coated with the marinade. Cover the baking dish tightly with aluminum foil. This step is crucial for allowing the chicken to marinate properly and absorb all the delicious flavors. Refrigerate the chicken for at least 1 hour. For even deeper flavor penetration, you can marinate the chicken for up to 4 hours, or even overnight. The longer the marinating time, the more flavorful and tender the chicken will become. However, even a minimum of 1 hour of marinating will make a significant difference. Make sure the chicken is refrigerated during marinating for food safety reasons.
- Preheat the Oven and Prepare for Baking: When you are ready to bake the chicken, preheat your oven to 375°F (190°C). This temperature is ideal for baking chicken drumsticks, ensuring they cook through without drying out too quickly. While the oven is preheating, prepare a broiler pan. Line the bottom of the broiler pan with aluminum foil for easy cleanup. Place a rack on top of the broiler pan. Using a rack is essential for allowing air to circulate around the chicken, promoting even cooking and browning on all sides. The broiler pan catches any drippings, preventing them from burning in the oven and making cleanup easier.
- Bake the Chicken: Using tongs, carefully lift the marinated drumsticks from the baking dish and place them onto the rack set above the broiler pan. Arrange the drumsticks in a single layer, ensuring they are not overcrowded. Brush the drumsticks generously with the sauce remaining in the baking pan. This step is important for adding extra flavor and glaze during baking. Place the broiler pan with the chicken in the preheated oven and bake for 50 to 60 minutes. The baking time may vary slightly depending on the size of your drumsticks and the accuracy of your oven. To check for doneness, pierce a drumstick with a fork in the thickest part. The juices should run clear, not pink, and the internal temperature should reach 165°F (74°C). The drumsticks should also be tender when pierced with a fork.
- Baste and Glaze (Optional but Recommended): For an even more glazed and flavorful finish, you can baste the chicken with the pan drippings halfway through baking, around the 30-minute mark. Carefully remove the broiler pan from the oven, brush the drumsticks again with the pan sauce, and return to the oven to continue baking. For extra caramelization and a stickier glaze in the last 10-15 minutes of baking, you can increase the oven temperature to 400°F (200°C). Keep a close eye on the chicken to prevent burning, especially if you have increased the temperature. The glaze will become beautifully caramelized and sticky during this final stage.
- Rest and Serve: Once the drumsticks are cooked through and beautifully glazed, remove them from the oven and let them rest for 5-10 minutes before serving. Resting allows the juices to redistribute throughout the chicken, resulting in more tender and flavorful meat. Serve the Glazed Chicken Drumsticks hot, garnished with fresh herbs like chopped parsley or green onions, if desired.
Nutrition
- Serving Size: One Normal Portion
- Calories: 250-350


