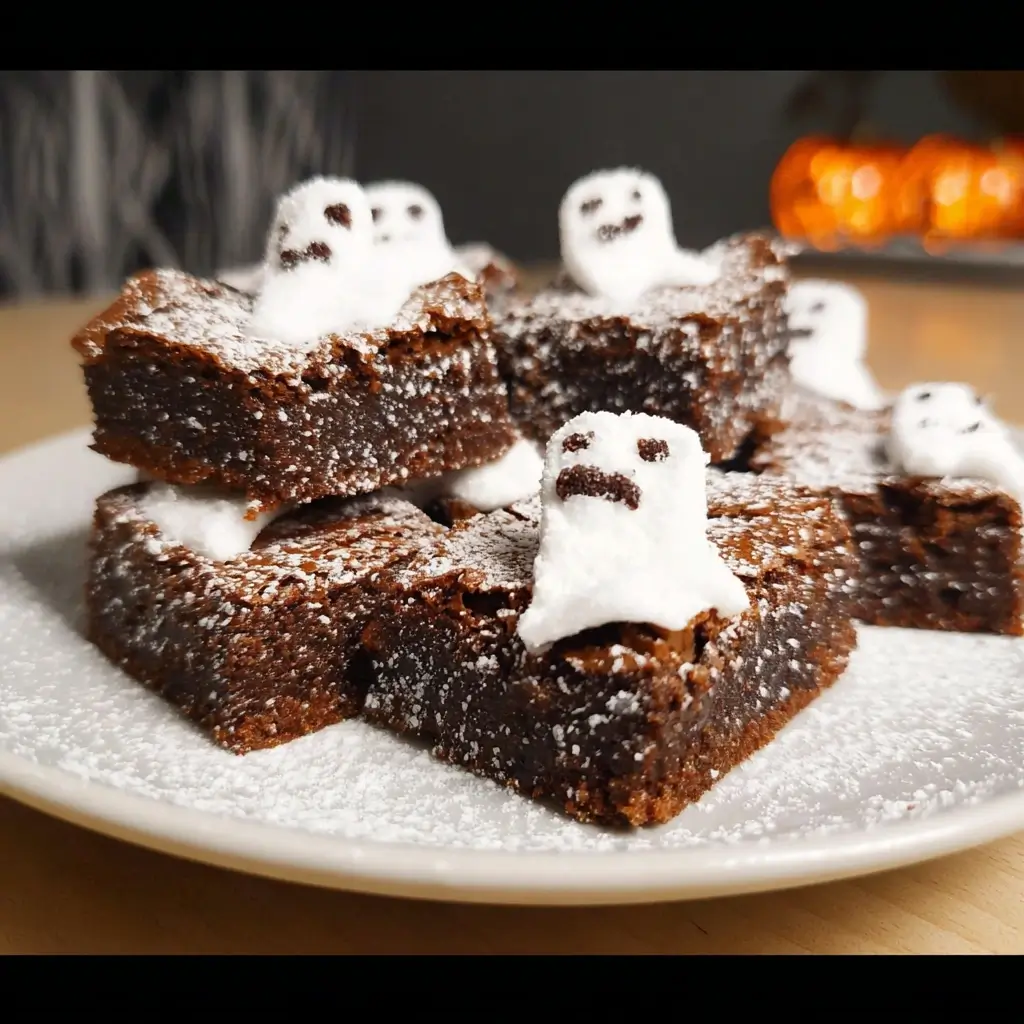

Of all the traditions our family cherishes, our annual Halloween baking session is easily my favorite. The air outside grows crisp, spooky decorations begin to creep onto every surface of the house, and the kitchen transforms into our magical, slightly messy, cauldron of creativity. For years, we tried different recipes—spiderweb cookies, pumpkin-shaped cakes, witch-hat cupcakes—but nothing ever quite captured the perfect blend of spooky, cute, and delicious until we conjured these Ghost Brownies. I’ll never forget the first time I made them. The rich, intoxicating aroma of deep, dark chocolate filled the entire house, a scent so good it could raise spirits all on its own. My kids, with their faces already dusted in a fine layer of cocoa powder, watched with wide-eyed wonder as I topped the still-warm brownies with fluffy marshmallows. The real magic, though, happened when we draped them in a ghostly cloak of melted white chocolate. The moment we dotted on their tiny chocolate chip eyes, they came to life. They weren’t just brownies anymore; they were a little army of adorable ghouls, each with its own personality. The shrieks of delight from my kids were more rewarding than any Halloween candy. That first bite was pure bliss—a super fudgy, intensely chocolatey brownie base that was the perfect foundation for the chewy marshmallow and the sweet, smooth white chocolate coating. They were an instant legend in our house, and now, no Halloween is complete without a pan of these ghostly treats on the counter, waiting to be devoured by trick-or-treaters, party guests, and our own little monsters.
Why These Ghost Brownies Are a Spooktacular Treat
Before we dive into the cauldron, let’s talk about why this specific recipe will become your go-to Halloween dessert. It’s more than just a novelty; it’s a genuinely superior brownie experience with a festive twist.
- Unbelievably Fudgy: This is not a cakey brownie recipe. We’re using a combination of melted butter, melted chocolate, and a minimal amount of flour to create an ultra-dense, moist, and fudgy texture that will have chocolate lovers swooning.
- Deep Chocolate Flavor: By using both unsweetened cocoa powder and high-quality semi-sweet chocolate, we achieve a complex, rich chocolate flavor that isn’t just one-note sweet. It’s the perfect dark and mysterious base for our bright, sweet ghosts.
- Perfect for Parties: These brownies are a visual showstopper! They look fantastic on a Halloween party dessert table and are easy for guests to grab and eat. Plus, you can make the brownie base a day ahead to save time.
- Fun to Make with Kids: This recipe is a fantastic project to tackle with children. They can help measure ingredients, stir the batter (just don’t let them overmix!), place the marshmallows, and, of course, give the ghosts their eyes. It’s a memory-making activity disguised as a recipe.
- Customizable and Forgiving: Don’t have the exact right chocolate chips? Want to add a different extract? This recipe is robust and can handle a few minor tweaks. You can easily adapt it to your pantry and your personal taste.
Ingredients for the Ultimate Ghost Brownies
Crafting the perfect haunted treat requires the right magical components. We’ll break down the ingredients into two parts: the rich, dark brownie foundation and the ethereal, ghostly topping that brings them to life. Using high-quality ingredients, especially for the chocolate, will make a noticeable difference in the final product.
For the Fudgy Brownie Base:
- Unsalted Butter: 1 cup (2 sticks or 226g), melted and slightly cooled. Melting the butter is key for a fudgy texture.
- Granulated Sugar: 1 ¼ cups (250g). Provides sweetness and contributes to that classic crackly brownie top.
- Light Brown Sugar: ¾ cup (165g), packed. Adds moisture and a hint of caramel flavor, enhancing the fudginess.
- Large Eggs: 4, at room temperature. Room temperature eggs emulsify better into the batter, creating a smoother, more uniform texture.
- Pure Vanilla Extract: 1 tablespoon. A generous amount of good vanilla is crucial to elevate the chocolate flavor.
- Semi-Sweet Chocolate: 4 ounces (113g), chopped (or use high-quality chocolate chips). This will be melted with the butter for an intense chocolate core.
- All-Purpose Flour: 1 cup (120g). We use just enough to give the brownies structure without making them cakey.
- Unsweetened Cocoa Powder: ¾ cup (75g), sifted. Sifting prevents lumps and ensures it incorporates smoothly. Use a good quality brand like Dutch-processed for a darker color and richer flavor.
- Salt: 1 teaspoon. Salt is a flavor enhancer; it makes the chocolate taste more chocolatey and balances the sweetness.
- Semi-Sweet or Dark Chocolate Chips: 1 cup (170g). These are folded in at the end to create pockets of melted chocolate throughout the brownies.
For the Marshmallow Ghosts and Decoration:
- Large Marshmallows: 16-20. These will form the body of your ghosts.
- High-Quality White Chocolate Chips or Wafers: 1 ½ cups (255g). This will be the ghostly sheet that drapes over the marshmallows. Using melting wafers (like Ghirardelli) can make the melting process smoother.
- Coconut Oil or Vegetable Shortening: 1 tablespoon. This is essential for thinning the white chocolate, helping it drape smoothly over the marshmallows without clumping.
- Mini Chocolate Chips or Black Decorating Icing: For creating the eyes and mouths of the ghosts.
Step-by-Step Instructions: Summoning Your Ghost Brownies
Follow these instructions carefully, and you’ll have a pan of perfectly spooky and delicious brownies. We’ll proceed in three stages: baking the brownie base, preparing the ghostly topping, and the final, magical assembly.
Part 1: Baking the Fudgy Brownie Base
- Pre-heat and Prepare: Position a rack in the middle of your oven and preheat to 350°F (175°C). Prepare a 9×13 inch baking pan by greasing it with butter or non-stick spray. For easy removal, create a parchment paper “sling.” Cut two sheets of parchment paper to fit the pan, leaving an overhang on the sides. Lay them in the pan in a crisscross pattern. This will allow you to lift the entire slab of brownies out later for clean cutting.
- Melt the Chocolate and Butter: In a medium, microwave-safe bowl, combine the 1 cup of unsalted butter and the 4 ounces of chopped semi-sweet chocolate. Microwave in 30-second intervals, stirring in between, until the mixture is completely melted and smooth. Be careful not to scorch the chocolate. Set aside to cool slightly.
- Whisk Eggs and Sugars: In a separate large mixing bowl, combine the granulated sugar, packed light brown sugar, and the 4 room-temperature eggs. Using an electric hand mixer or a stand mixer with the whisk attachment, beat the mixture on medium-high speed for 3-5 minutes. The mixture should become pale, thick, and fluffy. This step is crucial for developing that coveted shiny, crackly top on your brownies.
- Combine Wet Ingredients: Pour the slightly cooled, melted chocolate-butter mixture into the whipped egg and sugar mixture. Add the tablespoon of vanilla extract. Gently fold everything together with a spatula until just combined. You don’t want to deflate all the air you just whipped into the eggs.
- Combine Dry Ingredients: In a separate medium bowl, whisk together the 1 cup of all-purpose flour, ¾ cup of sifted cocoa powder, and 1 teaspoon of salt.
- Unite the Batter: Gently pour the dry ingredients into the wet ingredients. Using a spatula, fold the mixture together until there are just a few streaks of flour remaining. Do NOT overmix. Overmixing develops the gluten in the flour, which will lead to tough, cakey brownies instead of soft, fudgy ones.
- Fold in Chocolate Chips: Add the 1 cup of semi-sweet or dark chocolate chips to the batter. Give it a final few folds to distribute the chips evenly and incorporate the last of the flour streaks. The batter will be thick and glossy.
- Bake: Pour the brownie batter into your prepared 9×13 inch pan and use the spatula to spread it into an even layer, making sure it reaches all the corners. Bake for 30-35 minutes. The brownies are done when a wooden skewer or toothpick inserted into the center comes out with moist, fudgy crumbs attached, but not wet batter. The edges should look set and be pulling away slightly from the sides of the pan.
- Cool Completely: This is a non-negotiable step! Remove the pan from the oven and place it on a wire rack to cool completely to room temperature. This can take at least 2-3 hours. If you try to cut or decorate them while they are warm, you will have a delicious, but very gooey, mess. Patience is key for perfect brownies.
Part 2: Assembling Your Ghoulish Guests
- Cut the Brownies: Once the brownies are completely cool, use the parchment paper sling to lift the entire slab out of the pan and onto a cutting board. Cut them into 16-20 even squares.
- Position the Marshmallows: Place one large marshmallow in the center of each brownie square.
- Melt the White Chocolate: In a microwave-safe bowl, combine the 1 ½ cups of white chocolate chips and the 1 tablespoon of coconut oil or shortening. Microwave in 20-second bursts, stirring well after each interval, until the chocolate is melted and perfectly smooth. The oil is crucial for achieving a pourable consistency. Do not overheat white chocolate, as it can seize and become grainy.
- Create the Ghosts: Allow the melted white chocolate to cool for a minute or two so it’s not piping hot. Using a spoon, carefully drape about a tablespoon of the melted white chocolate over each marshmallow, encouraging it to drip down the sides to create a ghostly, sheet-like shape. Use the back of the spoon to help guide the drips and cover the marshmallow completely.
- Add the Eyes: While the white chocolate is still wet, immediately place two mini chocolate chips on each ghost for eyes. You can also wait until the chocolate is set and use a tube of black decorating icing to draw on eyes and even a little “O” shaped mouth for a screaming effect.
- Let Them Set: Allow the brownies to sit at room temperature for about an hour, or until the white chocolate has completely hardened. To speed up the process, you can place them in the refrigerator for 15-20 minutes.
Nutrition Facts
- Servings: 16 brownies
- Calories per serving: Approximately 450-480 kcal
Disclaimer: The nutritional information provided is an estimate and can vary based on the specific ingredients and brands used.
Preparation and Baking Time
Understanding the time commitment helps in planning your baking adventure, especially for a party.
- Preparation Time: 25 minutes
- Baking Time: 30-35 minutes
- Cooling and Decorating Time: 2.5 – 3 hours (most of this is hands-off cooling time)
- Total Time: Approximately 3.5 – 4 hours
How to Serve Your Ghostly Creations
Presentation is part of the fun! These Ghost Brownies are destined to be the star of your Halloween spread. Here are a few creative ways to serve them:
- On a Haunted Platter:
- Arrange the brownies on a dark or black platter to make the white ghosts pop.
- Scatter Halloween-themed sprinkles, like bats, pumpkins, or orange and black jimmies, around the brownies.
- For a truly spooky effect, carefully place a small bowl of dry ice with a little warm water nearby to create a rolling fog over your dessert table (ensure it’s done safely and out of reach of children).
- Individual Ghoul Gardens:
- Place each brownie on a small dessert plate.
- Crumble some Oreo cookies (without the cream filling) around the base of the brownie to look like “dirt.”
- Stick a small candy pumpkin or a gummy worm next to the ghost for a little graveyard scene.
- Perfect Pairings:
- For Kids: A tall glass of cold milk is the classic, unbeatable companion. You could also serve it with a “Witches’ Brew” green punch or a mug of hot chocolate.
- For Adults: These rich brownies pair wonderfully with a dark cup of coffee or an espresso. For an after-dinner treat, serve alongside a glass of milk stout or a coffee liqueur.
Additional Tips for Perfect Ghost Brownies Every Time
- The Importance of Room Temperature Eggs: Don’t skip this! Cold eggs can cause the melted butter and chocolate mixture to seize and harden, resulting in a lumpy batter and a less-than-perfect texture. To quickly bring eggs to room temperature, place them in a bowl of warm (not hot) water for 5-10 minutes.
- Don’t Skimp on Chocolate Quality: The flavor of your brownies is almost entirely dependent on the quality of your chocolate and cocoa powder. Using a premium chocolate bar (like Ghirardelli, Scharffen Berger, or Callebaut) instead of generic chocolate chips for the melted portion will yield a much richer, more complex flavor. For cocoa, Dutch-processed will give a darker, smoother result.
- The Secret to Clean Cuts: For beautifully clean, professional-looking squares, a cooled brownie slab is the first step. The second step is the cutting technique. Use a large, sharp chef’s knife. Run the blade under hot water, wipe it completely dry, and make one cut. Repeat the process—hot water, wipe dry—for every single cut you make. This melts any chocolate on the blade, preventing it from dragging and smearing the edges.
- Make-Ahead and Storage Strategy: These brownies are great for making ahead. You can bake the brownie base, cool it completely, and store it uncut and well-wrapped in the pan at room temperature for up to two days before you plan to decorate and serve. Once decorated, the brownies should be stored in a single layer in an airtight container at room temperature for up to 3-4 days. Refrigerating can dry them out, but if your house is very warm, the fridge is a safer bet to keep the ghosts from melting.
- Troubleshooting White Chocolate: White chocolate can be finicky. If it seizes (becomes thick and grainy), it’s likely been overheated or has come into contact with a drop of water. To prevent this, always use a clean, completely dry bowl and microwave in short intervals. The addition of coconut oil or shortening is your best defense, as it helps stabilize the chocolate and keeps it smooth and fluid for draping. If it’s too thick, add a tiny bit more oil (½ teaspoon at a time) until it reaches the right consistency.
Frequently Asked Questions (FAQ)
Q1: Can I use a boxed brownie mix instead of making them from scratch?
A: Absolutely! If you’re short on time or just prefer the convenience, a boxed mix is a great shortcut. For the best results, choose a high-quality “fudgy” brownie mix rather than a “cakey” one. Bake the brownies according to the package directions in a 9×13 pan. Let them cool completely before proceeding with the marshmallow and white chocolate topping steps as outlined in the recipe. They’ll still be adorable and delicious!
Q2: My white chocolate ghost topping is too thick and isn’t draping nicely. What did I do wrong?
A: This is a common issue with white chocolate. It’s likely one of two things: the chocolate was slightly overheated, or it just needs a bit more thinning. The key is the coconut oil or shortening. If your melted chocolate seems too thick, stir in another ½ teaspoon of coconut oil until it’s smooth and easily drips from a spoon. Also, ensure you let the melted chocolate cool for a minute or two before draping; if it’s too hot, it can melt the marshmallow, and if it’s too cool, it will be too thick.
Q3: How can I make these brownies gluten-free?
A: You can easily adapt this recipe to be gluten-free. Simply substitute the 1 cup of all-purpose flour with a high-quality, 1-to-1 gluten-free baking flour blend (like Bob’s Red Mill 1-to-1 Baking Flour). These blends already contain xanthan gum and other ingredients to mimic the properties of regular flour. All other ingredients in the recipe are naturally gluten-free, but always double-check the labels on your chocolate chips and cocoa powder to ensure they were processed in a GF-certified facility if you are baking for someone with a severe allergy.
Q4: My marshmallow ghosts are sliding off the brownies. How do I make them stick?
A: To ensure your marshmallows stay put, you can use a small dab of the melted white chocolate as “glue.” Before you drape the ghosts, put a small dot of the melted white chocolate in the center of the brownie square, then press the marshmallow onto it. Let it set for a minute before draping the rest of the white chocolate over the top. This will create a secure anchor for your ghost.
Q5: Can I make different spooky shapes instead of ghosts?
A: Of course! This brownie base is the perfect canvas for all sorts of Halloween creativity. Instead of ghosts, you could:
- Create Spiderwebs: Skip the marshmallows. Drizzle or pipe melted white chocolate over the dark brownie in a spiral pattern. Then, drag a toothpick from the center outwards to create a web design.
- Make Mummies: Cut the brownies into rectangles. Drizzle the melted white chocolate back and forth in thin lines to look like mummy wrappings, leaving a small space where you can add two candy eyeballs.
- Graveyard Scene: Frost the entire pan of brownies with chocolate frosting and cover it with crushed Oreo “dirt.” Use rectangular cookies (like Milano) as “tombstones” and place your marshmallow ghosts among them.
Ghost Brownies Recipe
Ingredients
For the Fudgy Brownie Base:
- Unsalted Butter: 1 cup (2 sticks or 226g), melted and slightly cooled. Melting the butter is key for a fudgy texture.
- Granulated Sugar: 1 ¼ cups (250g). Provides sweetness and contributes to that classic crackly brownie top.
- Light Brown Sugar: ¾ cup (165g), packed. Adds moisture and a hint of caramel flavor, enhancing the fudginess.
- Large Eggs: 4, at room temperature. Room temperature eggs emulsify better into the batter, creating a smoother, more uniform texture.
- Pure Vanilla Extract: 1 tablespoon. A generous amount of good vanilla is crucial to elevate the chocolate flavor.
- Semi-Sweet Chocolate: 4 ounces (113g), chopped (or use high-quality chocolate chips). This will be melted with the butter for an intense chocolate core.
- All-Purpose Flour: 1 cup (120g). We use just enough to give the brownies structure without making them cakey.
- Unsweetened Cocoa Powder: ¾ cup (75g), sifted. Sifting prevents lumps and ensures it incorporates smoothly. Use a good quality brand like Dutch-processed for a darker color and richer flavor.
- Salt: 1 teaspoon. Salt is a flavor enhancer; it makes the chocolate taste more chocolatey and balances the sweetness.
- Semi-Sweet or Dark Chocolate Chips: 1 cup (170g). These are folded in at the end to create pockets of melted chocolate throughout the brownies.
For the Marshmallow Ghosts and Decoration:
- Large Marshmallows: 16-20. These will form the body of your ghosts.
- High-Quality White Chocolate Chips or Wafers: 1 ½ cups (255g). This will be the ghostly sheet that drapes over the marshmallows. Using melting wafers (like Ghirardelli) can make the melting process smoother.
- Coconut Oil or Vegetable Shortening: 1 tablespoon. This is essential for thinning the white chocolate, helping it drape smoothly over the marshmallows without clumping.
- Mini Chocolate Chips or Black Decorating Icing: For creating the eyes and mouths of the ghosts.
Instructions
Part 1: Baking the Fudgy Brownie Base
- Pre-heat and Prepare: Position a rack in the middle of your oven and preheat to 350°F (175°C). Prepare a 9×13 inch baking pan by greasing it with butter or non-stick spray. For easy removal, create a parchment paper “sling.” Cut two sheets of parchment paper to fit the pan, leaving an overhang on the sides. Lay them in the pan in a crisscross pattern. This will allow you to lift the entire slab of brownies out later for clean cutting.
- Melt the Chocolate and Butter: In a medium, microwave-safe bowl, combine the 1 cup of unsalted butter and the 4 ounces of chopped semi-sweet chocolate. Microwave in 30-second intervals, stirring in between, until the mixture is completely melted and smooth. Be careful not to scorch the chocolate. Set aside to cool slightly.
- Whisk Eggs and Sugars: In a separate large mixing bowl, combine the granulated sugar, packed light brown sugar, and the 4 room-temperature eggs. Using an electric hand mixer or a stand mixer with the whisk attachment, beat the mixture on medium-high speed for 3-5 minutes. The mixture should become pale, thick, and fluffy. This step is crucial for developing that coveted shiny, crackly top on your brownies.
- Combine Wet Ingredients: Pour the slightly cooled, melted chocolate-butter mixture into the whipped egg and sugar mixture. Add the tablespoon of vanilla extract. Gently fold everything together with a spatula until just combined. You don’t want to deflate all the air you just whipped into the eggs.
- Combine Dry Ingredients: In a separate medium bowl, whisk together the 1 cup of all-purpose flour, ¾ cup of sifted cocoa powder, and 1 teaspoon of salt.
- Unite the Batter: Gently pour the dry ingredients into the wet ingredients. Using a spatula, fold the mixture together until there are just a few streaks of flour remaining. Do NOT overmix. Overmixing develops the gluten in the flour, which will lead to tough, cakey brownies instead of soft, fudgy ones.
- Fold in Chocolate Chips: Add the 1 cup of semi-sweet or dark chocolate chips to the batter. Give it a final few folds to distribute the chips evenly and incorporate the last of the flour streaks. The batter will be thick and glossy.
- Bake: Pour the brownie batter into your prepared 9×13 inch pan and use the spatula to spread it into an even layer, making sure it reaches all the corners. Bake for 30-35 minutes. The brownies are done when a wooden skewer or toothpick inserted into the center comes out with moist, fudgy crumbs attached, but not wet batter. The edges should look set and be pulling away slightly from the sides of the pan.
- Cool Completely: This is a non-negotiable step! Remove the pan from the oven and place it on a wire rack to cool completely to room temperature. This can take at least 2-3 hours. If you try to cut or decorate them while they are warm, you will have a delicious, but very gooey, mess. Patience is key for perfect brownies.
Part 2: Assembling Your Ghoulish Guests
- Cut the Brownies: Once the brownies are completely cool, use the parchment paper sling to lift the entire slab out of the pan and onto a cutting board. Cut them into 16-20 even squares.
- Position the Marshmallows: Place one large marshmallow in the center of each brownie square.
- Melt the White Chocolate: In a microwave-safe bowl, combine the 1 ½ cups of white chocolate chips and the 1 tablespoon of coconut oil or shortening. Microwave in 20-second bursts, stirring well after each interval, until the chocolate is melted and perfectly smooth. The oil is crucial for achieving a pourable consistency. Do not overheat white chocolate, as it can seize and become grainy.
- Create the Ghosts: Allow the melted white chocolate to cool for a minute or two so it’s not piping hot. Using a spoon, carefully drape about a tablespoon of the melted white chocolate over each marshmallow, encouraging it to drip down the sides to create a ghostly, sheet-like shape. Use the back of the spoon to help guide the drips and cover the marshmallow completely.
- Add the Eyes: While the white chocolate is still wet, immediately place two mini chocolate chips on each ghost for eyes. You can also wait until the chocolate is set and use a tube of black decorating icing to draw on eyes and even a little “O” shaped mouth for a screaming effect.
- Let Them Set: Allow the brownies to sit at room temperature for about an hour, or until the white chocolate has completely hardened. To speed up the process, you can place them in the refrigerator for 15-20 minutes.
Nutrition
- Serving Size: One Normal Portion
- Calories: 450-480 kcal