


The holidays, for me, are synonymous with family, warmth, and of course, food. Mountains of food. For years, the Thanksgiving and Christmas spreads featured beloved classics, but as our family grew and dietary needs evolved, challenges arose. The biggest hurdle? Finding ways to recreate those comforting, nostalgic dishes without dairy. Green bean casserole, that quintessential creamy, crunchy, savory side, seemed like an impossible mountain to climb. The original relied so heavily on cream of mushroom soup and often a cheesy topping. I tried various store-bought dairy-free alternatives, but they often fell flat, lacking that rich depth of flavor or having an odd aftertaste. Determined not to let our dairy-avoiding family members miss out, I embarked on a mission. After much experimentation – tweaking roux ratios, testing different plant-based milks, perfecting the seasoning – this recipe was born. The first time I served it, nervously watching faces around the table, the reaction was astounding. Skeptics became converts. My cousin, a die-hard traditionalist, declared it “even better than the original.” It was creamy without being heavy, deeply savory from the homemade mushroom sauce, and topped with those irresistibly crispy onions. It wasn’t just a “good enough” substitute; it was genuinely, stand-on-its-own delicious. Now, this Dairy-Free Green Bean Casserole is a non-negotiable staple at our gatherings, proving that dietary restrictions don’t mean sacrificing flavor or tradition. It brings everyone to the table, happily digging in, and that’s the best review any recipe can get.
The Ultimate Dairy-Free Green Bean Casserole Recipe
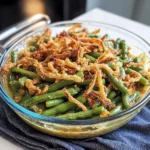
This recipe transforms the classic comfort food into a dish everyone can enjoy, without compromising on the creamy texture and savory flavor you love. We ditch the canned soup and build a rich, flavorful base from scratch using simple, wholesome ingredients. Get ready to impress your guests, whether they’re dairy-free or not!
Ingredients
Creating that iconic casserole flavor without dairy requires careful selection of ingredients. Here’s what you’ll need, with explanations to ensure success:
- Fresh Green Beans: 1.5 pounds (about 6 cups), trimmed and cut into 1-2 inch pieces.
- Why Fresh? Fresh green beans provide the best texture – tender-crisp rather than mushy. Frozen green beans are the next best option (use them straight from frozen, no need to thaw, but you might need a slightly longer baking time). While canned green beans can be used in a pinch, they will result in a much softer, less vibrant casserole. If using canned, drain them very well.
- Dairy-Free Butter: 1/4 cup (4 tablespoons).
- Recommendation: Use a good quality vegan butter stick (like Miyoko’s Kitchen Cultured Vegan Butter, Melt Organic Vegan Butter, or Earth Balance Vegan Butter Sticks). These behave most similarly to dairy butter when making the roux and provide a rich flavor. Avoid tub-style margarines which can have higher water content.
- Yellow Onion: 1 large, finely chopped (about 1.5 cups).
- Flavor Base: Onion provides a fundamental layer of savory sweetness to the sauce. Yellow or white onions work best.
- Garlic: 3-4 cloves, minced (about 1 tablespoon).
- Aromatic Depth: Fresh garlic adds aromatic depth that complements the mushrooms and onions. Don’t skimp here!
- Mushrooms: 10 ounces (about 3 cups sliced), cremini (baby bella) or white button mushrooms, cleaned and sliced.
- The “Cream” Element: Mushrooms are key to replicating the flavor of traditional cream of mushroom soup. Cremini mushrooms offer a slightly deeper, earthier flavor than white button mushrooms, but either works beautifully. Slice them relatively uniformly.
- All-Purpose Flour: 1/4 cup.
- Thickener: This combines with the dairy-free butter to create a roux, the thickening agent for our creamy sauce. For a gluten-free version, use a good quality measure-for-measure gluten-free flour blend (like Bob’s Red Mill 1-to-1 Baking Flour or King Arthur Measure for Measure Flour). Rice flour or cornstarch can also work, but may require slight adjustments in quantity or technique (cornstarch should be mixed with cold liquid first as a slurry).
- Unsweetened Plant-Based Milk: 1.5 cups.
- Creaminess: Choose a neutral-flavored, unsweetened plant milk. Unsweetened almond milk, soy milk, or oat milk are excellent choices. Full-fat canned coconut milk can also be used for extra richness, but be aware it might impart a subtle coconut flavor, which some people enjoy and others don’t. Ensure it’s thoroughly whisked before measuring if using coconut milk. Avoid sweetened or strongly flavored varieties (like vanilla).
- Vegetable Broth: 1/2 cup.
- Flavor & Consistency: Adds savory depth and helps achieve the right sauce consistency. Use a low-sodium broth to better control the saltiness of the final dish.
- Soy Sauce or Tamari: 1 tablespoon.
- Umami Boost: This secret weapon adds a savory, umami depth that mimics the richness often lost without dairy. Use tamari for a gluten-free option, or coconut aminos for a soy-free and gluten-free alternative (you might need slightly more coconut aminos).
- Salt: 1 teaspoon (or to taste).
- Enhancer: Essential for bringing out all the flavors. Start with 1 teaspoon and adjust after tasting the sauce. Remember the crispy onions will add saltiness too.
- Black Pepper: 1/2 teaspoon freshly ground (or to taste).
- Warmth: Adds a gentle warmth and spice. Freshly ground pepper offers superior flavor.
- Crispy Fried Onions: 1.5 cups, divided.
- The Crunch: The iconic topping! Most commercially available crispy fried onions are accidentally vegan/dairy-free, but always check the ingredients label to be sure (some brands may contain milk derivatives). You can also make your own for superior flavor and crunch (see tips section). We divide them to mix some into the casserole for texture and flavor throughout, and save the rest for that crucial crispy topping.
- Optional: Dairy-Free Shredded Cheese: 1/2 cup for topping.
- Extra Indulgence: If you want a “cheesy” element, sprinkle some dairy-free cheddar or mozzarella shreds (brands like Daiya, Violife, Miyoko’s Kitchen) over the top along with the final layer of crispy onions before baking. This is entirely optional; the casserole is delicious without it.
Instructions
Follow these steps carefully to build maximum flavor and achieve the perfect texture for your dairy-free green bean casserole:
- Preheat & Prep Baking Dish: Preheat your oven to 375°F (190°C). Lightly grease a 9×13 inch baking dish or a similar 2.5 – 3 quart casserole dish with a bit of dairy-free butter or cooking spray. Set aside.
- Prepare the Green Beans (If Using Fresh): Bring a large pot of salted water to a rolling boil. Add the trimmed and cut green beans and blanch them for 4-5 minutes. They should be bright green and slightly tender but still have a crisp bite (tender-crisp). Immediately drain the beans and plunge them into an ice bath (a large bowl filled with ice and cold water) for a minute or two to stop the cooking process and preserve their vibrant color. Drain them thoroughly and set aside. If using frozen green beans, you can skip this blanching step. If using canned, ensure they are very well drained.
- Sauté the Aromatics: Place a large skillet or Dutch oven over medium heat. Add the 1/4 cup of dairy-free butter. Once melted and shimmering, add the chopped yellow onion. Sauté for 5-7 minutes, stirring occasionally, until the onion is softened and translucent.
- Cook the Mushrooms and Garlic: Add the sliced mushrooms to the skillet with the onions. Increase the heat slightly to medium-high. Cook, stirring occasionally, for about 8-10 minutes. The mushrooms will initially release water; continue cooking until most of this liquid has evaporated and the mushrooms are nicely browned and reduced in size. This browning step is crucial for developing deep, savory flavor. Stir in the minced garlic and cook for another minute until fragrant – be careful not to burn the garlic.
- Make the Roux: Sprinkle the 1/4 cup of all-purpose flour (or gluten-free alternative) over the mushroom and onion mixture. Stir constantly for 1-2 minutes, coating the vegetables evenly. This cooks out the raw flour taste and forms the base of your sauce (the roux).
- Build the Creamy Sauce: Gradually whisk in the 1.5 cups of unsweetened plant-based milk, adding about 1/4 cup at a time, whisking well after each addition to prevent lumps. Once all the milk is incorporated, whisk in the 1/2 cup of vegetable broth.
- Simmer and Season: Bring the mixture to a gentle simmer, stirring frequently. Let it cook for 3-5 minutes, or until the sauce has thickened enough to coat the back of a spoon. It should be smooth and creamy. Stir in the 1 tablespoon of soy sauce (or tamari/coconut aminos), 1 teaspoon of salt, and 1/2 teaspoon of black pepper. Taste the sauce and adjust seasonings if necessary. Remember that the crispy onions will add more salt later.
- Combine Casserole Ingredients: Remove the skillet from the heat. Add the prepared green beans (blanched fresh, frozen, or well-drained canned) to the skillet with the creamy mushroom sauce. Gently stir everything together until the green beans are evenly coated. Stir in half (about 3/4 cup) of the crispy fried onions. Mixing some onions into the casserole itself adds texture and flavor throughout the dish, not just on top.
- Assemble the Casserole: Pour the green bean mixture into the prepared baking dish, spreading it out evenly.
- Top and Bake: Sprinkle the remaining 3/4 cup of crispy fried onions evenly over the top of the casserole. If using, sprinkle the optional dairy-free cheese shreds over the top as well.
- Bake: Place the casserole dish in the preheated oven. Bake for 25-30 minutes, or until the sauce is bubbly around the edges and the crispy onion topping is golden brown and fragrant. If the onions start to brown too quickly, you can loosely tent the dish with foil for the last 10 minutes of baking.
- Rest and Serve: Carefully remove the casserole from the oven. Let it rest for 5-10 minutes before serving. This allows the sauce to set slightly and makes it easier to serve. Serve hot and enjoy the deliciousness!
Nutrition Facts
Understanding the nutritional profile can be helpful, especially when managing dietary needs.
- Servings: This recipe typically yields 6 to 8 servings, depending on portion size and whether it’s served as a main side or alongside many other dishes.
- Calories per Serving (Approximate): Approximately 200-280 calories per serving.
Disclaimer: The exact nutritional information will vary based on the specific brands of dairy-free butter, plant-based milk, vegetable broth, and crispy fried onions used, as well as the optional addition of dairy-free cheese. This estimate is based on using unsweetened almond milk, standard vegetable broth, and common vegan butter and crispy onion brands, without added cheese. This casserole is naturally cholesterol-free when using all plant-based ingredients. It provides a good source of fiber from the green beans and mushrooms.
Preparation and Cook Time
Planning your cooking schedule, especially for holidays or gatherings, is essential. Here’s a breakdown of the time involved:
- Preparation Time: 20-25 minutes (includes trimming/cutting beans, chopping vegetables, making the sauce). Blanching fresh beans adds about 10 minutes to this (including bringing water to a boil).
- Cook Time: 25-30 minutes (baking time in the oven).
- Total Time: Approximately 45-55 minutes (plus 5-10 minutes resting time).
This timing makes it a manageable side dish, even for busy occasions. Much of the prep can be done slightly ahead to streamline the process (see tips section).
How to Serve Your Dairy-Free Green Bean Casserole
This versatile casserole fits beautifully into various meal settings. Here are some serving suggestions:
- Holiday Centerpiece Side: It’s a must-have alongside traditional holiday mains:
- Roasted Turkey
- Glazed Ham
- Roast Chicken
- Plant-based roasts (like Lentil Loaf or Tofurky)
- Classic Comfort Meal: Pair it with other comforting sides for the ultimate spread:
- Creamy Mashed Potatoes (use dairy-free butter/milk)
- Stuffing or Dressing (ensure it’s dairy-free/vegan if needed)
- Cranberry Sauce
- Dinner Rolls (serve with dairy-free butter)
- Potluck Star: This dish travels well (cover tightly with foil) and is always a crowd-pleaser at potlucks and gatherings. Its dairy-free nature makes it inclusive for guests with dietary restrictions.
- Weeknight Winner: Don’t reserve it just for holidays! It makes a delicious and satisfying side dish for weeknight dinners alongside grilled chicken, pork chops, or baked tofu.
- Presentation:
- Serve directly from the attractive baking dish it was cooked in.
- Garnish with a sprinkle of fresh chopped parsley for a pop of color just before serving, if desired.
- Ensure you have a good serving spoon to scoop out portions easily, getting both the creamy filling and the crispy topping.
- Temperature: Always serve this casserole hot, fresh from the oven (after its brief resting period), for the best texture and flavor experience.
Top 5 Tips for the Perfect Dairy-Free Green Bean Casserole
Elevate your casserole from great to absolutely unforgettable with these pro tips:
- Don’t Overcook the Beans (Especially Fresh): The key to a great texture is tender-crisp green beans, not mushy ones. If using fresh beans, blanch them just until bright green and slightly tender, then immediately shock them in ice water. This preserves their color and prevents them from becoming overly soft during baking. If using frozen, add them directly to the sauce; they’ll cook through perfectly in the oven. Avoid canned beans if possible, but if you must use them, drain extremely well.
- Build Flavor in the Sauce: Don’t rush cooking the onions and mushrooms. Sauté the onions until truly soft and translucent. Allow the mushrooms to brown properly by not overcrowding the pan and letting their moisture evaporate – this caramelization adds immense depth. The soy sauce/tamari is crucial for that umami kick that mimics traditional richness. Taste and adjust seasoning before adding the beans.
- Achieve the Right Sauce Consistency: The sauce should be thick enough to coat the beans nicely but not so thick that it becomes gloppy. If your sauce seems too thin after simmering, you can create a small slurry by mixing 1 tablespoon of cornstarch or flour with 2 tablespoons of cold water or plant milk, then whisking it into the simmering sauce until thickened. If it seems too thick, whisk in a little more vegetable broth or plant milk until it reaches the desired consistency.
- Maximize Crispy Onion Crunch: Divide the crispy onions! Mixing half into the casserole adds texture and flavor throughout. Ensure the final topping covers the surface evenly. For extra crispiness, consider making your own fried onions (thinly slice onions, toss in seasoned flour, and fry in batches until golden brown – drain well on paper towels). If using store-bought and they seem lackluster, you can briefly toast them in a dry skillet before adding them to the casserole topping for enhanced crunch.
- Make-Ahead Strategy: You can prepare components or the entire casserole ahead of time to save stress on busy cooking days.
- Components: Blanch green beans (if using fresh) and chop vegetables a day or two in advance; store covered in the refrigerator. Make the mushroom sauce up to 2 days ahead, let it cool completely, and store it in an airtight container in the refrigerator.
- Full Casserole (Unbaked): Assemble the entire casserole (combine sauce, beans, and internal onions) in the baking dish, cover tightly with plastic wrap or foil, and refrigerate for up to 24 hours. Do not add the final crispy onion topping until just before baking, otherwise, it will become soggy. When ready to bake, remove from the fridge for about 30 minutes to take the chill off, add the topping, and bake as directed, possibly adding 5-10 extra minutes to ensure it’s heated through.
Frequently Asked Questions (FAQ)
Here are answers to some common questions about making this dairy-free green bean casserole:
- Q: Can I use frozen green beans instead of fresh?
- A: Absolutely! Frozen green beans are a great, convenient alternative. Do not thaw them before use. Simply add the frozen green beans directly to the mushroom sauce when the recipe calls for adding the beans. You may need to add about 5-10 minutes to the total baking time to ensure they cook through completely and the casserole is hot and bubbly. The texture will be slightly softer than using fresh blanched beans but still very good.
- Q: Is this recipe also vegan?
- A: Yes, this recipe is easily made vegan! As written, using dairy-free butter, plant-based milk, vegetable broth, and ensuring your crispy fried onions don’t contain animal products (most major brands are accidentally vegan, but always double-check the label for ingredients like whey or animal fat) makes the entire dish vegan. If you opt for the cheese topping, ensure you use vegan cheese shreds.
- Q: My sauce didn’t thicken properly. What went wrong?
- A: There are a few possibilities. Ensure you cooked the roux (flour and butter mixture) for at least a full minute before adding liquid – this helps activate the flour’s thickening power. Make sure you brought the sauce to a proper simmer after adding the liquids, as heat is needed for thickening. Also, ensure your measurements for flour, butter, and liquids were accurate. If it’s still too thin after simmering, use the slurry method described in Tip #3 (mix 1 tbsp cornstarch or flour with 2 tbsp cold liquid, whisk into the simmering sauce until thickened).
- Q: Can I make this casserole gluten-free?
- A: Yes, making this gluten-free is straightforward. Use a good quality measure-for-measure gluten-free all-purpose flour blend in place of the regular all-purpose flour for the roux. Substitute tamari (which is gluten-free soy sauce) or coconut aminos for the soy sauce. Finally, ensure your crispy fried onions are certified gluten-free or make your own using a gluten-free coating. Many brands contain wheat flour, so checking labels is essential.
- Q: Can I freeze this dairy-free green bean casserole?
- A: Yes, you can freeze it, ideally before the final baking step for the best texture upon reheating. Assemble the casserole fully (sauce, beans, internal onions) in a freezer-safe baking dish. Do not add the top layer of crispy onions. Let the casserole cool completely, then cover it tightly with a layer of plastic wrap followed by a layer of aluminum foil, or use a tight-fitting lid. Freeze for up to 2-3 months. To bake, thaw it overnight in the refrigerator. Let it sit at room temperature for about 30 minutes before baking. Remove the plastic wrap, add the fresh crispy onion topping, and bake according to the original instructions (375°F for 25-30 minutes), possibly adding 10-15 extra minutes since it started cold, until hot, bubbly, and golden. Freezing a fully baked casserole is possible, but the topping will likely lose its crispness upon reheating, and the sauce texture might change slightly.
Dairy-Free Green Bean Casserole Recipe
Ingredients
- Fresh Green Beans: 1.5 pounds (about 6 cups), trimmed and cut into 1-2 inch pieces.
- Why Fresh? Fresh green beans provide the best texture – tender-crisp rather than mushy. Frozen green beans are the next best option (use them straight from frozen, no need to thaw, but you might need a slightly longer baking time). While canned green beans can be used in a pinch, they will result in a much softer, less vibrant casserole. If using canned, drain them very well.
- Dairy-Free Butter: 1/4 cup (4 tablespoons).
- Recommendation: Use a good quality vegan butter stick (like Miyoko’s Kitchen Cultured Vegan Butter, Melt Organic Vegan Butter, or Earth Balance Vegan Butter Sticks). These behave most similarly to dairy butter when making the roux and provide a rich flavor. Avoid tub-style margarines which can have higher water content.
- Yellow Onion: 1 large, finely chopped (about 1.5 cups).
- Flavor Base: Onion provides a fundamental layer of savory sweetness to the sauce. Yellow or white onions work best.
- Garlic: 3-4 cloves, minced (about 1 tablespoon).
- Aromatic Depth: Fresh garlic adds aromatic depth that complements the mushrooms and onions. Don’t skimp here!
- Mushrooms: 10 ounces (about 3 cups sliced), cremini (baby bella) or white button mushrooms, cleaned and sliced.
- The “Cream” Element: Mushrooms are key to replicating the flavor of traditional cream of mushroom soup. Cremini mushrooms offer a slightly deeper, earthier flavor than white button mushrooms, but either works beautifully. Slice them relatively uniformly.
- All-Purpose Flour: 1/4 cup.
- Thickener: This combines with the dairy-free butter to create a roux, the thickening agent for our creamy sauce. For a gluten-free version, use a good quality measure-for-measure gluten-free flour blend (like Bob’s Red Mill 1-to-1 Baking Flour or King Arthur Measure for Measure Flour). Rice flour or cornstarch can also work, but may require slight adjustments in quantity or technique (cornstarch should be mixed with cold liquid first as a slurry).
- Unsweetened Plant-Based Milk: 1.5 cups.
- Creaminess: Choose a neutral-flavored, unsweetened plant milk. Unsweetened almond milk, soy milk, or oat milk are excellent choices. Full-fat canned coconut milk can also be used for extra richness, but be aware it might impart a subtle coconut flavor, which some people enjoy and others don’t. Ensure it’s thoroughly whisked before measuring if using coconut milk. Avoid sweetened or strongly flavored varieties (like vanilla).
- Vegetable Broth: 1/2 cup.
- Flavor & Consistency: Adds savory depth and helps achieve the right sauce consistency. Use a low-sodium broth to better control the saltiness of the final dish.
- Soy Sauce or Tamari: 1 tablespoon.
- Umami Boost: This secret weapon adds a savory, umami depth that mimics the richness often lost without dairy. Use tamari for a gluten-free option, or coconut aminos for a soy-free and gluten-free alternative (you might need slightly more coconut aminos).
- Salt: 1 teaspoon (or to taste).
- Enhancer: Essential for bringing out all the flavors. Start with 1 teaspoon and adjust after tasting the sauce. Remember the crispy onions will add saltiness too.
- Black Pepper: 1/2 teaspoon freshly ground (or to taste).
- Warmth: Adds a gentle warmth and spice. Freshly ground pepper offers superior flavor.
- Crispy Fried Onions: 1.5 cups, divided.
- The Crunch: The iconic topping! Most commercially available crispy fried onions are accidentally vegan/dairy-free, but always check the ingredients label to be sure (some brands may contain milk derivatives). You can also make your own for superior flavor and crunch (see tips section). We divide them to mix some into the casserole for texture and flavor throughout, and save the rest for that crucial crispy topping.
- Optional: Dairy-Free Shredded Cheese: 1/2 cup for topping.
- Extra Indulgence: If you want a “cheesy” element, sprinkle some dairy-free cheddar or mozzarella shreds (brands like Daiya, Violife, Miyoko’s Kitchen) over the top along with the final layer of crispy onions before baking. This is entirely optional; the casserole is delicious without it.
Instructions
- Preheat & Prep Baking Dish: Preheat your oven to 375°F (190°C). Lightly grease a 9×13 inch baking dish or a similar 2.5 – 3 quart casserole dish with a bit of dairy-free butter or cooking spray. Set aside.
- Prepare the Green Beans (If Using Fresh): Bring a large pot of salted water to a rolling boil. Add the trimmed and cut green beans and blanch them for 4-5 minutes. They should be bright green and slightly tender but still have a crisp bite (tender-crisp). Immediately drain the beans and plunge them into an ice bath (a large bowl filled with ice and cold water) for a minute or two to stop the cooking process and preserve their vibrant color. Drain them thoroughly and set aside. If using frozen green beans, you can skip this blanching step. If using canned, ensure they are very well drained.
- Sauté the Aromatics: Place a large skillet or Dutch oven over medium heat. Add the 1/4 cup of dairy-free butter. Once melted and shimmering, add the chopped yellow onion. Sauté for 5-7 minutes, stirring occasionally, until the onion is softened and translucent.
- Cook the Mushrooms and Garlic: Add the sliced mushrooms to the skillet with the onions. Increase the heat slightly to medium-high. Cook, stirring occasionally, for about 8-10 minutes. The mushrooms will initially release water; continue cooking until most of this liquid has evaporated and the mushrooms are nicely browned and reduced in size. This browning step is crucial for developing deep, savory flavor. Stir in the minced garlic and cook for another minute until fragrant – be careful not to burn the garlic.
- Make the Roux: Sprinkle the 1/4 cup of all-purpose flour (or gluten-free alternative) over the mushroom and onion mixture. Stir constantly for 1-2 minutes, coating the vegetables evenly. This cooks out the raw flour taste and forms the base of your sauce (the roux).
- Build the Creamy Sauce: Gradually whisk in the 1.5 cups of unsweetened plant-based milk, adding about 1/4 cup at a time, whisking well after each addition to prevent lumps. Once all the milk is incorporated, whisk in the 1/2 cup of vegetable broth.
- Simmer and Season: Bring the mixture to a gentle simmer, stirring frequently. Let it cook for 3-5 minutes, or until the sauce has thickened enough to coat the back of a spoon. It should be smooth and creamy. Stir in the 1 tablespoon of soy sauce (or tamari/coconut aminos), 1 teaspoon of salt, and 1/2 teaspoon of black pepper. Taste the sauce and adjust seasonings if necessary. Remember that the crispy onions will add more salt later.
- Combine Casserole Ingredients: Remove the skillet from the heat. Add the prepared green beans (blanched fresh, frozen, or well-drained canned) to the skillet with the creamy mushroom sauce. Gently stir everything together until the green beans are evenly coated. Stir in half (about 3/4 cup) of the crispy fried onions. Mixing some onions into the casserole itself adds texture and flavor throughout the dish, not just on top.
- Assemble the Casserole: Pour the green bean mixture into the prepared baking dish, spreading it out evenly.
- Top and Bake: Sprinkle the remaining 3/4 cup of crispy fried onions evenly over the top of the casserole. If using, sprinkle the optional dairy-free cheese shreds over the top as well.
- Bake: Place the casserole dish in the preheated oven. Bake for 25-30 minutes, or until the sauce is bubbly around the edges and the crispy onion topping is golden brown and fragrant. If the onions start to brown too quickly, you can loosely tent the dish with foil for the last 10 minutes of baking.
- Rest and Serve: Carefully remove the casserole from the oven. Let it rest for 5-10 minutes before serving. This allows the sauce to set slightly and makes it easier to serve. Serve hot and enjoy the deliciousness!
Nutrition
- Serving Size: One Normal Portion
- Calories: 200-280


