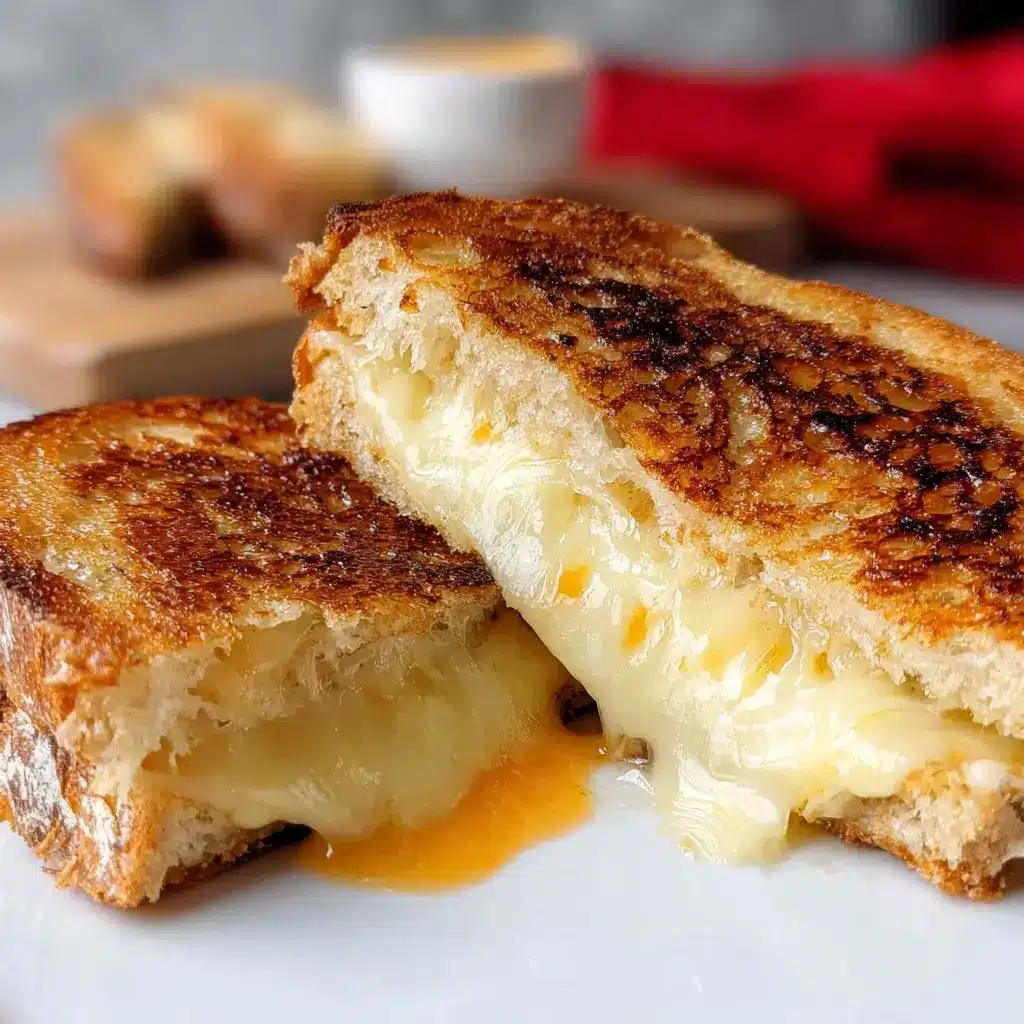
Of all the comfort foods in the world, the grilled cheese sandwich holds a special, almost sacred place in my heart. It was the first thing I learned to cook by myself, a simple assembly of white bread and a single slice of American cheese. But as I grew, so did my palate. I realized that this humble sandwich had the potential for greatness, a culinary canvas waiting for the right artist. My quest for the perfect grilled cheese led me down a delicious path of experimentation, but it wasn’t until I landed on thick-cut sourdough bread that everything clicked. The moment my family first bit into this Crispy Sourdough Grilled Cheese, a reverent silence fell over the kitchen, broken only by the symphonic crunch of the crust. The tangy, chewy sourdough, the perfectly golden and shatteringly crisp exterior, and the river of gooey, molten cheese within—it was a revelation. This isn’t just a sandwich; it’s an experience. It’s the recipe that turned a simple Tuesday night dinner into a gourmet event and the one my kids now request more than any other. This is the ultimate grilled cheese, and I’m thrilled to share every secret to making it absolutely perfect.
The Ultimate Crispy Sourdough Grilled Cheese
This recipe is designed for one perfect sandwich, but it can be easily scaled up to feed a hungry crowd. The key is in the quality of the ingredients and the technique used to achieve that signature crunch and perfect melt.
Yields: 1 Sandwich
Prep time: 5 minutes
Cook time: 8-10 minutes
Ingredients
- Sourdough Bread: 2 thick slices (about ¾-inch to 1-inch thick) of high-quality sourdough bread.
- Cheese: 4 ounces (about ½ cup, shredded) of a good melting cheese blend. A fantastic combination is 2 ounces of sharp cheddar and 2 ounces of low-moisture mozzarella or Gruyère.
- Mayonnaise: 1 tablespoon of full-fat mayonnaise (like Duke’s or Kewpie).
- Unsalted Butter: 2 tablespoons of unsalted butter, softened to room temperature.
- Optional: A pinch of flaky sea salt for finishing.
Instructions
- Prepare the Ingredients: If you’re using block cheese, shred it using the large holes of a box grater. Shredding the cheese is crucial as it melts more quickly and evenly than slices. Allow the cheese and softened butter to sit at room temperature for about 10-15 minutes before you begin. This helps ensure a perfect melt without burning the bread.
- Butter the Bread (The Inside!): This is a game-changing step. Lightly spread a thin layer of the softened butter on one side of each slice of bread. These buttered sides will be the inside of your sandwich. This adds a layer of rich flavor that soaks into the bread as the cheese melts.
- Apply the Mayonnaise (The Outside!): On the opposite (outer) side of each slice of bread, spread a thin, even layer of mayonnaise from crust to crust. This is the secret to the crispiest, most evenly golden-brown crust you’ve ever had. Mayonnaise has a higher smoke point than butter and contains oil and eggs, which help to create a beautiful, uniform crust that resists burning.
- Assemble the Sandwich: Place one slice of bread, mayonnaise-side down, in a cold, non-stick or cast-iron skillet. Pile the shredded cheese evenly onto the bread, making sure it goes all the way to the edges. A little bit of cheese “spillover” is a good thing—it will fry into crispy, delicious “frico” on the pan. Place the second slice of bread on top, mayonnaise-side up.
- The Low and Slow Cook: Place the skillet over medium-low heat. Cooking a grilled cheese low and slow is paramount. If the heat is too high, the bread will burn long before the cheese has a chance to melt into gooey perfection.
- Cook the First Side: Let the sandwich cook undisturbed for 4-5 minutes. You should hear a gentle, consistent sizzle. Resist the urge to press down on it initially. After a few minutes, you can use a spatula to gently press down on the sandwich to encourage even cooking and help the cheese melt.
- The Flip: Carefully peek at the underside of the sandwich. Once it is a deep, crisp golden brown, it’s time to flip. Use a wide spatula to confidently flip the sandwich.
- Cook the Second Side: Cook for another 3-4 minutes on the second side, again pressing gently with the spatula. This side will often cook a bit faster as the pan and the cheese are already hot. Cook until it’s equally golden brown and the cheese is completely melted, oozing gloriously from the sides.
- Rest and Slice: Transfer the finished sandwich to a cutting board and let it rest for at least 60 seconds. This allows the molten cheese to set up slightly, preventing it from all running out when you slice it. Sprinkle with a tiny pinch of flaky sea salt for an extra pop of flavor and texture. Slice in half diagonally (it’s scientifically proven to taste better that way!) and serve immediately.
Nutrition Facts
- Servings: 1 sandwich
- Calories per serving: Approximately 750-850 kcal
Disclaimer: The nutritional information is an estimate and can vary significantly based on the specific brands of bread, cheese, butter, and mayonnaise used.
Preparation Time
- Total Time: 15 minutes
- Active Prep Time: 5 minutes
- Cooking Time: 10 minutes
Why This Recipe Works: The Science of Perfection
Achieving grilled cheese nirvana isn’t about luck; it’s about understanding the “why” behind each step. This recipe is meticulously crafted to balance three critical elements: a shatteringly crisp crust, a luxuriously melted interior, and a deep, complex flavor profile.
The Sourdough Advantage
Not all bread is created equal when it comes to a grilled cheese. Sourdough is the undisputed champion for several reasons:
- Structural Integrity: Sourdough has a robust, chewy crumb and a sturdy crust developed through its long fermentation process. It can stand up to the weight of a generous amount of cheese and the moisture from the butter and mayo without becoming a soggy mess.
- Flavor Complexity: The characteristic tangy flavor of sourdough, a result of the wild yeast and lactic acid bacteria in the starter, provides a beautiful counterpoint to the rich, salty, and savory cheese. It cuts through the fat and adds a layer of gourmet complexity that you just don’t get from plain white bread.
- The Perfect Texture: When toasted, the open crumb structure of sourdough creates a multitude of nooks and crannies that become exceptionally crisp, offering an incredible textural contrast to the soft, melted cheese.
The Great Fat Debate: Mayonnaise vs. Butter
This recipe uses both, and for very specific reasons. It’s the ultimate “why not both?” approach to flavor and texture.
- Mayonnaise for the Crust: This is the ultimate hack for an unbelievably crispy, evenly browned exterior. Mayonnaise is an emulsion of oil, egg yolk, and an acid (like vinegar or lemon juice). The oil content gives it a higher smoke point than butter, meaning it can withstand the heat of the pan for longer without burning. This allows the bread to toast perfectly while the cheese inside melts. The sugar and protein in the egg and other ingredients promote a beautiful Maillard reaction, resulting in that flawless golden-brown color.
- Butter for the Flavor: While mayonnaise creates the perfect crust, butter delivers that classic, nostalgic, rich flavor we all associate with a grilled cheese. By buttering the inside of the bread, the butter melts directly into the bread and mingles with the cheese, creating a decadent, savory, and nutty flavor profile from within. It’s the best of both worlds.
The Cheese-Meltology
The choice of cheese is personal, but the technique is universal.
- Shred, Don’t Slice: Shredded cheese melts significantly faster and more evenly than sliced cheese. The increased surface area allows the heat to penetrate quickly, ensuring every bit is perfectly gooey by the time the bread is toasted.
- The Power of the Blend: Using a single cheese is fine, but a blend creates a more dynamic sandwich. The formula is simple: one “melter” and one “flavor.”
- The Melters: These cheeses provide that epic, Instagram-worthy cheese pull. Good options include low-moisture mozzarella, young provolone, fontina, or Gruyère. Gruyère is a superstar because it melts beautifully and adds a nutty, complex flavor.
- The Flavor Punchers: These cheeses bring the sharp, tangy, or savory notes. Sharp cheddar, aged provolone, or even a bit of smoked gouda can elevate the sandwich. A classic sharp cheddar is the perfect partner for the tang of the sourdough.
- Room Temperature is Key: Allowing your shredded cheese to come to room temperature for 15-20 minutes before assembling gives it a head start on melting. Cold cheese will take much longer to melt, increasing the risk of your bread burning.
How to Serve Your Gourmet Grilled Cheese
While this sandwich is a star on its own, the right accompaniments can turn it into a truly memorable meal. Think about contrast—acidity, texture, and temperature.
- The Classic Companion:
- Creamy Tomato Soup: The quintessential pairing. The acidity of the tomato cuts through the richness of the cheese, and there’s nothing more satisfying than dipping a crispy corner of the sandwich into the warm soup. Try a fire-roasted tomato bisque for a smoky, elevated flavor.
- Fresh and Crisp Salads:
- Simple Arugula Salad: A peppery arugula salad tossed with a bright lemon vinaigrette, shaved Parmesan, and toasted pine nuts offers a fresh, acidic contrast that cleanses the palate.
- Classic Coleslaw: A tangy, crunchy coleslaw provides both textural and flavor contrast.
- Dipping Sauces and Spreads:
- Spicy Aioli: Whisk a little sriracha or chipotle in adobo into some mayonnaise for a creamy, spicy dip.
- Pesto: The fresh, herbaceous flavor of basil pesto is a fantastic and unexpected partner for the cheesy sandwich.
- Fig Jam or Hot Honey: For a sweet and savory experience, a small side of fig jam or a drizzle of hot honey adds a completely new dimension.
- Pickled and Fermented Sides:
- Dill Pickles: A crunchy, sour dill pickle spear is a classic for a reason. Its sharp acidity is the perfect foil for the fatty richness.
- Pickled Red Onions: Their sweet and tangy bite adds a pop of color and flavor.
- Kimchi: For the adventurous, the spicy, funky, fermented flavor of kimchi offers an incredible and bold pairing.
Additional Tips for Grilled Cheese Mastery
- Use a Heavy-Bottomed Pan: A cast-iron skillet or a heavy-bottomed non-stick pan is your best friend. They retain and distribute heat evenly, which is crucial for preventing hot spots that can burn the bread.
- The Lid Trick: For the first few minutes of cooking, you can cover the pan with a lid. This traps steam and heat, helping the cheese to start melting more quickly from the top down. Just be sure to remove the lid for the last minute or two on each side to allow the exterior to re-crisp.
- Don’t Overcrowd the Pan: If you’re making multiple sandwiches, cook them in batches. Overcrowding the pan will lower the temperature and cause the bread to steam rather than toast, resulting in a soggy sandwich. Give each sandwich its own space to sizzle.
- Embrace the “Frico”: Don’t be afraid to let a little cheese spill out of the sandwich and onto the pan. This cheese will fry directly on the skillet’s surface, creating a crispy, lacey, and intensely cheesy wafer known as “frico.” Scrape these bits up and enjoy them—they’re a chef’s treat!
- Let it Rest: It’s the hardest part of the process, but letting the sandwich rest for a minute or two before slicing is crucial. This allows the super-molten cheese to cool just enough to slightly solidify. If you slice it immediately, the cheese will run out like lava, leaving you with a less cheesy sandwich interior. Patience yields a perfectly contained, gooey center.
Frequently Asked Questions (FAQ)
1. Why did my grilled cheese come out soggy instead of crispy?
Sogginess is usually caused by one of two things: too low heat or steam. If the pan temperature is too low, the bread will absorb the fat slowly and become greasy rather than forming a crust. Conversely, if you cover the pan for the entire cooking time, the trapped steam will soften the crust. The solution is to use medium-low heat to get a consistent sizzle and only cover the pan for the first couple of minutes, if at all. Using mayonnaise on the outside is also a great defense against sogginess.
2. Can I make this in an air fryer or panini press?
Absolutely!
- Air Fryer: Assemble the sandwich as directed. Place it in the air fryer basket and cook at 370°F (185°C) for about 4-5 minutes per side, or until golden brown and crispy. The circulating hot air creates an incredibly crisp crust.
- Panini Press: A panini press works wonderfully. You get the benefit of cooking both sides at once. Just be sure not to press down too hard, or you’ll squeeze all the cheese out.
3. What’s the best way to reheat a grilled cheese?
The microwave is the enemy of a crispy grilled cheese; it will make it limp and tough. The best way to reheat it is in a dry skillet over low heat. This will re-crisp the bread and re-melt the cheese. You can also use a toaster oven or an air fryer at around 350°F (175°C) for a few minutes until it’s warmed through and crisp again.
4. Can I add other ingredients to the sandwich?
Of course! This recipe is a perfect base for a more elaborate sandwich. Great additions include:
- A thin layer of fig jam or apple butter.
- Caramelized onions.
- Crispy bacon or thinly sliced prosciutto.
- Sliced tomatoes (pat them dry first!) or roasted red peppers.
- A few leaves of fresh basil or spinach.
Just be careful not to overstuff the sandwich, as this can make it difficult to cook evenly.
5. I’m out of sourdough. What’s the next best bread to use?
While sourdough is the ideal choice, other thick, sturdy breads work well. Look for breads that won’t fall apart. Great alternatives include:
- Brioche: For a richer, slightly sweeter, and more tender sandwich.
- Ciabatta: Its open, airy structure gets wonderfully crisp.
- A thick-cut country loaf or artisan white bread: These are a significant step up from standard sandwich bread and will hold up well.

Crispy Sourdough Grilled Cheese Recipe
Ingredients
- Sourdough Bread: 2 thick slices (about ¾-inch to 1-inch thick) of high-quality sourdough bread.
- Cheese: 4 ounces (about ½ cup, shredded) of a good melting cheese blend. A fantastic combination is 2 ounces of sharp cheddar and 2 ounces of low-moisture mozzarella or Gruyère.
- Mayonnaise: 1 tablespoon of full-fat mayonnaise (like Duke’s or Kewpie).
- Unsalted Butter: 2 tablespoons of unsalted butter, softened to room temperature.
- Optional: A pinch of flaky sea salt for finishing.
Instructions
- Prepare the Ingredients: If you’re using block cheese, shred it using the large holes of a box grater. Shredding the cheese is crucial as it melts more quickly and evenly than slices. Allow the cheese and softened butter to sit at room temperature for about 10-15 minutes before you begin. This helps ensure a perfect melt without burning the bread.
- Butter the Bread (The Inside!): This is a game-changing step. Lightly spread a thin layer of the softened butter on one side of each slice of bread. These buttered sides will be the inside of your sandwich. This adds a layer of rich flavor that soaks into the bread as the cheese melts.
- Apply the Mayonnaise (The Outside!): On the opposite (outer) side of each slice of bread, spread a thin, even layer of mayonnaise from crust to crust. This is the secret to the crispiest, most evenly golden-brown crust you’ve ever had. Mayonnaise has a higher smoke point than butter and contains oil and eggs, which help to create a beautiful, uniform crust that resists burning.
- Assemble the Sandwich: Place one slice of bread, mayonnaise-side down, in a cold, non-stick or cast-iron skillet. Pile the shredded cheese evenly onto the bread, making sure it goes all the way to the edges. A little bit of cheese “spillover” is a good thing—it will fry into crispy, delicious “frico” on the pan. Place the second slice of bread on top, mayonnaise-side up.
- The Low and Slow Cook: Place the skillet over medium-low heat. Cooking a grilled cheese low and slow is paramount. If the heat is too high, the bread will burn long before the cheese has a chance to melt into gooey perfection.
- Cook the First Side: Let the sandwich cook undisturbed for 4-5 minutes. You should hear a gentle, consistent sizzle. Resist the urge to press down on it initially. After a few minutes, you can use a spatula to gently press down on the sandwich to encourage even cooking and help the cheese melt.
- The Flip: Carefully peek at the underside of the sandwich. Once it is a deep, crisp golden brown, it’s time to flip. Use a wide spatula to confidently flip the sandwich.
- Cook the Second Side: Cook for another 3-4 minutes on the second side, again pressing gently with the spatula. This side will often cook a bit faster as the pan and the cheese are already hot. Cook until it’s equally golden brown and the cheese is completely melted, oozing gloriously from the sides.
- Rest and Slice: Transfer the finished sandwich to a cutting board and let it rest for at least 60 seconds. This allows the molten cheese to set up slightly, preventing it from all running out when you slice it. Sprinkle with a tiny pinch of flaky sea salt for an extra pop of flavor and texture. Slice in half diagonally (it’s scientifically proven to taste better that way!) and serve immediately.
Nutrition
- Serving Size: One Normal Portion
- Calories: 750-850