

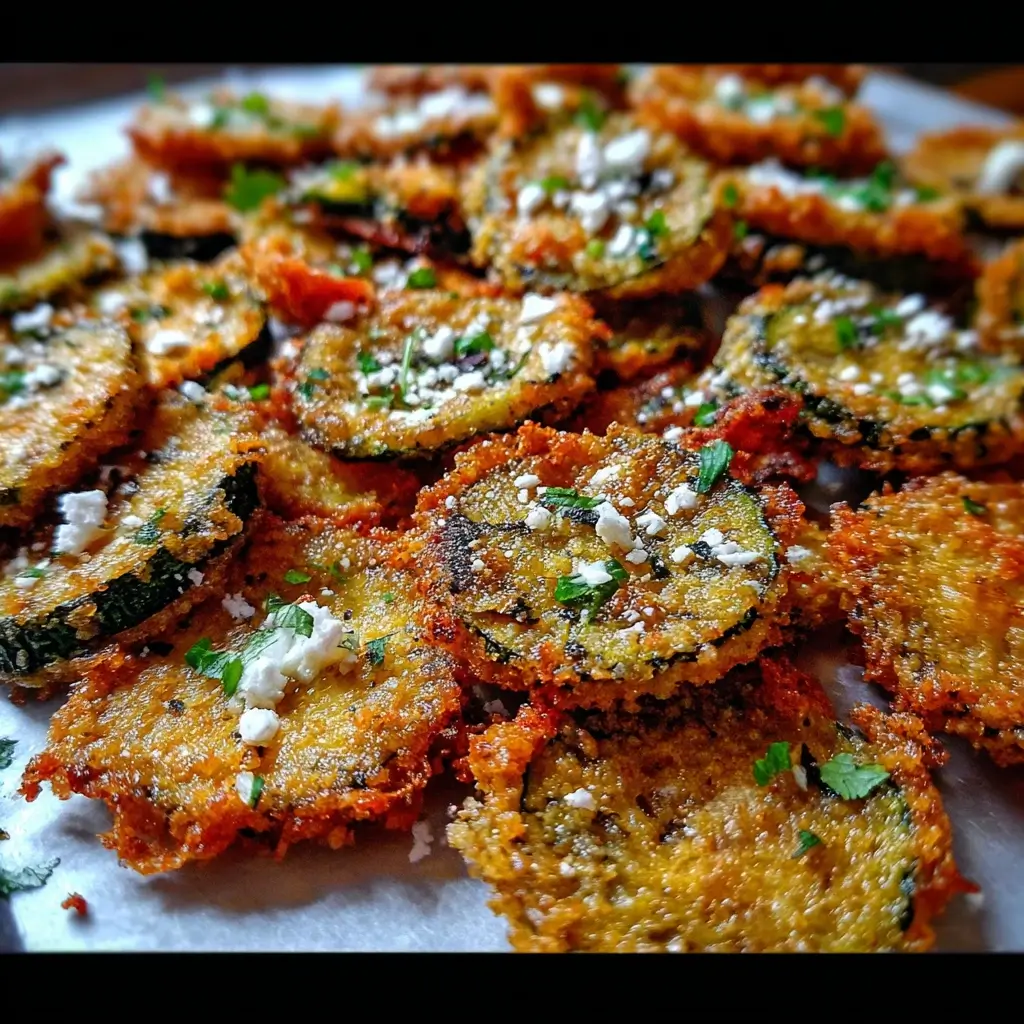

There are few culinary experiences that transport me to sun-drenched Greek islands quite like the simple perfection of Crispy Greek Zucchini Slices, or Kolokithakia Tiganita as they’re affectionately known. I still remember the first time I had them at a small taverna overlooking the Aegean Sea; the salty air, the sound of the waves, and then, this plate of impossibly crispy, golden zucchini arrived, served with a dollop of creamy, garlicky tzatziki. It was love at first bite! Recreating that magic at home became a bit of an obsession. After a few (admittedly less-than-crispy) attempts, I finally nailed the technique. Now, these zucchini slices are a staple in our household, especially during summer when zucchini is abundant. My family adores them – the kids, who usually turn their noses up at vegetables, devour them like candy, and my partner always requests a double batch. They are the perfect appetizer for guests, a delightful side dish, or even just a satisfying snack. The beauty of this recipe lies in its simplicity, but the secret is in the technique to achieve that ultimate, shatteringly crisp exterior while keeping the inside tender. Prepare to be amazed by how a humble zucchini can be transformed into such an addictive treat!
Ingredients for Irresistibly Crispy Greek Zucchini Slices (Kolokithakia Tiganita)
To achieve that authentic Greek taverna taste and texture, the quality and preparation of your ingredients are key. Here’s what you’ll need to create approximately 4-6 appetizer servings:
- Fresh Zucchini: 3 medium-sized (about 1.5 lbs / 680g), firm and unblemished. Younger, smaller zucchini tend to have fewer seeds and less moisture, making them ideal.
- All-Purpose Flour: 1 ½ cups (approx. 180g). This forms the base of our crispy coating. Some traditional recipes use only flour, while others might incorporate a touch of cornstarch for extra crisp. We’re keeping it classic here.
- Fine Sea Salt: 1 ½ teaspoons, plus more for salting the zucchini and for finishing. Salt is crucial not only for flavor but also for drawing out excess moisture from the zucchini.
- Freshly Ground Black Pepper: ½ teaspoon, or to taste.
- Optional Spices (for the flour mixture):
- ½ teaspoon dried Greek oregano (adds a lovely aromatic touch)
- ¼ teaspoon garlic powder (for a subtle garlicky undertone)
- Cold Water or Sparkling Water: About 1 cup (240ml). Using ice-cold or sparkling water helps create a lighter, crispier batter. The exact amount might vary slightly depending on your flour.
- Light Olive Oil or Vegetable Oil for Frying: Approximately 2-3 cups (480-720ml), or enough to have about ½ – ¾ inch depth in your frying pan. Choose an oil with a high smoke point.
- For Serving (Highly Recommended):
- Fresh Lemon Wedges
- Homemade or store-bought Tzatziki sauce (see notes below for a quick tzatziki idea)
- Freshly chopped parsley or dill for garnish (optional)
Why these amounts?
The quantity of zucchini allows for a generous platter. The flour amount ensures good coverage without being overly thick. The water content is key for the batter consistency – you’re looking for something akin to thin pancake batter. The oil quantity is typical for shallow frying, ensuring the zucchini cooks evenly and crisps up without absorbing too much oil.
Step-by-Step Instructions to Golden Perfection
Follow these steps meticulously for zucchini slices that are crispy every single time. The magic lies in preparing the zucchini properly and maintaining the right oil temperature.
- Prepare the Zucchini – The Crucial First Step:
- Wash the zucchini thoroughly under cold running water. Pat them completely dry with a clean kitchen towel or paper towels.
- Trim off the ends of each zucchini.
- Slice the zucchini into thin rounds, approximately ⅛ to ¼ inch (3-6mm) thick. A mandoline slicer is highly recommended here for uniform thickness, which ensures even cooking and crisping. If using a knife, take your time to make the slices as consistent as possible. Slices that are too thick will not crisp up properly and may become soggy.
- Place the zucchini slices in a colander in a single layer, if possible (or in batches). Sprinkle them generously with about 1 teaspoon of fine sea salt. Toss gently to distribute the salt.
- Let the salted zucchini sit in the colander (placed over a bowl or in the sink to catch the liquid) for at least 30 minutes, or up to 1 hour. This process, known as disgorging, draws out excess moisture from the zucchini, which is absolutely essential for achieving maximum crispiness. You’ll be surprised how much water is released!
- After the resting period, gently pat the zucchini slices thoroughly dry with paper towels. Remove as much surface moisture and residual salt as possible. Do not rinse them. This drying step is critical; wet zucchini will lead to a soggy result and can cause the oil to splatter dangerously.
- Prepare the Frying Station:
- Choose a large, heavy-bottomed skillet or a Dutch oven. A cast-iron skillet works wonderfully as it retains heat well.
- Pour the frying oil into the skillet to a depth of about ½ to ¾ inch.
- Place a wire rack over a baking sheet and keep it nearby. This is where you’ll drain the fried zucchini slices, allowing air to circulate underneath and keeping them crispy. Draining directly on paper towels can sometimes trap steam and make the underside less crisp.
- Make the Light Batter (or Dredge):
- In a wide, shallow bowl, whisk together the all-purpose flour, the remaining ½ teaspoon of salt, freshly ground black pepper, and any optional spices like oregano or garlic powder.
- If making a wet batter: Gradually whisk in the ice-cold water or sparkling water until you achieve a smooth, thin batter, similar in consistency to crepe batter or thin pancake batter. It should be just thick enough to lightly coat the zucchini without being heavy. Do not overmix; a few small lumps are okay.
- If opting for a dry dredge (simpler, and often preferred for ultimate crispiness): Simply use the seasoned flour mixture. This method relies on the slight residual moisture on the (patted dry) zucchini to help the flour adhere. Many traditional Greek recipes use just a flour dredge. For this article’s primary method, we’ll assume a very light batter.
- Heat the Oil:
- Place the skillet with the oil over medium-high heat.
- To test if the oil is ready, you can use a cooking thermometer – it should register between 350-375°F (175-190°C).
- Alternatively, drop a small piece of zucchini or a tiny bit of batter into the oil. If it sizzles vigorously and turns golden brown in about 30-60 seconds, the oil is ready. If it browns too quickly, the oil is too hot; if it sinks and sizzles weakly, the oil is not hot enough. Adjust the heat accordingly.
- Dredge and Fry the Zucchini Slices:
- Working in batches to avoid overcrowding the pan (which lowers the oil temperature and leads to greasy zucchini), take a handful of the dried zucchini slices.
- If using batter: Dip each slice into the thin batter, allowing any excess to drip off. You want a very light, almost translucent coating.
- If using a dry dredge: Toss the zucchini slices in the seasoned flour, ensuring they are lightly coated on all sides. Shake off any excess flour.
- Carefully place the coated zucchini slices into the hot oil in a single layer. Do not overlap them.
- Fry for about 2-3 minutes per side, or until they are beautifully golden brown and crispy. The exact time will depend on the thickness of your slices and the oil temperature.
- Use tongs or a slotted spoon to flip the slices gently once the first side is golden.
- Drain and Season:
- Once both sides are golden and crisp, remove the zucchini slices from the oil using a slotted spoon or spider skimmer, allowing excess oil to drip back into the pan.
- Transfer the fried zucchini to the prepared wire rack to drain.
- Immediately sprinkle the hot zucchini slices lightly with a tiny pinch of fine sea salt (optional, especially if your initial salting was thorough and your batter seasoned). The heat helps the salt adhere.
- Repeat the dredging and frying process with the remaining zucchini slices, making sure to allow the oil to return to the proper temperature between batches. If you notice the oil getting too dark or full of flour bits, you can carefully strain it between batches if necessary (though for a single recipe batch, this is often not needed if your dredge is light).
- Serve Immediately:
- Crispy Greek Zucchini Slices are best enjoyed hot and fresh, straight from the pan, for maximum crispiness.
Nutritional Snapshot (Estimated)
It’s important to remember that these are fried, so while zucchini itself is healthy, the frying process adds calories and fat. This dish is best enjoyed as a treat.
- Servings: Approximately 4-6 appetizer servings.
- Calories per serving (estimated for 1 of 6 servings): Approximately 250-350 calories.
This estimation can vary significantly based on:
- The exact amount of oil absorbed during frying (which depends on oil temperature and batter thickness).
- The thickness of the zucchini slices.
- The specific type of oil used.
- Serving size.
Zucchini itself is low in calories and a good source of Vitamin C, Vitamin A, potassium, and folate. However, the flour and oil contribute the majority of the calories in this preparation.
Time Commitment: From Garden to Golden
Understanding the time involved helps in planning your meal.
- Preparation Time: 20 minutes (slicing zucchini, preparing batter/dredge).
- Zucchini Salting/Resting Time: 30-60 minutes (this is mostly hands-off time).
- Cooking Time: 20-30 minutes (frying in batches).
- Total Time (including resting): Approximately 1 hour 10 minutes to 1 hour 50 minutes.
While the resting time seems long, it’s crucial and allows you to prepare other parts of your meal, like the tzatziki sauce.
Serving Suggestions: Elevate Your Crispy Zucchini Experience
These Crispy Greek Zucchini Slices are fantastic on their own, but pairing them thoughtfully can take them to the next level. Here are some classic and creative ways to serve them:
- The Classic Companion – Tzatziki:
- A generous bowl of creamy, cool tzatziki sauce is non-negotiable for many. The coolness and tanginess of the yogurt, cucumber, garlic, and dill or mint cut through the richness of the fried zucchini beautifully.
- Quick Tzatziki Idea: Mix plain Greek yogurt with grated cucumber (squeezed of excess water), minced garlic, a splash of lemon juice, a drizzle of olive oil, and chopped fresh dill or mint. Season with salt.
- Simple Lemon Squeeze:
- Serve with plenty of fresh lemon wedges. A squeeze of lemon juice right before eating brightens the flavors and adds a zesty kick.
- As Part of a Meze Platter:
- Arrange the crispy zucchini slices on a large platter alongside other Greek mezedes (appetizers) such as:
- Olives (Kalamata are perfect)
- Feta cheese (perhaps drizzled with olive oil and oregano)
- Dolmades (stuffed grape leaves)
- Hummus or Tirokafteri (spicy feta dip)
- Pita bread wedges
- Arrange the crispy zucchini slices on a large platter alongside other Greek mezedes (appetizers) such as:
- As a Side Dish:
- These make an excellent side dish for grilled meats like souvlaki (chicken or pork skewers), lamb chops, or grilled fish.
- They also pair well with roasted chicken or a hearty moussaka.
- With Other Dips:
- Skordalia: A pungent Greek garlic and potato (or bread) dip offers a robust alternative to tzatziki.
- Whipped Feta Dip: Creamy, salty, and tangy, this is another delightful pairing.
- Roasted Red Pepper Dip (Melitzanosalata Agioritiki variation): Adds a smoky sweetness.
- Garnishes for Visual Appeal and Flavor:
- Sprinkle with freshly chopped parsley for a touch of green and freshness.
- A dusting of fresh dill echoes the flavors often found in tzatziki.
- A pinch of smoked paprika or a tiny bit of red pepper flakes can add warmth and a hint of spice.
- For a Lighter Meal:
- Serve a generous portion of crispy zucchini with a large Greek salad (Horiatiki) for a satisfying vegetarian lunch or light dinner.
Remember, the key is to serve them hot and fresh for the best texture and taste!
Pro Tips for Unforgettably Crispy Zucchini
Mastering crispy zucchini isn’t just about following the recipe; a few extra insights can make all the difference.
- Uniform Slicing is Paramount:
This cannot be stressed enough. If your zucchini slices are uneven, the thinner parts will burn before the thicker parts are cooked and crispy. A mandoline slicer is your best friend here. Aim for consistent ⅛ to ¼ inch (3-6mm) thickness. If you don’t have a mandoline, use your sharpest knife and take your time. - Don’t Skip the Salting and Drying:
Zucchini is about 95% water. Salting draws out a significant amount of this moisture through osmosis. Removing this excess water is the number one secret to preventing soggy zucchini. After salting, patting them thoroughly dry with paper towels is equally important. Any surface moisture will turn to steam when it hits the hot oil, working against your crisping efforts and potentially causing dangerous oil splatters. - Maintain Optimal Oil Temperature:
The ideal frying temperature is between 350-375°F (175-190°C).- Too low: The zucchini will absorb too much oil and become greasy and soggy.
- Too high: The coating will burn before the zucchini inside is tender.
A deep-fry thermometer is a worthy investment. If you don’t have one, use the “test piece” method described in the instructions. Also, don’t overcrowd the pan. Adding too many slices at once will drastically lower the oil temperature. Fry in batches!
- The “Less is More” Batter/Dredge Approach:
You want a very light coating. A thick, heavy batter will result in a doughy, less crispy exterior.- For a wet batter: Ensure it’s thin, like crepe batter. Let excess drip off.
- For a dry dredge (flour only): Lightly coat and shake off all excess flour. Some prefer this method for an even crispier, more delicate crust. The slight residual moisture on the salted and dried zucchini is usually enough for the flour to adhere.
- Serve Immediately on a Wire Rack (Not Paper Towels):
Once fried, immediately transfer the zucchini slices to a wire rack set over a baking sheet. This allows air to circulate all around the slices, keeping them crispy. Placing them directly on paper towels can trap steam underneath, leading to a soggy bottom. While they are best eaten hot, if you need to hold them for a short period, you can keep the wire rack with the zucchini in a warm oven (around 200°F or 95°C), but they will gradually lose some crispness over time.
Frequently Asked Questions (FAQ) About Crispy Greek Zucchini Slices
Here are answers to some common questions you might have:
Q1: Why are my zucchini slices coming out soggy instead of crispy?
A: This is the most common issue and usually stems from one or more of these factors:
* Excess Moisture: You likely didn’t salt the zucchini long enough or didn’t pat them thoroughly dry after salting. Zucchini releases a lot of water!
* Oil Temperature Too Low: If the oil isn’t hot enough (below 350°F/175°C), the zucchini will absorb oil instead of quickly crisping up on the outside.
* Overcrowding the Pan: Adding too many slices at once drops the oil temperature significantly. Fry in small batches.
* Batter Too Thick: A heavy batter won’t crisp well. Aim for a very light coating.
* Draining Improperly: Draining on a wire rack is better than directly on paper towels, which can trap steam.
Q2: Can I make these Crispy Greek Zucchini Slices ahead of time?
A: Honestly, they are best enjoyed immediately after frying for maximum crispiness. Fried foods, especially delicate ones like zucchini, tend to lose their crisp texture as they sit and cool. If you must make them slightly ahead (e.g., within 30 minutes to an hour), you can keep them in a single layer on a wire rack in a warm oven (around 200°F/95°C). Reheating them later in an air fryer or oven might restore some crispness, but they won’t be quite the same as fresh.
Q3: Can I bake or air-fry these zucchini slices instead of deep-frying for a healthier version?
A: Yes, you can, but the texture will be different. They won’t achieve that same shatteringly crisp, deep-fried texture.
* For Baking: Preheat your oven to 400-425°F (200-220°C). Follow the salting and drying steps. Lightly coat with seasoned flour (you might want to add a tablespoon of oil to the flour mixture to help with browning and crisping, or spray the slices with oil). Arrange in a single layer on a baking sheet lined with parchment paper. Bake for 15-25 minutes, flipping halfway, until golden and tender-crisp.
* For Air Frying: Preheat your air fryer to 375-400°F (190-200°C). Prepare zucchini as above (salted, dried, lightly floured/battered). Lightly spray the basket and the zucchini slices with oil. Air fry in a single layer for 8-12 minutes, flipping halfway, until golden and crispy. You’ll likely need to work in batches.
Q4: What’s the best type of zucchini to use for this recipe?
A: Smaller to medium-sized, firm zucchini are generally best. They tend to have fewer seeds, a more delicate flavor, and less water content than very large, mature zucchini. Look for zucchini with smooth, unblemished skin. Varieties like ‘Black Beauty’ or ‘Costata Romanesco’ work well. Avoid any that feel soft or have wrinkled skin.
Q5: My batter isn’t sticking to the zucchini. What am I doing wrong?
A: This usually happens if the zucchini slices are too wet or too dry for the type of coating you’re using.
* If using a dry flour dredge: The zucchini slices should be patted dry after salting but still have a slight tackiness for the flour to adhere. If they are bone dry, the flour might not stick well. If they are too wet, the flour will clump.
* If using a wet batter: Ensure the zucchini slices are well-patted dry. If they are too wet, the batter can slide off. Also, ensure your batter isn’t too thin (though it should be thinner than American pancake batter). Sometimes, a very light dusting of plain flour before dipping into the wet batter can help it adhere better, creating a “primer” coat.

Crispy Greek Zucchini Slices Recipe
Ingredients
- Fresh Zucchini: 3 medium-sized (about 1.5 lbs / 680g), firm and unblemished. Younger, smaller zucchini tend to have fewer seeds and less moisture, making them ideal.
- All-Purpose Flour: 1 ½ cups (approx. 180g). This forms the base of our crispy coating. Some traditional recipes use only flour, while others might incorporate a touch of cornstarch for extra crisp. We’re keeping it classic here.
- Fine Sea Salt: 1 ½ teaspoons, plus more for salting the zucchini and for finishing. Salt is crucial not only for flavor but also for drawing out excess moisture from the zucchini.
- Freshly Ground Black Pepper: ½ teaspoon, or to taste.
- Optional Spices (for the flour mixture):
- ½ teaspoon dried Greek oregano (adds a lovely aromatic touch)
- ¼ teaspoon garlic powder (for a subtle garlicky undertone)
- Cold Water or Sparkling Water: About 1 cup (240ml). Using ice-cold or sparkling water helps create a lighter, crispier batter. The exact amount might vary slightly depending on your flour.
- Light Olive Oil or Vegetable Oil for Frying: Approximately 2-3 cups (480-720ml), or enough to have about ½ – ¾ inch depth in your frying pan. Choose an oil with a high smoke point.
- For Serving (Highly Recommended):
- Fresh Lemon Wedges
- Homemade or store-bought Tzatziki sauce (see notes below for a quick tzatziki idea)
- Freshly chopped parsley or dill for garnish (optional)
Instructions
- Prepare the Zucchini – The Crucial First Step:
- Wash the zucchini thoroughly under cold running water. Pat them completely dry with a clean kitchen towel or paper towels.
- Trim off the ends of each zucchini.
- Slice the zucchini into thin rounds, approximately ⅛ to ¼ inch (3-6mm) thick. A mandoline slicer is highly recommended here for uniform thickness, which ensures even cooking and crisping. If using a knife, take your time to make the slices as consistent as possible. Slices that are too thick will not crisp up properly and may become soggy.
- Place the zucchini slices in a colander in a single layer, if possible (or in batches). Sprinkle them generously with about 1 teaspoon of fine sea salt. Toss gently to distribute the salt.
- Let the salted zucchini sit in the colander (placed over a bowl or in the sink to catch the liquid) for at least 30 minutes, or up to 1 hour. This process, known as disgorging, draws out excess moisture from the zucchini, which is absolutely essential for achieving maximum crispiness. You’ll be surprised how much water is released!
- After the resting period, gently pat the zucchini slices thoroughly dry with paper towels. Remove as much surface moisture and residual salt as possible. Do not rinse them. This drying step is critical; wet zucchini will lead to a soggy result and can cause the oil to splatter dangerously.
- Prepare the Frying Station:
- Choose a large, heavy-bottomed skillet or a Dutch oven. A cast-iron skillet works wonderfully as it retains heat well.
- Pour the frying oil into the skillet to a depth of about ½ to ¾ inch.
- Place a wire rack over a baking sheet and keep it nearby. This is where you’ll drain the fried zucchini slices, allowing air to circulate underneath and keeping them crispy. Draining directly on paper towels can sometimes trap steam and make the underside less crisp.
- Make the Light Batter (or Dredge):
- In a wide, shallow bowl, whisk together the all-purpose flour, the remaining ½ teaspoon of salt, freshly ground black pepper, and any optional spices like oregano or garlic powder.
- If making a wet batter: Gradually whisk in the ice-cold water or sparkling water until you achieve a smooth, thin batter, similar in consistency to crepe batter or thin pancake batter. It should be just thick enough to lightly coat the zucchini without being heavy. Do not overmix; a few small lumps are okay.
- If opting for a dry dredge (simpler, and often preferred for ultimate crispiness): Simply use the seasoned flour mixture. This method relies on the slight residual moisture on the (patted dry) zucchini to help the flour adhere. Many traditional Greek recipes use just a flour dredge. For this article’s primary method, we’ll assume a very light batter.
- Heat the Oil:
- Place the skillet with the oil over medium-high heat.
- To test if the oil is ready, you can use a cooking thermometer – it should register between 350-375°F (175-190°C).
- Alternatively, drop a small piece of zucchini or a tiny bit of batter into the oil. If it sizzles vigorously and turns golden brown in about 30-60 seconds, the oil is ready. If it browns too quickly, the oil is too hot; if it sinks and sizzles weakly, the oil is not hot enough. Adjust the heat accordingly.
- Dredge and Fry the Zucchini Slices:
- Working in batches to avoid overcrowding the pan (which lowers the oil temperature and leads to greasy zucchini), take a handful of the dried zucchini slices.
- If using batter: Dip each slice into the thin batter, allowing any excess to drip off. You want a very light, almost translucent coating.
- If using a dry dredge: Toss the zucchini slices in the seasoned flour, ensuring they are lightly coated on all sides. Shake off any excess flour.
- Carefully place the coated zucchini slices into the hot oil in a single layer. Do not overlap them.
- Fry for about 2-3 minutes per side, or until they are beautifully golden brown and crispy. The exact time will depend on the thickness of your slices and the oil temperature.
- Use tongs or a slotted spoon to flip the slices gently once the first side is golden.
- Drain and Season:
- Once both sides are golden and crisp, remove the zucchini slices from the oil using a slotted spoon or spider skimmer, allowing excess oil to drip back into the pan.
- Transfer the fried zucchini to the prepared wire rack to drain.
- Immediately sprinkle the hot zucchini slices lightly with a tiny pinch of fine sea salt (optional, especially if your initial salting was thorough and your batter seasoned). The heat helps the salt adhere.
- Repeat the dredging and frying process with the remaining zucchini slices, making sure to allow the oil to return to the proper temperature between batches. If you notice the oil getting too dark or full of flour bits, you can carefully strain it between batches if necessary (though for a single recipe batch, this is often not needed if your dredge is light).
- Serve Immediately:
- Crispy Greek Zucchini Slices are best enjoyed hot and fresh, straight from the pan, for maximum crispiness.
Nutrition
- Serving Size: One Normal Portion
- Calories: 250-350


