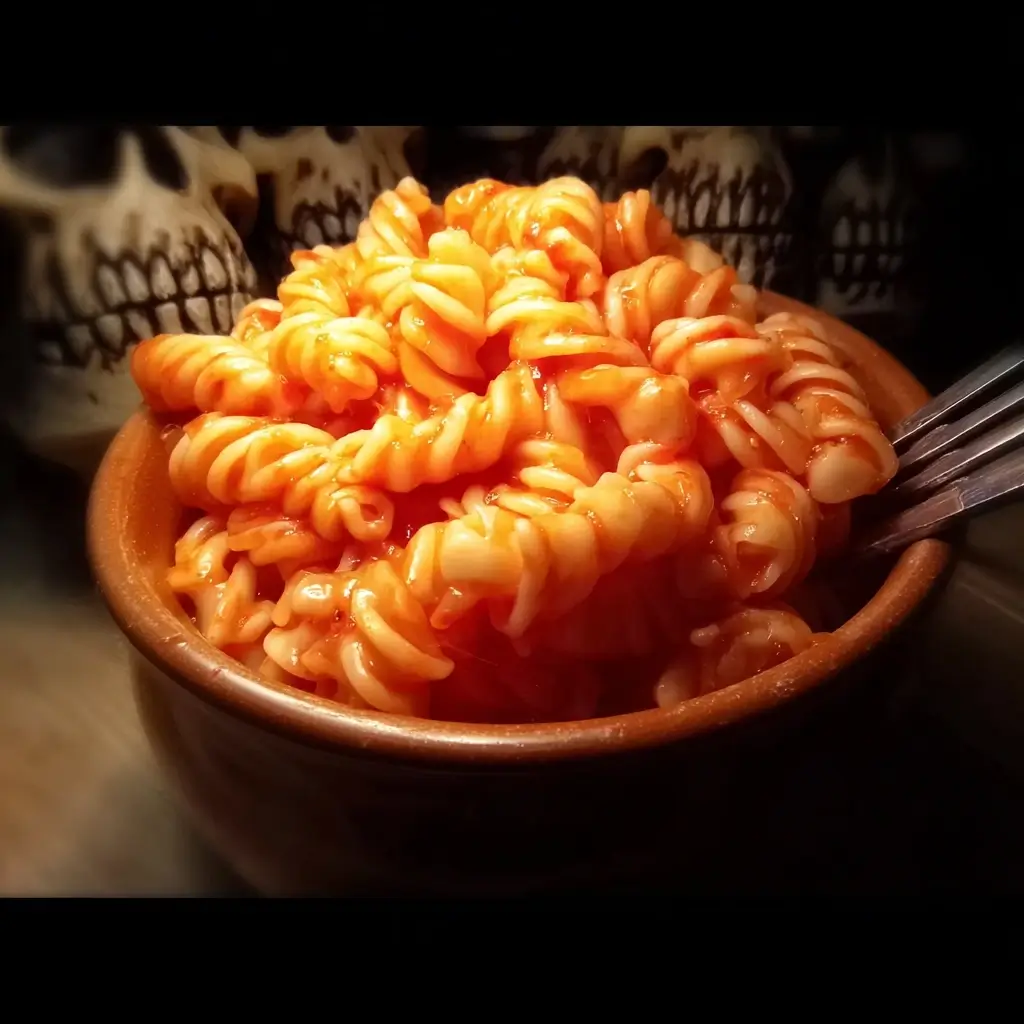
Of all the wild and wacky creations that have come out of my kitchen, none have elicited the same glorious chorus of “Eww, gross!” followed by “Ooh, can I have more?” quite like this Creepy Brain Pasta. The first time I unveiled it at our annual Halloween potluck, a hush fell over the room. My kids stared, their eyes wide, a perfect mix of horror and fascination. My brother-in-law, a man who prides himself on his unshakeable stomach, actually took a step back. It sat there on a black platter, glistening under the dim lights—a disturbingly realistic, pinkish-gray pasta brain, complete with veiny shrimp and a drizzle of “blood.” Success! The magic of this dish isn’t just in its ghoulish appearance; it’s that the shock value instantly melts away with the first bite. The “brain” is a nest of perfectly cooked pasta coated in a luxuriously creamy, savory roasted red pepper and tomato sauce, and the “veins” are succulent, garlic-infused shrimp. It became the centerpiece of the table and the talk of the night. Now, it’s a non-negotiable part of our Halloween tradition, a recipe that proves that the most memorable meals are the ones that are as fun to look at as they are delicious to eat.
Unveiling Your Monstrous Masterpiece: The Creepy Brain Pasta Recipe
This recipe is designed for maximum visual impact and incredible flavor. The creamy sauce clings to every strand of pasta, helping it hold its brain-like shape, while the shrimp add a pop of protein and a delightfully creepy texture. Don’t be intimidated by the assembly; it’s a surprisingly straightforward process that’s more about creative plating than complex culinary skill.
The Mad Scientist’s Ingredient List
To bring this culinary creature to life, you will need a specific set of components. Each ingredient is chosen not only for its taste but for its contribution to the overall “brainy” aesthetic. Here’s a detailed breakdown of your laboratory’s pantry:
- For the Pasta Brain:
- Pasta: 1 lb (450g) of long, thin pasta like spaghetti, bucatini, or linguine. The long, squiggly strands are essential for mimicking the folds and fissures of a brain. Bucatini is an excellent choice for its thickness, which adds volume.
- Olive Oil: 2 tablespoons, for tossing with the cooked pasta to prevent it from becoming a single, inseparable clump.
- Brain Mold or Bowl: A silicone brain-shaped gelatin mold (approximately 8-9 inches or 20-23 cm in diameter) is ideal. If you don’t have one, a medium-sized, round glass or metal bowl will work as a substitute.
- For the Creamy Pink Brain Sauce:
- Jarred Roasted Red Peppers: One 12-ounce (340g) jar, drained. These are the secret to the sauce’s savory depth and contribute to its fleshy, pinkish color.
- Heavy Cream: 1 cup (240ml). This is what gives the sauce its rich, creamy texture and lightens the color to a more realistic pale pink.
- Canned Diced Tomatoes: One 14.5-ounce (411g) can, undrained. This forms the classic, flavorful base of our sauce.
- Ricotta Cheese: ½ cup (120g). This adds a subtle tang and enhances the creaminess and opaque color of the sauce.
- Garlic: 4 cloves, roughly chopped. Because no monstrous creation is complete without a pungent, aromatic kick.
- Yellow Onion: ½ of a medium onion, chopped. Provides a sweet, savory foundation for the sauce.
- Unsalted Butter: 2 tablespoons. Adds richness and helps sauté the aromatics.
- Parmesan Cheese: ½ cup (50g), freshly grated, plus more for serving. For that essential salty, nutty flavor that brings the sauce together.
- Seasoning: 1 teaspoon of dried oregano, ½ teaspoon of salt (or to taste), and ¼ teaspoon of black pepper.
- For the “Veiny” Shrimp and “Blood” Drizzle:
- Raw Shrimp: 1 lb (450g), peeled and deveined, tails on or off. Large or jumbo shrimp work best, as their curved shape looks remarkably like blood vessels when scattered over the brain.
- Garlic: 2 additional cloves, minced. To infuse the shrimp with flavor.
- Olive Oil: 1 tablespoon. For cooking the shrimp.
- For the “Blood” Drizzle: 2 tablespoons of your favorite marinara or tomato sauce, slightly thinned with a teaspoon of water or balsamic glaze for a darker, more dramatic look.
Step-by-Step Instructions: Bringing Your Creation to Life
Follow these instructions carefully to ensure your pasta brain is both structurally sound and delicious. We will tackle this in three stages: crafting the sauce, cooking the pasta and shrimp, and the final, thrilling assembly.
Phase 1: Crafting the Creamy Brain Sauce
This sauce is the heart of the recipe, providing both the color and the flavor that makes this dish a standout.
- Sauté the Aromatics: In a large saucepan or Dutch oven, melt the 2 tablespoons of butter over medium heat. Add the chopped onion and sauté for 4-5 minutes until it becomes soft and translucent. Add the 4 cloves of roughly chopped garlic and cook for another minute until fragrant. Be careful not to let the garlic brown, as it can become bitter.
- Simmer the Base: Pour the entire can of undrained diced tomatoes into the pot. Add the drained roasted red peppers, dried oregano, salt, and black pepper. Stir everything together and bring the mixture to a gentle simmer. Reduce the heat to low, cover, and let it cook for 15 minutes to allow the flavors to meld together.
- Blend to Perfection: Carefully transfer the hot tomato and pepper mixture to a high-powered blender. Add the heavy cream and ricotta cheese. Blend on high speed for 1-2 minutes, or until the sauce is completely smooth and uniform in color. You are looking for a pale, pinkish-orange hue. Taste and adjust seasoning if necessary.
- Finish the Sauce: Pour the blended sauce back into the saucepan. Stir in the ½ cup of grated Parmesan cheese until it has melted completely into the sauce. Keep the sauce on very low heat to stay warm while you prepare the other components.
Phase 2: Preparing the Pasta and Shrimp
Timing is key here. You want the pasta to be ready just as the sauce is finishing, so everything can be combined while warm.
- Cook the Pasta: Bring a large pot of heavily salted water to a rolling boil. Add the spaghetti or bucatini and cook according to package directions, but aim for al dente. The pasta should still have a slight bite. This is crucial, as mushy pasta will not hold the brain shape well.
- Reserve and Drain: Before draining the pasta, reserve about 1 cup of the starchy pasta water. This “liquid gold” can be used to thin the sauce if it becomes too thick. Drain the pasta thoroughly in a colander.
- Cook the Shrimp: While the pasta is cooking, heat 1 tablespoon of olive oil in a large skillet over medium-high heat. Add the 2 minced garlic cloves and cook for 30 seconds until fragrant. Add the peeled and deveined shrimp to the skillet in a single layer. Cook for 1-2 minutes per side, until they are pink, opaque, and cooked through. Do not overcook, or they will become rubbery. Remove from heat and set aside.
Phase 3: Assembling Your Monstrosity
This is the most exciting part—where you transform a simple pasta dish into a grotesque centerpiece.
- Prepare the Mold: Lightly grease the inside of your brain mold or a round bowl with olive oil or cooking spray. This will ensure your brain releases cleanly when you unmold it.
- Combine Pasta and Sauce: Place the drained, hot pasta back into its large cooking pot (off the heat). Pour about three-quarters of the warm brain sauce over the pasta. Use tongs to toss everything together thoroughly, ensuring every strand is coated in the creamy pink sauce. If the sauce seems too thick, add a splash of the reserved pasta water to loosen it to a thick but pliable consistency.
- Mold the Brain: Working quickly while the pasta is still warm and flexible, begin packing the sauced pasta into the prepared mold. Use the tongs and the back of a spoon to press the pasta firmly into every crevice and curve of the mold. The goal is to eliminate air pockets and create a dense, solid shape.
- Chill and Set: Cover the mold with plastic wrap and place it in the refrigerator for at least 30 minutes, or up to 2 hours. This chilling step is vital; it allows the pasta and sauce to set and firm up, ensuring it will hold its intricate brain shape upon release.
- The Grand Unveiling: Choose your serving platter, preferably a dark or black one for dramatic contrast. Remove the mold from the refrigerator. Place the platter upside down over the top of the mold. In one swift, confident motion, flip both the mold and platter over. Gently lift the mold away. If you greased it properly, the pasta brain should slide right out. If it needs a little encouragement, a few gentle taps on the mold should do the trick.
- Final Touches of Gore: Reheat the remaining sauce. You can either gently drape it over parts of the brain or serve it in a bowl on the side. Strategically place the cooked shrimp all over the pasta brain, tucking them into the folds to look like writhing worms or pulsing veins. Finally, take your thinned marinara sauce or balsamic glaze and drizzle it over the top and around the base of the brain for a gruesome “fresh blood” effect. Serve immediately to a chorus of gasps and applause.
Nutrition Facts
- Servings: 8 servings
- Calories per serving: Approximately 650-700 kcal
Disclaimer: The nutritional information provided is an estimate and can vary based on the specific ingredients and brands used.
Preparation Time
- Prep Time: 20 minutes
- Cook Time: 30 minutes
- Assembly & Chilling Time: 40 minutes
- Total Time: Approximately 1 hour 30 minutes
How to Serve Your Ghoulish Creation
Presentation is everything for this dish. Setting the right scene will elevate your Creepy Brain Pasta from a simple meal to an unforgettable Halloween experience.
- The Classic Mad Scientist’s Lab:
- Serve the brain on a cold, sterile-looking metal tray or a slate platter.
- Surround the platter with beakers and flasks filled with colored water or drinks.
- Use dry ice in a nearby bowl of hot water (with proper safety precautions) to create a spooky, low-lying fog that rolls across the table.
- Serve with tongs and other “surgical” looking utensils.
- The Zombie Apocalypse Feast:
- Plating should be messy and chaotic.
- Crumble dark pumpernickel or rye bread around the base of the brain to look like freshly dug “dirt.”
- Serve alongside other “body part” foods, such as:
- “Witches’ Fingers”: Breadsticks with an almond slice for a fingernail.
- “Monster Eyeballs”: Small mozzarella balls (bocconcini) with a sliced black olive pupil.
- “Blood Clot” Jello: Lumpy red Jello served in a jar.
- An Elegant Gothic Dinner:
- For a more sophisticated, less campy vibe, serve the brain on an elegant black ceramic or porcelain platter.
- Use a high-quality balsamic glaze for a dark, rich “blood” drizzle.
- Surround the platter with fresh figs, dark grapes, and sprigs of fresh rosemary for a beautiful, moody tablescape.
- Pair with a deep red wine, like a Cabernet Sauvignon or Merlot, served in gothic-style goblets.
Additional Tips for a Frightfully Flawless Brain
- The Mold is Your Ally: While a bowl works in a pinch, a silicone brain mold is a game-changer for a truly authentic look. They are readily available online or in party supply stores around Halloween. Silicone is ideal because its flexibility makes unmolding a breeze.
- Achieving the Perfect Pink: The color of your sauce is key. If your sauce is too red from the tomatoes, you can lighten it by adding more heavy cream or ricotta. For a more intense, fleshy pink, you can blend in a small piece of a cooked beet (a little goes a long way!) or, if you’re not opposed, a single drop of red food coloring.
- Pasta Perfection is Non-Negotiable: Do not overcook your pasta! I can’t stress this enough. Al dente pasta retains its structural integrity. Mushy pasta will collapse into a sad pile instead of holding its brainy shape. Tossing the cooked pasta with a little olive oil before adding the sauce also helps prevent the strands from sticking together too intensely.
- Make-Ahead Magic for a Stress-Free Halloween: Party hosting is chaotic. You can make the entire sauce a day or two in advance and store it in an airtight container in the refrigerator. You can also cook the shrimp ahead of time. On the day of the party, all you need to do is cook the pasta, gently reheat the sauce, and assemble.
- Don’t Fear the Assembly: The final unmolding can feel nerve-wracking. The key is confidence! Grease the mold well, pack the pasta tightly, and let it chill sufficiently. When it’s time to flip, do it in one smooth, decisive motion. Even if a small piece breaks or a strand falls out of place, don’t panic! You can easily tuck it back in or cover the imperfection with a well-placed shrimp or a drizzle of “blood.” It’s a monster, after all—it’s not supposed to be perfect!
Creepy Brain Pasta: Your Questions Answered
1. Can I make this Creepy Brain Pasta vegetarian or vegan?
Absolutely! For a vegetarian version, simply omit the shrimp. The pasta brain is still visually stunning on its own. For a vegan version, you’ll need to make a few substitutions. Use a plant-based butter, substitute the heavy cream with full-fat coconut milk or a cashew cream, and use a vegan ricotta and parmesan alternative. The results are just as creepy and delicious!
2. I don’t have a brain mold! What can I do?
No problem! A medium-sized, oven-safe glass or metal bowl is a perfect substitute. Grease the bowl and pack the pasta in just as you would with the mold. When you unmold it, you’ll have a perfect semi-sphere or dome shape. You can then use a butter knife or the end of a spoon to gently press a line down the middle and add some squiggly indentations on the sides to create the look of the brain’s two hemispheres.
3. My sauce didn’t turn out pink. What went wrong?
The final color depends on the ratio of red (tomatoes, peppers) to white (cream, ricotta). If your sauce is too orange or red, it likely needs more of the creamy components. Try blending in a bit more heavy cream or ricotta cheese until you reach the desired shade. Also, ensure your roasted red peppers are the vibrant red kind, not the smoky, dark red chipotle variety.
4. Can I use a different type of pasta?
While long, thin pasta like spaghetti is best for the classic “brain fold” look, you can get creative. Fettuccine or even ramen noodles could work. Avoid short pasta shapes like penne or macaroni, as they won’t hold together in a single, molded form and will fall apart when you try to unmold them.
5. Is this recipe too scary for young kids?
This depends entirely on your children! Many kids love the “gross-out” factor of Halloween food. My advice is to involve them in the process. Let them help mix the sauce and pack the pasta into the mold. When they know it’s just “pink pasta,” it demystifies the dish and turns the fear into fun. You can also tone down the “gore” by omitting the blood drizzle and calling the shrimp “pasta pals” instead of veins.
Creepy Brain Pasta Recipe
Ingredients
- For the Pasta Brain:
- Pasta: 1 lb (450g) of long, thin pasta like spaghetti, bucatini, or linguine. The long, squiggly strands are essential for mimicking the folds and fissures of a brain. Bucatini is an excellent choice for its thickness, which adds volume.
- Olive Oil: 2 tablespoons, for tossing with the cooked pasta to prevent it from becoming a single, inseparable clump.
- Brain Mold or Bowl: A silicone brain-shaped gelatin mold (approximately 8-9 inches or 20-23 cm in diameter) is ideal. If you don’t have one, a medium-sized, round glass or metal bowl will work as a substitute.
- For the Creamy Pink Brain Sauce:
- Jarred Roasted Red Peppers: One 12-ounce (340g) jar, drained. These are the secret to the sauce’s savory depth and contribute to its fleshy, pinkish color.
- Heavy Cream: 1 cup (240ml). This is what gives the sauce its rich, creamy texture and lightens the color to a more realistic pale pink.
- Canned Diced Tomatoes: One 14.5-ounce (411g) can, undrained. This forms the classic, flavorful base of our sauce.
- Ricotta Cheese: ½ cup (120g). This adds a subtle tang and enhances the creaminess and opaque color of the sauce.
- Garlic: 4 cloves, roughly chopped. Because no monstrous creation is complete without a pungent, aromatic kick.
- Yellow Onion: ½ of a medium onion, chopped. Provides a sweet, savory foundation for the sauce.
- Unsalted Butter: 2 tablespoons. Adds richness and helps sauté the aromatics.
- Parmesan Cheese: ½ cup (50g), freshly grated, plus more for serving. For that essential salty, nutty flavor that brings the sauce together.
- Seasoning: 1 teaspoon of dried oregano, ½ teaspoon of salt (or to taste), and ¼ teaspoon of black pepper.
- For the “Veiny” Shrimp and “Blood” Drizzle:
- Raw Shrimp: 1 lb (450g), peeled and deveined, tails on or off. Large or jumbo shrimp work best, as their curved shape looks remarkably like blood vessels when scattered over the brain.
- Garlic: 2 additional cloves, minced. To infuse the shrimp with flavor.
- Olive Oil: 1 tablespoon. For cooking the shrimp.
- For the “Blood” Drizzle: 2 tablespoons of your favorite marinara or tomato sauce, slightly thinned with a teaspoon of water or balsamic glaze for a darker, more dramatic look.
Instructions
Phase 1: Crafting the Creamy Brain Sauce
This sauce is the heart of the recipe, providing both the color and the flavor that makes this dish a standout.
- Sauté the Aromatics: In a large saucepan or Dutch oven, melt the 2 tablespoons of butter over medium heat. Add the chopped onion and sauté for 4-5 minutes until it becomes soft and translucent. Add the 4 cloves of roughly chopped garlic and cook for another minute until fragrant. Be careful not to let the garlic brown, as it can become bitter.
- Simmer the Base: Pour the entire can of undrained diced tomatoes into the pot. Add the drained roasted red peppers, dried oregano, salt, and black pepper. Stir everything together and bring the mixture to a gentle simmer. Reduce the heat to low, cover, and let it cook for 15 minutes to allow the flavors to meld together.
- Blend to Perfection: Carefully transfer the hot tomato and pepper mixture to a high-powered blender. Add the heavy cream and ricotta cheese. Blend on high speed for 1-2 minutes, or until the sauce is completely smooth and uniform in color. You are looking for a pale, pinkish-orange hue. Taste and adjust seasoning if necessary.
- Finish the Sauce: Pour the blended sauce back into the saucepan. Stir in the ½ cup of grated Parmesan cheese until it has melted completely into the sauce. Keep the sauce on very low heat to stay warm while you prepare the other components.
Phase 2: Preparing the Pasta and Shrimp
Timing is key here. You want the pasta to be ready just as the sauce is finishing, so everything can be combined while warm.
- Cook the Pasta: Bring a large pot of heavily salted water to a rolling boil. Add the spaghetti or bucatini and cook according to package directions, but aim for al dente. The pasta should still have a slight bite. This is crucial, as mushy pasta will not hold the brain shape well.
- Reserve and Drain: Before draining the pasta, reserve about 1 cup of the starchy pasta water. This “liquid gold” can be used to thin the sauce if it becomes too thick. Drain the pasta thoroughly in a colander.
- Cook the Shrimp: While the pasta is cooking, heat 1 tablespoon of olive oil in a large skillet over medium-high heat. Add the 2 minced garlic cloves and cook for 30 seconds until fragrant. Add the peeled and deveined shrimp to the skillet in a single layer. Cook for 1-2 minutes per side, until they are pink, opaque, and cooked through. Do not overcook, or they will become rubbery. Remove from heat and set aside.
Phase 3: Assembling Your Monstrosity
This is the most exciting part—where you transform a simple pasta dish into a grotesque centerpiece.
- Prepare the Mold: Lightly grease the inside of your brain mold or a round bowl with olive oil or cooking spray. This will ensure your brain releases cleanly when you unmold it.
- Combine Pasta and Sauce: Place the drained, hot pasta back into its large cooking pot (off the heat). Pour about three-quarters of the warm brain sauce over the pasta. Use tongs to toss everything together thoroughly, ensuring every strand is coated in the creamy pink sauce. If the sauce seems too thick, add a splash of the reserved pasta water to loosen it to a thick but pliable consistency.
- Mold the Brain: Working quickly while the pasta is still warm and flexible, begin packing the sauced pasta into the prepared mold. Use the tongs and the back of a spoon to press the pasta firmly into every crevice and curve of the mold. The goal is to eliminate air pockets and create a dense, solid shape.
- Chill and Set: Cover the mold with plastic wrap and place it in the refrigerator for at least 30 minutes, or up to 2 hours. This chilling step is vital; it allows the pasta and sauce to set and firm up, ensuring it will hold its intricate brain shape upon release.
- The Grand Unveiling: Choose your serving platter, preferably a dark or black one for dramatic contrast. Remove the mold from the refrigerator. Place the platter upside down over the top of the mold. In one swift, confident motion, flip both the mold and platter over. Gently lift the mold away. If you greased it properly, the pasta brain should slide right out. If it needs a little encouragement, a few gentle taps on the mold should do the trick.
- Final Touches of Gore: Reheat the remaining sauce. You can either gently drape it over parts of the brain or serve it in a bowl on the side. Strategically place the cooked shrimp all over the pasta brain, tucking them into the folds to look like writhing worms or pulsing veins. Finally, take your thinned marinara sauce or balsamic glaze and drizzle it over the top and around the base of the brain for a gruesome “fresh blood” effect. Serve immediately to a chorus of gasps and applause.
Nutrition
- Serving Size: One Normal Portion
- Calories: 650-700 kcal