Of all the recipes that have become a permanent fixture in my weekly meal rotation, this Creamy Chickpea Curry holds a special place. It started as a frantic, “what-do-we-have-in-the-pantry” kind of dinner on a Tuesday night when energy was low and expectations were even lower. I pulled out a can of chickpeas, a can of coconut milk, and some basic spices, hoping for something edible. What emerged from the pot thirty minutes later was nothing short of a revelation. The aroma alone—a warm, fragrant cloud of ginger, garlic, and toasted spices—drew my family into the kitchen. The first spoonful was met with wide eyes and murmurs of approval. It was rich and creamy without being heavy, deeply flavorful, and incredibly comforting. Now, it’s our go-to comfort meal, the dish I make when a friend needs a pick-me-up, and the recipe I share most often. It proves that you don’t need hours of simmering or a laundry list of complicated ingredients to create a meal that feels both nourishing and deeply satisfying. This recipe is more than just food; it’s a warm hug in a bowl, and I’m thrilled to share it with you.
A Weeknight Wonder: The Ultimate Creamy Chickpea Curry Recipe
This recipe is designed for both ease and flavor. It utilizes pantry staples to create a restaurant-quality curry in the comfort of your own kitchen. The magic lies in the layering of flavors—starting with the aromatic base, blooming the spices to unlock their full potential, and finishing with creamy coconut milk and a bright squeeze of citrus. It’s a versatile canvas, perfect for a quick weeknight meal but special enough to serve to guests.
Ingredients
- For the Curry:
- 2 tablespoons coconut oil (or any neutral oil like avocado or vegetable oil)
- 1 large yellow onion, finely chopped
- 4-5 cloves garlic, minced
- 1 tablespoon fresh ginger, grated
- 1 jalapeño or serrano pepper, finely minced (optional, for heat)
- 1 ½ teaspoons ground cumin
- 1 ½ teaspoons ground coriander
- 1 teaspoon turmeric powder
- ½ teaspoon smoked paprika
- ¼ – ½ teaspoon cayenne pepper (adjust to your spice preference)
- 1 teaspoon garam masala
- 1 (28-ounce / 800g) can crushed or diced tomatoes, undrained
- 2 (15-ounce / 425g) cans chickpeas (garbanzo beans), rinsed and drained
- 1 (13.5-ounce / 400ml) can full-fat coconut milk
- 1 tablespoon maple syrup or coconut sugar (optional, to balance acidity)
- 1 teaspoon salt (or to taste)
- ½ teaspoon black pepper, freshly ground
- For Serving & Garnish (Optional):
- Fresh cilantro, chopped
- Fresh lime or lemon wedges
- Cooked basmati rice, quinoa, or naan bread
- A dollop of plain yogurt or coconut yogurt
Instructions
- Sauté the Aromatics: Heat the coconut oil in a large Dutch oven or heavy-bottomed pot over medium heat. Once the oil is shimmering, add the chopped onion and cook, stirring occasionally, for 5-7 minutes, or until softened and translucent. Add the minced garlic, grated ginger, and optional jalapeño. Sauté for another 1-2 minutes until fragrant. Be careful not to burn the garlic.
- Bloom the Spices: Add the ground cumin, ground coriander, turmeric, smoked paprika, and cayenne pepper to the pot. Stir constantly for about 60 seconds. This step, known as “blooming,” toasts the spices in the hot oil, which deepens and intensifies their flavor, forming the backbone of your curry.
- Build the Sauce: Pour in the can of crushed or diced tomatoes with their juices. Use a wooden spoon to scrape up any browned bits from the bottom of the pot (this is where a lot of flavor lives!). Bring the mixture to a gentle simmer and let it cook for about 5 minutes, allowing the flavors to meld and the sauce to thicken slightly.
- Add the Stars of the Show: Stir in the rinsed and drained chickpeas and the full-fat coconut milk. Add the salt, black pepper, and optional maple syrup. Give everything a thorough stir to combine.
- Simmer to Perfection: Bring the curry back to a gentle simmer. Reduce the heat to low, cover the pot, and let it cook for at least 15-20 minutes. This simmering time is crucial for the chickpeas to absorb the flavors of the sauce and for the curry to thicken into a rich, creamy consistency. If you have more time, letting it simmer for 30 minutes will yield even better results.
- Finishing Touches: Remove the curry from the heat. Stir in the garam masala. This spice blend is added at the end because its delicate, aromatic compounds can be lost with prolonged cooking. Taste the curry and adjust seasonings as needed—more salt for flavor, a pinch more cayenne for heat, or a squeeze of lime juice to brighten it up.
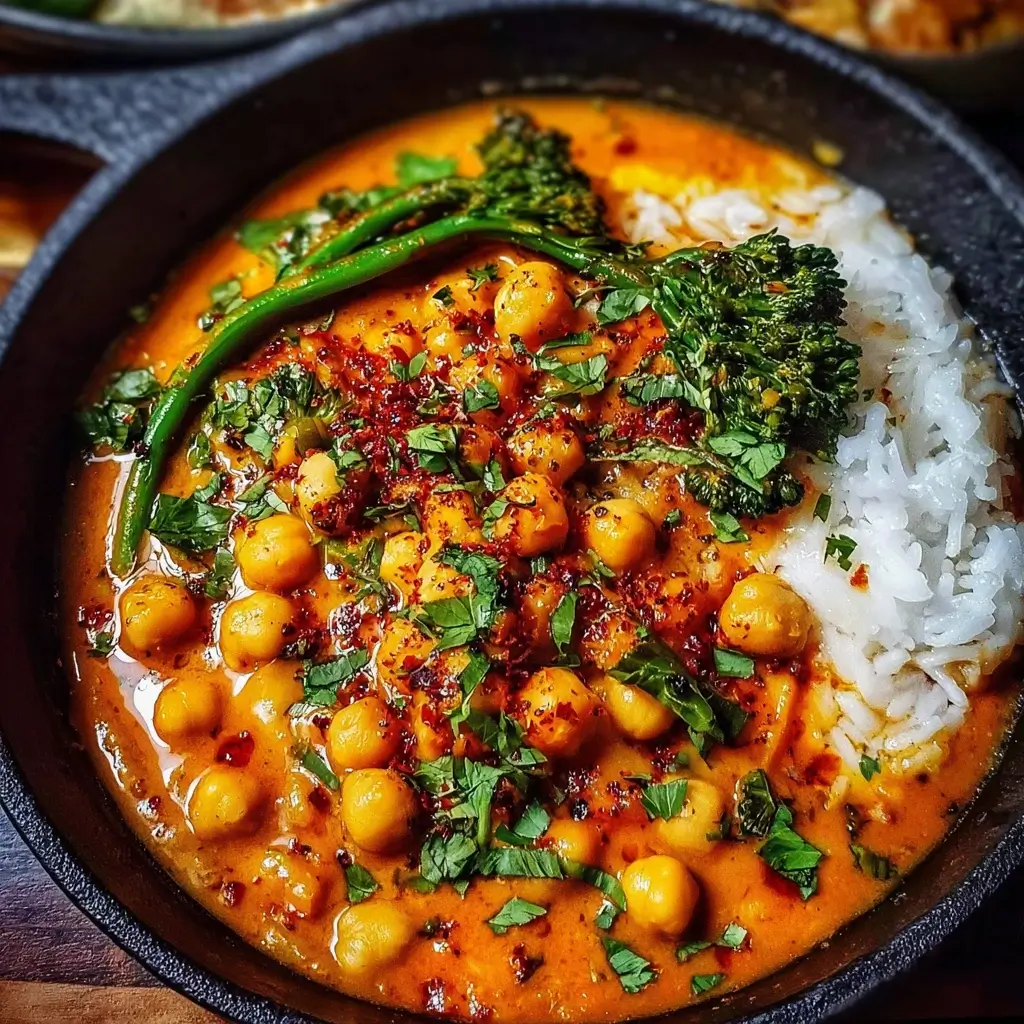
- Serve and Garnish: Ladle the hot chickpea curry into bowls. Serve immediately over fluffy basmati rice or with warm naan bread. Garnish generously with fresh chopped cilantro and a lime wedge on the side for squeezing.
Nutrition Facts
- Servings: 4-6
- Calories per serving (approximate): 450-500 kcal (This is an estimate and can vary based on exact ingredients used, such as the type of oil and if optional sugar is added. This calculation assumes 5 servings.)
Preparation Time
- Prep Time: 10 minutes
- Cook Time: 30 minutes
- Total Time: 40 minutes
How to Serve Your Perfect Chickpea Curry
A great curry is made even better by what you serve alongside it. The accompaniments are not just side dishes; they are essential components that complete the meal by providing contrasting textures and flavors. Here’s a comprehensive guide to serving your chickpea curry for a truly memorable dining experience.
- The Foundation: Grains and Breads
- Fluffy Basmati Rice: The quintessential partner for any curry. Its long, separate grains and delicate fragrance are perfect for soaking up every last drop of the creamy sauce. For extra flavor, try cooking it with a pinch of salt, a cardamom pod, and a small bay leaf.
- Warm Naan Bread: There is nothing quite like tearing off a piece of warm, pillowy naan bread to scoop up a mouthful of curry. Whether you choose plain, garlic, or butter naan, it provides a satisfying chew that contrasts beautifully with the soft chickpeas.
- Healthy Brown Rice or Quinoa: For a more nutrient-dense option, serve the curry over brown rice or quinoa. Both offer a nutty flavor and a slightly firmer texture, adding extra fiber and protein to the meal.
- Roti or Chapati: These whole wheat flatbreads are a lighter alternative to naan and are a staple in many Indian households. They are perfect for wrapping or dipping.
- The Finishing Touches: Toppings and Garnishes
- Fresh Cilantro: A generous sprinkle of fresh, chopped cilantro is non-negotiable. Its bright, citrusy, and peppery notes cut through the richness of the coconut milk and awaken the entire dish.
- A Squeeze of Citrus: A wedge of fresh lime or lemon served on the side is crucial. The acidity brightens all the other flavors, balances the creaminess, and adds a zesty finish that elevates the curry from good to great.
- Cooling Yogurt: A dollop of plain Greek yogurt, regular yogurt, or a plant-based alternative like coconut or cashew yogurt provides a cool, tangy contrast to the warm spices of the curry. It also helps to temper the heat if you’ve made it on the spicier side.
- Crunch and Texture: Add a textural element by sprinkling some toasted cashews, slivered almonds, or even pumpkin seeds on top just before serving. A handful of crispy fried onions also works wonders.
- Completing the Meal: Simple Side Dishes
- Kachumber Salad: A simple Indian salad made from chopped tomatoes, cucumbers, and onions, dressed with lime juice, salt, and a little cilantro. Its fresh, crunchy nature provides a refreshing counterpoint to the warm, rich curry.
- Steamed or Roasted Vegetables: A side of simple steamed green beans, roasted cauliflower, or broccoli ensures you get an extra serving of greens and adds another layer of texture and nutrition to your plate.
- Pickles and Chutneys: For those who love complex flavors, serving a small amount of mango chutney or a spicy lime pickle (achar) on the side can add a burst of sweet, sour, and spicy excitement to every bite.
Mastering the Details: 5 Essential Tips for the Best Chickpea Curry
While this recipe is straightforward, a few key techniques can elevate it from a simple weeknight meal to a truly exceptional dish. These tips focus on building deep, layered flavor at every stage of the cooking process.
1. The Art of Blooming Spices (Tadka)
This is arguably the most important step in making any great curry. Simply dumping your spices into the liquid won’t do them justice. Spices contain fat-soluble flavor compounds, and “blooming” them—frying them briefly in hot oil—unlocks their full aromatic potential. When you add the ground cumin, coriander, turmeric, and other spices to the hot oil with the sautéed onions, you’re essentially toasting them. This process mellows any raw, bitter notes and creates a much deeper, more complex, and fragrant flavor base for your entire dish. Don’t skip this 60-second step; the fragrant aroma that fills your kitchen is the first sign you’re on the right track.
2. Choose Full-Fat Coconut Milk for Ultimate Creaminess
In the world of coconut milk, fat is flavor and texture. While “light” or “lite” coconut milk might seem like a healthier choice, it is essentially just watered-down full-fat coconut milk. For this curry, you want the luxurious, creamy texture and rich flavor that only full-fat coconut milk can provide. It creates a velvety sauce that coats the chickpeas beautifully and perfectly balances the acidity of the tomatoes and the warmth of the spices. If you are concerned about richness, you can always use a little less, but starting with a full-fat version will give you a far superior result. Look for brands with a high percentage of coconut extract and minimal additives.
3. Build a Strong Foundation: The Sauté
The first five to seven minutes of this recipe—sautéing the onion, ginger, and garlic—are foundational. Rushing this step is a common mistake. You want to cook the onions over medium heat until they are completely soft, translucent, and just beginning to turn golden. This process breaks down their cell walls and releases their natural sugars, creating a sweet, savory base that eliminates the sharp, raw taste of onion. Likewise, cooking the ginger and garlic until they are fragrant (but not browned or burnt) infuses the oil with their pungent, aromatic flavors. This patient approach at the beginning pays huge dividends in the final taste of the curry.
4. Don’t Underestimate the Power of the Finish
Great cooking is often about the finishing touches. In this recipe, two ingredients added at the very end make a world of difference: garam masala and fresh lime juice. Garam masala is a blend of aromatic “finishing spices” like cardamom, cinnamon, and cloves. Its volatile oils can be damaged by long cooking, so stirring it in just before serving preserves its incredible fragrance and adds a final layer of warmth. Similarly, the acidity from a fresh squeeze of lime juice cuts through the richness of the coconut milk, brightens the entire dish, and makes all the individual flavors pop. Always taste your curry before serving and adjust with a bit of salt and a generous squeeze of lime.
5. Give It Time to Simmer
Once all the ingredients are in the pot, the final and perhaps easiest step is to simply let it simmer. This is not a step to rush. The minimum 15-20 minute simmer is crucial for several reasons. First, it allows the chickpeas, which are fairly neutral in flavor, to absorb the complex, spicy, and savory notes of the sauce. Second, it gives the sauce time to reduce and thicken naturally, creating that perfect, clingy consistency. Third, it allows all the distinct flavors—the tomatoes, spices, aromatics, and coconut—to meld and marry into one cohesive, harmonious dish. If you have the luxury of time, extending the simmer to 30 minutes on a very low heat will result in an even deeper and more developed flavor profile.
Your Chickpea Curry Questions Answered: FAQ Section
1. Can I use dried chickpeas instead of canned?
Absolutely! Using dried chickpeas is a fantastic, budget-friendly option and many people prefer their firmer texture. However, it requires some planning. You will need to soak about 1 cup of dried chickpeas overnight in plenty of water. The next day, drain the soaking water, add fresh water, and boil them until tender, which can take 1-2 hours on the stovetop or about 15-20 minutes in a pressure cooker. Once cooked, 1 cup of dried chickpeas will yield about 3 cups of cooked chickpeas, which is roughly equivalent to two 15-ounce cans. Simply substitute the cooked chickpeas in the recipe as directed.
2. How do I store and reheat leftovers?
This chickpea curry stores beautifully and the flavors often deepen overnight, making it perfect for meal prep.
- Refrigeration: Allow the curry to cool completely, then transfer it to an airtight container. It will keep well in the refrigerator for up to 4-5 days. To reheat, simply warm it in a saucepan over medium-low heat, stirring occasionally until heated through. You may need to add a splash of water or vegetable broth if the sauce has thickened too much.
- Freezing: This curry also freezes exceptionally well. Let it cool completely, then portion it into freezer-safe containers or bags, leaving a little space at the top for expansion. It can be frozen for up to 3 months. To reheat, let it thaw overnight in the refrigerator and then warm it on the stovetop as described above.
3. Can I add more vegetables to this curry?
Yes, this recipe is incredibly versatile and serves as a great base for adding more vegetables. This is a perfect way to clean out your produce drawer. Here are some popular additions and when to add them:
- Leafy Greens: Stir in a few large handfuls of fresh spinach or kale during the last 5 minutes of simmering. They will wilt down into the sauce beautifully.
- Hearty Vegetables: For vegetables like sweet potatoes, carrots, or cauliflower, cut them into bite-sized pieces and add them along with the canned tomatoes. They will need about 15-20 minutes to become tender.
- Quicker-Cooking Vegetables: Add vegetables like bell peppers, zucchini, or peas about 10 minutes before the curry is finished cooking so they retain a slight bite and don’t become mushy.
4. My curry isn’t thick enough. How can I fix it?
If your curry is thinner than you’d like, there are a few easy ways to thicken it up:
- Simmer Longer: The simplest method is to remove the lid and let the curry simmer for an additional 5-10 minutes. This allows excess water to evaporate and the sauce to reduce and thicken naturally.
- Mash Some Chickpeas: Use the back of a spoon or a potato masher to gently mash some of the chickpeas directly in the pot. The starch released from the mashed chickpeas will act as a natural thickener.
- Use a Cornstarch Slurry: For a quick fix, mix 1 tablespoon of cornstarch with 2 tablespoons of cold water in a small bowl until smooth. Stir this slurry into the simmering curry and cook for another minute or two until the sauce has thickened.
5. Is this recipe vegan and gluten-free?
Yes, as written, this chickpea curry recipe is naturally both vegan and gluten-free. It contains no animal products and no ingredients with gluten. It’s a fantastic, inclusive meal for households with varying dietary needs. The only thing to be mindful of is your accompaniments. To keep the entire meal gluten-free, serve it with rice, quinoa, or gluten-free bread instead of traditional naan. To keep it vegan, ensure you serve it with a plant-based yogurt (like coconut or soy) instead of dairy yogurt. Always double-check the labels on your canned goods and spices if you have a severe allergy or intolerance, but the core ingredients are compliant.
Print
Creamy Chickpea Curry Recipe
Ingredients
- For the Curry:
- 2 tablespoons coconut oil (or any neutral oil like avocado or vegetable oil)
- 1 large yellow onion, finely chopped
- 4–5 cloves garlic, minced
- 1 tablespoon fresh ginger, grated
- 1 jalapeño or serrano pepper, finely minced (optional, for heat)
- 1 ½ teaspoons ground cumin
- 1 ½ teaspoons ground coriander
- 1 teaspoon turmeric powder
- ½ teaspoon smoked paprika
- ¼ – ½ teaspoon cayenne pepper (adjust to your spice preference)
- 1 teaspoon garam masala
- 1 (28-ounce / 800g) can crushed or diced tomatoes, undrained
- 2 (15-ounce / 425g) cans chickpeas (garbanzo beans), rinsed and drained
- 1 (13.5-ounce / 400ml) can full-fat coconut milk
- 1 tablespoon maple syrup or coconut sugar (optional, to balance acidity)
- 1 teaspoon salt (or to taste)
- ½ teaspoon black pepper, freshly ground
- For Serving & Garnish (Optional):
- Fresh cilantro, chopped
- Fresh lime or lemon wedges
- Cooked basmati rice, quinoa, or naan bread
- A dollop of plain yogurt or coconut yogurt
Instructions
- Sauté the Aromatics: Heat the coconut oil in a large Dutch oven or heavy-bottomed pot over medium heat. Once the oil is shimmering, add the chopped onion and cook, stirring occasionally, for 5-7 minutes, or until softened and translucent. Add the minced garlic, grated ginger, and optional jalapeño. Sauté for another 1-2 minutes until fragrant. Be careful not to burn the garlic.
- Bloom the Spices: Add the ground cumin, ground coriander, turmeric, smoked paprika, and cayenne pepper to the pot. Stir constantly for about 60 seconds. This step, known as “blooming,” toasts the spices in the hot oil, which deepens and intensifies their flavor, forming the backbone of your curry.
- Build the Sauce: Pour in the can of crushed or diced tomatoes with their juices. Use a wooden spoon to scrape up any browned bits from the bottom of the pot (this is where a lot of flavor lives!). Bring the mixture to a gentle simmer and let it cook for about 5 minutes, allowing the flavors to meld and the sauce to thicken slightly.
- Add the Stars of the Show: Stir in the rinsed and drained chickpeas and the full-fat coconut milk. Add the salt, black pepper, and optional maple syrup. Give everything a thorough stir to combine.
- Simmer to Perfection: Bring the curry back to a gentle simmer. Reduce the heat to low, cover the pot, and let it cook for at least 15-20 minutes. This simmering time is crucial for the chickpeas to absorb the flavors of the sauce and for the curry to thicken into a rich, creamy consistency. If you have more time, letting it simmer for 30 minutes will yield even better results.
- Finishing Touches: Remove the curry from the heat. Stir in the garam masala. This spice blend is added at the end because its delicate, aromatic compounds can be lost with prolonged cooking. Taste the curry and adjust seasonings as needed—more salt for flavor, a pinch more cayenne for heat, or a squeeze of lime juice to brighten it up.
- Serve and Garnish: Ladle the hot chickpea curry into bowls. Serve immediately over fluffy basmati rice or with warm naan bread. Garnish generously with fresh chopped cilantro and a lime wedge on the side for squeezing.
Nutrition
- Serving Size: One Normal Portion
- Calories: 450-500