


The holiday season is upon us, bringing with it a time for joy, cheer, and delightful treats. Christmas-themed cakesicles are the perfect addition to your festive celebrations. These delicious, colorful, and fun desserts are not only easy to make but also a creative way to involve the whole family in holiday preparations. Whether you’re hosting a Christmas party or looking for a fun activity to enjoy with your loved ones, cakesicles provide a sweet solution. In this article, we’ll dive into a step-by-step guide on how to create these delectable delights, ensuring your holiday season is both merry and bright.
Ingredients Needed for Christmas Themed Cakesicles
To create these scrumptious cakesicles, you’ll need a handful of simple ingredients. Here’s what you need to get started:
- 2 cups cake crumbs (any flavor of your choice)
- 1 cup frosting (vanilla or chocolate works best)
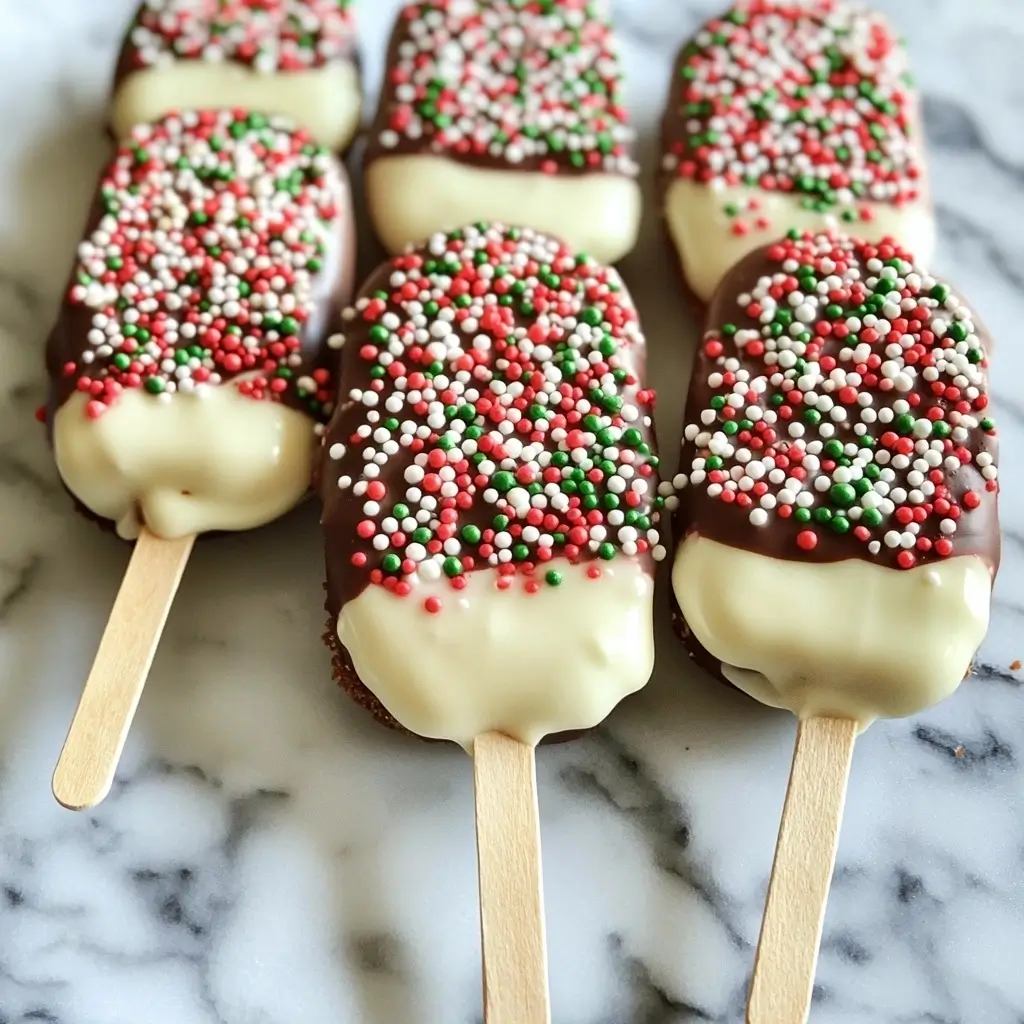
- 1 cup white chocolate or candy melts
- Holiday sprinkles (to add a festive touch)
- Lollipop sticks (for easy handling and serving)
Step-by-Step Instructions
Creating Christmas-themed cakesicles is a fun and straightforward process. Follow these easy steps to craft your festive treats:
- Combine Cake Crumbs and Frosting
In a large mixing bowl, combine the cake crumbs with the frosting. Use a spatula or your hands to mix until the ingredients are fully combined. The mixture should be moist enough to hold its shape when formed into balls. - Shape the Cakesicles
Take small portions of the mixture and form them into oval shapes resembling traditional cakesicles. The size is up to you, but aim for consistency so they freeze evenly. - Insert Lollipop Sticks and Freeze
Insert a lollipop stick into each shaped cakesicle, ensuring it’s secure. Place the cakesicles on a baking sheet lined with parchment paper and freeze them for about 1 hour. This step helps them maintain their shape when dipped in chocolate. - Melt the Chocolate
In a microwave-safe bowl, melt the white chocolate or candy melts. Heat in intervals of 30 seconds, stirring in between, until smooth and fully melted. - Dip the Cakesicles
Remove the cakesicles from the freezer. Dip each one into the melted chocolate, ensuring they’re evenly coated. Tap off any excess chocolate gently. - Decorate with Sprinkles
Quickly sprinkle your chosen holiday-themed sprinkles over the chocolate coating before it hardens. This step adds a festive flair to your cakesicles. - Set the Cakesicles
Place the decorated cakesicles back on the parchment paper to set completely. Allow them to sit at room temperature or refrigerate until the chocolate is fully hardened.
Nutrition Facts
Understanding the nutritional content of your treats can help you enjoy them responsibly. Here’s a breakdown of the estimated nutrition facts per serving (one cakesicle):
- Calories: Approximately 250-300
- Total Fat: 12-15g
- Saturated Fat: 8-10g
- Cholesterol: 15-25mg
- Sodium: 100-150mg
- Total Carbohydrates: 35-40g
- Dietary Fiber: 0-1g
- Sugars: 25-30g
- Protein: 2-3g
Please note that these values may vary based on specific ingredients used, such as the type of cake or frosting.
How to Serve Your Christmas Cakesicles
Serving cakesicles can be as creative as making them, offering a delightful opportunity to showcase your culinary artistry while adding a festive touch to your holiday gatherings. Here are several ideas to inspire your presentation, ensuring your cakesicles are not only tasty but visually appealing as well:
1. Festive Display
Creating a festive display for your cakesicles can elevate the atmosphere of any gathering. Start by selecting a decorative platter or a multi-tiered cake stand that complements your holiday theme. Arrange the cakesicles in a rainbow of colors, alternating flavors and designs to catch the eye. You might even consider adding some greenery, such as pine sprigs or holly, around the base of the cakesicles to enhance the seasonal vibe. For an interactive experience, provide small decorative tags next to each cakesicle, describing the flavors or ingredients, allowing guests to make informed choices and sparking conversation.
2. Gift Boxes
Cakesicles make for delightful holiday gifts, and packaging them beautifully can add a personal touch. Choose individual clear cellophane bags, and place each cakesicle inside, making sure to seal them securely to maintain freshness. Tie each bag with a festive ribbon in colors such as red, gold, or green to create a charming, eye-catching presentation. You can also personalize the gift boxes by adding a small tag with a heartfelt message or a recipe card detailing how to recreate the cakesicles at home. For an added layer of surprise, consider filling the bottom of the gift boxes with edible confetti or shredded paper that matches the holiday theme, providing a delightful reveal when opened.
3. Dessert Table
Integrating cakesicles into a dessert table can transform your holiday spread into a feast for the senses. To create a visually appealing arrangement, select a variety of cakesicle flavors and colors, and group them with other seasonal treats such as cookies, gingerbread houses, and chocolate truffles. Use decorative trays or stands to create height and dimension, ensuring that the table is easy to navigate. Consider adding labels to each dessert, highlighting unique flavors or dietary options, such as gluten-free or vegan choices. To enhance the ambiance, incorporate additional elements such as fairy lights, candles, or themed decorations that reflect the festive spirit, making your dessert table the centerpiece of your celebration.
4. Centerpiece Arrangement
Transform your cakesicles into a stunning centerpiece that doubles as a dessert option by creating a holiday bouquet arrangement. Start by selecting a sturdy foam base, which can be decorated with festive wrapping paper or fabric to match your decor. Insert the cakesicles upright into the foam, ensuring they are spaced evenly and at varying heights to create visual interest. You can embellish the arrangement with additional elements, such as faux flowers, ornaments, or seasonal greenery like eucalyptus or pinecones, which will add texture and color. This centerpiece not only serves as an eye-catching decoration but also invites guests to indulge in a sweet treat throughout the event.
By utilizing these creative serving ideas, you can ensure your Christmas cakesicles are not only a delicious treat but also a beautiful addition to your holiday celebrations. From festive displays to thoughtful gift packaging and stunning centerpieces, let your imagination run wild as you present these delightful confections in style.
Additional Tips for Perfect Cakesicles
Creating the perfect cakesicles can be a delightful and rewarding endeavor, allowing you to blend creativity with baking in an enjoyable way. Here are some comprehensive tips that will elevate your cakesicle-making experience and ensure that each batch is a delicious success.
Flavor Variations
One of the most exciting aspects of making cakesicles is the opportunity to experiment with different flavor combinations. Here are some suggestions to inspire your creativity:
- Classic Combinations: Traditional flavors like vanilla and chocolate are always crowd-pleasers. Consider pairing vanilla cake with a rich chocolate frosting or vice versa for a timeless taste.
- Seasonal Flavors: Take advantage of seasonal ingredients. For instance, pumpkin spice cake with cream cheese frosting is perfect for fall, while strawberry cake with whipped cream frosting works beautifully in the spring.
- Unique Blends: Don’t hesitate to think outside the box! Try combining unexpected flavors such as lavender cake with lemon frosting, or coconut cake with pineapple frosting, to create a tropical treat.
- Cultural Inspirations: Incorporate flavors from different cuisines, such as matcha green tea with vanilla frosting for a Japanese twist, or chai-spiced cake paired with a spiced buttercream for a taste of India.
Colorful Coatings
The visual appeal of your cakesicles can greatly enhance the overall experience. Here are some ideas for making your coatings pop:
- Thematic Colors: Use colored candy melts to match your baking to specific holidays or events. For example, red and green for Christmas, pastel colors for Easter, or orange and black for Halloween.
- Rainbow Effect: Create a stunning rainbow effect by dipping half of each cakesicle in one color and the other half in a different hue. Use a skewer or toothpick to gently swirl the colors together for a marbled look.
- Decorative Sprinkles: After dipping your cakesicles, immediately coat them in colorful sprinkles, edible glitter, or crushed cookies for added texture and visual flair. This not only enhances their appearance but also adds a delightful crunch.
Add-Ins
Incorporating various add-ins can elevate the flavors and textures of your cakesicles:
- Nuts: Chopped nuts like almonds, walnuts, or pecans can add a satisfying crunch and depth of flavor. Toasting the nuts beforehand can enhance their natural oils and bring out a richer taste.
- Dried Fruits: Adding dried fruits such as cranberries, apricots, or cherries can introduce natural sweetness and chewiness to your cakesicle mixture, balancing the richness of the cake and frosting.
- Crushed Candies: For a festive touch, consider mixing in crushed candy canes during the holiday season or crushed Oreos for a cookies-and-cream flavor. These add texture and bursts of flavor that will surprise your taste buds.
- Spices and Extracts: A pinch of cinnamon, nutmeg, or even a dash of flavored extracts (like almond or coconut) can enhance the flavor profile of your cakesicles, making them more aromatic and appealing.
Temperature Control
Getting the chocolate or candy melts just right is crucial for a smooth coating:
- Consistency Check: The ideal consistency for dipping should be pourable but not too runny. If your melts are too thick, they may clump on your cakesicles, ruining the finish.
- Thinning Tips: If you find your melts are too thick, add a teaspoon of vegetable oil or shortening to achieve a smoother texture. Stir well until fully incorporated, and test the consistency by dipping a small piece of cake or a spoon.
- Heat Management: When melting candy melts or chocolate, do so in short intervals in the microwave (15-30 seconds) to prevent overheating. Stir after each interval to help evenly distribute the heat.
- Cooling: If your cakesicles are too warm when dipped, the coating may not set properly. Allow the cakesicles to chill in the refrigerator for about 15 minutes before dipping to help the coating adhere better and create a pleasing finish.
Final Touches
Once your cakesicles are coated and set, consider adding some final touches:
- Drizzle: Use a contrasting colored melt to drizzle over the top for an artistic flair. This can be done using a piping bag or a fork for a more casual look.
- Personalization: Add personalized touches with edible markers or custom labels, especially if you’re gifting them. This can make them feel unique and special.
- Storage: To keep your cakesicles fresh, store them in an airtight container in the refrigerator. They can typically last for up to a week, allowing you to enjoy your creations longer.
By following these tips and incorporating your own creative flair, you can master the art of cakesicle-making and impress your friends and family with both the taste and presentation of your delightful treats. Happy baking!
FAQs About Christmas Themed Cakesicles
Q: Can I make cakesicles in advance?
A: Absolutely! You can prepare cakesicles up to a week in advance. Store them in an airtight container in the refrigerator to maintain freshness.
Q: What can I use instead of lollipop sticks?
A: If you don’t have lollipop sticks, you can use popsicle sticks or even pretzel sticks for a fun twist.
Q: Can I use dark or milk chocolate for coating?
A: Yes, you can use any type of chocolate for coating. Adjust the sweetness of the cake mixture accordingly if using darker chocolates.
Q: How long do cakesicles last?
A: Cakesicles can last up to two weeks in the refrigerator or up to three months in the freezer. Be sure to store them in a sealed container.
Q: How do I prevent the chocolate from cracking?
A: Ensure the cakesicles are not too cold when dipping them in chocolate. Allow them to sit at room temperature for a few minutes if needed.
Conclusion
Christmas-themed cakesicles are a delightful addition to any holiday celebration. They combine creativity with delicious flavors, making them a hit with both kids and adults. With simple ingredients and easy steps, you can craft these colorful treats and spread holiday cheer. Whether enjoyed as a dessert, shared as a gift, or displayed as a festive centerpiece, cakesicles are sure to bring smiles to your holiday festivities. So gather your ingredients, follow our guide, and let the holiday baking begin!


