


There are some recipes that just click, the kind that sneak into your weekly routine and become an absolute staple. This Chocolate Tahini Granola Bark is one of those recipes for my family. The first time I made it, I was simply looking for a way to use up a jar of tahini and a bag of granola that was nearing its end. I never expected to create the snack that would be requested for movie nights, packed into lunchboxes, and even brought as a potluck dessert for the next three months straight. The magic is in the contrast. You get the deep, slightly bitter notes of dark chocolate, the rich, nutty, and almost savory creaminess of the tahini, and then the delightful, oaty crunch of the granola. It’s a symphony of textures and flavors that feels incredibly indulgent yet is packed with wholesome ingredients. My kids love the “tiger stripes” the tahini swirl makes on top, and I love that it’s a no-bake, five-ingredient treat I can whip up in under 15 minutes. It’s more than just a snack; it’s a moment of pure, crunchy, chocolatey bliss.
The Ultimate Chocolate Tahini Granola Bark Recipe
This section breaks down everything you need to create this stunningly simple yet sophisticated treat. The beauty of this recipe lies in its adaptability, but we’ll start with the perfect base combination that has been tested and approved by critics of all ages (namely, my family and friends!).
Core Ingredients: The Foundation of Flavor
Before you begin, gather these essential components. The quality of your ingredients will directly impact the final taste and texture, so choose wisely!
- Dark Chocolate: 12 ounces (about 340g) of good-quality dark chocolate, preferably between 60-75% cacao. You can use chocolate chips for ease, but chopped chocolate from a bar will melt more smoothly and evenly. The higher cacao percentage provides a rich, intense flavor that beautifully balances the sweetness and the nuttiness of the tahini.
- Tahini: ½ cup (about 120g) of high-quality, runny tahini. Tahini is a paste made from ground sesame seeds. For this recipe, a smooth, pourable tahini is crucial for creating those beautiful swirls. If your tahini is thick or has separated, give it a very vigorous stir to recombine the oil and solids until it is smooth and drizzly.
- Granola: 2 cups (about 200g) of your favorite crunchy granola. The key here is crunch. Avoid soft, chewy, or muesli-style granolas. A simple oat and nut-based granola works wonderfully. Feel free to use a store-bought version for convenience or a homemade batch for full control over sweetness and ingredients.
- Coconut Oil: 1 tablespoon of virgin or refined coconut oil. This is our secret weapon for perfectly glossy, snappy chocolate. It helps the chocolate melt smoothly and set with a firm, professional-looking finish. If you don’t have coconut oil, a neutral-flavored oil like avocado oil can work in a pinch, but the texture may be slightly softer.
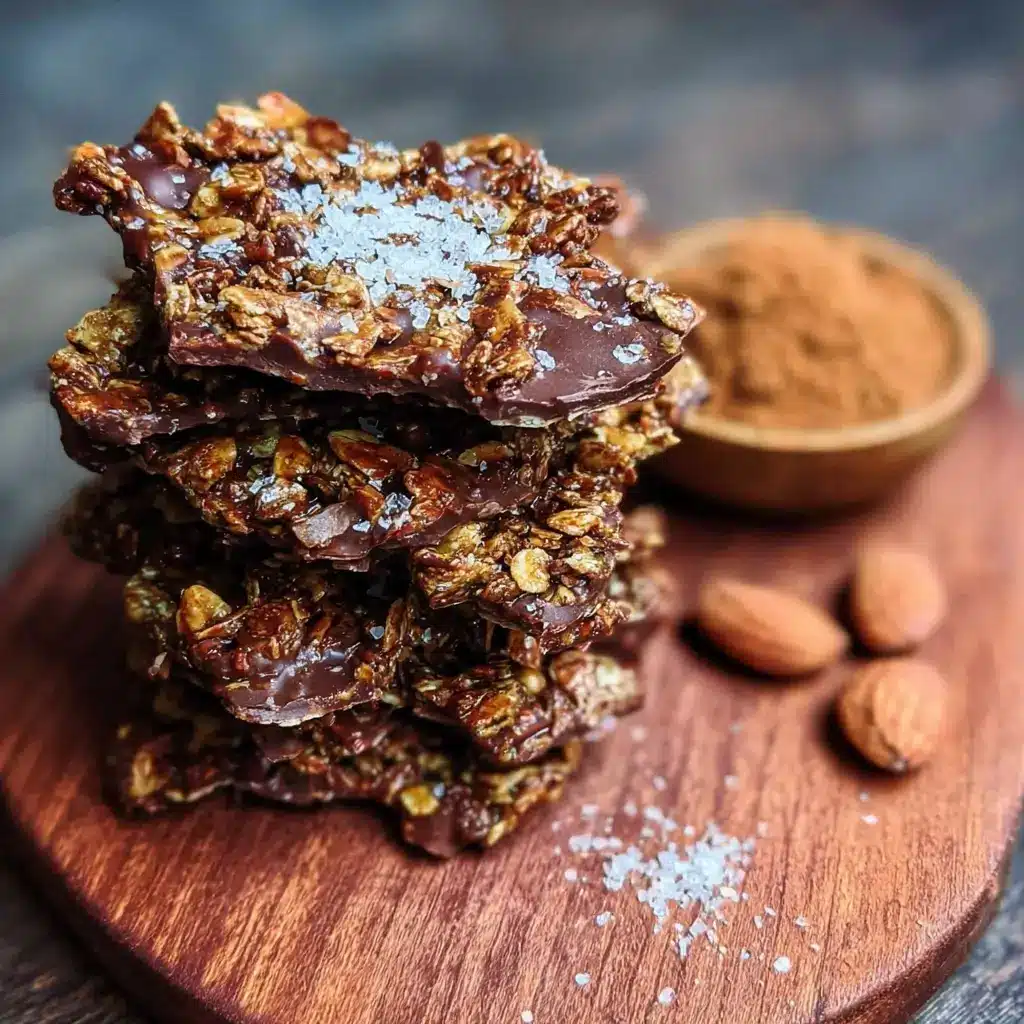
- Flaky Sea Salt: 1 teaspoon, plus more for sprinkling. This is not just a garnish; it is an essential flavor enhancer. The salt cuts through the richness of the chocolate and tahini, making all the other flavors pop. Flaky sea salt (like Maldon) provides a delightful crunch and visual appeal.
Instructions: Crafting Your Bark Step-by-Step
Follow these detailed instructions for foolproof results every time. This is a simple process, but paying attention to the details will elevate your bark from good to unforgettable.
- Prepare Your Pan: Line a 9×13 inch baking sheet or pan with parchment paper. The most important tip here is to leave a few inches of overhang on at least two sides. This will create “handles” that allow you to easily lift the entire slab of bark out of the pan once it has set, making it incredibly easy to break into pieces without a mess.
- Melt the Chocolate to Perfection: You have two primary methods for this crucial step.
- Microwave Method (Quick & Easy): Place the chopped chocolate or chocolate chips and the tablespoon of coconut oil in a microwave-safe bowl. Heat in 30-second intervals, stirring thoroughly after each interval. It’s vital to stir even if the chocolate doesn’t look fully melted. The residual heat will continue the melting process. Continue until the chocolate is about 90% melted, then remove and stir until it is completely smooth and glossy. This prevents the chocolate from overheating and seizing (becoming thick and grainy).
- Double Boiler Method (Gentle & Controlled): If you don’t have a microwave or prefer a more traditional approach, create a double boiler. Fill a small saucepan with about an inch of water and bring it to a gentle simmer. Place a heatproof bowl (glass or stainless steel) on top of the saucepan, ensuring the bottom of the bowl does not touch the water. Add the chocolate and coconut oil to the bowl. Stir constantly as the gentle steam heat melts the chocolate. This method provides even, gentle heat and significantly reduces the risk of scorching.
- Combine the Base: Once your chocolate is beautifully melted and smooth, pour the granola directly into the bowl. Use a spatula to gently fold the granola into the chocolate until every cluster is evenly and generously coated. Work quickly but gently to maintain the texture of the granola.
- Spread the Mixture: Pour the chocolate-granola mixture onto your prepared parchment-lined baking sheet. Use your spatula to spread it into an even, thin layer across the entire surface of the pan. The thickness is up to you, but about ¼-inch thick is ideal for a satisfying snap.
- Add the Tahini Swirl: Now for the artistic part! Drizzle the ½ cup of runny tahini all over the surface of the chocolate-granola base. To achieve the beautiful marbled effect, take a skewer, a toothpick, or the tip of a knife and gently drag it through the tahini and chocolate. Make S-shapes, figure-eights, or random zig-zags. The key is not to overmix. You want distinct ribbons of chocolate and tahini, not a uniform, muddy brown color. A few gentle passes are all you need.
- The Finishing Touch: Immediately after swirling the tahini, sprinkle the flaky sea salt evenly across the top. The salt will adhere to the wet surface and provide that final, irresistible pop of flavor and texture.
- Chill to Set: Carefully transfer the baking sheet to the refrigerator. Let the bark chill for at least 1-2 hours, or until it is completely firm to the touch. For a faster set, you can place it in the freezer for about 30-45 minutes.
- Break and Enjoy: Once the bark is fully hardened, use the parchment paper overhangs to lift the entire slab out of the pan and place it on a cutting board. You can either use a large knife to chop it into neat squares or triangles, or you can go the rustic route and simply use your hands to break it into beautifully irregular shards.
Nutrition Facts
Please note that these values are an estimate and can vary significantly based on the specific brands of chocolate, tahini, and granola you use.
- Servings: This recipe makes approximately 12 servings.
- Calories Per Serving: Approximately 280-320 kcal.
Preparation Time
This is one of the quickest and most rewarding recipes you’ll ever make.
- Active Preparation Time: 15 minutes
- Chilling Time: 1-2 hours
- Total Time: Approximately 1 hour 15 minutes
How to Serve Your Chocolate Tahini Granola Bark
This versatile treat can be enjoyed in so many ways. Here are some of our favorite ideas to get you started:
- The Perfect Afternoon Pick-Me-Up: A piece of this bark alongside a hot cup of coffee or a robust black tea is the ultimate way to beat the 3 PM slump. The combination of caffeine and the energy-boosting ingredients in the bark is a match made in heaven.
- An Elegant, Easy Dessert: After dinner, arrange a few beautifully broken pieces on a small platter. It’s a sophisticated yet simple dessert that requires no extra effort but is guaranteed to impress your guests.
- A Topping with Texture: Break the bark into smaller, bite-sized crumbles and sprinkle them over other foods for a major texture and flavor upgrade. It’s incredible on:
- Greek yogurt or coconut yogurt bowls
- Vanilla bean or coffee ice cream
- Oatmeal or porridge
- Smoothie bowls
- Feature on a Dessert Charcuterie Board: Place a pile of bark shards on a large board alongside fresh berries, other types of chocolate, cheeses, and nuts. Its unique appearance and flavor profile make it a standout addition.
- A Thoughtful Homemade Gift: This bark makes a wonderful and personal gift. Place the pieces in a clear cellophane bag tied with a ribbon, or arrange them in a decorative tin. It’s perfect for holidays, teacher appreciation gifts, or as a thank you to a host.
The Magic of Tahini in Desserts
For those unfamiliar with using tahini in sweet applications, it might seem like an unusual choice. Traditionally a staple in savory Middle Eastern and Mediterranean dishes like hummus and baba ghanoush, tahini has a complex flavor profile that makes it a secret weapon for modern bakers and dessert makers.
Tahini is made from 100% ground sesame seeds, giving it a profoundly nutty, earthy, and slightly bitter flavor. Think of it as the more sophisticated, grown-up cousin of peanut butter. It’s this very complexity that makes it so brilliant in desserts. When paired with something sweet like chocolate or maple syrup, tahini’s inherent bitterness cuts through the sugar, creating a wonderfully balanced and less cloying final product.
Its creamy, rich texture adds a luscious mouthfeel to recipes, and its savory undertones provide a surprising depth that keeps you coming back for another bite. The combination of salty, sweet, nutty, and bitter hits all the right notes, making a simple treat like this chocolate bark feel layered and gourmet. If you’ve ever had halva, a dense, sweet confection made from tahini and sugar, you’ve already experienced the magic. This bark is a modern, crunchy interpretation of that classic pairing.
Additional Tips for Bark Perfection (5 Pro-Tips)
Take your bark from great to absolutely divine with these five expert tips.
- Tip 1: Choose Your Chocolate Wisely. The chocolate is the star of the show, so its quality matters. While chocolate chips are convenient, they often contain stabilizers that prevent them from melting as smoothly as a high-quality chocolate bar. For the best possible texture and sheen, invest in a good baking bar (like Ghirardelli, Scharffen Berger, or Callebaut) and chop it yourself. The percentage of cacao also makes a difference—60-70% dark chocolate offers the perfect balance, but feel free to experiment with semi-sweet for a sweeter bark or even 85% for an intensely dark version.
- Tip 2: The Runnier the Tahini, the Better the Swirl. Not all tahini is created equal. Some brands are very thick and pasty, while others are naturally smooth and pourable. For this recipe, a runny tahini is essential for achieving those beautiful, delicate swirls. Brands from Lebanon or Israel are often praised for their silky texture. If your tahini has separated in the jar (a layer of oil on top), don’t just pour the oil off! This is normal. You must stir it vigorously with a knife or fork until it’s completely re-emulsified and has a consistent, drizzly texture. You can even warm it slightly to help it loosen up.
- Tip 3: Customization is Your Best Friend. This recipe is a fantastic blank canvas. Think of the base recipe as a starting point and get creative with add-ins. Fold these into the chocolate along with the granola for extra flavor and texture. Some wonderful additions include:
- Toasted Nuts: Chopped pistachios, almonds, or hazelnuts add a great crunch.
- Seeds: Pepitas (pumpkin seeds) or sunflower seeds add a nice texture. A tablespoon of sesame seeds can amplify the tahini flavor.
- Dried Fruit: Chopped dried apricots, cranberries, or cherries can add a chewy, tart contrast.
- Spices: A pinch of cinnamon, cardamom, or even a tiny dash of cayenne pepper mixed into the melted chocolate can add a surprising warmth and complexity.
- Zest: The zest of one orange folded into the chocolate mixture adds a beautiful, bright citrus note that pairs wonderfully with both chocolate and tahini.
- Tip 4: Don’t Skip the Salt. It might seem like a small detail, but the sprinkle of flaky sea salt on top is non-negotiable. It does more than just add a salty taste; it acts as a flavor enhancer that balances the sweetness of the chocolate and amplifies the nutty notes of the tahini. The crunchy texture of flaky salt also provides a delightful contrast to the smooth chocolate. Use a light hand, but make sure the entire surface gets a little love.
- Tip 5: Proper Storage is Key to Longevity. To maintain that perfect, snappy texture, store your bark correctly. Place the pieces in an airtight container.
- In the Refrigerator: This is the ideal storage spot. It will keep the bark firm and snappy for up to 2 weeks.
- In the Freezer: For longer-term storage, the freezer is your best bet. It will stay fresh for up to 3 months. Let it sit at room temperature for 5-10 minutes before eating to soften it slightly.
- Avoid the Counter: Storing the bark at room temperature, especially in a warm environment, will cause it to soften and lose its signature snap.
Frequently Asked Questions (FAQ)
Here are answers to some common questions you might have about making this delicious Chocolate Tahini Granola Bark.
1. Q: Can I make this recipe vegan and/or gluten-free?
A: Absolutely! This recipe is very easy to adapt.
- For a Vegan Version: The main thing to check is your chocolate. Ensure you are using a dark chocolate that is dairy-free (most high-quality dark chocolates are, but always check the label for ingredients like milk fat). Also, ensure your granola is certified vegan, as some brands use honey as a sweetener.
- For a Gluten-Free Version: The only ingredient you need to worry about is the granola. Simply use a certified gluten-free granola, which is widely available in most supermarkets. The other ingredients (chocolate, tahini, coconut oil, salt) are naturally gluten-free, but it’s always wise to check labels for any cross-contamination warnings if you have a severe allergy or celiac disease.
2. Q: My chocolate became thick and grainy when I melted it. What did I do wrong?
A: This is a common issue called “seizing,” and it almost always happens for one of two reasons. First, your chocolate may have come into contact with a tiny amount of water. Even a single drop from a wet spoon or a bit of steam from a double boiler can cause the cocoa solids to clump together. Always use completely dry bowls and utensils. Second, you may have overheated it. Chocolate is delicate and scorches easily, especially in the microwave. This is why heating it in short bursts and stirring frequently is so important. Unfortunately, once chocolate has fully seized, it’s very difficult to save for a recipe like this. The best course of action is to start over with a fresh batch.
3. Q: Can I use a different nut or seed butter instead of tahini?
A: Yes, you can, but it will change the flavor profile significantly. The unique, slightly bitter nuttiness of tahini is what makes this recipe special. However, if you have an allergy or simply don’t have tahini on hand, smooth peanut butter or almond butter would be the best substitutes. You can also use sunflower seed butter for a nut-free alternative that still provides a lovely roasted flavor. Just make sure whatever you use is smooth and relatively runny for easy swirling.
4. Q: My bark is a little soft and doesn’t have a good “snap.” How can I fix this?
A: The “snap” of a chocolate bark comes from the proper setting of the cocoa butter. If your bark is soft, it could be due to a few factors. You might have added too much coconut oil or your tahini might have had a very high oil content, raising the overall fat ratio and resulting in a softer set. Another possibility is that it simply hasn’t chilled for long enough. Make sure it’s completely firm all the way through before breaking it. Storing it in the freezer will always result in the firmest, snappiest texture. For future batches, you could also try “tempering” your chocolate, which is a more advanced process of heating and cooling chocolate to specific temperatures to stabilize the cocoa butter crystals, resulting in a very glossy finish and a superior snap. However, for a simple home recipe, a long, cold chill is usually sufficient.
5. Q: What is the best kind of granola to use for this bark?
A: The best granola is one that is very crunchy and not overly sweet. You want the granola to provide texture and a wholesome, oaty base, not to overpower the chocolate and tahini. Look for granolas that have large, hard clusters. Simple oat and nut-based granolas are fantastic. Avoid granolas that are soft, chewy, or have a lot of powdered milk or fine, dusty bits, as these can make the chocolate texture a bit muddled. Making your own is also a great option, as you can toast it until it’s extra-crispy and control the sugar content perfectly. A simple mix of rolled oats, chopped nuts, a little maple syrup, and a pinch of salt, toasted until golden brown, would be ideal.
Print
Chocolate Tahini Granola Bark Recipe
Ingredients
- Dark Chocolate: 12 ounces (about 340g) of good-quality dark chocolate, preferably between 60-75% cacao. You can use chocolate chips for ease, but chopped chocolate from a bar will melt more smoothly and evenly. The higher cacao percentage provides a rich, intense flavor that beautifully balances the sweetness and the nuttiness of the tahini.
- Tahini: ½ cup (about 120g) of high-quality, runny tahini. Tahini is a paste made from ground sesame seeds. For this recipe, a smooth, pourable tahini is crucial for creating those beautiful swirls. If your tahini is thick or has separated, give it a very vigorous stir to recombine the oil and solids until it is smooth and drizzly.
- Granola: 2 cups (about 200g) of your favorite crunchy granola. The key here is crunch. Avoid soft, chewy, or muesli-style granolas. A simple oat and nut-based granola works wonderfully. Feel free to use a store-bought version for convenience or a homemade batch for full control over sweetness and ingredients.
- Coconut Oil: 1 tablespoon of virgin or refined coconut oil. This is our secret weapon for perfectly glossy, snappy chocolate. It helps the chocolate melt smoothly and set with a firm, professional-looking finish. If you don’t have coconut oil, a neutral-flavored oil like avocado oil can work in a pinch, but the texture may be slightly softer.
- Flaky Sea Salt: 1 teaspoon, plus more for sprinkling. This is not just a garnish; it is an essential flavor enhancer. The salt cuts through the richness of the chocolate and tahini, making all the other flavors pop. Flaky sea salt (like Maldon) provides a delightful crunch and visual appeal.
Instructions
- Prepare Your Pan: Line a 9×13 inch baking sheet or pan with parchment paper. The most important tip here is to leave a few inches of overhang on at least two sides. This will create “handles” that allow you to easily lift the entire slab of bark out of the pan once it has set, making it incredibly easy to break into pieces without a mess.
- Melt the Chocolate to Perfection: You have two primary methods for this crucial step.
- Microwave Method (Quick & Easy): Place the chopped chocolate or chocolate chips and the tablespoon of coconut oil in a microwave-safe bowl. Heat in 30-second intervals, stirring thoroughly after each interval. It’s vital to stir even if the chocolate doesn’t look fully melted. The residual heat will continue the melting process. Continue until the chocolate is about 90% melted, then remove and stir until it is completely smooth and glossy. This prevents the chocolate from overheating and seizing (becoming thick and grainy).
- Double Boiler Method (Gentle & Controlled): If you don’t have a microwave or prefer a more traditional approach, create a double boiler. Fill a small saucepan with about an inch of water and bring it to a gentle simmer. Place a heatproof bowl (glass or stainless steel) on top of the saucepan, ensuring the bottom of the bowl does not touch the water. Add the chocolate and coconut oil to the bowl. Stir constantly as the gentle steam heat melts the chocolate. This method provides even, gentle heat and significantly reduces the risk of scorching.
- Combine the Base: Once your chocolate is beautifully melted and smooth, pour the granola directly into the bowl. Use a spatula to gently fold the granola into the chocolate until every cluster is evenly and generously coated. Work quickly but gently to maintain the texture of the granola.
- Spread the Mixture: Pour the chocolate-granola mixture onto your prepared parchment-lined baking sheet. Use your spatula to spread it into an even, thin layer across the entire surface of the pan. The thickness is up to you, but about ¼-inch thick is ideal for a satisfying snap.
- Add the Tahini Swirl: Now for the artistic part! Drizzle the ½ cup of runny tahini all over the surface of the chocolate-granola base. To achieve the beautiful marbled effect, take a skewer, a toothpick, or the tip of a knife and gently drag it through the tahini and chocolate. Make S-shapes, figure-eights, or random zig-zags. The key is not to overmix. You want distinct ribbons of chocolate and tahini, not a uniform, muddy brown color. A few gentle passes are all you need.
- The Finishing Touch: Immediately after swirling the tahini, sprinkle the flaky sea salt evenly across the top. The salt will adhere to the wet surface and provide that final, irresistible pop of flavor and texture.
- Chill to Set: Carefully transfer the baking sheet to the refrigerator. Let the bark chill for at least 1-2 hours, or until it is completely firm to the touch. For a faster set, you can place it in the freezer for about 30-45 minutes.
- Break and Enjoy: Once the bark is fully hardened, use the parchment paper overhangs to lift the entire slab out of the pan and place it on a cutting board. You can either use a large knife to chop it into neat squares or triangles, or you can go the rustic route and simply use your hands to break it into beautifully irregular shards.
Nutrition
- Serving Size: One Normal Portion
- Calories: 280-320


