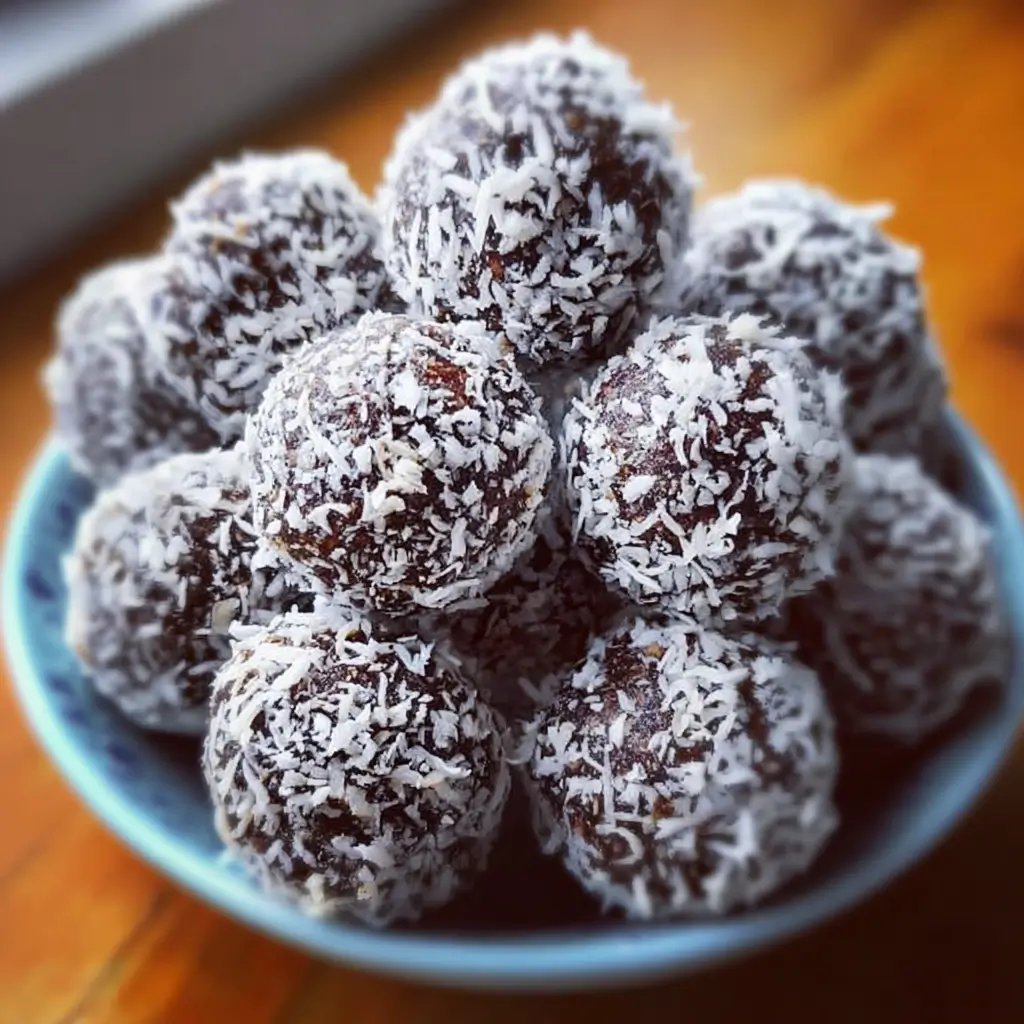
There are certain recipes that become more than just food; they become a part of your daily rhythm, a reliable friend you can turn to in a moment of need. For my family, these Chocolate Coconut Protein Balls are exactly that. I first whipped up a batch on a hectic Tuesday afternoon, staring down the barrel of the dreaded 3 p.m. energy slump. My kids were home from school, ravenous as always, and I was desperate for a snack that wouldn’t lead to a sugar crash. I wanted something healthy but genuinely delicious—a treat that felt indulgent without the guilt. Pulling together some pantry staples, I had no idea I was creating what would become our household’s most requested snack. The moment my husband bit into one, his eyes widened. “This is like a healthy Mounds bar!” he exclaimed. He was right. That perfect marriage of rich, dark chocolate and sweet, chewy coconut is pure bliss. Now, a container of these protein balls is a permanent fixture in our fridge, ready to fuel us before a workout, satisfy a late-night craving, or get tucked into a lunchbox for a midday pick-me-up. They are, without a doubt, the easiest, most satisfying, and most versatile healthy treat I have ever made.
The Ultimate Chocolate Coconut Protein Ball Recipe
This recipe is designed for simplicity, flavor, and a powerful nutritional punch. It’s a no-bake wonder that comes together in minutes, relying on wholesome ingredients to create a snack that tastes like a dessert but works like fuel. It’s naturally gluten-free (when using certified GF oats) and can be easily adapted to be fully vegan.
Ingredients You’ll Need
- Rolled Oats: 1 ½ cups (Use certified gluten-free if necessary)
- Chocolate Protein Powder: ¾ cup (Whey, casein, or a plant-based blend all work)
- Unsweetened Shredded Coconut: 1 cup, plus an additional ½ cup for rolling
- Creamy Nut Butter: ¾ cup (Almond, peanut, or cashew butter are excellent choices)
- Pure Maple Syrup: ⅓ cup (or substitute with honey or agave nectar)
- Unsweetened Cocoa Powder: 3 tablespoons (for a deep, rich chocolate flavor)
- Chia Seeds: 2 tablespoons (for added fiber, omega-3s, and binding power)
- Vanilla Extract: 1 teaspoon
- Pinch of Sea Salt: ¼ teaspoon (to enhance all the flavors)
- Milk or Water: 1 to 3 tablespoons (as needed, to adjust consistency)
Step-by-Step Instructions
- Combine Dry Ingredients: In a large mixing bowl, add the rolled oats, chocolate protein powder, 1 cup of the unsweetened shredded coconut, the unsweetened cocoa powder, chia seeds, and the pinch of sea salt. Whisk everything together until it’s thoroughly combined and uniform in color. This step ensures that every bite has a perfect balance of flavor.
- Add Wet Ingredients: To the bowl of dry ingredients, add the creamy nut butter, pure maple syrup, and vanilla extract.
- Mix Thoroughly: Using a sturdy spatula or a wooden spoon, begin to mix all the ingredients together. It will be very thick and may seem a bit dry at first. Keep mixing, pressing the mixture against the side of the bowl to fully incorporate everything. Your goal is a thick, sticky “dough” that holds together when pressed.
- Adjust Consistency: Check the texture of your mixture. If it seems too dry and crumbly to hold a shape, add 1 tablespoon of milk (or water) and mix again. Continue to add liquid, 1 tablespoon at a time, until the dough is sticky enough to be easily rolled into balls. Be careful not to add too much liquid, or it will become too sticky. The type of protein powder and nut butter you use can affect the required moisture.
- Chill the Dough (Optional but Recommended): For easier rolling and less mess, cover the bowl with plastic wrap and place it in the refrigerator for 20-30 minutes. This allows the oats and chia seeds to absorb some of the moisture and firms up the mixture, making it less sticky to the touch.
- Roll the Balls: Place the remaining ½ cup of shredded coconut in a shallow dish or on a plate. Use a small cookie scoop (about 1 tablespoon in size) or a regular spoon to portion out the dough. Roll each portion firmly between your palms to create a smooth, compact ball.
- Coat in Coconut: Immediately after rolling each ball, roll it in the dish of shredded coconut until it’s evenly coated on all sides. The coconut coating not only adds a beautiful finish but also a great texture and prevents the balls from sticking together.
- Set and Store: Place the finished protein balls on a baking sheet lined with parchment paper. Once all the balls are rolled and coated, you can enjoy them right away, but for the best texture, place the baking sheet in the refrigerator for at least 30 minutes to allow them to firm up completely. Transfer them to an airtight container for storage.
Nutrition Facts
- Servings: This recipe makes approximately 24 balls.
- Calories per serving (1 ball): Approximately 125-140 calories, depending on the specific protein powder and nut butter used.
Preparation Time
- Active Prep Time: 15 minutes
- Chilling Time: 30 minutes
- Total Time: 45 minutes
Why This Is the Perfect Healthy Snack
Beyond the incredible taste, these chocolate coconut protein balls are a powerhouse of benefits, making them a staple for anyone leading a busy, health-conscious lifestyle.
- Incredibly Easy & No-Bake: This is perhaps the biggest draw. There’s no oven, no complex techniques, and no long waiting times. It’s a simple process of mixing, rolling, and chilling.
- Perfect for Meal Prep: Spend 15 minutes on a Sunday afternoon making a batch, and you’ll have healthy, grab-and-go snacks ready for the entire week. They eliminate the temptation to reach for processed, sugary snacks when hunger strikes.
- Packed with Balanced Nutrition: Each ball offers a fantastic blend of macronutrients. You get complex carbohydrates from the oats for sustained energy, protein for muscle repair and satiety, and healthy fats from the nut butter and chia seeds to keep you full and focused.
- Completely Customizable: This recipe is a brilliant template. You can easily swap ingredients based on your dietary needs or what you have in your pantry. We’ll explore a range of customizations further down.
- Kid-Approved and Family-Friendly: They taste like a decadent treat, making them a huge hit with children and adults alike. It’s a fantastic way to get more protein and fiber into your kids’ diets without a fuss.
A Deep Dive into the Star Ingredients
Understanding what each ingredient brings to the table helps you appreciate the nutritional magic of these little bites and empowers you to make smart substitutions.
Rolled Oats: The Hearty Foundation
Rolled oats (also called old-fashioned oats) are the structural backbone of this recipe. They provide a chewy texture and are a fantastic source of complex carbohydrates and soluble fiber, specifically beta-glucan. This type of fiber helps to slow digestion, keeping you fuller for longer and promoting stable blood sugar levels. For those with celiac disease or gluten sensitivity, be sure to use oats that are certified gluten-free to avoid cross-contamination.
Chocolate Protein Powder: The Powerhouse
The protein powder is what elevates these from simple energy bites to true protein balls. It’s crucial for muscle recovery after a workout and is the most satiating macronutrient, meaning it will curb your hunger effectively.
- Whey/Casein: Dairy-based proteins that mix well and offer a complete amino acid profile.
- Plant-Based Protein: Pea, rice, soy, or hemp protein blends are perfect for making this recipe vegan. Choose one you enjoy the taste of, as it will be a dominant flavor.
Unsweetened Shredded Coconut: The Tropical Twist
Coconut provides that signature flavor that pairs so beautifully with chocolate. Using unsweetened coconut is key to keeping the sugar content in check. Coconut contains healthy fats known as medium-chain triglycerides (MCTs), which are more readily used by the body for energy. The shredded texture also adds a delightful chewiness.
Nut Butter: The Healthy Binder
Nut butter acts as the primary binder, holding everything together while contributing healthy monounsaturated fats, protein, and flavor.
- Almond Butter: Offers a mild, slightly sweet flavor.
- Peanut Butter: Provides a classic, robust flavor that many love.
- Cashew Butter: Is creamier and has a more neutral taste.
For the healthiest option, choose a natural nut butter where the only ingredients are nuts and maybe a little salt.
Maple Syrup: The Natural Sweetener
Pure maple syrup provides sweetness without resorting to refined sugar. It also adds necessary moisture to help bind the mixture. It contains some minerals and antioxidants not found in white sugar. For a non-vegan option, honey works just as well and has its own unique health benefits.
How to Serve Your Chocolate Coconut Protein Balls
These bites are incredibly versatile. Here are some of the best ways to enjoy them, moving beyond just a simple snack.
- The Ultimate Pre-Workout Fuel: Have one or two about 30-60 minutes before exercise. The carbs from the oats provide quick energy, while the protein primes your muscles for the work ahead.
- A Post-Workout Recovery Hero: Consume within an hour after your workout to replenish glycogen stores and provide your muscles with the protein needed for repair and growth.
- The Mid-Afternoon Slump Buster: Pair one with a cup of green tea or coffee for the perfect pick-me-up to power you through the rest of your workday.
- A Healthy Dessert Alternative: When a craving for something sweet and chocolatey hits after dinner, one of these balls is the perfect portion-controlled treat to satisfy it without derailing your health goals.
- A Breakfast Boost: Crumble one or two over a bowl of Greek yogurt or oatmeal for added texture, flavor, and a significant protein boost to start your day.
- On-the-Go Snack: Toss a few into a small container and keep them in your car, gym bag, or work desk for a healthy option when you’re in a pinch.
For a more decorative presentation:
- Drizzle the finished balls with a little melted dark chocolate.
- Roll them in different coatings like finely chopped nuts, hemp seeds, or extra cocoa powder.
- Press a single almond or a dark chocolate chip into the top of each ball before chilling.
Additional Tips for Protein Ball Perfection (5 Tips)
After making dozens of batches, I’ve learned a few tricks that guarantee a perfect result every time.
- Get the Texture Just Right: The most common issue is a mixture that’s either too dry or too wet. If it’s too dry and crumbly, add your liquid (milk or water) very slowly, just one teaspoon at a time, until it comes together. If you accidentally make it too wet, add a tablespoon more of oats or protein powder to help absorb the excess moisture.
- Don’t Skip the Chill: Chilling the dough before you roll is a game-changer. It makes the mixture far less sticky and much easier to handle, resulting in more uniform and perfectly round balls. It also helps the flavors meld together.
- Taste and Adjust Before You Roll: Your protein powder and nut butter will heavily influence the final taste. Before you chill the dough, take a tiny taste. Does it need more sweetness? A little more cocoa for a richer chocolate flavor? A bigger pinch of salt to make the flavors pop? This is your chance to customize it perfectly to your palate.
- Use a Cookie Scoop for Uniformity: For perfectly portioned and consistently sized protein balls, a small cookie scoop is your best friend. This not only makes them look more professional but also ensures the nutritional information per ball is accurate.
- Your Choice of Protein Powder Matters: Not all protein powders are created equal. Some are much more absorbent than others. A super-absorbent powder (like some caseins or plant blends) might require more liquid. Also, ensure you use a protein powder that you genuinely like the taste of on its own, as its flavor will be prominent in the final product.
Customizations and Variations
This recipe is a fantastic starting point. Feel free to get creative and tailor it to your preferences and dietary needs.
- Nut-Free Version: For a nut-free alternative, substitute the nut butter with sunflower seed butter (SunButter) or tahini. Both work wonderfully as binders. Ensure your protein powder is also nut-free.
- Go Fully Vegan: To ensure the recipe is 100% vegan, simply use a plant-based protein powder (like pea, soy, or a brown rice blend) and stick with pure maple syrup or agave as your sweetener instead of honey.
- Delicious Add-Ins: Take the flavor and texture to the next level with some fun additions. Stir in about ¼ cup of any of the following:
- Mini dark chocolate chips
- Cacao nibs for an intense, crunchy chocolate kick
- Finely chopped walnuts, pecans, or almonds
- Dried fruit like cherries or cranberries
- A dash of cinnamon or espresso powder to enhance the chocolate flavor
- Experiment with Extracts: While vanilla is classic, try a ¼ teaspoon of almond extract for a marzipan-like flavor or a little peppermint extract for a chocolate-mint vibe.
Proper Storage for Lasting Freshness
Storing your protein balls correctly is essential to keep them fresh, delicious, and ready to eat.
In the Refrigerator
This is the standard and recommended storage method. Place the finished balls in a single layer in an airtight container, or stack them with a small piece of parchment paper between the layers to prevent sticking. They will stay fresh and delicious in the refrigerator for up to 2 weeks. They will be firmer straight from the fridge, so you might want to let them sit at room temperature for a few minutes before enjoying.
In the Freezer
These protein balls freeze beautifully, making them ideal for long-term storage. Arrange them in a single layer on a parchment-lined baking sheet and place them in the freezer until solid (about 1-2 hours). Once frozen, transfer them to a freezer-safe zip-top bag or container. This prevents them from freezing together in a large clump. They will last in the freezer for up to 3 months. To eat, you can let them thaw in the refrigerator overnight or on the counter for about 15-20 minutes.
Frequently Asked Questions (FAQ)
Here are answers to some of the most common questions about making these chocolate coconut protein balls.
1. Can I make these without protein powder?
Yes, you absolutely can. If you leave it out, you will essentially be making “energy balls” rather than “protein balls.” You will need to replace the volume of the protein powder with another dry ingredient to maintain the right consistency. The best substitute is an equal amount of oat flour (which you can make by simply blending rolled oats in a blender) or more rolled oats.
2. My mixture is too dry and crumbly. What did I do wrong?
You likely haven’t done anything wrong! The absorbency of different protein powders and the oiliness of various nut butters can greatly affect the dough’s moisture level. This is the easiest problem to fix. Simply add a liquid like almond milk, oat milk, or water, just 1 tablespoon at a time, and mix thoroughly until the dough becomes sticky and holds together when pressed between your fingers.
3. Are these protein balls gluten-free?
They can be! Oats are naturally gluten-free, but they are often processed in facilities that also handle wheat, leading to cross-contamination. To ensure this recipe is 100% gluten-free, you must use oats that are specifically labeled and certified as “gluten-free.” All other core ingredients in this recipe are naturally gluten-free.
4. Can I use quick oats instead of rolled oats?
You can, but it will change the final texture. Rolled oats provide a distinct, chewy texture. Quick oats are more processed and will result in a softer, more uniform, and slightly pastier texture. It’s a matter of personal preference, but for the best chewiness, rolled (old-fashioned) oats are recommended. Do not use steel-cut oats, as they will not soften and will be unpleasantly hard.
5. How long do these protein balls last?
When stored properly in an airtight container, they will last for up to two weeks in the refrigerator. For longer-term storage, they can be frozen for up to three months. Thanks to the low moisture content and ingredients, they are quite stable and perfect for making in large batches.

Chocolate Coconut Protein Balls Recipe
Ingredients
- Rolled Oats: 1 ½ cups (Use certified gluten-free if necessary)
- Chocolate Protein Powder: ¾ cup (Whey, casein, or a plant-based blend all work)
- Unsweetened Shredded Coconut: 1 cup, plus an additional ½ cup for rolling
- Creamy Nut Butter: ¾ cup (Almond, peanut, or cashew butter are excellent choices)
- Pure Maple Syrup: ⅓ cup (or substitute with honey or agave nectar)
- Unsweetened Cocoa Powder: 3 tablespoons (for a deep, rich chocolate flavor)
- Chia Seeds: 2 tablespoons (for added fiber, omega-3s, and binding power)
- Vanilla Extract: 1 teaspoon
- Pinch of Sea Salt: ¼ teaspoon (to enhance all the flavors)
- Milk or Water: 1 to 3 tablespoons (as needed, to adjust consistency)
Instructions
- Combine Dry Ingredients: In a large mixing bowl, add the rolled oats, chocolate protein powder, 1 cup of the unsweetened shredded coconut, the unsweetened cocoa powder, chia seeds, and the pinch of sea salt. Whisk everything together until it’s thoroughly combined and uniform in color. This step ensures that every bite has a perfect balance of flavor.
- Add Wet Ingredients: To the bowl of dry ingredients, add the creamy nut butter, pure maple syrup, and vanilla extract.
- Mix Thoroughly: Using a sturdy spatula or a wooden spoon, begin to mix all the ingredients together. It will be very thick and may seem a bit dry at first. Keep mixing, pressing the mixture against the side of the bowl to fully incorporate everything. Your goal is a thick, sticky “dough” that holds together when pressed.
- Adjust Consistency: Check the texture of your mixture. If it seems too dry and crumbly to hold a shape, add 1 tablespoon of milk (or water) and mix again. Continue to add liquid, 1 tablespoon at a time, until the dough is sticky enough to be easily rolled into balls. Be careful not to add too much liquid, or it will become too sticky. The type of protein powder and nut butter you use can affect the required moisture.
- Chill the Dough (Optional but Recommended): For easier rolling and less mess, cover the bowl with plastic wrap and place it in the refrigerator for 20-30 minutes. This allows the oats and chia seeds to absorb some of the moisture and firms up the mixture, making it less sticky to the touch.
- Roll the Balls: Place the remaining ½ cup of shredded coconut in a shallow dish or on a plate. Use a small cookie scoop (about 1 tablespoon in size) or a regular spoon to portion out the dough. Roll each portion firmly between your palms to create a smooth, compact ball.
- Coat in Coconut: Immediately after rolling each ball, roll it in the dish of shredded coconut until it’s evenly coated on all sides. The coconut coating not only adds a beautiful finish but also a great texture and prevents the balls from sticking together.
- Set and Store: Place the finished protein balls on a baking sheet lined with parchment paper. Once all the balls are rolled and coated, you can enjoy them right away, but for the best texture, place the baking sheet in the refrigerator for at least 30 minutes to allow them to firm up completely. Transfer them to an airtight container for storage.
Nutrition
- Serving Size: One Normal Portion
- Calories: 125-140