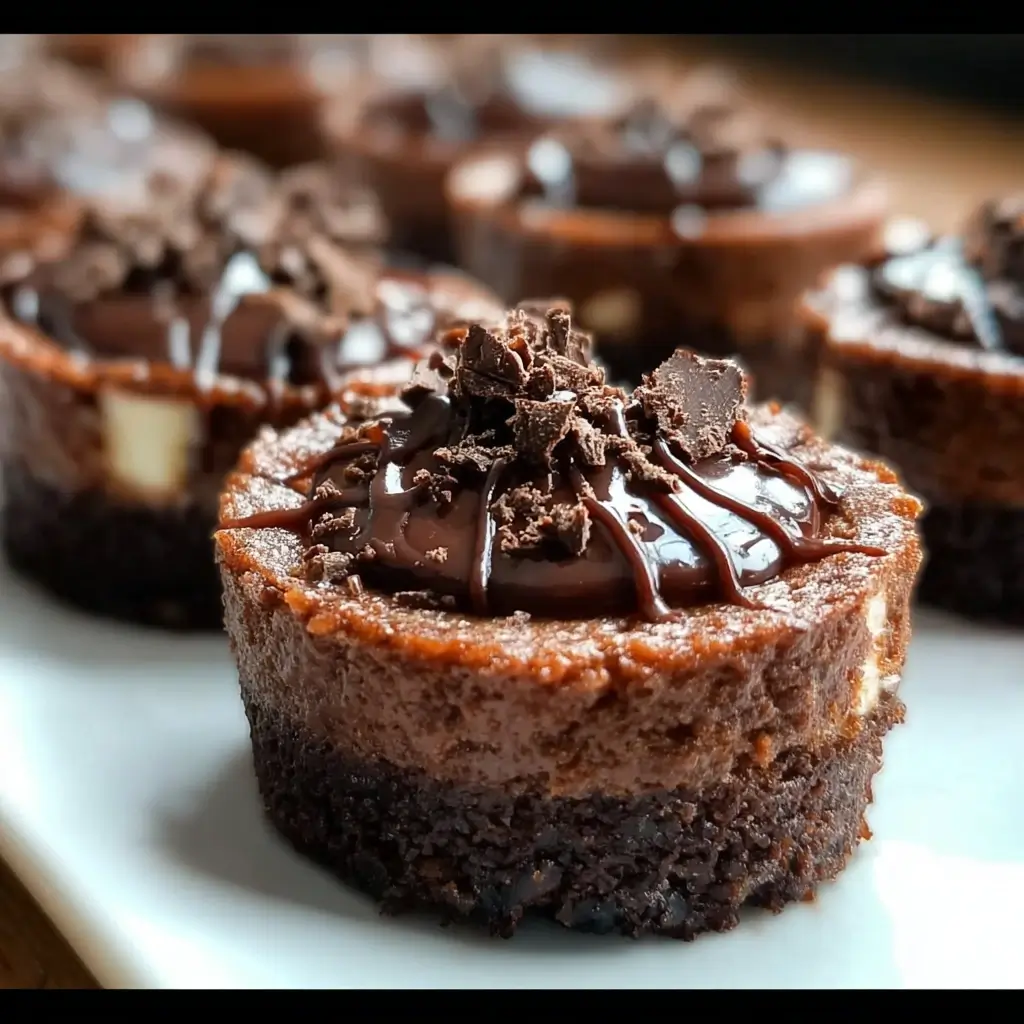
It started as a simple request from my daughter for her birthday: “Can we have chocolate and cheesecake? Together?” My mind immediately went to a classic, towering New York-style cheesecake with a chocolate swirl, but then a better idea sparked. What if we miniaturized the decadence? What if we created a dessert that was personal, portable, and packed every bit of that rich flavor into a single, perfect portion? That was the genesis of these Chocolate Cheesecake Cupcakes. The first time I pulled a tray of these from the oven, the deep, dark aroma of chocolate filled the entire house, a delicious promise of what was to come. After they chilled to perfection and I added the final, glossy layer of ganache, I presented the first one to the birthday girl. Her eyes widened, and after the first bite, a slow, satisfied smile spread across her face. “This is better than a cake,” she declared. And she was right. These aren’t just cupcakes; they are an experience. They boast a trifecta of textures: a crisp, buttery chocolate cookie crust, a dense yet velvety smooth chocolate cheesecake filling that melts in your mouth, and a silky, rich ganache topping that drapes over it all like a luxurious blanket. They have become our family’s go-to dessert for celebrations, potlucks, and those moments when only a truly show-stopping treat will do. Every single time I make them, they vanish from the platter, leaving behind only happy sighs and a few stray crumbs. This recipe is more than just a set of instructions; it’s a guaranteed way to bring a little bit of magic to your table.
The Ultimate Chocolate Cheesecake Cupcakes Recipe
This recipe has been tested and perfected to ensure a flawless result every time. The key is using high-quality ingredients and paying close attention to the temperatures and mixing techniques. Follow these steps, and you’ll be rewarded with the most decadent, professional-looking cupcakes you’ve ever made.
Ingredients for the Perfect Bite
Success in baking begins with the right ingredients. Here’s a detailed breakdown of what you’ll need for each glorious layer.
For the Chocolate Cookie Crust
- 1 ½ cups (about 150g) chocolate cookie crumbs: Oreo cookies (filling removed for a crisper crust, or left in for a sweeter one) or chocolate wafers work perfectly.
- 6 tablespoons (85g) unsalted butter, melted: This is the glue that holds your crust together.
For the Rich Chocolate Cheesecake Filling
- 16 ounces (452g) full-fat block cream cheese, softened to room temperature: This is non-negotiable. Full-fat block cream cheese provides the necessary structure and rich flavor. Do not use whipped or low-fat varieties.
- ¾ cup (150g) granulated sugar: Provides sweetness and helps create a smooth texture.
- ¼ cup (50g) packed light brown sugar: Adds a hint of moisture and a subtle caramel note.
- 2 large eggs, at room temperature: Room temperature eggs incorporate more easily, preventing over-mixing and reducing the risk of cracks.
- ½ cup (120ml) full-fat sour cream, at room temperature: Adds a wonderful tanginess and contributes to the ultra-creamy, velvety texture.
- 1 teaspoon pure vanilla extract: Enhances all the other flavors.
- Pinch of salt: Balances the sweetness and deepens the chocolate flavor.
- 6 ounces (170g) high-quality semi-sweet or bittersweet chocolate, melted and cooled slightly: The star of the show. Use a good quality chocolate bar (like Ghirardelli or Baker’s) for the best flavor, not chocolate chips, which contain stabilizers that can affect the texture.
For the Silky Chocolate Ganache Topping
- 6 ounces (170g) high-quality semi-sweet chocolate, finely chopped: Again, quality matters. Finely chopping it ensures it melts evenly and quickly.
- ¾ cup (180ml) heavy whipping cream: The high fat content is essential for a rich, stable, and glossy ganache.
Step-by-Step Instructions for Flawless Cupcakes
Follow this detailed guide for a foolproof baking process. The most important virtues here are patience and attention to temperature.
Part 1: Preparation and the Crust
- Preheat and Prep: Preheat your oven to 325°F (163°C). Line a standard 12-cup muffin tin with paper or foil liners. This recipe makes about 14-16 cupcakes, so you may need a second tin or to bake in two batches.
- Make the Cookie Crumbs: If you’re not using pre-made crumbs, place about 15-18 Oreo cookies in a food processor and pulse until you have fine crumbs. Alternatively, place them in a zip-top bag and crush them with a rolling pin.
- Combine Crust Ingredients: In a small bowl, combine the chocolate cookie crumbs and the melted unsalted butter. Mix with a fork until all the crumbs are evenly moistened and the mixture resembles wet sand.
- Form the Crusts: Spoon approximately 1 to 1 ½ tablespoons of the crumb mixture into the bottom of each cupcake liner. Use the bottom of a small glass, a spice jar, or your fingers to press the crumbs down into an even, compact layer.
- Pre-Bake the Crust: Bake the crusts for 5-7 minutes. This step helps the crust set and stay crisp. Remove from the oven and set the pan aside to cool while you prepare the filling.
Part 2: The Chocolate Cheesecake Filling
- Melt the Chocolate: Break your high-quality chocolate bar into pieces. Melt it using either a double boiler or in the microwave. For the microwave, heat in 20-second intervals, stirring well between each, until smooth. Set aside to cool slightly. You want it to be fluid but not hot, as hot chocolate can scramble the eggs.
- Beat the Cream Cheese: In a large bowl using a stand mixer with the paddle attachment or a handheld electric mixer, beat the softened cream cheese on medium-low speed for about 2-3 minutes until completely smooth and creamy. Scrape down the sides and bottom of the bowl frequently to ensure there are no lumps. This is the most critical step for a silky-smooth cheesecake.
- Add Sugars and Flavorings: Add the granulated sugar and light brown sugar to the cream cheese. Beat on low speed until just combined. Scrape the bowl again. Add the sour cream, vanilla extract, and salt, and mix on low speed until smooth.
- Incorporate the Eggs: Add the room temperature eggs one at a time, mixing on low speed after each addition only until the yellow yolk disappears. Do NOT overmix once the eggs are in; this incorporates too much air and is the primary cause of cheesecake cracking and puffing up too much.
- Fold in the Chocolate: Pour the slightly cooled, melted chocolate into the batter. Using a rubber spatula, gently fold the chocolate into the cheesecake batter until it is evenly combined and there are no white streaks remaining. The batter should be thick, glossy, and uniform in color.
Part 3: Baking and Chilling
- Fill the Liners: Evenly divide the cheesecake batter among the prepared cupcake liners, filling each one almost to the top. The batter will not rise significantly.
- Bake: Place the muffin tin in the preheated oven. Bake for 18-22 minutes. The cheesecakes are done when the edges are set, but the centers still have a slight wobble (not liquid, but like Jell-O). They will continue to set as they cool. Do not overbake, as this will lead to a dry texture and cracks.
- Cool Gradually: Turn off the oven, crack the oven door open, and let the cheesecakes cool in the oven for 1 hour. This gradual cooling process is another key defense against cracking.
- Cool to Room Temperature: Remove the pan from the oven and let it cool on a wire rack until it reaches room temperature, about another hour.
- Chill Thoroughly: Once at room temperature, cover the pan with plastic wrap and transfer it to the refrigerator. Chill for at least 4 hours, but preferably overnight. This chilling period is essential for the cheesecake to fully set and for the flavors to meld and deepen. Do not skip this step!
Part 4: The Ganache and Final Assembly
- Prepare the Ganache: Once the cheesecakes are fully chilled, make the ganache. Place the finely chopped chocolate in a medium heat-proof bowl.
- Heat the Cream: Heat the heavy cream in a small saucepan over medium heat until it just begins to simmer around the edges. Do not let it come to a rolling boil.
- Combine and Rest: Immediately pour the hot cream over the chopped chocolate. Do not stir. Let the mixture sit undisturbed for 5 minutes. This allows the heat from the cream to gently melt the chocolate.
- Stir until Silky: After 5 minutes, begin stirring from the center of the bowl, working your way outwards in small circles. Continue to stir gently until the ganache is completely smooth, glossy, and emulsified.
- Top the Cupcakes: Let the ganache cool for about 10-15 minutes, stirring occasionally, until it is slightly thickened but still pourable. Carefully remove the chilled cheesecakes from the muffin tin. Spoon about a tablespoon of the ganache onto the center of each cupcake, using the back of the spoon to gently spread it to the edges.
- Final Set: Place the ganache-topped cupcakes back in the refrigerator for at least 30 minutes to allow the ganache to set firmly.
Nutrition at a Glance
- Servings: 16 cupcakes
- Calories per serving: Approximately 380-420 kcal
Disclaimer: The nutritional information provided is an estimate and will vary based on the specific ingredients and brands used.
Time Commitment: From Prep to Perfection
Properly planning your time is key to a stress-free baking experience.
- Active Preparation Time: 30 minutes
- Baking & Cooling Time: 1 hour 20 minutes (20 min bake + 1 hour in oven)
- Chilling Time: 5+ hours (1 hour room temp + 4+ hours in fridge)
- Total Time: Approximately 6 hours 50 minutes (most of which is hands-off chilling time)
How to Serve Your Chocolate Cheesecake Cupcakes
These cupcakes are stunning on their own, but a little extra flair can elevate them for any occasion.
- The Classic: Serve them chilled, straight from the refrigerator, for the perfect firm texture and intense flavor.
- With a Garnish:
- Top with a fresh raspberry or a sliced strawberry for a pop of color and a touch of tartness to cut through the richness.
- Add a dollop of fresh, lightly sweetened whipped cream.
- Sprinkle with chocolate shavings or mini chocolate chips just before the ganache sets.
- Place a single, perfect chocolate-covered espresso bean in the center for an elegant look.
- For a Party Platter: Arrange them on a multi-tiered dessert stand to create a beautiful and tempting centerpiece.
- Perfect Pairings:
- Coffee: A hot cup of black coffee or a latte beautifully complements the deep chocolate notes.
- Milk: A cold glass of milk is a classic and comforting pairing.
- Wine: A late-harvest Zinfandel or a Ruby Port can stand up to the richness of the dessert.
Pro Tips for Cheesecake Cupcake Mastery
- Room Temperature is Non-Negotiable: This is the golden rule of cheesecake. Softened cream cheese ensures a lump-free batter. Room temperature eggs and sour cream incorporate seamlessly without requiring over-mixing, which protects the delicate texture. Set your ingredients out on the counter 1-2 hours before you begin.
- Scrape, Scrape, and Scrape Again: Use a flexible rubber spatula to scrape the bottom and sides of your mixing bowl after every single addition. Pockets of unmixed cream cheese or sugar are the enemy of a velvety smooth cheesecake.
- The “Gentle Heat” Water Bath Trick: While a full water bath isn’t necessary for cupcakes, creating a humid environment in the oven is a great pro-trick. Place a baking pan (like a 9×13 inch pan) filled with an inch of hot water on the rack below your muffin tin. This steam helps the cheesecakes bake more evenly and provides extra insurance against cracks.
- Don’t Overbake! The Wobble is Your Friend: The biggest mistake bakers make is baking cheesecake until it’s completely firm in the center. This results in a dry, crumbly texture. The cupcakes should be set around the edges but still have a distinct jiggle in the middle when you gently shake the pan. They have residual heat and will finish setting up as they cool.
- Patience in Chilling is Paramount: The long, slow chill is not just about getting the cupcakes cold. It’s a crucial chemical process. During this time, the cheesecake firms up to the perfect sliceable (or bite-able) consistency, and the flavors meld, deepen, and mature. A rushed chill will result in a soft, less flavorful cheesecake. Overnight is always best.
Frequently Asked Questions (FAQ)
Q1: Why did my chocolate cheesecake cupcakes crack on top?
A: Cracking is almost always caused by one of three things: over-mixing the batter (especially after adding the eggs), baking at too high a temperature, or cooling them too quickly. To prevent this, mix on low speed, ensure your oven is calibrated to the correct temperature, and follow the gradual cooling instructions (cooling in the turned-off oven, then at room temperature) precisely.
Q2: Can I freeze these chocolate cheesecake cupcakes?
A: Yes, they freeze beautifully! For best results, freeze them before adding the ganache topping. Place the fully chilled cheesecakes on a baking sheet and freeze until solid, about 1-2 hours. Then, wrap each cupcake individually in plastic wrap and place them in a freezer-safe bag or container. They can be frozen for up to 2 months. To serve, thaw them in the refrigerator overnight, then prepare and add the fresh ganache before serving.
Q3: Can I use a different type of cookie for the crust?
A: Absolutely! While chocolate cookies provide the classic “death by chocolate” experience, you can easily substitute them. A graham cracker crust is a classic choice that pairs well with chocolate. For a different flavor profile, try a crust made from Biscoff cookies or even finely crushed pretzels for a sweet and salty kick. Simply substitute the same amount (1 ½ cups of crumbs).
Q4: I don’t have sour cream. Is there a substitute?
A: Yes, in a pinch, you can substitute the sour cream with an equal amount of full-fat plain Greek yogurt. It provides a similar tang and creaminess. Ensure the Greek yogurt is also at room temperature before you add it to the batter to maintain the smooth consistency.
Q5: How can I tell if my cheesecake cupcakes are done baking without a doubt?
A: The visual cue of a set edge and a wobbly center is the best method. An instant-read thermometer is another foolproof way to check. The internal temperature of a perfectly baked cheesecake should be between 145°F and 150°F (63°C to 65°C). Be careful not to over-probe and create holes. Test one cupcake in the center of the pan for an accurate reading.
Chocolate Cheesecake Cupcakes Recipe
Ingredients
For the Chocolate Cookie Crust
- 1 ½ cups (about 150g) chocolate cookie crumbs: Oreo cookies (filling removed for a crisper crust, or left in for a sweeter one) or chocolate wafers work perfectly.
- 6 tablespoons (85g) unsalted butter, melted: This is the glue that holds your crust together.
For the Rich Chocolate Cheesecake Filling
- 16 ounces (452g) full-fat block cream cheese, softened to room temperature: This is non-negotiable. Full-fat block cream cheese provides the necessary structure and rich flavor. Do not use whipped or low-fat varieties.
- ¾ cup (150g) granulated sugar: Provides sweetness and helps create a smooth texture.
- ¼ cup (50g) packed light brown sugar: Adds a hint of moisture and a subtle caramel note.
- 2 large eggs, at room temperature: Room temperature eggs incorporate more easily, preventing over-mixing and reducing the risk of cracks.
- ½ cup (120ml) full-fat sour cream, at room temperature: Adds a wonderful tanginess and contributes to the ultra-creamy, velvety texture.
- 1 teaspoon pure vanilla extract: Enhances all the other flavors.
- Pinch of salt: Balances the sweetness and deepens the chocolate flavor.
- 6 ounces (170g) high-quality semi-sweet or bittersweet chocolate, melted and cooled slightly: The star of the show. Use a good quality chocolate bar (like Ghirardelli or Baker’s) for the best flavor, not chocolate chips, which contain stabilizers that can affect the texture.
For the Silky Chocolate Ganache Topping
- 6 ounces (170g) high-quality semi-sweet chocolate, finely chopped: Again, quality matters. Finely chopping it ensures it melts evenly and quickly.
- ¾ cup (180ml) heavy whipping cream: The high fat content is essential for a rich, stable, and glossy ganache.
Instructions
Part 1: Preparation and the Crust
- Preheat and Prep: Preheat your oven to 325°F (163°C). Line a standard 12-cup muffin tin with paper or foil liners. This recipe makes about 14-16 cupcakes, so you may need a second tin or to bake in two batches.
- Make the Cookie Crumbs: If you’re not using pre-made crumbs, place about 15-18 Oreo cookies in a food processor and pulse until you have fine crumbs. Alternatively, place them in a zip-top bag and crush them with a rolling pin.
- Combine Crust Ingredients: In a small bowl, combine the chocolate cookie crumbs and the melted unsalted butter. Mix with a fork until all the crumbs are evenly moistened and the mixture resembles wet sand.
- Form the Crusts: Spoon approximately 1 to 1 ½ tablespoons of the crumb mixture into the bottom of each cupcake liner. Use the bottom of a small glass, a spice jar, or your fingers to press the crumbs down into an even, compact layer.
- Pre-Bake the Crust: Bake the crusts for 5-7 minutes. This step helps the crust set and stay crisp. Remove from the oven and set the pan aside to cool while you prepare the filling.
Part 2: The Chocolate Cheesecake Filling
- Melt the Chocolate: Break your high-quality chocolate bar into pieces. Melt it using either a double boiler or in the microwave. For the microwave, heat in 20-second intervals, stirring well between each, until smooth. Set aside to cool slightly. You want it to be fluid but not hot, as hot chocolate can scramble the eggs.
- Beat the Cream Cheese: In a large bowl using a stand mixer with the paddle attachment or a handheld electric mixer, beat the softened cream cheese on medium-low speed for about 2-3 minutes until completely smooth and creamy. Scrape down the sides and bottom of the bowl frequently to ensure there are no lumps. This is the most critical step for a silky-smooth cheesecake.
- Add Sugars and Flavorings: Add the granulated sugar and light brown sugar to the cream cheese. Beat on low speed until just combined. Scrape the bowl again. Add the sour cream, vanilla extract, and salt, and mix on low speed until smooth.
- Incorporate the Eggs: Add the room temperature eggs one at a time, mixing on low speed after each addition only until the yellow yolk disappears. Do NOT overmix once the eggs are in; this incorporates too much air and is the primary cause of cheesecake cracking and puffing up too much.
- Fold in the Chocolate: Pour the slightly cooled, melted chocolate into the batter. Using a rubber spatula, gently fold the chocolate into the cheesecake batter until it is evenly combined and there are no white streaks remaining. The batter should be thick, glossy, and uniform in color.
Part 3: Baking and Chilling
- Fill the Liners: Evenly divide the cheesecake batter among the prepared cupcake liners, filling each one almost to the top. The batter will not rise significantly.
- Bake: Place the muffin tin in the preheated oven. Bake for 18-22 minutes. The cheesecakes are done when the edges are set, but the centers still have a slight wobble (not liquid, but like Jell-O). They will continue to set as they cool. Do not overbake, as this will lead to a dry texture and cracks.
- Cool Gradually: Turn off the oven, crack the oven door open, and let the cheesecakes cool in the oven for 1 hour. This gradual cooling process is another key defense against cracking.
- Cool to Room Temperature: Remove the pan from the oven and let it cool on a wire rack until it reaches room temperature, about another hour.
- Chill Thoroughly: Once at room temperature, cover the pan with plastic wrap and transfer it to the refrigerator. Chill for at least 4 hours, but preferably overnight. This chilling period is essential for the cheesecake to fully set and for the flavors to meld and deepen. Do not skip this step!
Part 4: The Ganache and Final Assembly
- Prepare the Ganache: Once the cheesecakes are fully chilled, make the ganache. Place the finely chopped chocolate in a medium heat-proof bowl.
- Heat the Cream: Heat the heavy cream in a small saucepan over medium heat until it just begins to simmer around the edges. Do not let it come to a rolling boil.
- Combine and Rest: Immediately pour the hot cream over the chopped chocolate. Do not stir. Let the mixture sit undisturbed for 5 minutes. This allows the heat from the cream to gently melt the chocolate.
- Stir until Silky: After 5 minutes, begin stirring from the center of the bowl, working your way outwards in small circles. Continue to stir gently until the ganache is completely smooth, glossy, and emulsified.
- Top the Cupcakes: Let the ganache cool for about 10-15 minutes, stirring occasionally, until it is slightly thickened but still pourable. Carefully remove the chilled cheesecakes from the muffin tin. Spoon about a tablespoon of the ganache onto the center of each cupcake, using the back of the spoon to gently spread it to the edges.
- Final Set: Place the ganache-topped cupcakes back in the refrigerator for at least 30 minutes to allow the ganache to set firmly.
Nutrition
- Serving Size: One Normal Portion
- Calories: 380-420


