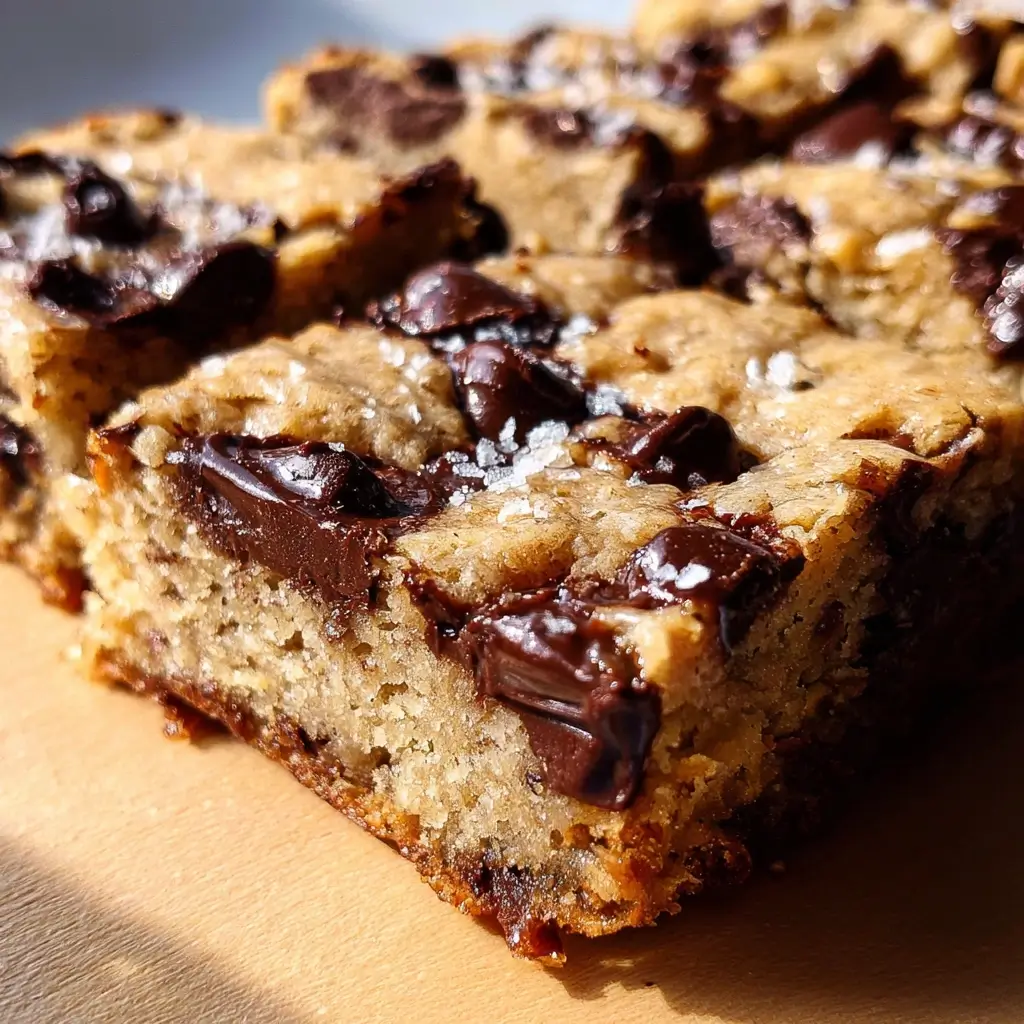
Of all the recipes in my plant-based baking arsenal, this one holds a special place in my heart and my kitchen. For years, I struggled to find a vegan chocolate chip cookie recipe that wasn’t just “good for a vegan cookie,” but was genuinely, undeniably delicious. I wanted something that could stand up to its buttery, egg-filled counterparts and win. I was searching for that perfect balance: a gooey, slightly underbaked center, chewy edges, and deep, rich pockets of melted chocolate. After countless batches—some too cakey, some too crumbly, some that spread into a single, greasy sheet—this recipe for Vegan Chocolate Chip Cookie Bars was born. The first time I made these, my family, a tough crowd with a mix of vegans and non-vegans, fell silent. The silence was broken only by a collective “Mmm.” They were an instant hit. My kids now request them for bake sales, my partner packs them for work lunches, and I make a batch whenever I need a foolproof, crowd-pleasing dessert. These bars are my secret weapon, proving that you don’t need dairy or eggs to create a treat that is pure comfort, decadence, and joy.
The Ultimate Chewy Vegan Chocolate Chip Cookie Bars
Welcome to what I confidently believe is the last vegan chocolate chip cookie bar recipe you will ever need. This recipe is engineered for perfection, focusing on texture and flavor to create a bar that is soft, chewy, and packed with chocolatey goodness. We use simple, accessible ingredients to achieve a result that will impress everyone, regardless of their dietary preferences.
Ingredients
This recipe has been carefully balanced to produce the best texture. For optimal results, I highly recommend using a kitchen scale to weigh your ingredients, especially the flour.
- For the Flax Egg:
- 2 tablespoons ground flaxseed
- 5 tablespoons warm water
- For the Wet Ingredients:
- 1 cup (220g) packed light brown sugar
- 1/2 cup (100g) granulated white sugar
- 1 cup (224g) melted refined coconut oil (or melted vegan butter)
- 2 teaspoons pure vanilla extract
- For the Dry Ingredients:
- 2 ½ cups (300g) all-purpose flour
- 1 teaspoon baking soda
- ½ teaspoon baking powder
- 1 teaspoon fine sea salt
- The Star of the Show:
- 2 cups (340g) vegan chocolate chips or chunks
- Flaky sea salt, for sprinkling on top (optional, but highly recommended)
Step-by-Step Instructions for Perfect Cookie Bars
Follow these instructions carefully to ensure your cookie bars turn out perfectly chewy and delicious every time. The key is in the technique, from creating the flax egg to knowing exactly when to pull the pan from the oven.
Step 1: Prepare Your Pan and Oven
Preheat your oven to 350°F (175°C). Grease a 9×13 inch (23×33 cm) baking pan with a bit of coconut oil or vegan butter. For easy removal and cleanup, line the pan with parchment paper, leaving a 2-inch overhang on the two long sides. This will act as a “sling” to lift the bars out once they’ve cooled. Set the prepared pan aside.
Step 2: Make the Flax Egg
In a small bowl, whisk together the 2 tablespoons of ground flaxseed and 5 tablespoons of warm water. Let the mixture sit for 5-10 minutes to thicken. It should develop a gel-like, viscous consistency, similar to a traditional egg. This is your binder and a crucial component for the chewy texture.
Step 3: Combine the Wet Ingredients
In a large mixing bowl, add the packed light brown sugar and granulated white sugar. Pour the melted (but not hot) refined coconut oil or vegan butter over the sugars. Using an electric mixer or a stand mixer with the paddle attachment, beat on medium speed for about 2 minutes. The mixture should become smooth, glossy, and well-combined. This step of creaming the fat and sugar together incorporates air and begins dissolving the sugar, which is essential for a great final texture. Once creamed, beat in the vanilla extract and the prepared flax egg until everything is fully incorporated.
Step 4: Combine the Dry Ingredients
In a separate medium-sized bowl, whisk together the all-purpose flour, baking soda, baking powder, and fine sea salt. Whisking ensures that the leavening agents and salt are evenly distributed throughout the flour, which prevents any salty or soapy-tasting bites and guarantees an even rise.
Step 5: Create the Cookie Dough
Pour the dry ingredient mixture into the large bowl with the wet ingredients. Mix on low speed or by hand with a spatula until just combined. It’s crucial not to overmix at this stage! Stop mixing as soon as you see the last streaks of flour disappear. Overmixing develops the gluten in the flour, which will result in tough, dense, or cakey bars instead of the soft, chewy texture we’re aiming for.
Step 6: Fold in the Chocolate Chips
Gently fold in the 2 cups of vegan chocolate chips using a spatula. If you’re using chocolate chunks, they will create larger, more luxurious pools of melted chocolate. Be sure to scrape the bottom of the bowl to ensure the chocolate is evenly distributed throughout the dough.
Step 7: Press Dough into the Pan
Transfer the cookie dough into your prepared 9×13 inch baking pan. The dough will be thick and slightly sticky. Use the back of a spatula or your hands (lightly greased if needed) to press the dough into an even layer, making sure it reaches all the corners of the pan. An even surface will ensure the bars bake uniformly.
Step 8: Bake to Perfection
Place the pan in the preheated oven and bake for 25-30 minutes. The bars are done when the edges are golden brown and firm to the touch, and the center is set but still looks slightly soft and underdone. This is the secret to a gooey center. A toothpick inserted into the center should come out with a few moist crumbs attached, but not wet batter. Be careful not to overbake, as they will continue to cook and firm up in the hot pan as they cool.
Step 9: Cool Completely Before Cutting
Remove the pan from the oven and, if using, immediately sprinkle the top with a pinch of flaky sea salt. The salt contrasts beautifully with the sweetness of the bars. Now for the hardest part: you must let the bars cool completely in the pan on a wire rack. This can take at least 2 hours, but it is a non-negotiable step. Cutting into them while they’re still warm will result in a crumbly mess. Patience will be rewarded with perfectly neat, chewy squares.
Step 10: Slice and Serve
Once the bars are completely cool, use the parchment paper “sling” to lift them out of the pan and onto a cutting board. Use a large, sharp knife to cut them into your desired size. This recipe yields 24 medium-sized bars.
Nutrition Facts
Please note that these values are an estimate and can vary based on the specific brands of ingredients used.
- Servings: 24 bars
- Calories per serving: Approximately 230-260 kcal
Preparation Time
- Prep Time: 15 minutes
- Cook Time: 25-30 minutes
- Cooling Time: 2 hours
- Total Time: Approximately 2 hours and 45 minutes
How to Serve Your Vegan Cookie Bars
These bars are incredibly versatile and can be enjoyed in many different ways. Here are a few of my favorite ways to serve them:
- The Classic:
- Enjoy a square at room temperature with a tall glass of your favorite plant-based milk (oat, almond, or soy milk are all fantastic choices).
- Warm and Gooey:
- Gently reheat a bar in the microwave for 10-15 seconds until the chocolate is melty again. This brings back that fresh-from-the-oven experience.
- A La Mode Sensation:
- Serve a slightly warmed bar with a generous scoop of vegan vanilla bean ice cream. The contrast between the warm, chewy bar and the cold, creamy ice cream is pure dessert heaven.
- Dressed to Impress:
- Drizzle the top of the bars (either whole or sliced) with melted vegan chocolate, vegan caramel sauce, or a dusting of powdered sugar for a more elegant presentation.
- For Parties and Gatherings:
- Cut the bars into smaller, bite-sized squares (1-inch by 1-inch) and arrange them on a platter. They are the perfect finger-food dessert for bake sales, potlucks, and parties.
- In a Lunchbox:
- These bars hold their shape well, making them a perfect, nut-free (if you omit any nut mix-ins) treat for school or work lunches.
Additional Tips for Success
Here are five extra tips to help you master this recipe and customize it to your liking.
- Don’t Skimp on the Cooling Time: I cannot stress this enough. The residual heat from the pan continues to cook the bars, setting the center. If you try to lift them or cut them while warm, they will fall apart. For ultra-clean cuts, you can even pop the fully cooled slab of bars into the refrigerator for 30 minutes before slicing.
- The Magic of Mix-Ins: While classic chocolate chips are perfect, feel free to get creative! You can substitute some of the chocolate chips for other vegan-friendly mix-ins. Try adding:
- Nuts: Chopped walnuts or pecans for a crunchy texture.
- Seeds: Sunflower or pumpkin seeds for a nut-free crunch.
- Dried Fruit: Chopped dried cherries or cranberries for a tart contrast.
- Other Chips: Vegan white chocolate, peanut butter, or butterscotch chips.
- Refined vs. Unrefined Coconut Oil: For this recipe, I recommend refined coconut oil. Refined coconut oil has a neutral flavor and smell, allowing the vanilla and chocolate to shine. Unrefined (or virgin) coconut oil will impart a distinct coconut flavor to your bars. If you love coconut, feel free to use it! Alternatively, a high-quality vegan butter will yield a richer, more buttery flavor profile.
- Achieve Your Perfect Texture: This recipe is designed for a chewy bar. However, you can make small adjustments to change the texture:
- For Cakier Bars: Add an extra ¼ teaspoon of baking powder.
- For Gooier, Fudgier Bars: Slightly underbake the bars by 2-3 minutes and use more brown sugar than white sugar (e.g., 1 ¼ cups brown sugar and ¼ cup white sugar).
- The Flaky Salt Finish: Don’t skip the final sprinkle of flaky sea salt (like Maldon sea salt). It might seem like a small detail, but it makes a huge difference. The salt enhances the deep flavor of the chocolate and cuts through the sweetness, creating a perfectly balanced, gourmet-tasting treat.
Frequently Asked Questions (FAQ)
Here are answers to some common questions you might have about making these vegan cookie bars.
1. Can I make these gluten-free?
Yes, you absolutely can! To make this recipe gluten-free, substitute the all-purpose flour with a high-quality, 1-to-1 gluten-free baking flour blend that already contains xanthan gum. Brands like Bob’s Red Mill 1-to-1 or King Arthur Flour Measure for Measure work very well. Do not substitute with a single-ingredient flour like almond or coconut flour, as the texture will be completely different. The rest of the recipe remains the same.
2. My bars came out dry and crumbly. What did I do wrong?
This is usually caused by one of two things: measuring flour incorrectly or overbaking.
- Flour Measurement: The most common baking error is scooping flour directly from the bag with your measuring cup. This compacts the flour, and you can end up with 25% more flour than the recipe calls for, leading to dry results. The best method is to use a kitchen scale. If you don’t have one, use the “spoon and level” method: use a spoon to fluff up the flour in its container, then spoon it into your measuring cup until it’s overflowing. Finally, use the back of a knife to level it off.
- Overbaking: Ovens can vary. Start checking your bars at the 25-minute mark. They should look slightly underdone in the very center when you pull them out. They will firm up as they cool.
3. Can I use a different egg replacer instead of the flax egg?
A flax egg is ideal for this recipe because it provides moisture and binding properties that contribute to a wonderfully chewy texture. However, you can experiment with other replacers. Two good alternatives are:
- Applesauce: ½ cup of unsweetened applesauce can replace the flax egg and some of the oil, but it will result in a slightly cakier, softer bar.
- Mashed Banana: ½ cup of ripe mashed banana also works but will impart a noticeable banana flavor to the bars.
4. Can I make this recipe in a different-sized pan?
Yes, but you will need to adjust the baking time.
- 8×8 inch or 9×9 inch square pan: The bars will be much thicker. You will need to increase the baking time to 35-45 minutes. Check for doneness with a toothpick.
- If you halve the recipe: Use an 8×8 inch pan and bake for 20-25 minutes.
5. How should I store the cookie bars and how long do they last?
These bars have a great shelf life!
- Room Temperature: Store them in an airtight container at room temperature for up to 4-5 days.
- Refrigerator: You can store them in the fridge for up to a week. They will be firmer when chilled, so you may want to let them sit at room temperature for a few minutes before eating.
- Freezer: These bars freeze beautifully. Cut them into squares and place them in a single layer on a baking sheet to flash-freeze for an hour. Then, transfer the frozen bars to a freezer-safe bag or container. They will keep for up to 3 months. Thaw at room temperature or warm gently in the microwave.

Chewy Vegan Chocolate Chip Cookie Bars Recipe
Ingredients
- For the Flax Egg:
- 2 tablespoons ground flaxseed
- 5 tablespoons warm water
- For the Wet Ingredients:
- 1 cup (220g) packed light brown sugar
- 1/2 cup (100g) granulated white sugar
- 1 cup (224g) melted refined coconut oil (or melted vegan butter)
- 2 teaspoons pure vanilla extract
- For the Dry Ingredients:
- 2 ½ cups (300g) all-purpose flour
- 1 teaspoon baking soda
- ½ teaspoon baking powder
- 1 teaspoon fine sea salt
- The Star of the Show:
- 2 cups (340g) vegan chocolate chips or chunks
- Flaky sea salt, for sprinkling on top (optional, but highly recommended)
Instructions
Step 1: Prepare Your Pan and Oven
Preheat your oven to 350°F (175°C). Grease a 9×13 inch (23×33 cm) baking pan with a bit of coconut oil or vegan butter. For easy removal and cleanup, line the pan with parchment paper, leaving a 2-inch overhang on the two long sides. This will act as a “sling” to lift the bars out once they’ve cooled. Set the prepared pan aside.
Step 2: Make the Flax Egg
In a small bowl, whisk together the 2 tablespoons of ground flaxseed and 5 tablespoons of warm water. Let the mixture sit for 5-10 minutes to thicken. It should develop a gel-like, viscous consistency, similar to a traditional egg. This is your binder and a crucial component for the chewy texture.
Step 3: Combine the Wet Ingredients
In a large mixing bowl, add the packed light brown sugar and granulated white sugar. Pour the melted (but not hot) refined coconut oil or vegan butter over the sugars. Using an electric mixer or a stand mixer with the paddle attachment, beat on medium speed for about 2 minutes. The mixture should become smooth, glossy, and well-combined. This step of creaming the fat and sugar together incorporates air and begins dissolving the sugar, which is essential for a great final texture. Once creamed, beat in the vanilla extract and the prepared flax egg until everything is fully incorporated.
Step 4: Combine the Dry Ingredients
In a separate medium-sized bowl, whisk together the all-purpose flour, baking soda, baking powder, and fine sea salt. Whisking ensures that the leavening agents and salt are evenly distributed throughout the flour, which prevents any salty or soapy-tasting bites and guarantees an even rise.
Step 5: Create the Cookie Dough
Pour the dry ingredient mixture into the large bowl with the wet ingredients. Mix on low speed or by hand with a spatula until just combined. It’s crucial not to overmix at this stage! Stop mixing as soon as you see the last streaks of flour disappear. Overmixing develops the gluten in the flour, which will result in tough, dense, or cakey bars instead of the soft, chewy texture we’re aiming for.
Step 6: Fold in the Chocolate Chips
Gently fold in the 2 cups of vegan chocolate chips using a spatula. If you’re using chocolate chunks, they will create larger, more luxurious pools of melted chocolate. Be sure to scrape the bottom of the bowl to ensure the chocolate is evenly distributed throughout the dough.
Step 7: Press Dough into the Pan
Transfer the cookie dough into your prepared 9×13 inch baking pan. The dough will be thick and slightly sticky. Use the back of a spatula or your hands (lightly greased if needed) to press the dough into an even layer, making sure it reaches all the corners of the pan. An even surface will ensure the bars bake uniformly.
Step 8: Bake to Perfection
Place the pan in the preheated oven and bake for 25-30 minutes. The bars are done when the edges are golden brown and firm to the touch, and the center is set but still looks slightly soft and underdone. This is the secret to a gooey center. A toothpick inserted into the center should come out with a few moist crumbs attached, but not wet batter. Be careful not to overbake, as they will continue to cook and firm up in the hot pan as they cool.
Step 9: Cool Completely Before Cutting
Remove the pan from the oven and, if using, immediately sprinkle the top with a pinch of flaky sea salt. The salt contrasts beautifully with the sweetness of the bars. Now for the hardest part: you must let the bars cool completely in the pan on a wire rack. This can take at least 2 hours, but it is a non-negotiable step. Cutting into them while they’re still warm will result in a crumbly mess. Patience will be rewarded with perfectly neat, chewy squares.
Step 10: Slice and Serve
Once the bars are completely cool, use the parchment paper “sling” to lift them out of the pan and onto a cutting board. Use a large, sharp knife to cut them into your desired size. This recipe yields 24 medium-sized bars.
Nutrition
- Serving Size: One Normal Portion
- Calories: 230-260


