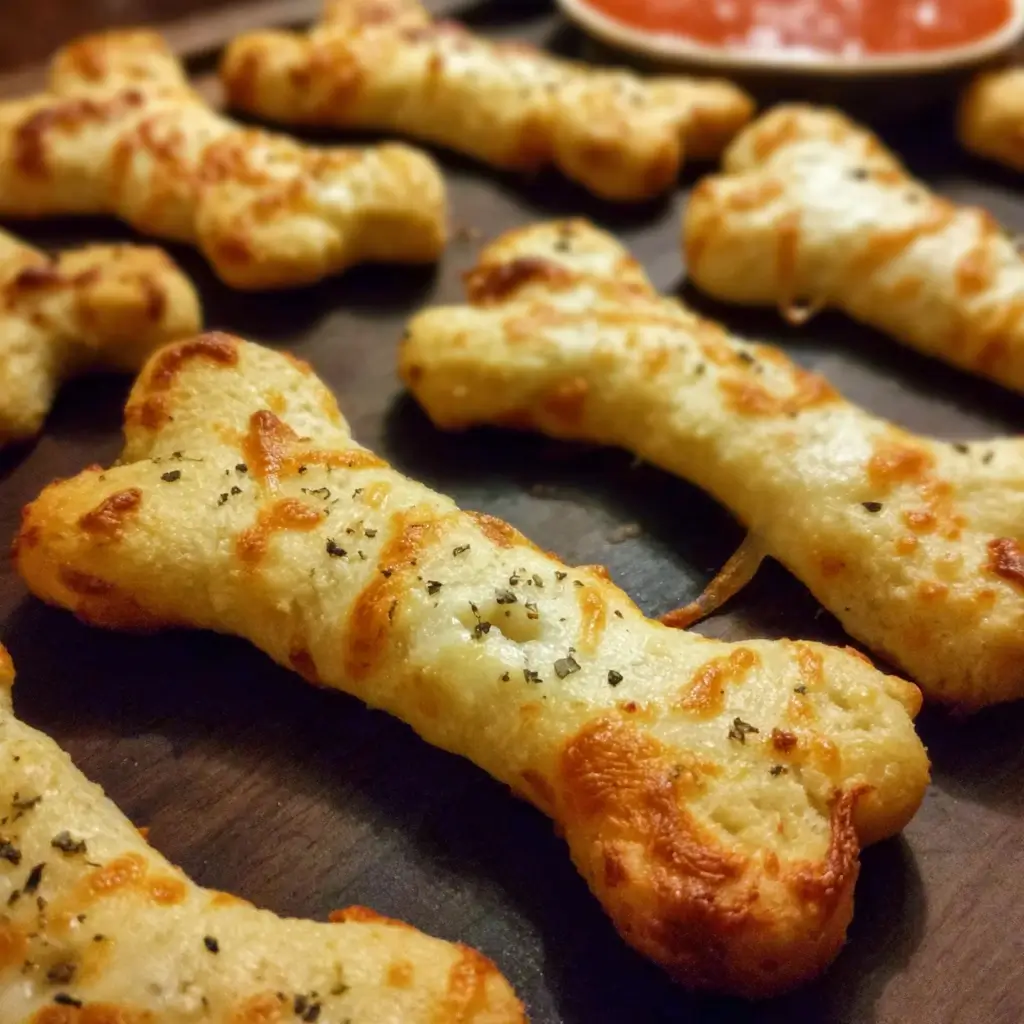
Of all the traditions our family has cultivated over the years, our annual Halloween feast is by far my favorite. It’s a night where ghoulish creativity takes over the kitchen, and every dish is part of the spooky spectacle. For years, I searched for that perfect centerpiece appetizer—something easy enough for a hectic Halloween night, delicious enough to disappear in minutes, and visually stunning enough to elicit gasps of delight from kids and adults alike. Then, I stumbled upon the idea for these Cheesy Halloween Breadstick Bones. The first time I made them, I knew I had found a permanent resident on our Halloween menu. The smell of baking bread, garlic, and melting cheese filled the house, mingling with the crisp autumn air. When I pulled the tray of golden-brown, knobby-ended “bones” from the oven, my kids’ eyes went wide. They weren’t just breadsticks; they were a prop, a story, a piece of the Halloween magic. Watching them gleefully snap the bones in half, revealing a satisfyingly stringy cheese pull, and dunking them into a bowl of “blood” (marinara sauce, of course) was pure joy. They are now the most requested item for any October gathering, from class parties to our big Halloween night bash. This recipe is more than just food; it’s an interactive, delicious experience that brings everyone together.
Complete Recipe: Cheesy Halloween Breadstick Bones
This recipe is designed for simplicity and maximum festive impact. Using store-bought refrigerated pizza dough is the ultimate time-saving hack, but the results taste wonderfully homemade. The combination of salty Parmesan and gooey, stretchy mozzarella creates a flavor and texture that is simply irresistible.
Yields: 16 breadstick bones
Prep time: 20 minutes
Cook time: 12-15 minutes
Ingredients
- For the Breadstick Bones:
- 1 (13.8-ounce) can of refrigerated pizza dough (the kind that comes in a tube)
- 3 tablespoons unsalted butter, melted
- 2 cloves garlic, minced (or 1 teaspoon garlic powder)
- 1 cup shredded low-moisture mozzarella cheese
- 1/4 cup grated Parmesan cheese, plus extra for sprinkling
- 1/2 teaspoon dried Italian seasoning (optional)
- 1/4 teaspoon salt
- 1/4 teaspoon black pepper
- For the Finishing Touch & Garnish:
- 1 tablespoon unsalted butter, melted
- 1/2 teaspoon garlic powder
- 1 tablespoon finely chopped fresh parsley (optional, for color)
- Flaky sea salt for sprinkling
- For Serving:
- 1 1/2 cups of your favorite marinara sauce, warmed, for dipping
Instructions
Follow these step-by-step instructions carefully to create perfectly shaped and delicious breadstick bones that will be the star of your Halloween spread.
Step 1: Prepare Your Workstation and Oven
First things first, preheat your oven to 400°F (200°C). This ensures the oven is at the perfect, consistent temperature to bake the breadsticks quickly and evenly, giving them a beautiful golden-brown crust. Line a large baking sheet with parchment paper. This is a crucial step that prevents the cheesy breadsticks from sticking to the pan and makes cleanup an absolute breeze. Set the prepared baking sheet aside.
Step 2: Prepare the Garlic Butter and Cheese Filling
In a small bowl, combine the 3 tablespoons of melted butter with the minced garlic (or garlic powder). Stir well until the garlic is evenly distributed. This fragrant garlic butter will be the flavor base for our bones. In a separate, slightly larger bowl, toss together the shredded mozzarella cheese, the 1/4 cup of grated Parmesan cheese, the optional Italian seasoning, salt, and pepper. Mixing the cheeses and seasonings beforehand ensures every bite is packed with flavor.
Step 3: Roll Out and Prepare the Dough
Unroll the refrigerated pizza dough onto a lightly floured surface or directly onto a piece of parchment paper to prevent sticking. Gently stretch and press the dough with your hands or use a rolling pin to form an even rectangle, approximately 12×8 inches in size. It doesn’t have to be perfect, but a uniform thickness will help the breadsticks bake evenly.
Step 4: Fill and Fold the Dough
Brush the prepared garlic butter evenly over the entire surface of the pizza dough rectangle, leaving a small 1/4-inch border around the edges. Now, sprinkle the cheese and seasoning mixture evenly over one half (the long side) of the dough. Carefully fold the other, non-cheesy half of the dough over the top of the cheese-covered half. Gently press down on the dough to seal the edges and to help the cheese mixture adhere to the dough. You should now have a long, folded rectangle, approximately 12×4 inches.
Step 5: Cut the Strips
Using a pizza cutter or a very sharp knife, cut the folded dough rectangle into 16 long, thin strips, each about 3/4-inch wide. The pizza cutter is highly recommended as it glides through the dough without pulling or tearing it.
Step 6: Shape the Bones
This is the fun and creative part! Take one strip of dough at a time. Gently stretch it to be about 6-7 inches long. To create the classic bone shape, tie a loose knot at each end of the strip. Don’t pull the knots too tight, as they need room to expand while baking. Once the knots are tied, use your sharp knife or a pair of kitchen shears to make two small snips into the end of each knot. This will create the “knuckles” of the bone. Gently flare out these snipped pieces with your fingers to further define the bone shape.
Step 7: Arrange and Bake
Carefully place each shaped breadstick bone onto the parchment-lined baking sheet, ensuring you leave at least an inch of space between them to allow for expansion. Once all the bones are on the sheet, place it in the preheated oven. Bake for 12 to 15 minutes, or until the breadsticks are puffed up and a deep golden brown on top and the cheese is bubbly. Keep a close eye on them during the last few minutes, as they can go from golden to burnt quite quickly.
Step 8: The Finishing Touch
While the breadsticks are baking, prepare the finishing butter. In a small bowl, mix the remaining 1 tablespoon of melted butter with the 1/2 teaspoon of garlic powder. As soon as you pull the breadstick bones from the oven, immediately brush them with this garlic butter mixture. This adds an extra layer of savory flavor and gives them a beautiful, appetizing sheen. For a final flourish, sprinkle them with a little extra grated Parmesan cheese, some fresh parsley for a pop of color, and a pinch of flaky sea salt.
Step 9: Serve Immediately
These Cheesy Halloween Breadstick Bones are at their absolute best when served warm and fresh from the oven. Arrange them on a platter alongside a bowl of warmed marinara sauce for dipping and watch them vanish.
Nutrition Facts
- Servings: 16 breadstick bones
- Calories per serving (1 bone): Approximately 115 calories
Disclaimer: The nutritional information provided is an estimate and can vary based on the specific brands of ingredients used.
Preparation Time
- Active Preparation Time: 20 minutes
- Baking Time: 12-15 minutes
- Total Time: Approximately 35 minutes
How to Serve Your Spooky Breadstick Bones
Presentation is everything when it comes to Halloween treats! Turning these delicious breadsticks into a memorable part of your party experience is easy with a little creativity. Here’s how to serve them for maximum spooky effect.
Dipping Sauces of Doom
The dipping sauce is as much a part of the fun as the bones themselves. Serve them with a variety of “potions” and “concoctions” to delight your guests.
- Classic “Blood Bath” Marinara: This is the go-to. Use a high-quality, rich marinara sauce. Serve it warm in a small, dark-colored bowl or a mini cauldron for a sinister look.
- “Witch’s Brew” Pesto: A vibrant green pesto dip adds a fantastic color contrast and a delicious, herby flavor. You can call it “Swamp Slime” or “Witch’s Potion” for the kids.
- “Ghostly” Garlic Alfredo: A creamy, white Alfredo or garlic cream cheese dip is a wonderfully rich and ghoulish option. It looks like a ghostly ooze and pairs beautifully with the garlic and cheese in the breadsticks.
- “Bubbling Cauldron” Queso: A warm, spicy queso dip with a bit of orange cheddar cheese can look like a bubbling cauldron, especially if you top it with some chopped cilantro and jalapeños.
Creating a Graveyard Platter
Don’t just place them on a plate—create a scene!
- The Base: Use a dark-colored platter, a rustic wooden board, or a slate serving tray to represent the graveyard grounds.
- The “Dirt”: Crumble dark rye or pumpernickel bread and scatter it around the platter to look like freshly dug earth. You can also use crushed dark crackers or even crumbled chocolate cookies if you’re mixing sweet and savory.
- Arrange the Bones: Pile the breadstick bones in the center of the platter like an ancient bone pile, or arrange them haphazardly as if they are emerging from the “dirt.”
- Garnish with Ghouls: Add some fun, non-edible props like plastic spiders, small skeleton hands, or a fake crow perched on the edge of the platter to complete the spooky tableau.
Incorporate into a Halloween “Snack-uterie” Board
Make the breadstick bones the star of a larger Halloween-themed snack board. This is perfect for a party where guests can graze.
- Meats: Add “mummy” sausages (sausages wrapped in strips of puff pastry) and salami or prosciutto folded into rose shapes.
- Cheeses: Use a block of white cheddar with a small knife stuck in it for a “stabbed” effect. Slice orange cheddar with mini Halloween cookie cutters. A small wheel of brie with red jam (like raspberry or cherry) drizzled over the top can look delightfully bloody.
- Fruits and Veggies: Use “pumpkin” clementines (a small piece of celery stick in the top), black grapes, blackberries, and carrot sticks with a “Witch’s Dip” (hummus with green food coloring or a spinach dip).
- The Centerpiece: Place your bowl of marinara dip in the center and arrange the breadstick bones artfully around it.
Additional Tips for Perfect Breadstick Bones
Here are five extra tips to ensure your recipe is a flawless success and to allow for easy customization.
1. The Cheese Matters Most: For the best “cheese pull” effect that everyone loves, you must use low-moisture, part-skim mozzarella. Fresh mozzarella contains too much water and will make the dough soggy. The Parmesan adds a sharp, nutty, salty flavor that complements the mild mozzarella perfectly. Don’t be afraid to try other hard, flavorful cheeses like Asiago or Pecorino Romano in the mix.
2. Dough Diversification: While refrigerated pizza dough is the easiest option, it’s not the only one. If you can’t find it, a can of refrigerated breadstick dough or even crescent roll dough will work in a pinch (though the texture will be flakier). For a truly superior, artisan-style breadstick, consider making your own simple pizza dough. A basic recipe of flour, water, yeast, salt, and a little olive oil will elevate these from a fun snack to a gourmet appetizer.
3. Make-Ahead Magic for a Stress-Free Halloween: Halloween can be a chaotic day. You can fully prepare these breadstick bones ahead of time to save yourself stress. Follow the recipe up to Step 6 (shaping the bones). Arrange the unbaked bones on your parchment-lined baking sheet, cover them tightly with plastic wrap, and refrigerate for up to 24 hours. When you’re ready to serve, simply remove them from the fridge, let them sit at room temperature for about 15-20 minutes while the oven preheats, and then bake as directed. You may need to add 1-2 minutes to the baking time.
4. Amp Up the Flavor Profile: Garlic and cheese are a classic combination, but you can easily introduce other flavors. Consider adding a pinch of red pepper flakes to the cheese mixture for a spicy kick. A sprinkle of Everything Bagel Seasoning on top before baking adds a wonderful savory crunch. You can also incorporate finely chopped herbs like rosemary or thyme into the garlic butter for a more complex, aromatic flavor.
5. Perfecting the Bone Shape: The key to a realistic bone shape is in the details. When you tie the knots at the ends, make sure they are distinct but not overly tight. The dough needs room to rise and puff up. When you make the snips for the “knuckles,” don’t cut too deeply, just enough to create a small flap you can flare outwards. If your dough is too elastic and keeps springing back, let it rest for 5-10 minutes on the counter. This allows the gluten to relax, making the dough much easier to stretch and shape.
Frequently Asked Questions (FAQ)
Here are answers to some common questions you might have about making these Cheesy Halloween Breadstick Bones.
1. Can I make these breadstick bones gluten-free?
Yes, you absolutely can! The easiest way is to purchase a high-quality gluten-free refrigerated pizza dough, which is now available in many supermarkets. Prepare the recipe exactly as written. Be aware that gluten-free doughs can sometimes be a bit more delicate or stickier to work with, so be sure to use a well-floured surface (with your gluten-free flour blend) and handle the strips gently. The final texture might be slightly denser than the traditional version, but they will still be incredibly delicious and festive.
2. How do I store and reheat leftovers?
In the unlikely event that you have leftovers, they can be stored easily. Allow the breadstick bones to cool completely to room temperature. Place them in an airtight container or a zip-top bag. They can be stored in the refrigerator for up to 3 days. To reheat and bring them back to their cheesy, delicious glory, place them on a baking sheet in a 350°F (175°C) oven or a toaster oven for 5-7 minutes, or until warmed through and the cheese is re-melted. Avoid reheating them in the microwave, as it will make the bread tough and soggy.
3. Can I freeze the breadstick bones for later?
Yes, this recipe is very freezer-friendly. You have two options.
- Freeze Unbaked: Prepare the bones up to the point of baking. Place them on a parchment-lined baking sheet in a single layer and “flash freeze” them for about 1 hour, or until solid. Then, transfer the frozen, unbaked bones to a freezer-safe bag or container. They can be stored for up to 2 months. To bake, place them directly from the freezer onto a parchment-lined sheet and bake at 400°F (200°C), adding about 5-8 minutes to the original baking time.
- Freeze Baked: Allow the baked breadstick bones to cool completely. Flash freeze them on a baking sheet, then transfer to a freezer bag. To reheat, bake from frozen at 350°F (175°C) for 10-12 minutes.
4. My pizza dough is very sticky and difficult to handle. What should I do?
This is a common issue with refrigerated doughs. The best solution is to use a light dusting of flour on your work surface, your hands, and your rolling pin. This creates a barrier and prevents the dough from sticking. However, be careful not to use too much flour, as it can make the final breadsticks dry and tough. If the dough is very cold and elastic, making it hard to roll out, simply let it rest on the floured counter for 10-15 minutes. This allows the gluten to relax, making it much more pliable and cooperative.
5. What are the most kid-friendly dipping sauces to serve besides marinara?
While marinara is a hit, having options is always a good idea for a party, especially with kids. A simple, mild ranch dressing is always a crowd-pleaser and can be called “Ghost Guts.” Another fantastic option is a simple cheese sauce, like the kind you’d serve with soft pretzels. You can make an easy version by melting Velveeta with a little milk, or by making a simple béchamel and adding shredded mild cheddar. For a slightly healthier but still fun option, a mild guacamole can be presented as “Monster Mash.”

Cheesy Halloween Breadstick Bones Recipe
Ingredients
- For the Breadstick Bones:
- 1 (13.8-ounce) can of refrigerated pizza dough (the kind that comes in a tube)
- 3 tablespoons unsalted butter, melted
- 2 cloves garlic, minced (or 1 teaspoon garlic powder)
- 1 cup shredded low-moisture mozzarella cheese
- 1/4 cup grated Parmesan cheese, plus extra for sprinkling
- 1/2 teaspoon dried Italian seasoning (optional)
- 1/4 teaspoon salt
- 1/4 teaspoon black pepper
- For the Finishing Touch & Garnish:
- 1 tablespoon unsalted butter, melted
- 1/2 teaspoon garlic powder
- 1 tablespoon finely chopped fresh parsley (optional, for color)
- Flaky sea salt for sprinkling
- For Serving:
- 1 1/2 cups of your favorite marinara sauce, warmed, for dipping
Instructions
Step 1: Prepare Your Workstation and Oven
First things first, preheat your oven to 400°F (200°C). This ensures the oven is at the perfect, consistent temperature to bake the breadsticks quickly and evenly, giving them a beautiful golden-brown crust. Line a large baking sheet with parchment paper. This is a crucial step that prevents the cheesy breadsticks from sticking to the pan and makes cleanup an absolute breeze. Set the prepared baking sheet aside.
Step 2: Prepare the Garlic Butter and Cheese Filling
In a small bowl, combine the 3 tablespoons of melted butter with the minced garlic (or garlic powder). Stir well until the garlic is evenly distributed. This fragrant garlic butter will be the flavor base for our bones. In a separate, slightly larger bowl, toss together the shredded mozzarella cheese, the 1/4 cup of grated Parmesan cheese, the optional Italian seasoning, salt, and pepper. Mixing the cheeses and seasonings beforehand ensures every bite is packed with flavor.
Step 3: Roll Out and Prepare the Dough
Unroll the refrigerated pizza dough onto a lightly floured surface or directly onto a piece of parchment paper to prevent sticking. Gently stretch and press the dough with your hands or use a rolling pin to form an even rectangle, approximately 12×8 inches in size. It doesn’t have to be perfect, but a uniform thickness will help the breadsticks bake evenly.
Step 4: Fill and Fold the Dough
Brush the prepared garlic butter evenly over the entire surface of the pizza dough rectangle, leaving a small 1/4-inch border around the edges. Now, sprinkle the cheese and seasoning mixture evenly over one half (the long side) of the dough. Carefully fold the other, non-cheesy half of the dough over the top of the cheese-covered half. Gently press down on the dough to seal the edges and to help the cheese mixture adhere to the dough. You should now have a long, folded rectangle, approximately 12×4 inches.
Step 5: Cut the Strips
Using a pizza cutter or a very sharp knife, cut the folded dough rectangle into 16 long, thin strips, each about 3/4-inch wide. The pizza cutter is highly recommended as it glides through the dough without pulling or tearing it.
Step 6: Shape the Bones
This is the fun and creative part! Take one strip of dough at a time. Gently stretch it to be about 6-7 inches long. To create the classic bone shape, tie a loose knot at each end of the strip. Don’t pull the knots too tight, as they need room to expand while baking. Once the knots are tied, use your sharp knife or a pair of kitchen shears to make two small snips into the end of each knot. This will create the “knuckles” of the bone. Gently flare out these snipped pieces with your fingers to further define the bone shape.
Step 7: Arrange and Bake
Carefully place each shaped breadstick bone onto the parchment-lined baking sheet, ensuring you leave at least an inch of space between them to allow for expansion. Once all the bones are on the sheet, place it in the preheated oven. Bake for 12 to 15 minutes, or until the breadsticks are puffed up and a deep golden brown on top and the cheese is bubbly. Keep a close eye on them during the last few minutes, as they can go from golden to burnt quite quickly.
Step 8: The Finishing Touch
While the breadsticks are baking, prepare the finishing butter. In a small bowl, mix the remaining 1 tablespoon of melted butter with the 1/2 teaspoon of garlic powder. As soon as you pull the breadstick bones from the oven, immediately brush them with this garlic butter mixture. This adds an extra layer of savory flavor and gives them a beautiful, appetizing sheen. For a final flourish, sprinkle them with a little extra grated Parmesan cheese, some fresh parsley for a pop of color, and a pinch of flaky sea salt.
Step 9: Serve Immediately
These Cheesy Halloween Breadstick Bones are at their absolute best when served warm and fresh from the oven. Arrange them on a platter alongside a bowl of warmed marinara sauce for dipping and watch them vanish.
Nutrition
- Serving Size: One Normal Portion
- Calories: 115