

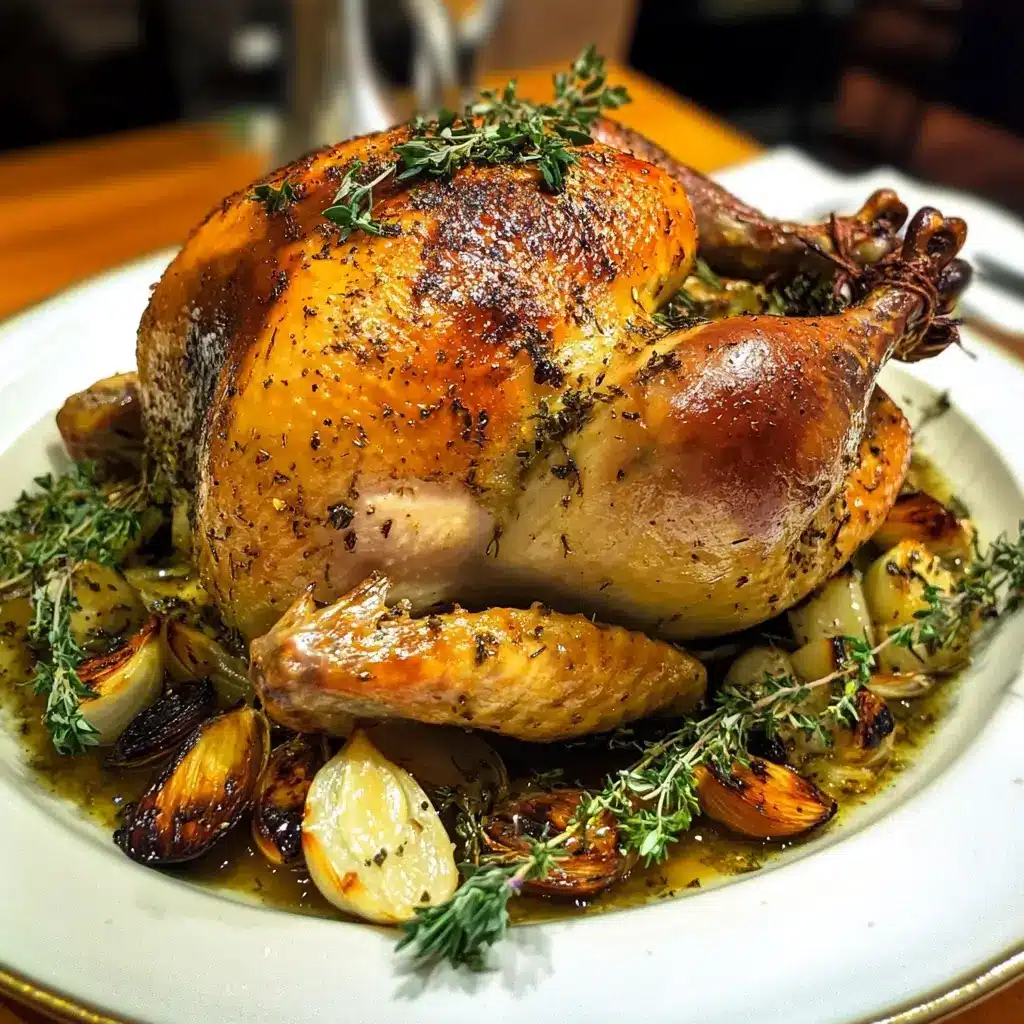

Every year, the pressure is on to deliver a holiday centerpiece that is both impressive and utterly delicious. For years, I experimented with various turkey recipes, each promising perfection, yet often falling short of my family’s expectations. Dry meat, bland flavor, uneven cooking – these were the ghosts of Thanksgiving past. Then, I stumbled upon this Butter Roasted Turkey with Garlic and Herbs recipe, and everything changed. The first time I made it, the aroma alone was intoxicating, filling the house with a savory, garlicky, herbaceous fragrance that had everyone eagerly anticipating dinner. And the taste? Oh, the taste! The skin was gloriously crisp and golden brown, while the meat was unbelievably juicy and infused with the rich, aromatic flavors of butter, garlic, and fresh herbs. My family declared it the best turkey they had ever had, and it has been a non-negotiable centerpiece on our holiday table ever since. This isn’t just a recipe; it’s a guaranteed crowd-pleaser that will elevate your holiday feast to new heights. Prepare to be showered with compliments and requests for the recipe – it’s that good!
Ingredients
This recipe relies on simple, fresh ingredients to create a symphony of flavor. Quality is key, especially when it comes to the butter and herbs, as they are the stars of the show. Here’s what you’ll need to bring this culinary masterpiece to life:
For the Turkey:
- 1 (12-14 pound) Turkey: Choose a fresh or fully thawed frozen turkey. A bird in this size range is ideal for serving 6-8 people with generous portions and leftovers.
- 1 cup (2 sticks) Unsalted Butter, Softened: Using unsalted butter gives you control over the saltiness of the dish. Ensure it’s softened to room temperature for easy spreading.
- 1 Whole Head of Garlic: Fresh garlic is crucial for that pungent, aromatic flavor. You’ll be roasting the entire head, mellowing its intensity while maximizing its flavor.
- 1 Large Lemon: The lemon adds brightness and acidity, cutting through the richness of the butter and complementing the herbs.
- Fresh Herbs, Roughly Chopped (about 1 cup total): A combination of herbs works best. I recommend:
- 1/2 cup Fresh Rosemary: Provides a piney, robust aroma and flavor.
- 1/4 cup Fresh Thyme: Earthy and slightly lemony, thyme adds a delicate complexity.
- 1/4 cup Fresh Sage: Sage offers a peppery, slightly musky note that is classic with poultry.
- Optional additions: Fresh parsley, oregano, or marjoram can also be included for added depth of flavor.
- 2 Tablespoons Olive Oil: Used for drizzling over the turkey for initial crisping and moisture.
- Salt and Freshly Ground Black Pepper: Essential for seasoning and enhancing all the flavors. Kosher salt is recommended for its coarser texture and even seasoning.
For the Pan Drippings (Optional, for Gravy):
- 2 cups Chicken Broth: Low sodium broth is preferred, as the pan drippings will already be salty.
- 2 Tablespoons All-Purpose Flour (or Cornstarch for gluten-free): Used to thicken the gravy.
- Pan Drippings from Roasted Turkey: The flavorful base for a rich and savory gravy.
Instructions
Roasting a turkey might seem daunting, but this recipe breaks it down into manageable steps, ensuring even a novice cook can achieve turkey perfection. Follow these instructions carefully for a guaranteed delicious and juicy Butter Roasted Turkey.
Step 1: Prepare the Turkey
- Thaw the Turkey (if frozen): If using a frozen turkey, ensure it is completely thawed. This can take several days in the refrigerator, depending on the size of the bird. A general rule is 24 hours of thawing time for every 5 pounds of turkey. You can also quick-thaw in cold water, changing the water every 30 minutes, but this requires more attention. Never thaw a turkey at room temperature as this can promote bacterial growth.
- Preheat Oven and Prepare Roasting Pan: Preheat your oven to 450°F (232°C). Position an oven rack in the lower third of the oven to ensure even cooking and prevent the breast from browning too quickly. Prepare a large roasting pan with a roasting rack. If you don’t have a rack, you can use roughly chopped vegetables like carrots, celery, and onions to elevate the turkey.
- Remove Giblets and Neck: Remove the turkey from its packaging and take out the giblets and neck from the cavity. These are often found in a small bag inside the turkey. You can use the neck and giblets to make gravy or stock if desired.
- Pat the Turkey Dry: This is a crucial step for achieving crispy skin. Use paper towels to thoroughly pat the turkey dry, both inside and out. Dry skin will allow the butter and heat to better crisp the skin during roasting.
Step 2: Prepare the Garlic Herb Butter
- Prepare the Garlic: Slice off the top quarter of the garlic head to expose the cloves. Drizzle the exposed garlic with about 1 tablespoon of olive oil and wrap the entire head loosely in aluminum foil. Roasting the garlic mellows its flavor and makes it incredibly spreadable and aromatic.
- Roast the Garlic: Place the foil-wrapped garlic head in the preheated oven alongside the turkey (or in a separate pan if space is limited) and roast for about 30-40 minutes, or until the cloves are soft and fragrant. The garlic can be roasted while you prepare the turkey, or even ahead of time.
- Prepare the Herb Mixture: While the garlic is roasting, in a medium bowl, combine the softened butter, chopped fresh rosemary, thyme, and sage. Squeeze the juice of half a lemon into the butter mixture and season generously with salt and freshly ground black pepper. Mix everything together until well combined and the herbs are evenly distributed throughout the butter.
- Squeeze Roasted Garlic: Once the garlic is roasted and cooled slightly, squeeze the roasted garlic cloves out of their skins directly into the butter mixture. Mash the roasted garlic into the butter with a fork until it’s fully incorporated and the butter is fragrant with garlic.
Step 3: Butter and Season the Turkey
- Loosen the Skin (Optional but Recommended): Gently loosen the skin of the turkey breast from the meat, starting at the neck cavity. Carefully slide your fingers under the skin, separating it from the breast meat. Be careful not to tear the skin. Loosening the skin creates pockets for the herb butter to be placed directly onto the breast meat, maximizing flavor and juiciness. You can also loosen the skin on the thighs and drumsticks if you wish.
- Stuff Butter Under the Skin: Using your fingers, generously spread about two-thirds of the garlic herb butter mixture under the loosened skin of the turkey breast, thighs, and drumsticks, ensuring the butter is evenly distributed and in contact with the meat.
- Rub Remaining Butter on the Skin: Rub the remaining one-third of the garlic herb butter all over the outside of the turkey skin. This will create a flavorful and crispy crust.
- Season Inside and Out: Season the inside cavity of the turkey generously with salt and pepper. Also, season the outside skin of the turkey with additional salt and pepper to ensure well-seasoned and flavorful skin.
- Stuff the Cavity (Optional): For extra flavor, you can stuff the turkey cavity with quartered lemon wedges (from the remaining half lemon), any leftover herb sprigs, and the reserved roasted garlic skins (optional). Stuffing the cavity adds subtle aromatic notes to the turkey from the inside out. Note: Stuffing the cavity will increase the cooking time and requires careful monitoring to ensure the stuffing reaches a safe internal temperature of 165°F (74°C).
Step 4: Roast the Turkey
- Place Turkey in Roasting Pan: Place the prepared turkey breast-side up on the roasting rack in the roasting pan.
- Add Water or Broth (Optional): Pour about 1 cup of water or chicken broth into the bottom of the roasting pan. This helps to create steam, keeping the turkey moist, and prevents the pan drippings from burning. Be sure to monitor the liquid level during roasting and add more if it evaporates completely.
- Initial High Heat Roast: Roast the turkey in the preheated 450°F (232°C) oven for 30 minutes. This initial high heat helps to crisp the skin quickly.
- Reduce Oven Temperature and Continue Roasting: Reduce the oven temperature to 325°F (163°C). Continue roasting for approximately 2.5 to 3.5 hours, or until a meat thermometer inserted into the thickest part of the thigh (without touching the bone) registers 165°F (74°C). The exact roasting time will depend on the size of your turkey and your oven’s temperature accuracy.
- Baste (Optional but Recommended): Basting the turkey every 30-45 minutes with the pan drippings helps to keep it moist and enhances the browning. Use a bulb baster to draw up the pan drippings and drizzle them over the turkey skin.
- Check for Doneness: Start checking the turkey for doneness around the 2-hour mark. Use a meat thermometer to ensure accuracy. The turkey is done when the thigh meat reaches 165°F (74°C) and the juices run clear when pierced with a fork. The breast meat should also reach a minimum of 165°F (74°C), but it’s preferable if it reaches around 170°F (77°C) for optimal tenderness.
- Tent with Foil if Browning Too Quickly: If the turkey skin is browning too quickly before the internal temperature is reached, loosely tent the turkey with aluminum foil to prevent burning.
Step 5: Rest and Carve
- Rest the Turkey: Once the turkey is cooked through, remove it from the oven and transfer it to a large cutting board. Tent it loosely with aluminum foil and let it rest for at least 20-30 minutes before carving. Resting is crucial as it allows the juices to redistribute throughout the meat, resulting in a more tender and juicy turkey.
- Make Gravy (Optional): While the turkey is resting, you can make gravy using the pan drippings. Skim off excess fat from the pan drippings in the roasting pan. Place the roasting pan on the stovetop over medium heat. Whisk in the flour (or cornstarch slurry – cornstarch mixed with cold water) into the pan drippings and cook for 1-2 minutes to cook out the raw flour taste. Gradually whisk in the chicken broth, scraping up any browned bits from the bottom of the pan. Bring to a simmer and cook, stirring occasionally, until the gravy thickens to your desired consistency. Season with salt and pepper to taste. Strain the gravy through a fine-mesh sieve for a smoother texture, if desired.
- Carve and Serve: After the turkey has rested, carve it and serve immediately.
Nutrition Facts (Estimated)
Please note that these are estimated values and can vary based on the specific turkey size, ingredients used, and serving sizes.
- Servings: Approximately 8-10 servings
- Calories per Serving (estimated): 450-550 calories
These values are estimates and do not include side dishes or gravy. A more precise nutritional breakdown would require specific software and would depend on the exact ingredients and portion sizes used. However, this provides a general idea of the caloric content per serving of the Butter Roasted Turkey.
Preparation Time
- Prep Time: 45-60 minutes (includes thawing garlic roasting, butter and herb mixture preparation, and turkey preparation)
- Cook Time: 3-4 hours (including initial high heat and resting time)
- Total Time: Approximately 4-5 hours (excluding turkey thawing time)
Plan ahead and allow ample time for both preparation and cooking, especially if you are making this for a special occasion.
How to Serve
This Butter Roasted Turkey is incredibly versatile and pairs beautifully with a wide array of side dishes. Here are some serving suggestions to create a complete and memorable meal:
Classic Holiday Sides:
- Mashed Potatoes: Creamy and comforting, mashed potatoes are a quintessential turkey side.
- Stuffing/Dressing: Whether you prefer bread stuffing, cornbread stuffing, or a wild rice dressing, stuffing is a must-have.
- Cranberry Sauce: The tartness of cranberry sauce provides a perfect counterpoint to the richness of the turkey.
- Green Bean Casserole: A classic and crowd-pleasing vegetable side.
- Sweet Potato Casserole: The sweetness of sweet potatoes complements the savory turkey.
- Dinner Rolls or Biscuits: Warm and buttery rolls or biscuits are perfect for soaking up gravy and enjoying with the turkey.
Fresh and Lighter Sides:
- Roasted Root Vegetables: Carrots, parsnips, sweet potatoes, and Brussels sprouts roasted with herbs and olive oil offer a healthy and flavorful option.
- Salad: A fresh green salad with a light vinaigrette provides a refreshing contrast to the rich meal.
- Steamed Asparagus or Broccoli: Simple steamed green vegetables add color and nutrients to the plate.
- Cornbread: Slightly sweet cornbread is a delicious alternative to dinner rolls.
Don’t Forget the Gravy!
- Serve Gravy Generously: Ladle the homemade gravy generously over the turkey slices and mashed potatoes.
Leftovers:
- Turkey Sandwiches: The next day, enjoy delicious turkey sandwiches with cranberry sauce and stuffing.
- Turkey Soup or Stew: Use leftover turkey to make hearty and flavorful soups or stews.
- Turkey Pot Pie: Transform leftover turkey into a comforting and satisfying pot pie.
- Turkey Salad: Make a classic turkey salad for sandwiches or lettuce wraps.
Additional Tips for Turkey Perfection
- Start with a Good Quality Turkey: The quality of your turkey will significantly impact the final flavor. Opt for a fresh, high-quality turkey whenever possible. If using frozen, ensure it is fully thawed for even cooking.
- Don’t Overcrowd the Oven: Make sure there is enough space around the roasting pan in your oven for proper air circulation. Overcrowding can lead to uneven cooking.
- Use a Meat Thermometer: A meat thermometer is your best friend when roasting a turkey. It is the most reliable way to ensure the turkey is cooked to a safe internal temperature and prevent overcooking, which can lead to dryness.
- Let the Turkey Rest Adequately: Resist the temptation to carve the turkey immediately after it comes out of the oven. Resting allows the juices to redistribute, resulting in a much juicier and more flavorful bird.
- Make Gravy Ahead of Time (Partially): To reduce stress on the day of your feast, you can make the gravy base (up to the point of adding pan drippings) a day or two in advance. This will save you time and effort on the big day.
FAQ Section
Q1: Can I use dried herbs instead of fresh herbs?
A: While fresh herbs are highly recommended for the best flavor in this recipe, you can use dried herbs in a pinch. If substituting dried herbs, use about 1 tablespoon of dried herbs for every 3 tablespoons of fresh herbs. Dried herbs are more concentrated in flavor, so use them sparingly. Rosemary, thyme, and sage all retain their flavor well when dried.
Q2: My turkey skin is not crispy enough. What can I do?
A: Crispy skin is all about dry skin and high heat. Ensure you thoroughly pat the turkey dry before applying the butter. If the skin is not crispy enough at the end of the roasting time, you can increase the oven temperature back to 450°F (232°C) for the last 10-15 minutes of cooking (watching carefully to prevent burning). You can also try broiling the turkey for the last few minutes, but keep a very close eye on it as broiling can quickly burn the skin.
Q3: Can I stuff the turkey with traditional stuffing instead of just herbs and lemon?
A: Yes, you can stuff the turkey with traditional stuffing if you prefer. However, stuffing the cavity will increase the cooking time and requires extra attention to food safety. The stuffing must reach an internal temperature of 165°F (74°C) to be safe to eat. Use a meat thermometer to check the temperature of the stuffing in the center of the cavity. Start checking the stuffing temperature about 30-45 minutes before you expect the turkey to be done. If the stuffing reaches 165°F (74°C) before the turkey is cooked, you may need to remove the stuffing and continue roasting the turkey separately. Alternatively, you can bake the stuffing separately in a casserole dish to ensure it cooks evenly and safely.
Q4: Can I make this recipe with a larger or smaller turkey?
A: Yes, you can adapt this recipe for different sized turkeys. For a larger turkey (e.g., 16-20 pounds), you will need to increase the ingredients proportionally, especially the butter and herb mixture. You will also need to increase the roasting time. For a smaller turkey (e.g., 8-10 pounds), you can reduce the ingredients and cooking time accordingly. Always use a meat thermometer to ensure the turkey is cooked to the correct internal temperature, regardless of size.
Q5: What’s the best way to carve a turkey?
A: Carving a turkey can seem intimidating, but with a sharp carving knife and a few simple steps, it becomes much easier. First, let the turkey rest for at least 20-30 minutes. Then, remove the legs and thighs by cutting through the joint connecting them to the body. Separate the thigh from the drumstick at the joint. Next, slice the breast meat by cutting downwards along the breastbone, following the curve of the ribs. Slice the breast meat into even slices. Arrange the carved turkey on a platter and serve immediately. There are many helpful videos online that demonstrate turkey carving techniques visually.
This Butter Roasted Turkey with Garlic and Herbs recipe is more than just a meal; it’s an experience. From the intoxicating aroma that fills your kitchen to the rave reviews you’ll receive from your guests, this recipe is guaranteed to become a cherished holiday tradition. Enjoy the process, savor the flavors, and create unforgettable memories around your table.
Print
Butter Roasted Turkey with Garlic and Herbs Recipe
Ingredients
For the Turkey:
- 1 (12-14 pound) Turkey: Choose a fresh or fully thawed frozen turkey. A bird in this size range is ideal for serving 6-8 people with generous portions and leftovers.
- 1 cup (2 sticks) Unsalted Butter, Softened: Using unsalted butter gives you control over the saltiness of the dish. Ensure it’s softened to room temperature for easy spreading.
- 1 Whole Head of Garlic: Fresh garlic is crucial for that pungent, aromatic flavor. You’ll be roasting the entire head, mellowing its intensity while maximizing its flavor.
- 1 Large Lemon: The lemon adds brightness and acidity, cutting through the richness of the butter and complementing the herbs.
- Fresh Herbs, Roughly Chopped (about 1 cup total): A combination of herbs works best. I recommend:
- 1/2 cup Fresh Rosemary: Provides a piney, robust aroma and flavor.
- 1/4 cup Fresh Thyme: Earthy and slightly lemony, thyme adds a delicate complexity.
- 1/4 cup Fresh Sage: Sage offers a peppery, slightly musky note that is classic with poultry.
- Optional additions: Fresh parsley, oregano, or marjoram can also be included for added depth of flavor.
- 2 Tablespoons Olive Oil: Used for drizzling over the turkey for initial crisping and moisture.
- Salt and Freshly Ground Black Pepper: Essential for seasoning and enhancing all the flavors. Kosher salt is recommended for its coarser texture and even seasoning.
For the Pan Drippings (Optional, for Gravy):
- 2 cups Chicken Broth: Low sodium broth is preferred, as the pan drippings will already be salty.
- 2 Tablespoons All-Purpose Flour (or Cornstarch for gluten-free): Used to thicken the gravy.
- Pan Drippings from Roasted Turkey: The flavorful base for a rich and savory gravy.
Instructions
Step 1: Prepare the Turkey
- Thaw the Turkey (if frozen): If using a frozen turkey, ensure it is completely thawed. This can take several days in the refrigerator, depending on the size of the bird. A general rule is 24 hours of thawing time for every 5 pounds of turkey. You can also quick-thaw in cold water, changing the water every 30 minutes, but this requires more attention. Never thaw a turkey at room temperature as this can promote bacterial growth.
- Preheat Oven and Prepare Roasting Pan: Preheat your oven to 450°F (232°C). Position an oven rack in the lower third of the oven to ensure even cooking and prevent the breast from browning too quickly. Prepare a large roasting pan with a roasting rack. If you don’t have a rack, you can use roughly chopped vegetables like carrots, celery, and onions to elevate the turkey.
- Remove Giblets and Neck: Remove the turkey from its packaging and take out the giblets and neck from the cavity. These are often found in a small bag inside the turkey. You can use the neck and giblets to make gravy or stock if desired.
- Pat the Turkey Dry: This is a crucial step for achieving crispy skin. Use paper towels to thoroughly pat the turkey dry, both inside and out. Dry skin will allow the butter and heat to better crisp the skin during roasting.
Step 2: Prepare the Garlic Herb Butter
- Prepare the Garlic: Slice off the top quarter of the garlic head to expose the cloves. Drizzle the exposed garlic with about 1 tablespoon of olive oil and wrap the entire head loosely in aluminum foil. Roasting the garlic mellows its flavor and makes it incredibly spreadable and aromatic.
- Roast the Garlic: Place the foil-wrapped garlic head in the preheated oven alongside the turkey (or in a separate pan if space is limited) and roast for about 30-40 minutes, or until the cloves are soft and fragrant. The garlic can be roasted while you prepare the turkey, or even ahead of time.
- Prepare the Herb Mixture: While the garlic is roasting, in a medium bowl, combine the softened butter, chopped fresh rosemary, thyme, and sage. Squeeze the juice of half a lemon into the butter mixture and season generously with salt and freshly ground black pepper. Mix everything together until well combined and the herbs are evenly distributed throughout the butter.
- Squeeze Roasted Garlic: Once the garlic is roasted and cooled slightly, squeeze the roasted garlic cloves out of their skins directly into the butter mixture. Mash the roasted garlic into the butter with a fork until it’s fully incorporated and the butter is fragrant with garlic.
Step 3: Butter and Season the Turkey
- Loosen the Skin (Optional but Recommended): Gently loosen the skin of the turkey breast from the meat, starting at the neck cavity. Carefully slide your fingers under the skin, separating it from the breast meat. Be careful not to tear the skin. Loosening the skin creates pockets for the herb butter to be placed directly onto the breast meat, maximizing flavor and juiciness. You can also loosen the skin on the thighs and drumsticks if you wish.
- Stuff Butter Under the Skin: Using your fingers, generously spread about two-thirds of the garlic herb butter mixture under the loosened skin of the turkey breast, thighs, and drumsticks, ensuring the butter is evenly distributed and in contact with the meat.
- Rub Remaining Butter on the Skin: Rub the remaining one-third of the garlic herb butter all over the outside of the turkey skin. This will create a flavorful and crispy crust.
- Season Inside and Out: Season the inside cavity of the turkey generously with salt and pepper. Also, season the outside skin of the turkey with additional salt and pepper to ensure well-seasoned and flavorful skin.
- Stuff the Cavity (Optional): For extra flavor, you can stuff the turkey cavity with quartered lemon wedges (from the remaining half lemon), any leftover herb sprigs, and the reserved roasted garlic skins (optional). Stuffing the cavity adds subtle aromatic notes to the turkey from the inside out. Note: Stuffing the cavity will increase the cooking time and requires careful monitoring to ensure the stuffing reaches a safe internal temperature of 165°F (74°C).
Step 4: Roast the Turkey
- Place Turkey in Roasting Pan: Place the prepared turkey breast-side up on the roasting rack in the roasting pan.
- Add Water or Broth (Optional): Pour about 1 cup of water or chicken broth into the bottom of the roasting pan. This helps to create steam, keeping the turkey moist, and prevents the pan drippings from burning. Be sure to monitor the liquid level during roasting and add more if it evaporates completely.
- Initial High Heat Roast: Roast the turkey in the preheated 450°F (232°C) oven for 30 minutes. This initial high heat helps to crisp the skin quickly.
- Reduce Oven Temperature and Continue Roasting: Reduce the oven temperature to 325°F (163°C). Continue roasting for approximately 2.5 to 3.5 hours, or until a meat thermometer inserted into the thickest part of the thigh (without touching the bone) registers 165°F (74°C). The exact roasting time will depend on the size of your turkey and your oven’s temperature accuracy.
- Baste (Optional but Recommended): Basting the turkey every 30-45 minutes with the pan drippings helps to keep it moist and enhances the browning. Use a bulb baster to draw up the pan drippings and drizzle them over the turkey skin.
- Check for Doneness: Start checking the turkey for doneness around the 2-hour mark. Use a meat thermometer to ensure accuracy. The turkey is done when the thigh meat reaches 165°F (74°C) and the juices run clear when pierced with a fork. The breast meat should also reach a minimum of 165°F (74°C), but it’s preferable if it reaches around 170°F (77°C) for optimal tenderness.
- Tent with Foil if Browning Too Quickly: If the turkey skin is browning too quickly before the internal temperature is reached, loosely tent the turkey with aluminum foil to prevent burning.
Step 5: Rest and Carve
- Rest the Turkey: Once the turkey is cooked through, remove it from the oven and transfer it to a large cutting board. Tent it loosely with aluminum foil and let it rest for at least 20-30 minutes before carving. Resting is crucial as it allows the juices to redistribute throughout the meat, resulting in a more tender and juicy turkey.
- Make Gravy (Optional): While the turkey is resting, you can make gravy using the pan drippings. Skim off excess fat from the pan drippings in the roasting pan. Place the roasting pan on the stovetop over medium heat. Whisk in the flour (or cornstarch slurry – cornstarch mixed with cold water) into the pan drippings and cook for 1-2 minutes to cook out the raw flour taste. Gradually whisk in the chicken broth, scraping up any browned bits from the bottom of the pan. Bring to a simmer and cook, stirring occasionally, until the gravy thickens to your desired consistency. Season with salt and pepper to taste. Strain the gravy through a fine-mesh sieve for a smoother texture, if desired.
- Carve and Serve: After the turkey has rested, carve it and serve immediately.
Nutrition
- Serving Size: one normal portion
- Calories: 450-550


