

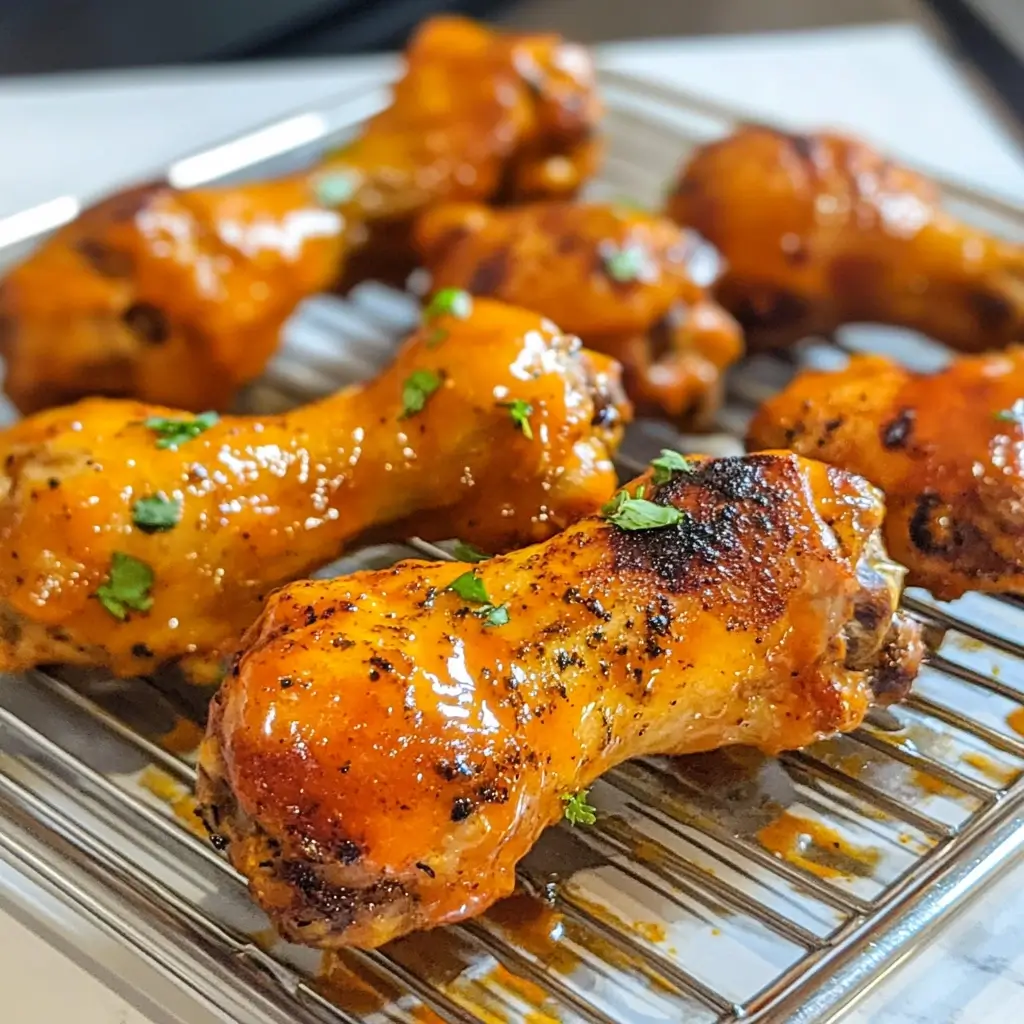

There are some recipes that just become legendary in a household, whispered about in anticipation for the next game day, family gathering, or even just a particularly exciting Tuesday night. For my family, these Buffalo Chicken Drumsticks are exactly that. The first time I made them, the aroma alone had everyone migrating to the kitchen, eyes wide with expectation. The kids, who can be notoriously picky, devoured them, their fingers and faces happily smeared with that iconic orange sauce. My husband, a self-proclaimed wing connoisseur, declared them “restaurant-quality, but better.” It was the perfect blend of crispy skin, tender, juicy meat, and that unmistakably tangy, spicy kick of Buffalo sauce that sealed the deal. They’re surprisingly easy to make, yet deliver such a powerful flavor punch that they feel like a special treat every single time. Whether baked to perfection in the oven or crisped up in the air fryer, these drumsticks are a guaranteed crowd-pleaser and a recipe I’m thrilled to share.
Why You’ll Absolutely Love These Buffalo Chicken Drumsticks
Before we even get to the “how-to,” let’s talk about the “why.” What makes this Buffalo Chicken Drumstick recipe stand out from the crowd?
- Ultimate Flavor Explosion: The star of the show is, of course, the Buffalo sauce. We’re talking about that perfect marriage of tangy vinegar, rich butter, and fiery cayenne pepper that makes your taste buds sing. Combined with savory seasonings on the chicken itself, every bite is a multi-layered experience.
- Crispy Skin, Juicy Meat: One of the eternal quests in chicken cookery is achieving that dream combination of shatteringly crispy skin and incredibly moist, tender meat. This recipe delivers, with techniques that ensure you’re not sacrificing one for the other.
- Versatile Cooking Methods: Whether you’re an oven-baking traditionalist or an air fryer enthusiast, this recipe adapts beautifully. We’ll cover both methods so you can choose what works best for your kitchen and time.
- Crowd-Pleaser Guaranteed: Is there anyone who doesn’t love a good Buffalo chicken dish? These drumsticks are perfect for game days, parties, potlucks, or even a fun family dinner. They’re finger-licking good and always disappear fast.
- Surprisingly Simple: Despite their impressive flavor and texture, these drumsticks are straightforward to prepare. No complicated steps, just simple, effective techniques for maximum deliciousness.
- Customizable Heat: Love it fiery? Want it milder? You’re in control. We’ll discuss how to easily adjust the spice level to suit everyone’s palate.
This isn’t just a recipe; it’s an experience waiting to happen. Get ready to transform humble chicken drumsticks into a culinary triumph.
Ingredients: The Building Blocks of Buffalo Bliss
Crafting the perfect Buffalo Chicken Drumsticks starts with quality ingredients. Here’s what you’ll need to gather. We’re aiming for that classic, irresistible flavor profile.
- For the Chicken:
- Chicken Drumsticks: 2.5 – 3 lbs (about 10-12 drumsticks), skin-on. The skin is crucial for crispiness and flavor.
- Olive Oil or Avocado Oil: 2 tablespoons. Helps the seasonings adhere and promotes crisping.
- Baking Powder: 1 tablespoon (aluminum-free recommended, especially for baking method). This is a secret weapon for super crispy skin! Ensure it’s baking powder, not baking soda.
- Garlic Powder: 2 teaspoons. For that aromatic, savory depth.
- Onion Powder: 1 teaspoon. Complements the garlic beautifully.
- Smoked Paprika: 1 teaspoon. Adds a lovely color and a subtle smoky undertone.
- Salt: 1.5 teaspoons (or to taste). Kosher salt is preferred for its texture and flavor.
- Black Pepper: 1 teaspoon (freshly ground preferred, or to taste).
- For the Classic Buffalo Sauce:
- Frank’s RedHot Original Cayenne Pepper Sauce: 1/2 cup. This is the traditional base for authentic Buffalo sauce. Accept no substitutes for the classic taste!
- Unsalted Butter: 1/2 cup (1 stick), melted. Adds richness and helps the sauce cling to the chicken.
- White Vinegar: 1 tablespoon (optional, for extra tang). Some like it, some don’t. Frank’s already has vinegar, so use judiciously.
- Worcestershire Sauce: 1 teaspoon. Adds a complex umami depth.
- Garlic Powder: 1/2 teaspoon (optional, for an extra garlic kick in the sauce).
- Cayenne Pepper: 1/4 – 1/2 teaspoon (optional, for extra heat). Adjust to your preference.
A Note on Ingredients:
- Chicken: Always opt for fresh, good-quality drumsticks. If frozen, ensure they are thoroughly thawed in the refrigerator before use. Patting them extremely dry is key, so don’t skip that step.
- Baking Powder: While optional if you’re solely air frying (as air fryers are great at crisping), it’s highly recommended for oven-baking to draw out moisture and create an incredibly crispy exterior.
- Hot Sauce: While Frank’s RedHot Original is the gold standard for authentic Buffalo flavor, feel free to experiment with other cayenne-based hot sauces if you have a favorite. However, the flavor profile might change.
Instructions: Your Step-by-Step Guide to Perfection
We’ll break this down into clear, manageable steps. Whether you’re baking or air frying, the initial preparation is the same.
Part 1: Preparing the Chicken (Universal Steps)
- Pre-Dry the Chicken: This is CRUCIAL for crispy skin. Remove the chicken drumsticks from their packaging. Pat them thoroughly dry with paper towels. Get into all the nooks and crannies. The drier the skin, the crispier it will become. Let them sit on a wire rack over a baking sheet in the fridge, uncovered, for at least 30 minutes, or even a few hours if you have time. This further dries out the skin.
- Prepare Seasoning Mix: In a small bowl, combine the baking powder, garlic powder, onion powder, smoked paprika, salt, and black pepper. Whisk them together until well incorporated. This ensures even distribution of flavors.
- Oil and Season the Chicken: Place the thoroughly dried drumsticks in a large bowl. Drizzle with the olive oil (or avocado oil) and toss to coat them evenly. Then, sprinkle the seasoning mixture over the chicken. Use your hands to rub the seasoning all over each drumsticks, ensuring every piece is well-coated.
Part 2: Cooking the Chicken – Choose Your Method
Method A: Oven-Baked for Classic Crispiness
- Preheat Oven & Prepare Rack: Preheat your oven to 400°F (200°C). Place a wire rack inside a baking sheet lined with aluminum foil (for easy cleanup). The wire rack allows hot air to circulate around the drumsticks, promoting even cooking and crisping.
- Arrange Chicken: Place the seasoned drumsticks on the wire rack, ensuring they are not overcrowded. Leave some space between each piece for optimal air circulation.
- Bake: Bake for 20 minutes. Then, flip the drumsticks using tongs.
- Continue Baking: Bake for another 20-25 minutes, or until the skin is golden brown and crispy, and the internal temperature reaches at least 165°F (74°C) in the thickest part of the drumstick, avoiding the bone. For even crispier skin and potentially higher internal temp (drumsticks can handle it, up to 185°F for fall-off-the-bone tender), you can increase oven temp to 425°F (220°C) for the last 10 minutes.
Method B: Air Fryer for Quicker Crisping
- Preheat Air Fryer (Optional but Recommended): Preheat your air fryer to 380°F (193°C) for about 5 minutes. Preheating helps the chicken start crisping immediately.
- Arrange Chicken: Place the seasoned drumsticks in the air fryer basket in a single layer. Do not overcrowd the basket; cook in batches if necessary. Overcrowding will steam the chicken instead of crisping it.
- Air Fry: Air fry at 380°F (193°C) for 15 minutes.
- Flip and Continue: Open the air fryer, flip the drumsticks with tongs, and continue to air fry for another 10-15 minutes, or until the skin is beautifully golden and crispy, and the internal temperature registers at least 165°F (74°C) – again, 175-185°F is great for drumsticks.
Part 3: Making the Buffalo Sauce (While Chicken Cooks)
- Melt Butter: In a small saucepan, melt the butter over low heat.
- Combine Ingredients: Once the butter is melted, remove the saucepan from the heat. Whisk in the Frank’s RedHot Original sauce, white vinegar (if using), Worcestershire sauce, garlic powder (if using), and cayenne pepper (if using).
- Keep Warm: Whisk until the sauce is smooth and emulsified. Keep it warm over very low heat or set aside if the chicken is almost ready. If it separates, a quick whisk will bring it back together.
Part 4: Saucing the Drumsticks
- Rest Briefly (Optional): Once the chicken is cooked through and crispy, you can let it rest for 5 minutes. This helps the juices redistribute.
- Toss with Sauce: Place the hot, cooked drumsticks in a large, clean bowl. Pour about two-thirds of the warm Buffalo sauce over them. Gently toss the drumsticks until they are evenly coated in that glorious sauce. Use tongs for this to keep your hands clean and to handle the hot chicken safely.
- Optional Second Crisp/Caramelization (Highly Recommended!):
- Oven Method: Return the sauced drumsticks to the wire rack and place them back in the 400°F (200°C) oven for 5-7 minutes, or under the broiler (watch VERY carefully to prevent burning) for 1-2 minutes, until the sauce is bubbly and slightly caramelized onto the chicken.
- Air Fryer Method: Return the sauced drumsticks to the air fryer basket. Air fry at 400°F (200°C) for 3-5 minutes, until the sauce is set and slightly tacky.
- Serve Immediately: Arrange the sauced drumsticks on a platter. Serve immediately with the remaining Buffalo sauce on the side for dipping, along with your favorite accompaniments like blue cheese dressing or ranch dressing, celery sticks, and carrot sticks.
Nutrition Facts (Approximate)
Understanding the nutritional aspect of what we eat is important. Please note these are estimates and can vary based on the exact size of drumsticks, specific brands of ingredients used, and portion sizes.
- Servings: This recipe typically yields 5-6 servings (assuming 2 drumsticks per serving).
- Calories per serving (approx. 2 drumsticks): Around 450-550 calories.
Breakdown (Approximate per 2 drumsticks):
- Protein: 40-50g
- Fat: 30-40g (significant portion from skin and butter in sauce)
- Saturated Fat: 10-15g
- Carbohydrates: 2-5g (mostly from sauce, minimal from seasonings)
- Sodium: 900-1200mg (Frank’s RedHot and added salt contribute significantly)
Disclaimer: These values are illustrative. For precise nutritional information, it’s best to use a nutrition calculator with your specific ingredients and quantities. To reduce calories and fat, you could use less butter in the sauce or opt for skinless drumsticks (though you’ll sacrifice crispiness).
Preparation & Cooking Time
Knowing the time commitment helps plan your cooking adventure:
- Preparation Time:
- Active Prep: 15-20 minutes (patting dry, mixing seasonings, coating chicken).
- Optional Fridge Resting Time (for extra crispy skin): 30 minutes to 4 hours (passive time).
- Cooking Time:
- Oven Method: 40-50 minutes, plus 5-7 minutes for post-sauce crisping.
- Air Fryer Method: 25-30 minutes, plus 3-5 minutes for post-sauce crisping.
- Sauce Preparation: 5 minutes (done while chicken cooks).
- Total Time (excluding optional fridge rest):
- Oven: Approximately 1 hour to 1 hour 15 minutes.
- Air Fryer: Approximately 45 minutes to 1 hour.
This recipe is manageable for a weeknight if you skip the extended fridge rest, but it truly shines when you have a bit more time to let that skin dry out for maximum crunch.
How to Serve Your Glorious Buffalo Chicken Drumsticks
Presentation and accompaniments can elevate your Buffalo chicken experience from great to unforgettable. Here are some classic and creative ways to serve them:
- The Classic Trio:
- Blue Cheese Dressing: The creamy, tangy, funky notes of blue cheese dressing are the quintessential pairing for spicy Buffalo sauce. It provides a cooling contrast that’s simply divine.
- Ranch Dressing: For those who aren’t fans of blue cheese, creamy ranch dressing is an equally popular and delicious alternative.
- Celery and Carrot Sticks: Crisp, cool vegetable sticks offer a refreshing crunch and a healthy counterpoint to the rich, spicy chicken. They’re also perfect for dipping!
- On a Platter for Sharing:
- Arrange the sauced drumsticks artfully on a large platter.
- Garnish with fresh parsley or thinly sliced green onions for a pop of color.
- Place small bowls of dipping sauces and a generous pile of veggie sticks around the chicken.
- Make it a Meal:
- With Fries: Classic pairing! Serve with crispy French fries, sweet potato fries, or potato wedges.
- Mac and Cheese: Creamy, cheesy macaroni and cheese alongside spicy Buffalo chicken is comfort food heaven.
- Coleslaw: A tangy, creamy coleslaw provides a refreshing contrast to the heat.
- Corn on the Cob: Especially great during summer months.
- Simple Green Salad: A light salad with a vinaigrette can balance the richness of the drumsticks.
- Game Day Spread Essentials:
- Include them as part of a larger appetizer spread with other game day favorites like nachos, sliders, and potato skins.
- Provide plenty of napkins – these are delightfully messy!
- Offer wet wipes for easy cleanup.
- Serving Temperature:
- Buffalo Chicken Drumsticks are best served hot and fresh, when the skin is at its crispiest and the sauce is perfectly melded.
No matter how you serve them, ensure there’s extra Buffalo sauce on the side for those who like it extra saucy!
Additional Tips for Buffalo Chicken Drumstick Domination (5 Tips)
Want to take your drumsticks to the next level? Here are five extra tips:
- Don’t Skip the Pat Dry & Baking Powder for Oven Method: Seriously, these are game-changers for crispy skin. The drier the chicken skin starts, and the more the baking powder can work its magic by raising the pH level and drawing out moisture, the crispier the end result. If air frying, baking powder is less critical but still beneficial.
- Internal Temperature is Key for Safety & Juiciness: While 165°F (74°C) is the minimum safe internal temperature for chicken, dark meat like drumsticks actually benefits from being cooked to a higher temperature, around 175-185°F (79-85°C). This allows the connective tissues to break down further, resulting in more tender and juicy meat that practically falls off the bone. Use an instant-read meat thermometer inserted into the thickest part of the drumstick, avoiding the bone.
- Sauce at the End, and Consider a Double Crisp: Tossing the chicken in sauce too early can make the skin soggy. Cook the chicken until fully done and crispy, then toss it in the warm Buffalo sauce. For an even better texture, return the sauced chicken to the hot oven or air fryer for a few minutes. This helps the sauce “bake on” and caramelize slightly, making it less messy and even more delicious.
- Adjust Spice Level Thoughtfully: The “heat” of Buffalo sauce comes primarily from the cayenne pepper in Frank’s RedHot.
- To Make it Milder: Reduce the amount of Frank’s RedHot slightly and increase the proportion of melted butter. You can also add a touch of honey or brown sugar to the sauce to balance the heat with sweetness.
- To Make it Spicier: Add extra cayenne pepper (powder) to your Buffalo sauce mixture, or a few dashes of an even hotter, neutral-flavored hot sauce. Start small and taste as you go.
- Making Ahead & Reheating Strategy:
- Partial Make-Ahead: You can season the chicken and let it rest in the fridge (covered after the initial air-drying phase) for up to 24 hours. Cook as directed when ready. The Buffalo sauce can also be made ahead and stored in an airtight container in the refrigerator for up to a week; gently reheat before using.
- Reheating Cooked Drumsticks: The best way to reheat and maintain some crispiness is in an air fryer at 350°F (175°C) for 5-8 minutes, or in a 350°F (175°C) oven on a wire rack for 10-15 minutes, until heated through. Avoid the microwave if possible, as it tends to make the skin rubbery. You might want to toss with a little fresh sauce after reheating if they seem dry.
FAQ: Your Buffalo Chicken Drumstick Queries Answered
Here are answers to some frequently asked questions about making Buffalo Chicken Drumsticks:
- Q: Can I use other chicken parts for this recipe?
- A: Absolutely! This recipe works wonderfully with chicken wings (adjust cooking time accordingly, usually shorter), chicken thighs (skin-on, bone-in thighs will be juiciest), or even chicken breast cut into tenders (again, adjust cooking time to avoid drying out). For wings, you’ll likely cook them for 35-45 minutes in the oven or 20-25 minutes in the air fryer.
- Q: My chicken skin isn’t getting crispy. What am I doing wrong?
- A: Several factors could be at play:
- Moisture: The chicken skin wasn’t patted dry enough.
- Overcrowding: Too many drumsticks in the oven or air fryer basket will steam them. Cook in batches if needed.
- Temperature: Your oven/air fryer temperature might be too low, or not accurately calibrated.
- Baking Powder (for oven): Skipping the baking powder significantly impacts crispiness in the oven method.
- Saucing too early: Adding the sauce before the skin is fully crisped will make it soggy.
- A: Several factors could be at play:
- Q: How do I make the Buffalo sauce thicker or thinner?
- A: For a thicker sauce, you can simmer it very gently on low heat for a few extra minutes to allow some of the liquid to evaporate (be careful not to reduce it too much or let the butter separate). Some people also add a tiny bit of cornstarch slurry (1/2 tsp cornstarch mixed with 1 tsp cold water) while simmering, but this isn’t traditional. For a thinner sauce, simply add a little more Frank’s RedHot or a splash of water or chicken broth until you reach your desired consistency.
- Q: Can I prepare these Buffalo Chicken Drumsticks ahead of time for a party?
- A: Yes, with caveats. For best results (crispiest skin), cook them as close to serving time as possible. However, you can cook them completely, let them cool, and store them in the refrigerator. Reheat in a 350°F (175°C) oven or air fryer until hot and re-crisped (about 10-15 minutes in oven, 5-8 in air fryer). You might hold off on saucing them until after reheating, then toss with freshly warmed Buffalo sauce just before serving. Alternatively, sauce them, then reheat, understanding they might not be as crispy as when first made.
- Q: What’s the best way to store and reheat leftovers?
- A: Store leftover Buffalo Chicken Drumsticks in an airtight container in the refrigerator for up to 3-4 days. To reheat, the air fryer is your best friend: 5-8 minutes at 350-375°F (175-190°C) usually does the trick, making them surprisingly crispy again. Alternatively, use an oven at 350°F (175°C) on a wire rack for 10-15 minutes. Microwaving will work in a pinch for speed but will result in softer skin.

Buffalo Chicken Drumsticks Recipe
Ingredients
- For the Chicken:
- Chicken Drumsticks: 2.5 – 3 lbs (about 10-12 drumsticks), skin-on. The skin is crucial for crispiness and flavor.
- Olive Oil or Avocado Oil: 2 tablespoons. Helps the seasonings adhere and promotes crisping.
- Baking Powder: 1 tablespoon (aluminum-free recommended, especially for baking method). This is a secret weapon for super crispy skin! Ensure it’s baking powder, not baking soda.
- Garlic Powder: 2 teaspoons. For that aromatic, savory depth.
- Onion Powder: 1 teaspoon. Complements the garlic beautifully.
- Smoked Paprika: 1 teaspoon. Adds a lovely color and a subtle smoky undertone.
- Salt: 1.5 teaspoons (or to taste). Kosher salt is preferred for its texture and flavor.
- Black Pepper: 1 teaspoon (freshly ground preferred, or to taste).
- For the Classic Buffalo Sauce:
- Frank’s RedHot Original Cayenne Pepper Sauce: 1/2 cup. This is the traditional base for authentic Buffalo sauce. Accept no substitutes for the classic taste!
- Unsalted Butter: 1/2 cup (1 stick), melted. Adds richness and helps the sauce cling to the chicken.
- White Vinegar: 1 tablespoon (optional, for extra tang). Some like it, some don’t. Frank’s already has vinegar, so use judiciously.
- Worcestershire Sauce: 1 teaspoon. Adds a complex umami depth.
- Garlic Powder: 1/2 teaspoon (optional, for an extra garlic kick in the sauce).
- Cayenne Pepper: 1/4 – 1/2 teaspoon (optional, for extra heat). Adjust to your preference.
Instructions
Part 1: Preparing the Chicken (Universal Steps)
- Pre-Dry the Chicken: This is CRUCIAL for crispy skin. Remove the chicken drumsticks from their packaging. Pat them thoroughly dry with paper towels. Get into all the nooks and crannies. The drier the skin, the crispier it will become. Let them sit on a wire rack over a baking sheet in the fridge, uncovered, for at least 30 minutes, or even a few hours if you have time. This further dries out the skin.
- Prepare Seasoning Mix: In a small bowl, combine the baking powder, garlic powder, onion powder, smoked paprika, salt, and black pepper. Whisk them together until well incorporated. This ensures even distribution of flavors.
- Oil and Season the Chicken: Place the thoroughly dried drumsticks in a large bowl. Drizzle with the olive oil (or avocado oil) and toss to coat them evenly. Then, sprinkle the seasoning mixture over the chicken. Use your hands to rub the seasoning all over each drumsticks, ensuring every piece is well-coated.
Part 2: Cooking the Chicken – Choose Your Method
Method A: Oven-Baked for Classic Crispiness
- Preheat Oven & Prepare Rack: Preheat your oven to 400°F (200°C). Place a wire rack inside a baking sheet lined with aluminum foil (for easy cleanup). The wire rack allows hot air to circulate around the drumsticks, promoting even cooking and crisping.
- Arrange Chicken: Place the seasoned drumsticks on the wire rack, ensuring they are not overcrowded. Leave some space between each piece for optimal air circulation.
- Bake: Bake for 20 minutes. Then, flip the drumsticks using tongs.
- Continue Baking: Bake for another 20-25 minutes, or until the skin is golden brown and crispy, and the internal temperature reaches at least 165°F (74°C) in the thickest part of the drumstick, avoiding the bone. For even crispier skin and potentially higher internal temp (drumsticks can handle it, up to 185°F for fall-off-the-bone tender), you can increase oven temp to 425°F (220°C) for the last 10 minutes.
Method B: Air Fryer for Quicker Crisping
- Preheat Air Fryer (Optional but Recommended): Preheat your air fryer to 380°F (193°C) for about 5 minutes. Preheating helps the chicken start crisping immediately.
- Arrange Chicken: Place the seasoned drumsticks in the air fryer basket in a single layer. Do not overcrowd the basket; cook in batches if necessary. Overcrowding will steam the chicken instead of crisping it.
- Air Fry: Air fry at 380°F (193°C) for 15 minutes.
- Flip and Continue: Open the air fryer, flip the drumsticks with tongs, and continue to air fry for another 10-15 minutes, or until the skin is beautifully golden and crispy, and the internal temperature registers at least 165°F (74°C) – again, 175-185°F is great for drumsticks.
Part 3: Making the Buffalo Sauce (While Chicken Cooks)
- Melt Butter: In a small saucepan, melt the butter over low heat.
- Combine Ingredients: Once the butter is melted, remove the saucepan from the heat. Whisk in the Frank’s RedHot Original sauce, white vinegar (if using), Worcestershire sauce, garlic powder (if using), and cayenne pepper (if using).
- Keep Warm: Whisk until the sauce is smooth and emulsified. Keep it warm over very low heat or set aside if the chicken is almost ready. If it separates, a quick whisk will bring it back together.
Part 4: Saucing the Drumsticks
- Rest Briefly (Optional): Once the chicken is cooked through and crispy, you can let it rest for 5 minutes. This helps the juices redistribute.
- Toss with Sauce: Place the hot, cooked drumsticks in a large, clean bowl. Pour about two-thirds of the warm Buffalo sauce over them. Gently toss the drumsticks until they are evenly coated in that glorious sauce. Use tongs for this to keep your hands clean and to handle the hot chicken safely.
- Optional Second Crisp/Caramelization (Highly Recommended!):
- Oven Method: Return the sauced drumsticks to the wire rack and place them back in the 400°F (200°C) oven for 5-7 minutes, or under the broiler (watch VERY carefully to prevent burning) for 1-2 minutes, until the sauce is bubbly and slightly caramelized onto the chicken.
- Air Fryer Method: Return the sauced drumsticks to the air fryer basket. Air fry at 400°F (200°C) for 3-5 minutes, until the sauce is set and slightly tacky.
- Serve Immediately: Arrange the sauced drumsticks on a platter. Serve immediately with the remaining Buffalo sauce on the side for dipping, along with your favorite accompaniments like blue cheese dressing or ranch dressing, celery sticks, and carrot sticks.
Nutrition
- Serving Size: One Normal Portion
- Calories: 450-550
- Sodium: 900-1200mg
- Fat: 30-40g
- Saturated Fat: 10-15g
- Carbohydrates: 2-5g
- Protein: 40-50g


