


Of all the dishes in my culinary repertoire, the ones that hold the most cherished memories are those that bubble away for hours, filling the house with an aroma that promises pure comfort and satisfaction. This Beef and Mushroom Pie is the undisputed king of those recipes. I first made it on a blustery autumn afternoon, the kind where the wind rattles the windows and all you crave is warmth. As the rich, savory scent of slow-cooked beef, earthy mushrooms, and thyme began to weave its way through every room, my family started to gravitate towards the kitchen, drawn in by the culinary siren song. When I finally pulled it from the oven, its golden, flaky puff pastry crown puffed up to perfection, the silence that fell over the dinner table was the highest compliment I could have received. It was a moment of shared, simple joy—a testament to the power of a truly great homemade pie. This isn’t just a recipe; it’s an event. It’s the centerpiece of a Sunday dinner, a cure for a gloomy day, and a meal that consistently earns the title of “the best pie ever.” The magic lies in the slow-simmered filling, where tough cuts of beef become impossibly tender, melting into a luscious, glossy gravy packed with the umami depth of mushrooms and a hint of red wine. It’s a labor of love, to be sure, but every single minute is worth it for that first incredible bite.
The Ultimate Beef and Mushroom Pie Recipe
This recipe is designed for maximum flavor, achieved through patient browning and a slow, gentle simmer. We are creating a rich, stew-like filling that forms the heart of the pie, topped with a simple, elegant lid of golden puff pastry.
For the Rich Beef and Mushroom Filling
- Beef: 2.5 lbs (about 1.2 kg) chuck roast or beef shin, trimmed of excessive fat and cut into 1.5-inch cubes
- Mushrooms: 1 lb (450g) cremini (or chestnut) mushrooms, wiped clean and thickly sliced or quartered if small
- Onions: 2 large yellow onions, finely chopped
- Carrots: 2 medium carrots, peeled and diced into ½-inch pieces
- Celery: 2 celery stalks, finely chopped
- Garlic: 6 cloves, minced
- All-Purpose Flour: ¼ cup (for dredging beef and thickening)
- Fat: 2 tablespoons olive oil, plus 2 tablespoons unsalted butter
- Red Wine: 1 cup (150ml) of a dry, full-bodied red wine like Cabernet Sauvignon, Merlot, or Shiraz
- Beef Broth: 3 cups (700ml) of high-quality beef broth or stock
- Tomato Paste: 2 tablespoons
- Herbs: 4 sprigs of fresh thyme, 2 fresh bay leaves
- Seasoning: 1 tablespoon Worcestershire sauce, 1 teaspoon sea salt (or to taste), 1 teaspoon freshly cracked black pepper (or to taste)
- Frozen Peas: 1 cup (optional, for a touch of sweetness and color)
For the Golden Puff Pastry Topping
- Puff Pastry: 1 sheet (about 14 oz or 400g) of all-butter puff pastry, thawed if frozen
- Egg Wash: 1 large egg, beaten with 1 tablespoon of milk or cream
Step-by-Step Instructions
Follow these detailed instructions carefully to build layers of flavor that will make your pie unforgettable. The key is patience, especially during the browning and simmering stages.
Step 1: Prepare the Beef and Sear for Flavor
The foundation of a great pie filling is perfectly seared meat. This process, known as the Maillard reaction, creates a deep, brown crust on the beef that translates into immense flavor in the final gravy.
- Pat the Beef Dry: Use paper towels to pat your beef cubes completely dry. Moisture is the enemy of a good sear; wet meat will steam instead of brown.
- Dredge the Beef: In a large bowl, combine the ¼ cup of all-purpose flour with the salt and pepper. Add the dry beef cubes and toss them thoroughly until each piece is lightly coated. Shake off any excess flour. This flour coating not only helps with browning but will also be the primary thickener for your gravy.
- Sear in Batches: Heat the olive oil in a large, heavy-bottomed pot or Dutch oven over medium-high heat. The pan is ready when the oil shimmers slightly. Carefully place a single layer of beef cubes in the pot, ensuring not to overcrowd the pan. Searing in 2-3 batches is essential. Overcrowding will lower the pan’s temperature, causing the beef to steam.
- Brown on All Sides: Let the beef sear undisturbed for 3-4 minutes per side, until a deep, dark brown crust forms. Use tongs to turn the pieces. Once all sides are well-browned, remove the batch with a slotted spoon and set it aside on a plate. Repeat with the remaining beef, adding a little more oil if the pot becomes too dry.
Step 2: Build the Flavor Base
With the beef seared, the pot now holds precious browned bits stuck to the bottom, known as “fond.” This is concentrated flavor gold that we will incorporate into our gravy.
- Sauté the Aromatics: Reduce the heat to medium. Add the 2 tablespoons of butter to the pot. Once it’s melted and foaming, add the chopped onions, carrots, and celery (the “mirepoix”). Sauté for 8-10 minutes, stirring occasionally and scraping the bottom of the pot with a wooden spoon. The moisture from the vegetables will help lift some of that fond. Cook until the vegetables are soft and the onions are translucent and lightly golden.
- Add Garlic and Tomato Paste: Add the minced garlic and cook for another minute until fragrant. Be careful not to burn it. Next, stir in the tomato paste. Cook the paste for 2-3 minutes, stirring constantly. This step caramelizes the paste, removing its raw taste and deepening the overall umami flavor of the dish.
Step 3: Deglaze and Create the Gravy
This is where the magic happens and your rich, savory gravy begins to form.
- Deglaze with Wine: Pour the red wine into the pot. As it sizzles, use your wooden spoon to scrape vigorously at the bottom of the pot, releasing all those flavorful browned bits. Let the wine bubble and reduce by about half, which should take 3-5 minutes. This cooks off the harsh alcohol taste, leaving behind a rich, fruity depth.
- Incorporate Liquids and Seasonings: Return the seared beef and any accumulated juices from the plate back into the pot. Pour in the beef broth. Stir in the Worcestershire sauce, fresh thyme sprigs, and bay leaves.
- Bring to a Simmer: Increase the heat to bring the mixture to a gentle boil, then immediately reduce the heat to the lowest possible setting that maintains a bare simmer. The surface should have just a few lazy bubbles.
Step 4: The Slow Simmer
Patience is a virtue, and in this recipe, it’s the most important ingredient. The long, slow cooking time is what breaks down the tough connective tissues in the chuck roast, transforming it into melt-in-your-mouth tender morsels.
- Cover and Cook: Cover the pot with a tight-fitting lid and let it simmer for at least 2.5 to 3 hours. Check on it every hour or so to give it a gentle stir and ensure it’s not sticking to the bottom or cooking too rapidly.
- Check for Tenderness: After 2.5 hours, test the beef. A piece should be easily pierced with a fork and should shred with very little pressure. If it’s still firm, continue simmering for another 30-60 minutes. The filling is ready when the beef is exceptionally tender and the gravy has thickened and become dark and glossy.
Step 5: Finish the Filling and Assemble the Pie
Now we bring all the components together for the final bake.
- Cook the Mushrooms: While the beef is in its final 30 minutes of simmering, prepare the mushrooms. In a separate large skillet, melt a tablespoon of butter over medium-high heat. Add the sliced mushrooms in a single layer (work in batches if necessary). Let them cook undisturbed for 4-5 minutes until they are deeply browned on one side. Stir and continue to cook until they have released their liquid and are beautifully caramelized. Sautéing them separately prevents them from making the stew watery and develops a much deeper flavor.
- Combine and Cool: Once the beef filling is ready, remove the thyme sprigs and bay leaves. Taste the gravy and adjust for salt and pepper. It should be boldly seasoned. Stir in the browned mushrooms and the optional frozen peas.
- CRUCIAL STEP – Cool the Filling: Transfer the finished filling to your pie dish (a 9-inch deep-dish pie plate or a similar-sized oval baking dish works well). Allow it to cool completely. You can speed this up by placing it in the fridge for an hour. Placing hot filling under pastry will create steam, which results in a soggy crust and prevents the pastry from puffing up properly. This is the most common mistake in pie-making!
- Preheat and Prepare Pastry: Preheat your oven to 400°F (200°C). Lay your sheet of puff pastry over the cooled filling. Trim the edges, leaving about a 1-inch overhang. Use your fingers or a fork to crimp the edges against the rim of the dish to seal it.
- Finishing Touches: Brush the entire surface of the pastry with the egg wash. This will give it a beautiful, shiny, golden-brown finish. Use a sharp knife to cut 2-3 small slits in the center of the pastry lid to allow steam to escape during baking.
- Bake to Perfection: Place the pie dish on a baking sheet to catch any potential drips. Bake for 25-35 minutes, or until the pastry is deeply golden brown, puffed up, and crisp.
- Rest Before Serving: Let the pie rest for at least 10 minutes before cutting into it. This allows the filling to set slightly, making it easier to serve.
Nutrition Facts
- Servings: 8
- Calories per serving: Approximately 750-850 kcal
Disclaimer: The nutritional information provided is an estimate and can vary significantly based on the specific ingredients used, such as the fat content of the beef, the brand of puff pastry, and any modifications to the recipe.
Preparation Time
- Active Prep Time: 45 minutes (chopping, searing)
- Cook Time (Simmering): 3 hours
- Cooling Time: 1 hour
- Baking Time: 30 minutes
- Total Time: Approximately 5 hours 15 minutes
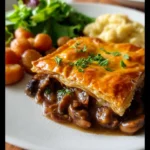
How to Serve Your Beef and Mushroom Pie
This hearty pie is a meal in itself, but the right accompaniments can elevate it to a truly spectacular feast. Serve it directly from the baking dish, scooping generous portions onto each plate, ensuring everyone gets a good mix of tender beef, mushrooms, and flaky crust.
- Classic Starchy Companions:
- Creamy Mashed Potatoes: The number one choice. Their smooth, buttery texture is the perfect vehicle for mopping up every last drop of the rich gravy.
- Roasted Root Vegetables: Cubes of roasted parsnips, sweet potatoes, and butternut squash, tossed with olive oil and rosemary, add a sweet and earthy counterpoint.
- Simple Boiled New Potatoes: Tossed in butter and fresh parsley, these are a simple yet elegant side.
- Green Vegetable Pairings:
- Steamed Green Beans or Asparagus: A simple side of crisp, steamed greens with a squeeze of lemon provides a fresh contrast to the richness of the pie.
- Sautéed Kale or Swiss Chard: Wilted with a little garlic and olive oil, these robust greens stand up well to the bold flavors of the filling.
- A Simple Garden Salad: A crisp salad with a sharp vinaigrette can cut through the richness and cleanse the palate between bites.
- Drink Pairings:
- Wine: Continue with the same type of full-bodied red wine you used in the cooking process, like a Cabernet Sauvignon or a French Bordeaux.
- Beer: A dark, malty beer like an English Porter, a Stout, or a Brown Ale complements the savory, meaty flavors beautifully.
5 Additional Tips for Pie Perfection
- Choose the Right Cut of Beef: Don’t be tempted to use expensive, lean steak cuts like sirloin or fillet. The best cuts for slow-cooking are those with plenty of connective tissue and marbling, like chuck roast, beef shin, or even brisket. During the long, slow simmer, this collagen breaks down into gelatin, which gives the gravy a luscious, silky body and makes the meat incredibly tender. Lean cuts will simply dry out and become tough.
- The Secret to a Perfectly Crisp Pastry Lid: The enemy of a crisp pastry lid is steam. That’s why cooling the filling completely before topping it with the pastry is the most critical tip. A hot filling will immediately start to melt the butter layers in the puff pastry from underneath, preventing it from rising and creating that signature flakiness. A cool filling ensures the pastry bakes evenly from the top down.
- Mushroom Mastery for Maximum Flavor: To get the best flavor and texture from your mushrooms, sear them in a hot pan separately. Mushrooms contain a lot of water. If you add them directly to the stew, they will release that water and essentially steam, resulting in a rubbery texture and diluting your gravy. By searing them in a hot, dry pan until they are deeply browned, you concentrate their earthy, umami flavor, which then enriches the entire pie.
- Make the Filling Ahead of Time: This pie is a perfect dish for entertaining because the entire filling can be made one or even two days in advance. In fact, the flavor of the filling often improves after a day in the refrigerator as the flavors meld and deepen. Simply prepare the filling through Step 4, let it cool completely, and store it in an airtight container in the fridge. When you’re ready to bake, just spoon the cold filling into your pie dish, top with pastry, and bake as directed (you may need to add 5-10 minutes to the baking time since the filling is chilled).
- Achieving the Perfect Gravy Consistency: The flour used to dredge the beef should thicken the gravy nicely over the long simmer. However, if you find your gravy is thinner than you’d like at the end, you can easily adjust it. Create a “slurry” by mixing 1 tablespoon of cornstarch with 2 tablespoons of cold water until smooth. While the filling is at a gentle simmer, slowly whisk in the slurry until the gravy reaches your desired thickness. Conversely, if it’s too thick, simply stir in a splash of warm beef broth or water until it’s just right.
Frequently Asked Questions (FAQ)
Q1: Can I use a different type of pastry?
A: Absolutely. While puff pastry provides a light, flaky, and dramatic topping, a traditional shortcrust pastry is also delicious. It will create a more classic, biscuit-like lid. You would follow the same assembly instructions. If you’re feeling adventurous, you could even make a cheddar or herb-infused shortcrust to complement the filling.
Q2: Can I make this pie with a bottom crust as well?
A: Yes, you can make a double-crust pie, but it requires an extra step. To prevent a “soggy bottom,” you’ll need to blind-bake the bottom crust first. Line your pie dish with shortcrust pastry, cover it with parchment paper and pie weights (or dried beans), and bake at 400°F (200°C) for 15-20 minutes. Remove the weights and paper and bake for another 5-7 minutes until the bottom is pale gold. Let it cool before adding your cooled beef filling and the top crust.
Q3: How do I store and reheat leftovers?
A: Store any leftover pie by covering it tightly with foil or plastic wrap and refrigerating for up to 4 days. The best way to reheat it is in the oven, not the microwave. The microwave will make the pastry soft and soggy. Place the leftover pie on a baking sheet and heat in a preheated oven at 350°F (175°C) for 20-25 minutes, or until the filling is hot and the crust has re-crisped.
Q4: Can I freeze the entire beef and mushroom pie?
A: Yes, this pie freezes beautifully both baked and unbaked.
- To freeze unbaked: Assemble the entire pie with the cooled filling and pastry top but do not apply the egg wash. Wrap the entire dish tightly in two layers of plastic wrap and one layer of aluminum foil. It can be frozen for up to 3 months. To bake, do not thaw. Brush with egg wash and bake from frozen at 400°F (200°C), adding 20-30 minutes to the original baking time.
- To freeze baked: Let the baked pie cool completely. Wrap it tightly as described above and freeze. To reheat, thaw it in the refrigerator overnight and then warm in a 350°F (175°C) oven for 25-30 minutes.
Q5: My gravy didn’t get very thick. What went wrong?
A: There are a few possible reasons for a thin gravy. You may not have used enough flour to dredge the beef, or your simmer might have been too low to allow for sufficient reduction. But don’t worry, it’s an easy fix! As mentioned in the tips, you can create a cornstarch slurry (1 tbsp cornstarch mixed with 2 tbsp cold water) and whisk it into the simmering filling until it thickens. Alternatively, you can simply remove the lid for the last 30-45 minutes of the simmering time to allow more liquid to evaporate and the sauce to reduce naturally.
Beef and Mushroom Pie Recipe
Ingredients
For the Rich Beef and Mushroom Filling
- Beef: 2.5 lbs (about 1.2 kg) chuck roast or beef shin, trimmed of excessive fat and cut into 1.5-inch cubes
- Mushrooms: 1 lb (450g) cremini (or chestnut) mushrooms, wiped clean and thickly sliced or quartered if small
- Onions: 2 large yellow onions, finely chopped
- Carrots: 2 medium carrots, peeled and diced into ½-inch pieces
- Celery: 2 celery stalks, finely chopped
- Garlic: 6 cloves, minced
- All-Purpose Flour: ¼ cup (for dredging beef and thickening)
- Fat: 2 tablespoons olive oil, plus 2 tablespoons unsalted butter
- Red Wine: 1 cup (150ml) of a dry, full-bodied red wine like Cabernet Sauvignon, Merlot, or Shiraz
- Beef Broth: 3 cups (700ml) of high-quality beef broth or stock
- Tomato Paste: 2 tablespoons
- Herbs: 4 sprigs of fresh thyme, 2 fresh bay leaves
- Seasoning: 1 tablespoon Worcestershire sauce, 1 teaspoon sea salt (or to taste), 1 teaspoon freshly cracked black pepper (or to taste)
- Frozen Peas: 1 cup (optional, for a touch of sweetness and color)
For the Golden Puff Pastry Topping
- Puff Pastry: 1 sheet (about 14 oz or 400g) of all-butter puff pastry, thawed if frozen
- Egg Wash: 1 large egg, beaten with 1 tablespoon of milk or cream
Instructions
Step 1: Prepare the Beef and Sear for Flavor
The foundation of a great pie filling is perfectly seared meat. This process, known as the Maillard reaction, creates a deep, brown crust on the beef that translates into immense flavor in the final gravy.
- Pat the Beef Dry: Use paper towels to pat your beef cubes completely dry. Moisture is the enemy of a good sear; wet meat will steam instead of brown.
- Dredge the Beef: In a large bowl, combine the ¼ cup of all-purpose flour with the salt and pepper. Add the dry beef cubes and toss them thoroughly until each piece is lightly coated. Shake off any excess flour. This flour coating not only helps with browning but will also be the primary thickener for your gravy.
- Sear in Batches: Heat the olive oil in a large, heavy-bottomed pot or Dutch oven over medium-high heat. The pan is ready when the oil shimmers slightly. Carefully place a single layer of beef cubes in the pot, ensuring not to overcrowd the pan. Searing in 2-3 batches is essential. Overcrowding will lower the pan’s temperature, causing the beef to steam.
- Brown on All Sides: Let the beef sear undisturbed for 3-4 minutes per side, until a deep, dark brown crust forms. Use tongs to turn the pieces. Once all sides are well-browned, remove the batch with a slotted spoon and set it aside on a plate. Repeat with the remaining beef, adding a little more oil if the pot becomes too dry.
Step 2: Build the Flavor Base
With the beef seared, the pot now holds precious browned bits stuck to the bottom, known as “fond.” This is concentrated flavor gold that we will incorporate into our gravy.
- Sauté the Aromatics: Reduce the heat to medium. Add the 2 tablespoons of butter to the pot. Once it’s melted and foaming, add the chopped onions, carrots, and celery (the “mirepoix”). Sauté for 8-10 minutes, stirring occasionally and scraping the bottom of the pot with a wooden spoon. The moisture from the vegetables will help lift some of that fond. Cook until the vegetables are soft and the onions are translucent and lightly golden.
- Add Garlic and Tomato Paste: Add the minced garlic and cook for another minute until fragrant. Be careful not to burn it. Next, stir in the tomato paste. Cook the paste for 2-3 minutes, stirring constantly. This step caramelizes the paste, removing its raw taste and deepening the overall umami flavor of the dish.
Step 3: Deglaze and Create the Gravy
This is where the magic happens and your rich, savory gravy begins to form.
- Deglaze with Wine: Pour the red wine into the pot. As it sizzles, use your wooden spoon to scrape vigorously at the bottom of the pot, releasing all those flavorful browned bits. Let the wine bubble and reduce by about half, which should take 3-5 minutes. This cooks off the harsh alcohol taste, leaving behind a rich, fruity depth.
- Incorporate Liquids and Seasonings: Return the seared beef and any accumulated juices from the plate back into the pot. Pour in the beef broth. Stir in the Worcestershire sauce, fresh thyme sprigs, and bay leaves.
- Bring to a Simmer: Increase the heat to bring the mixture to a gentle boil, then immediately reduce the heat to the lowest possible setting that maintains a bare simmer. The surface should have just a few lazy bubbles.
Step 4: The Slow Simmer
Patience is a virtue, and in this recipe, it’s the most important ingredient. The long, slow cooking time is what breaks down the tough connective tissues in the chuck roast, transforming it into melt-in-your-mouth tender morsels.
- Cover and Cook: Cover the pot with a tight-fitting lid and let it simmer for at least 2.5 to 3 hours. Check on it every hour or so to give it a gentle stir and ensure it’s not sticking to the bottom or cooking too rapidly.
- Check for Tenderness: After 2.5 hours, test the beef. A piece should be easily pierced with a fork and should shred with very little pressure. If it’s still firm, continue simmering for another 30-60 minutes. The filling is ready when the beef is exceptionally tender and the gravy has thickened and become dark and glossy.
Step 5: Finish the Filling and Assemble the Pie
Now we bring all the components together for the final bake.
- Cook the Mushrooms: While the beef is in its final 30 minutes of simmering, prepare the mushrooms. In a separate large skillet, melt a tablespoon of butter over medium-high heat. Add the sliced mushrooms in a single layer (work in batches if necessary). Let them cook undisturbed for 4-5 minutes until they are deeply browned on one side. Stir and continue to cook until they have released their liquid and are beautifully caramelized. Sautéing them separately prevents them from making the stew watery and develops a much deeper flavor.
- Combine and Cool: Once the beef filling is ready, remove the thyme sprigs and bay leaves. Taste the gravy and adjust for salt and pepper. It should be boldly seasoned. Stir in the browned mushrooms and the optional frozen peas.
- CRUCIAL STEP – Cool the Filling: Transfer the finished filling to your pie dish (a 9-inch deep-dish pie plate or a similar-sized oval baking dish works well). Allow it to cool completely. You can speed this up by placing it in the fridge for an hour. Placing hot filling under pastry will create steam, which results in a soggy crust and prevents the pastry from puffing up properly. This is the most common mistake in pie-making!
- Preheat and Prepare Pastry: Preheat your oven to 400°F (200°C). Lay your sheet of puff pastry over the cooled filling. Trim the edges, leaving about a 1-inch overhang. Use your fingers or a fork to crimp the edges against the rim of the dish to seal it.
- Finishing Touches: Brush the entire surface of the pastry with the egg wash. This will give it a beautiful, shiny, golden-brown finish. Use a sharp knife to cut 2-3 small slits in the center of the pastry lid to allow steam to escape during baking.
- Bake to Perfection: Place the pie dish on a baking sheet to catch any potential drips. Bake for 25-35 minutes, or until the pastry is deeply golden brown, puffed up, and crisp.
- Rest Before Serving: Let the pie rest for at least 10 minutes before cutting into it. This allows the filling to set slightly, making it easier to serve.
Nutrition
- Serving Size: One Normal Portion
- Calories: 750-850 kcal


