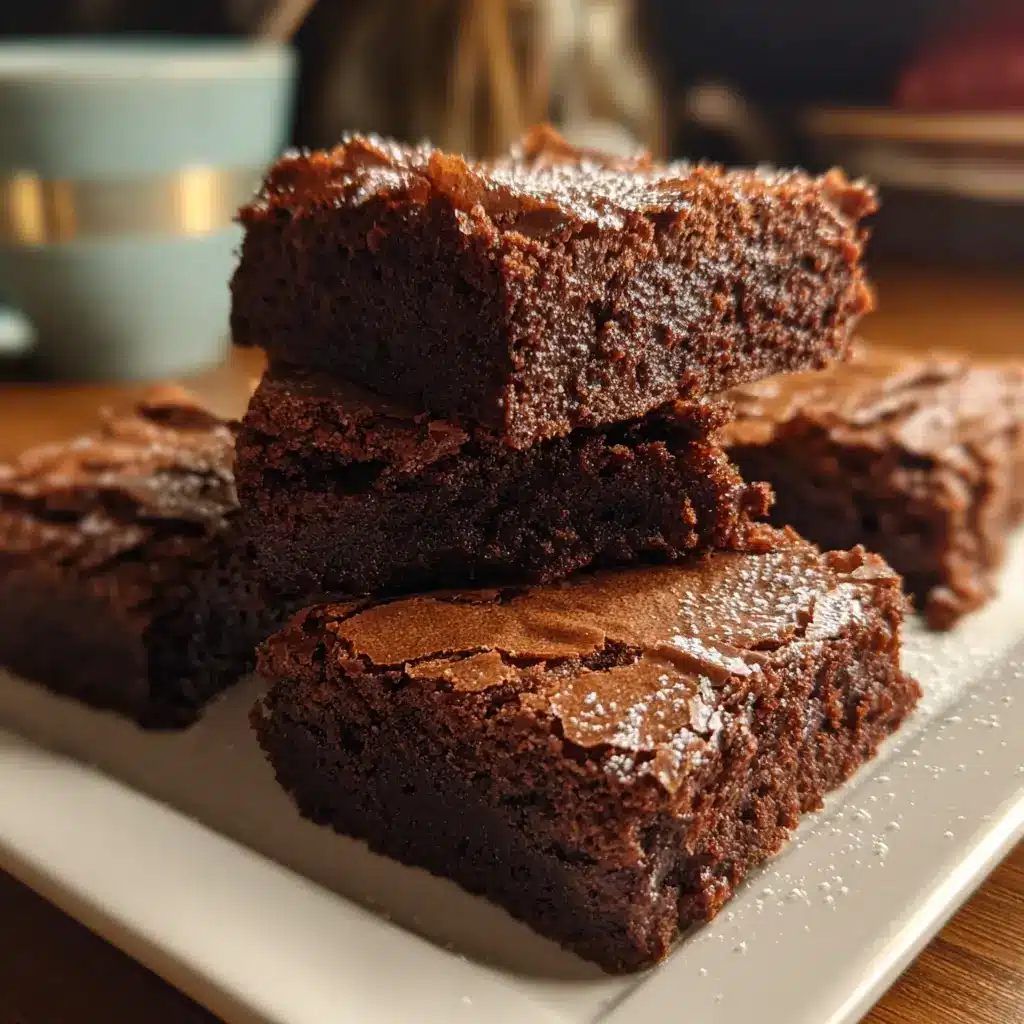
Of all the desserts in my baking repertoire, the one I return to time and time again isn’t a towering layer cake or a finicky French pastry. It’s this simple, unassuming, yet profoundly perfect pan of basic brownies. This isn’t just a recipe; it’s a legacy. It’s the recipe my mom used, scribbled on a stained index card, the one that filled our house with that intoxicating, fudgy aroma on rainy Sunday afternoons. I’ve made these for bake sales where they disappeared in minutes, for new neighbors as a welcome gift, and for my own family after a tough week when only the deep, dark comfort of pure chocolate will do. What makes this recipe the one? It’s the texture. It strikes the perfect balance—impossibly fudgy and dense in the center, with a satisfyingly chewy edge and that sought-after, paper-thin, crackly top. My husband, a self-proclaimed brownie connoisseur, declared these the “best he’s ever had,” a statement he doesn’t make lightly. My kids just call them “the good brownies,” and their chocolate-smeared smiles are the only five-star review I’ll ever need. This recipe uses simple, everyday pantry ingredients, but it transforms them into something truly special. It’s reliable, forgiving, and the perfect base for countless variations. Welcome to the last brownie recipe you’ll ever need.
The Ultimate Basic Brownie Recipe
This recipe is the cornerstone of great homemade brownies. It focuses on developing a deep chocolate flavor and a perfectly dense, fudgy texture. The key is in the technique—melting the butter and sugar together and ensuring you don’t overbake.
Ingredients
- Unsalted Butter: 1 cup (226g or 2 sticks), melted
- Granulated Sugar: 2 cups (400g)
- Large Eggs: 4, at room temperature
- Pure Vanilla Extract: 1 tablespoon
- Unsweetened Cocoa Powder: 1 cup (85g), sifted
- All-Purpose Flour: 1 cup (120g)
- Salt: 1 teaspoon
- Optional: 1 ½ cups (250g) of chocolate chips, chopped nuts, or other mix-ins
Instructions
- Preheat and Prepare: Position a rack in the middle of your oven and preheat to 350°F (175°C). Lightly grease a 9×13-inch baking pan. For best results and easy removal, line the pan with parchment paper, leaving a 2-inch overhang on the two long sides to act as “handles.” This is the secret to getting perfectly clean slices later.
- Melt Butter and Dissolve Sugar: In a large, microwave-safe bowl, melt the butter completely. Add the granulated sugar to the hot melted butter and whisk vigorously for about 1-2 minutes. The mixture will look grainy, but this step is crucial. It helps the sugar begin to dissolve, which is the key to creating that shiny, crackly top on your finished brownies. Alternatively, you can do this step in a medium saucepan over low heat, stirring constantly until the butter is melted and combined with the sugar.
- Incorporate Eggs and Vanilla: Let the butter-sugar mixture cool slightly for a few minutes so it doesn’t scramble the eggs. Add the 4 room-temperature eggs one at a time, whisking well after each addition until fully incorporated. You’re looking for the batter to become thick, glossy, and smooth. Once the eggs are mixed in, stir in the tablespoon of pure vanilla extract.
- Add Dry Ingredients: Place a fine-mesh sieve over your bowl. Sift the cocoa powder, all-purpose flour, and salt directly into the wet ingredients. Sifting is non-negotiable here; it removes lumps from the cocoa and aerates the flour, ensuring a smooth, uniform batter without any dry pockets.
- Gently Fold: Switch from a whisk to a rubber spatula. Gently fold the dry ingredients into the wet mixture until just combined. Be very careful not to overmix. A few streaks of flour are acceptable at this stage. Overmixing develops the gluten in the flour, which will result in tough, cakey brownies instead of the dense, fudgy texture we’re aiming for.
- Add Mix-Ins (Optional): If you’re using chocolate chips, chopped walnuts, pecans, or any other mix-ins, fold them in now.
- Pour and Bake: Pour the thick, luscious batter into your prepared 9×13-inch pan. Use the spatula to spread it evenly into the corners. Bake on the middle rack for 30-35 minutes.
- The Doneness Test: The baking time is a guideline. Start checking for doneness at the 28-minute mark. The edges of the brownies should look set and be pulling away slightly from the sides of the pan. The center should look set but not completely dry. To test, insert a wooden toothpick or skewer into the center. It should come out with a few moist, fudgy crumbs attached. If it comes out clean, the brownies are overbaked. If it comes out with wet, liquid batter, they need a few more minutes. Remember, they will continue to cook from residual heat as they cool in the pan.
- Cool Completely: This is perhaps the most important and most difficult step! Remove the pan from the oven and place it on a wire cooling rack. Let the brownies cool completely in the pan, for at least 2-3 hours, or even longer. Cooling is essential for the brownies to set properly. If you try to slice them while warm, they will be a gooey, delicious mess. Patience here will reward you with clean, professional-looking squares.
- Slice and Serve: Once completely cooled, use the parchment paper handles to lift the entire slab of brownies out of the pan and onto a cutting board. For the cleanest cuts, use a large, sharp chef’s knife. Wipe the blade clean with a damp paper towel between each cut. Slice into your desired size and serve.
Nutrition Facts
- Servings: 24 brownies
- Calories per serving: Approximately 210 kcal
Disclaimer: The nutritional information provided is an estimate and can vary based on the specific ingredients and brands used, as well as the final serving size.
Preparation & Baking Time
A great recipe is not just about taste, but also about planning. Here’s how the timing breaks down for these perfect basic brownies:
- Preparation Time: 15 minutes. This includes gathering and measuring your ingredients, lining the pan, and mixing the batter.
- Baking Time: 30-35 minutes. Oven temperatures can vary, so always rely on the visual and toothpick test for perfect results.
- Cooling Time: 2-3 hours (minimum). This is an active part of the recipe and crucial for texture and slicing. Do not skip it!
- Total Time: Approximately 3 hours to 3 hours 50 minutes.
How to Serve Your Perfect Brownies
While these brownies are spectacular on their own, they also serve as a perfect canvas for a wide range of delicious pairings and presentations. Here are some ideas to elevate your brownie experience from a simple treat to a show-stopping dessert.
The Classics
- Simply Dusting: For an elegant, minimalist look, let the brownies cool completely and then lightly dust the top with powdered sugar or extra unsweetened cocoa powder using a fine-mesh sieve.
- A Glass of Milk: The timeless pairing. A cold glass of milk perfectly cuts through the richness of the fudgy chocolate.
- Coffee or Espresso: A hot cup of coffee or a shot of espresso beautifully complements the deep chocolate notes, making it an ideal afternoon pick-me-up or after-dinner treat.
Indulgent & Decadent Toppings
- Brownie a la Mode: The ultimate indulgence. Serve a slightly warmed brownie with a generous scoop of high-quality vanilla bean ice cream. The contrast of the warm, fudgy brownie and the cold, creamy ice cream is pure bliss.
- Sauce Drizzles: Elevate the flavor profile with a drizzle of a complementary sauce.
- Salted Caramel Sauce: The combination of sweet, salty, and bitter chocolate is a match made in heaven.
- Hot Fudge or Chocolate Ganache: For the true chocoholic, double down on the chocolate with a rich, glossy drizzle.
- Raspberry Coulis: The tartness of a raspberry sauce provides a bright, fruity contrast to the deep chocolate.
- Whipped Cream & Berries: A dollop of freshly whipped cream (lightly sweetened) and a handful of fresh berries like raspberries, strawberries, or blueberries add a touch of freshness and color.
For a Crowd or Party
- Brownie Sundae Bar: This is a fantastic interactive dessert for parties. Set out the brownies (cut into squares) and an array of toppings in separate bowls. Guests can then build their own creations. Great topping ideas include:
- Multiple ice cream flavors (vanilla, chocolate, strawberry, coffee)
- Various sauces (caramel, chocolate, strawberry)
- Chopped nuts (pecans, walnuts, almonds)
- Sprinkles and chocolate chips
- Crushed Oreos or other cookies
- Toasted coconut flakes
- Whipped cream and maraschino cherries
- Brownie Trifles: Layer crumbled brownie pieces with chocolate pudding, whipped cream, and chopped toffee or chocolate bars in individual glass cups for a sophisticated and easy-to-serve dessert.
Additional Pro-Level Tips for Flawless Brownies
After making hundreds of batches, I’ve learned a few key tricks that separate good brownies from unforgettable ones. These five tips will help you nail the recipe every single time.
- Chase the Crackly Top. That beautiful, tissue-paper-thin, shiny top isn’t just luck; it’s science. The key is to dissolve the sugar as much as possible before baking. This is why the instruction to whisk the sugar vigorously into the hot, melted butter is so important. This creates a thin layer of sugary meringue on the surface as it bakes, which then cracks into that signature pattern. Using room temperature eggs also helps the sugar dissolve more effectively.
- Fear the Overbake! The number one mistake people make with brownies is overbaking them. An overbaked brownie is dry, crumbly, and cakey. You want to pull them from the oven when they are slightly underbaked in the center. The toothpick test should yield moist, fudgy crumbs, not come out perfectly clean. The brownies will firm up significantly as they cool due to residual heat cooking. Trust the process and pull them out early. It’s better to have a slightly gooey brownie than a dry one.
- The Critical Cool Down. I cannot stress this enough: patience during the cooling stage is a virtue that pays off in texture and presentation. Cutting into warm brownies is a recipe for a crumbly, messy disaster. As brownies cool, the melted butter and chocolate solidify, setting the structure and developing that dense, fudgy chew. Cooling them completely in the pan allows them to set fully. For even cleaner cuts, you can chill the cooled slab of brownies in the refrigerator for 30 minutes before slicing.
- Quality Cocoa is King. Since this recipe doesn’t use melted chocolate, the cocoa powder is the star player providing all the chocolate flavor. The quality of your cocoa powder will directly impact the final taste. For a deep, dark, and rich flavor, I highly recommend using a Dutch-processed cocoa powder (like Droste, Valrhona, or Ghirardelli). It has a smoother, less acidic flavor than natural cocoa powder and contributes to a fudgier texture. Sifting it is also essential to prevent bitter, dry clumps in your finished product.
- Master the Slice. For bakery-worthy, perfectly clean squares, two things are essential: a completely cooled brownie slab and the right tool. After lifting the slab from the pan, use a large, heavy chef’s knife. For the cleanest possible cuts, run the knife under hot water and wipe it dry before the first cut, then wipe the blade clean with a damp paper towel between every single cut. This prevents the fudgy interior from dragging and smearing. A plastic knife can also work surprisingly well, as the fudgy brownie doesn’t stick to it as much.
Your Brownie Questions Answered: FAQ
Here are answers to some of the most common questions about making brownies from scratch.
1. What is the difference between fudgy and cakey brownies, and how do I make them one way or the other?
This is the eternal brownie debate! The difference comes down to the fat-to-flour ratio.
- Fudgy Brownies (like this recipe): Have a higher fat-to-flour ratio. They use more butter and often rely on cocoa powder and melted fat for their dense, moist, and intensely chocolatey character. They have fewer leavening agents (like baking powder).
- Cakey Brownies: Have a lower fat-to-flour ratio, meaning more flour in proportion to the butter. They often have baking powder or soda added to give them lift and a lighter, more open, and airy crumb, similar to a chocolate cake.
To make this recipe more cakey, you could reduce the butter to ¾ cup and increase the flour to 1 ¼ cups, and add ½ teaspoon of baking powder. However, this recipe is optimized for a supreme fudgy experience.
2. Can I use melted chocolate instead of or in addition to cocoa powder?
Yes, but it will change the texture and sweetness. If you want to substitute melted chocolate for cocoa powder, a general rule is to use about 4-6 ounces of unsweetened or bittersweet baking chocolate. You would melt this with the butter at the beginning. Using melted chocolate often results in an even denser, richer brownie. If you simply want to add more chocolate flavor, your best bet is to follow the recipe as written and fold in 1 to 1 ½ cups of good quality chocolate chips or chopped chocolate chunks as a mix-in.
3. What is the best way to store homemade brownies to keep them fresh?
Proper storage is key to enjoying your brownies for days.
- At Room Temperature: Once completely cooled, store the brownies in an airtight container. You can store them unsliced (as a whole slab) to keep them moister for longer. They will stay fresh and fudgy for up to 4 days.
- In the Refrigerator: While you can store them in the fridge, it can dry them out slightly and make them very firm. If you do, make sure they are in a very well-sealed container. Let them come to room temperature for about 15-20 minutes before serving.
- In the Freezer: Brownies freeze beautifully! For best results, wrap the entire cooled slab tightly in plastic wrap, then a layer of aluminum foil, and place it in a freezer-safe zip-top bag. They can be frozen for up to 3 months. To serve, thaw them at room temperature.
4. My brownies came out dry and hard. What did I do wrong?
This is a common and frustrating problem, but it’s usually due to one of a few culprits:
- Overbaking: This is the most likely reason. Remember to pull them when the toothpick has moist crumbs, not when it’s clean.
- Incorrect Flour Measurement: Scooping flour directly from the bag with your measuring cup can pack it in, resulting in you using up to 25% too much flour. This throws off the fat-to-flour ratio and leads to dry brownies. The best method is to spoon the flour into your measuring cup and then level it off with a straight edge.
- Oven Temperature: Your oven may run hotter than the dial says. An inexpensive oven thermometer can be a baker’s best friend to ensure accuracy.
- Overmixing: Vigorously mixing after the flour is added develops gluten, which makes brownies tough and cakey rather than fudgy. Fold gently until just combined.
5. Can I double this recipe? And what pan should I use?
Yes, you can absolutely double this recipe for a crowd! If you double it, you will need a larger pan. A half-sheet pan (approximately 18×13 inches) is the perfect size for a double batch. The brownies will be a similar thickness to the original recipe. When baking in a larger pan, the baking time may be slightly longer, so start checking for doneness around the 35-minute mark and add time in 3-5 minute increments until the toothpick test is perfect. Do not try to bake a double batch in the same 9×13 inch pan; it will overflow and the center will never cook through properly.
Print
Basic Brownie Recipe
Ingredients
- Unsalted Butter: 1 cup (226g or 2 sticks), melted
- Granulated Sugar: 2 cups (400g)
- Large Eggs: 4, at room temperature
- Pure Vanilla Extract: 1 tablespoon
- Unsweetened Cocoa Powder: 1 cup (85g), sifted
- All-Purpose Flour: 1 cup (120g)
- Salt: 1 teaspoon
- Optional: 1 ½ cups (250g) of chocolate chips, chopped nuts, or other mix-ins
Instructions
- Preheat and Prepare: Position a rack in the middle of your oven and preheat to 350°F (175°C). Lightly grease a 9×13-inch baking pan. For best results and easy removal, line the pan with parchment paper, leaving a 2-inch overhang on the two long sides to act as “handles.” This is the secret to getting perfectly clean slices later.
- Melt Butter and Dissolve Sugar: In a large, microwave-safe bowl, melt the butter completely. Add the granulated sugar to the hot melted butter and whisk vigorously for about 1-2 minutes. The mixture will look grainy, but this step is crucial. It helps the sugar begin to dissolve, which is the key to creating that shiny, crackly top on your finished brownies. Alternatively, you can do this step in a medium saucepan over low heat, stirring constantly until the butter is melted and combined with the sugar.
- Incorporate Eggs and Vanilla: Let the butter-sugar mixture cool slightly for a few minutes so it doesn’t scramble the eggs. Add the 4 room-temperature eggs one at a time, whisking well after each addition until fully incorporated. You’re looking for the batter to become thick, glossy, and smooth. Once the eggs are mixed in, stir in the tablespoon of pure vanilla extract.
- Add Dry Ingredients: Place a fine-mesh sieve over your bowl. Sift the cocoa powder, all-purpose flour, and salt directly into the wet ingredients. Sifting is non-negotiable here; it removes lumps from the cocoa and aerates the flour, ensuring a smooth, uniform batter without any dry pockets.
- Gently Fold: Switch from a whisk to a rubber spatula. Gently fold the dry ingredients into the wet mixture until just combined. Be very careful not to overmix. A few streaks of flour are acceptable at this stage. Overmixing develops the gluten in the flour, which will result in tough, cakey brownies instead of the dense, fudgy texture we’re aiming for.
- Add Mix-Ins (Optional): If you’re using chocolate chips, chopped walnuts, pecans, or any other mix-ins, fold them in now.
- Pour and Bake: Pour the thick, luscious batter into your prepared 9×13-inch pan. Use the spatula to spread it evenly into the corners. Bake on the middle rack for 30-35 minutes.
- The Doneness Test: The baking time is a guideline. Start checking for doneness at the 28-minute mark. The edges of the brownies should look set and be pulling away slightly from the sides of the pan. The center should look set but not completely dry. To test, insert a wooden toothpick or skewer into the center. It should come out with a few moist, fudgy crumbs attached. If it comes out clean, the brownies are overbaked. If it comes out with wet, liquid batter, they need a few more minutes. Remember, they will continue to cook from residual heat as they cool in the pan.
- Cool Completely: This is perhaps the most important and most difficult step! Remove the pan from the oven and place it on a wire cooling rack. Let the brownies cool completely in the pan, for at least 2-3 hours, or even longer. Cooling is essential for the brownies to set properly. If you try to slice them while warm, they will be a gooey, delicious mess. Patience here will reward you with clean, professional-looking squares.
- Slice and Serve: Once completely cooled, use the parchment paper handles to lift the entire slab of brownies out of the pan and onto a cutting board. For the cleanest cuts, use a large, sharp chef’s knife. Wipe the blade clean with a damp paper towel between each cut. Slice into your desired size and serve.
Nutrition
- Serving Size: One Normal Portion
- Calories: 210