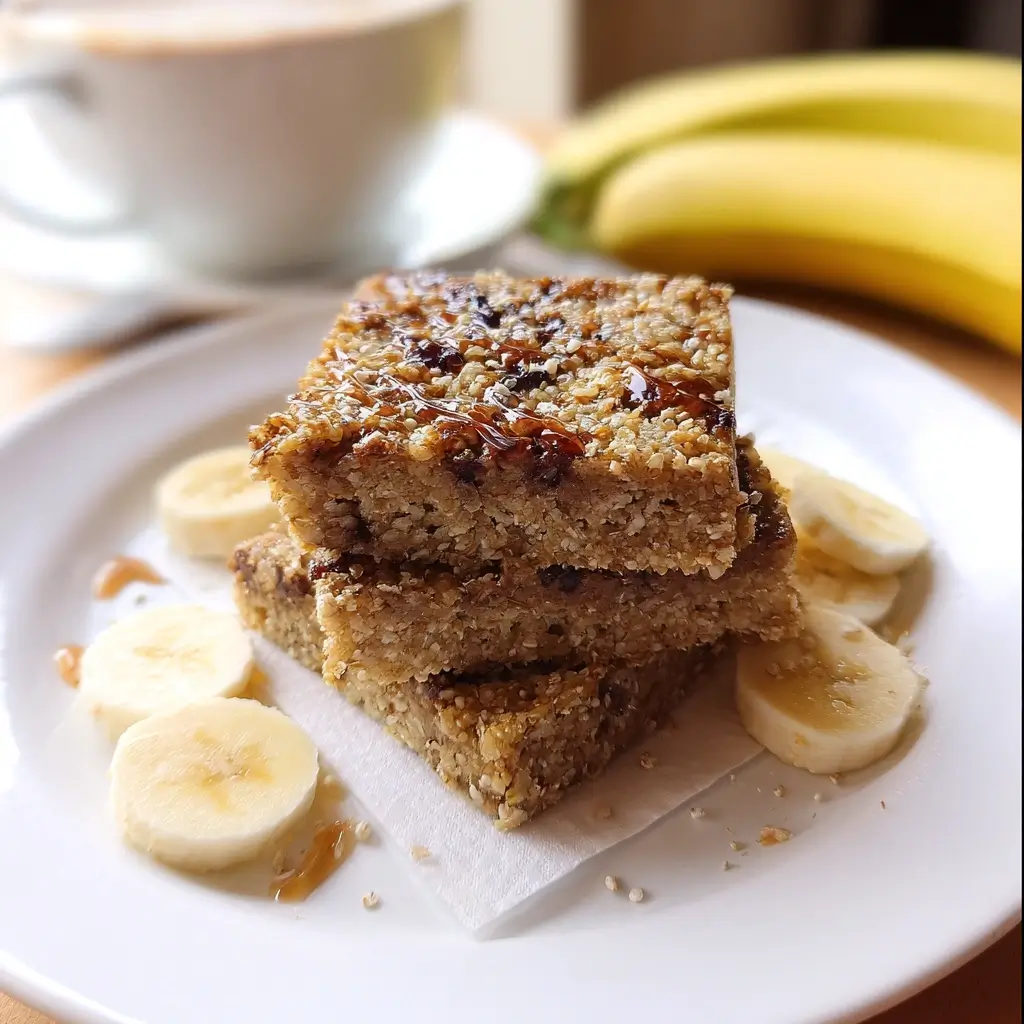
Of all the battles I face in the morning chaos of getting my family ready, the “what’s for breakfast” debate is often the most exhausting. Cereal boxes promise fun but deliver a sugar crash by 10 AM. Toast is quick but not always filling. And while I love a good plate of scrambled eggs, some mornings just don’t have that kind of time. That’s where these Banana Quinoa Breakfast Bars entered our lives and became the undisputed champion of our weekday mornings. The first time I made them, I was skeptical. Quinoa… in a breakfast bar? But the result was a revelation. They are perfectly moist, subtly sweet from the ripe bananas and maple syrup, and have the most satisfying, hearty texture from the combination of quinoa and rolled oats. My kids, who would normally turn their noses up at the word “quinoa,” devour them, especially when I add a handful of mini chocolate chips. For me, they are the perfect grab-and-go solution with my morning coffee, keeping me full and energized without any of the guilt. They are infinitely customizable, incredibly simple to make, and have single-handedly brought a sense of calm and deliciousness to our hectic mornings.
The Ultimate Banana Quinoa Breakfast Bars
These bars are the perfect make-ahead solution for a healthy, satisfying, and delicious breakfast or snack. They are packed with protein, fiber, and wholesome ingredients to fuel your day.
Ingredients
- 2 cups cooked quinoa, cooled
- 1 ½ cups old-fashioned rolled oats (ensure they are certified gluten-free if necessary)
- 3 large, very ripe bananas, mashed (about 1 ½ cups)
- ½ cup creamy or crunchy nut butter (almond, peanut, or sunbutter for a nut-free option)
- ⅓ cup pure maple syrup or honey
- ¼ cup melted coconut oil or unsalted butter
- 2 large eggs, lightly beaten (or 2 flax eggs for a vegan option)
- 1 teaspoon pure vanilla extract
- 1 teaspoon ground cinnamon
- ½ teaspoon baking powder
- ¼ teaspoon fine sea salt
- 1 cup mix-ins of your choice (e.g., walnuts, pecans, chocolate chips, dried cranberries, shredded coconut)
Instructions
- Preheat and Prepare: Preheat your oven to 350°F (175°C). Line a 9×13 inch baking pan with parchment paper, leaving some overhang on the sides to act as “handles.” This will make it much easier to lift the bars out later. Lightly grease the parchment paper and any exposed parts of the pan.
- Combine Wet Ingredients: In a large mixing bowl, add the mashed ripe bananas, cooked quinoa, nut butter, maple syrup, melted coconut oil, lightly beaten eggs, and vanilla extract. Whisk everything together until it’s well-combined and the mixture is relatively smooth.
- Combine Dry Ingredients: In a separate medium-sized bowl, whisk together the rolled oats, ground cinnamon, baking powder, and sea salt. This step ensures the leavening agent and spices are evenly distributed, which is key for a uniform texture and flavor.
- Mix Wet and Dry: Pour the dry ingredient mixture into the large bowl with the wet ingredients. Use a spatula to fold everything together until just combined. Be careful not to overmix; stop as soon as you no longer see dry streaks of oats. Overmixing can lead to denser, tougher bars.
- Fold in Mix-ins: Gently fold in your chosen mix-ins, like chopped walnuts and chocolate chips, until they are evenly distributed throughout the batter.
- Transfer to Pan: Pour the batter into your prepared baking pan. Use the back of the spatula to spread it into an even layer, pushing it into the corners. For denser, chewier bars, press the mixture down firmly and evenly across the entire surface.
- Bake: Place the pan in the preheated oven and bake for 25-30 minutes. The bars are done when the edges are golden brown, and a toothpick inserted into the center comes out clean or with a few moist crumbs attached. The top should feel set to the touch.
- Cool Completely: This is a crucial step! Remove the pan from the oven and place it on a wire cooling rack. Let the bars cool completely in the pan for at least 1-2 hours. If you try to cut them while they are still warm, they will be very crumbly and fall apart. Patience is key for perfectly formed bars.
- Slice and Serve: Once completely cooled, use the parchment paper handles to lift the entire block out of the pan and onto a cutting board. Use a sharp knife to slice into 16 bars. Serve immediately or store for later.
Nutrition Facts
- Servings: 16 bars
- Calories per serving: Approximately 180-220 kcal (This is an estimate and will vary based on your specific ingredients and chosen mix-ins, such as nut butter type and chocolate chips.)
Preparation Time
- Prep Time: 15 minutes
- Cook Time: 25-30 minutes
- Cooling Time: 1-2 hours
- Total Time: Approximately 2 hours
A Closer Look at the Powerhouse Ingredients
What makes these breakfast bars so uniquely satisfying and nutritious? It’s the synergistic effect of a few key whole-food ingredients. Understanding their roles can help you appreciate every bite and even inspire you to experiment.
Quinoa: The Unsung Hero
Often mistaken for a grain, quinoa is actually a seed, and it’s one of the few plant foods that contains all nine essential amino acids, making it a complete protein. This is fantastic news for a breakfast food, as protein is essential for satiety, muscle repair, and sustained energy. In these bars, the cooked quinoa provides a wonderfully subtle, slightly nutty flavor and a delightful, chewy texture that sets them apart from standard oat bars. It also adds a significant boost of fiber, magnesium, and iron. For this recipe, ensure your quinoa is cooked and completely cooled. Using warm quinoa can affect the texture of the batter.
Ripe Bananas: Nature’s Sweetener
The key to a perfectly sweet and moist bar lies in the ripeness of your bananas. The more brown spots, the better! As bananas ripen, their starches convert into natural sugars, making them intensely sweet and flavorful. This means you can use less added sugar (like maple syrup) for a healthier final product. Beyond sweetness, mashed bananas act as a primary binder and provide incredible moisture, preventing the bars from becoming dry and crumbly. They also contribute essential nutrients like potassium and vitamin B6.
Old-Fashioned Rolled Oats: The Hearty Foundation
Rolled oats form the backbone of these bars, providing that classic, comforting, chewy texture we all love. They are a fantastic source of soluble fiber, particularly beta-glucan, which is known for its heart-healthy benefits, including helping to lower cholesterol levels. This fiber also helps to slow down digestion, which keeps you feeling fuller for longer and helps to stabilize blood sugar levels. For this recipe, it’s best to use old-fashioned rolled oats rather than quick oats (which can become mushy) or steel-cut oats (which won’t soften enough during baking).
Nut Butter: Flavor, Fat, and Function
The nut butter in this recipe serves multiple purposes. First, it adds a rich, nutty flavor that pairs beautifully with the banana and cinnamon. Second, it provides healthy fats and additional protein, contributing to the bar’s ability to keep you satiated. Finally, it acts as a crucial binder, helping to hold all the ingredients together. You have complete freedom here: creamy almond butter provides a mild flavor, peanut butter offers a classic taste, and for a nut-free alternative, sunflower seed butter (sunbutter) works wonderfully.
How to Serve Your Banana Quinoa Breakfast Bars
While these bars are fantastic on their own as a grab-and-go breakfast, they can also be the star of a more complete and satisfying meal or snack. Here are a few ways to serve them:
- The Classic: Enjoy a bar as-is with your morning coffee, tea, or a tall glass of milk (or a dairy-free alternative like almond or oat milk).
- Yogurt Parfait Style: Crumble a bar over a bowl of Greek yogurt or coconut yogurt. Top with fresh berries for a delicious, protein-packed breakfast bowl with a fantastic mix of textures.
- The Nut Butter Drizzle: Warm a tablespoon of your favorite nut butter (almond, peanut, or cashew) in the microwave for 15-20 seconds until it’s runny, then drizzle it over a bar for an extra decadent treat.
- With a Side of Fruit: Pair a bar with a side of sliced apples, a fresh peach, or a handful of grapes for a well-rounded and fiber-rich snack.
- As a Healthy “Crouton”: For a truly unique twist, crumble a bar over a smoothie bowl. It adds a hearty, chewy crunch that is far more satisfying and nutritious than granola.
- Slightly Warmed: While they need to cool completely for cutting, you can gently warm an individual bar in the microwave for 10-15 seconds before eating. This softens the bar slightly and makes the chocolate chips (if using) melty and delicious.
Customizing Your Breakfast Bars: Fun Variations
One of the best things about this recipe is its versatility. Think of the base recipe as a canvas for your culinary creativity. Here are a few tested and loved variations to get you started:
Tropical Twist
Give your bars a sunny, tropical flair.
- Swap: Use melted virgin coconut oil for its distinct flavor.
- Mix-ins: Replace the standard mix-ins with ½ cup of unsweetened shredded coconut, ¼ cup of chopped macadamia nuts, and ¼ cup of chopped dried mango or pineapple.
Chocolate Peanut Butter Power
A classic combination that never fails to please.
- Swap: Use creamy or crunchy peanut butter as your nut butter of choice.
- Mix-ins: Use a full cup of semi-sweet or dark chocolate chips or chunks. You can even add 2 tablespoons of unsweetened cocoa powder to the dry ingredients for an even deeper chocolate flavor.
Nutty & Seedy Supercharge
Boost the healthy fats, fiber, and crunch factor with a variety of nuts and seeds.
- Mix-ins: Create a 1-cup blend of your favorites. Try a combination of chopped pecans, pumpkin seeds (pepitas), sunflower seeds, and a tablespoon of chia seeds or ground flaxseed for an extra omega-3 boost.
Autumn Spice Delight
Perfect for a crisp fall morning.
- Swap: You can substitute ½ cup of the mashed banana with ½ cup of pumpkin puree for a festive flavor. If you do this, you might need to add an extra tablespoon of maple syrup.
- Spices: In addition to the 1 teaspoon of cinnamon, add ¼ teaspoon of ground nutmeg, ¼ teaspoon of ground ginger, and a pinch of ground cloves.
- Mix-ins: Toasted pecans and dried cranberries are the perfect additions here.
Additional Tips for Perfect Bars Every Time
Achieving the perfect texture—chewy and moist, not dry or crumbly—is easy if you follow these five essential tips.
- Use Very Ripe Bananas: This cannot be overstated. Green-tinged or perfectly yellow bananas lack the necessary sugar content and moisture. You want bananas that are heavily speckled with brown or even mostly black. They will be much easier to mash and will provide the best natural sweetness and binding properties.
- Press the Mixture Firmly: Before baking, use the back of a spatula or even your slightly dampened hands to press the batter very firmly and evenly into the pan. This compaction is crucial. It helps the ingredients meld together and ensures the bars hold their shape after baking and cutting, preventing them from becoming too crumbly.
- Don’t Overbake: Keep a close eye on the bars as they approach the end of their baking time. Overbaking is the number one cause of dry, hard breakfast bars. The bars are ready when the edges are lightly browned and the center is set. They will continue to firm up significantly as they cool.
- Embrace the Parchment Paper Sling: Lining the pan with parchment paper that hangs over the sides is a game-changer. It guarantees the bars won’t stick to the pan and allows you to lift the entire batch out in one piece for clean, easy slicing. No more digging out the first piece with a spatula.
- Toast Your Nuts and Oats: For an incredible boost in flavor, take an extra five minutes to toast your rolled oats and any nuts you’re using. Spread them on a dry baking sheet and toast at 350°F (175°C) for 5-7 minutes, until they are lightly golden and fragrant. This simple step deepens their nutty flavor and adds a fantastic layer of complexity to the finished bars.
Frequently Asked Questions (FAQ)
Here are answers to some of the most common questions about making these Banana Quinoa Breakfast Bars.
1. Can I make these bars vegan?
Absolutely! This recipe is very easy to make vegan. Simply substitute the two large eggs with two “flax eggs.” To make a flax egg, combine one tablespoon of ground flaxseed with three tablespoons of water. Whisk together and let it sit for 5-10 minutes until it becomes gelatinous. Use two of these in place of the chicken eggs. Also, ensure you are using maple syrup (not honey) and a plant-based oil or butter like coconut oil.
2. How do I ensure my bars are 100% gluten-free?
Quinoa and bananas are naturally gluten-free. The main ingredient to check is your oats. While oats themselves do not contain gluten, they are often processed in facilities that also handle wheat, barley, and rye, leading to cross-contamination. To be safe, purchase oats that are explicitly labeled as “Certified Gluten-Free.”
3. Why did my breakfast bars turn out crumbly?
There are a few potential culprits for crumbly bars.
- Not cooling completely: This is the most common reason. The bars need to be completely cool to set properly.
- Not pressing firmly: If the mixture isn’t compacted tightly in the pan before baking, it won’t hold together as well.
- Incorrect measurements: Not using enough wet or binding ingredients (like banana, nut butter, or eggs) can lead to a dry, crumbly result.
- Overbaking: Baking for too long will dry out the bars, making them brittle.
4. Can I use a different fruit instead of banana?
Yes, you can experiment, but it may change the texture. A good substitute is unsweetened applesauce or pumpkin puree. You can typically substitute them in a 1:1 ratio for the mashed banana (e.g., 1 ½ cups of applesauce). However, since these fruits are less sweet and dense than ripe bananas, you might want to add an extra tablespoon or two of maple syrup and be aware that the final bar may be slightly softer.
5. Can I add protein powder to this recipe?
Yes, you can boost the protein content further by adding protein powder. I recommend adding ¼ to ⅓ cup of your favorite vanilla or unflavored protein powder to the dry ingredients. Because the powder will absorb moisture, you may need to compensate by adding a few extra tablespoons of liquid, such as almond milk, water, or a little more mashed banana, to get the right batter consistency.

Banana Quinoa Breakfast Bars
Ingredients
- 2 cups cooked quinoa, cooled
- 1 ½ cups old-fashioned rolled oats (ensure they are certified gluten-free if necessary)
- 3 large, very ripe bananas, mashed (about 1 ½ cups)
- ½ cup creamy or crunchy nut butter (almond, peanut, or sunbutter for a nut-free option)
- ⅓ cup pure maple syrup or honey
- ¼ cup melted coconut oil or unsalted butter
- 2 large eggs, lightly beaten (or 2 flax eggs for a vegan option)
- 1 teaspoon pure vanilla extract
- 1 teaspoon ground cinnamon
- ½ teaspoon baking powder
- ¼ teaspoon fine sea salt
- 1 cup mix-ins of your choice (e.g., walnuts, pecans, chocolate chips, dried cranberries, shredded coconut)
Instructions
- Preheat and Prepare: Preheat your oven to 350°F (175°C). Line a 9×13 inch baking pan with parchment paper, leaving some overhang on the sides to act as “handles.” This will make it much easier to lift the bars out later. Lightly grease the parchment paper and any exposed parts of the pan.
- Combine Wet Ingredients: In a large mixing bowl, add the mashed ripe bananas, cooked quinoa, nut butter, maple syrup, melted coconut oil, lightly beaten eggs, and vanilla extract. Whisk everything together until it’s well-combined and the mixture is relatively smooth.
- Combine Dry Ingredients: In a separate medium-sized bowl, whisk together the rolled oats, ground cinnamon, baking powder, and sea salt. This step ensures the leavening agent and spices are evenly distributed, which is key for a uniform texture and flavor.
- Mix Wet and Dry: Pour the dry ingredient mixture into the large bowl with the wet ingredients. Use a spatula to fold everything together until just combined. Be careful not to overmix; stop as soon as you no longer see dry streaks of oats. Overmixing can lead to denser, tougher bars.
- Fold in Mix-ins: Gently fold in your chosen mix-ins, like chopped walnuts and chocolate chips, until they are evenly distributed throughout the batter.
- Transfer to Pan: Pour the batter into your prepared baking pan. Use the back of the spatula to spread it into an even layer, pushing it into the corners. For denser, chewier bars, press the mixture down firmly and evenly across the entire surface.
- Bake: Place the pan in the preheated oven and bake for 25-30 minutes. The bars are done when the edges are golden brown, and a toothpick inserted into the center comes out clean or with a few moist crumbs attached. The top should feel set to the touch.
- Cool Completely: This is a crucial step! Remove the pan from the oven and place it on a wire cooling rack. Let the bars cool completely in the pan for at least 1-2 hours. If you try to cut them while they are still warm, they will be very crumbly and fall apart. Patience is key for perfectly formed bars.
- Slice and Serve: Once completely cooled, use the parchment paper handles to lift the entire block out of the pan and onto a cutting board. Use a sharp knife to slice into 16 bars. Serve immediately or store for later.
Nutrition
- Serving Size: One Normal Portion
- Calories: 180-220