There are mornings when the usual bowl of cereal or slice of toast just doesn’t cut it. You crave something a little special, something that feels indulgent yet still fits into a reasonably healthy breakfast routine. That’s exactly where these Banana Pudding Breakfast Parfaits came into my life. I was initially skeptical – could something tasting like banana pudding actually work for breakfast without being a total sugar bomb? The answer, discovered after some delicious experimentation, was a resounding YES! The first time I made these, my family’s eyes lit up. My kids, usually picky about anything remotely “healthy,” devoured them, asking for seconds. My partner, who typically grabs coffee and runs, actually sat down to savor it. It perfectly marries the comforting, creamy sweetness of classic banana pudding with the wholesome goodness of yogurt and fruit. It’s become our go-to for weekend brunches, special weekday treats, or even a healthier dessert option. The layers look beautiful in a glass, making it feel fancy, but it’s surprisingly simple to assemble. It’s that perfect combination of nostalgic flavor, satisfying texture, and breakfast-appropriate nutrition that makes this recipe a true winner in our household.
What Makes This Banana Pudding Breakfast Parfait Special?
Before diving into the recipe, let’s talk about why this isn’t just yogurt with bananas. This parfait is designed to evoke the essence of traditional banana pudding – the creamy vanilla base, the sweet bananas, and that signature crunch – but reimagined for a morning meal.
- The Creamy Base: Instead of heavy custard or instant pudding mix often loaded with sugar and artificial ingredients, we use a blend of protein-rich Greek yogurt and potentially some light cream cheese or even a chia pudding layer for added texture and fiber. This provides creaminess and tang, balancing the sweetness. Vanilla extract is key here to mimic that classic pudding flavor.
- The Banana Element: Fresh, ripe bananas are essential. Their natural sweetness intensifies as they ripen, reducing the need for excessive added sugar. Slicing them allows for even distribution throughout the layers.
- The “Wafer” Crunch: Traditional banana pudding relies heavily on Nilla wafers softening into the custard. For breakfast, we want crunch that holds up. Crushed vanilla wafers are the classic choice for authenticity, but granola, crushed digestive biscuits, graham crackers, or even toasted nuts/seeds offer healthier, crunchier alternatives that provide texture contrast right up until the last spoonful.
- Healthier Approach: By using Greek yogurt, controlling the sweetener, and incorporating whole fruit, this parfait offers protein, probiotics, potassium, and fiber – nutrients often missing in traditional desserts. It’s filling and provides sustained energy.
- Customizable: This recipe is a fantastic template. You can adjust the sweetness, swap the type of yogurt, add different spices (like cinnamon or nutmeg), or experiment with various crunchy toppings.
Ingredients You’ll Need
This recipe is designed for flexibility, but here’s a baseline to create approximately 2 large or 4 smaller parfaits.
- For the Creamy Vanilla Base:
- Greek Yogurt: 2 cups (approx. 450-500g) plain, full-fat or low-fat Greek yogurt. (Greek yogurt provides thickness and protein. Regular plain yogurt can work but will be runnier. For extra richness and tang, you could substitute 1/4 cup of the yogurt with softened cream cheese, whipped until smooth before folding into the rest of the yogurt).
- Sweetener: 2-4 tablespoons maple syrup, honey, or agave nectar (adjust to your taste preference and the yogurt’s tartness). You can also use a sugar substitute like stevia or erythritol, adjusting the amount according to its sweetness level.
- Vanilla Extract: 1 ½ teaspoons pure vanilla extract. This is crucial for the “pudding” flavor. Use good quality vanilla.
- Optional: Pinch of salt (enhances sweetness and flavor complexity).
- Optional: 1/4 teaspoon ground cinnamon or nutmeg for warmth.
- For the Banana Layers:
- Bananas: 2 large, ripe but still firm bananas. Avoid overly mushy bananas as they can make the parfait watery.
- For the Crunchy Layers:
- Crushed Vanilla Wafers: ½ to ¾ cup crushed vanilla wafers (like Nilla Wafers). Place them in a zip-top bag and crush gently with a rolling pin or the bottom of a glass. You want some smaller crumbs and some slightly larger pieces for texture.
- Alternatively: Use ¾ cup of your favorite granola, crushed graham crackers, digestive biscuits, or even toasted chopped pecans or walnuts.
- Optional Chia Pudding Layer (for extra texture & nutrients):
- Chia Seeds: ¼ cup (approx. 40g) chia seeds.
- Milk: 1 cup (240ml) milk (dairy or plant-based like almond, soy, oat, or coconut milk).
- Sweetener: 1 tablespoon maple syrup or honey (optional, adjust to taste).
- Vanilla Extract: ½ teaspoon vanilla extract (optional).
- (Note: If adding this layer, prepare it ahead of time as it needs to set).
- Optional Garnish:
- Whipped cream (store-bought or homemade).
- A sprinkle of cinnamon.
- A whole vanilla wafer.
- A few extra banana slices (treat with lemon juice to prevent browning if not serving immediately).
- A drizzle of caramel sauce or extra maple syrup.
Ingredient Deep Dive & Substitutions:
- Greek Yogurt: The high protein content keeps you full, and its thickness is ideal for layering. Substitutions: Regular plain yogurt (will be thinner), Skyr (similar to Greek yogurt), dairy-free yogurt (coconut, almond, soy, or oat-based – look for plain, unsweetened thick varieties). If using a thinner yogurt, straining it through cheesecloth for an hour can help thicken it. Adding softened cream cheese (about 2-4 oz whipped smooth) can significantly enhance richness and mimic custard flavor, but adds fat and calories.
- Sweetener: Maple syrup offers a lovely flavor profile. Honey is another great natural option. Agave is milder. Substitutions: Coconut sugar, date paste (will add color and thickness), or zero-calorie sweeteners like stevia or monk fruit (adjust carefully). Start with less sweetener and add more if needed, especially considering the bananas add natural sweetness.
- Vanilla Extract: Non-negotiable for that pudding taste. Use pure extract, not imitation, for the best flavor. Vanilla bean paste (use about half the amount) adds lovely visual specks.
- Bananas: Ripe bananas are sweeter. If your bananas are slightly underripe, the parfait might need a touch more sweetener. Substitutions: While essential for banana pudding flavor, you could adapt the parfait concept with other fruits like strawberries, peaches, or mangoes, perhaps changing the name accordingly (e.g., Strawberry Cream Parfait).
- Crunch Element: Vanilla wafers provide authentic flavor. Granola adds fiber and often nuts/seeds. Graham crackers offer a different spiced note. Substitutions: Digestive biscuits, Biscoff cookies (for a caramel note), shortbread cookies, toasted oats mixed with a little butter and brown sugar, or simply toasted nuts like pecans or walnuts for a gluten-free, lower-sugar option. Consider layering different types of crunch.
- Chia Pudding: This adds a fantastic textural contrast, boosts fiber, omega-3s, and makes the parfait even more filling. It’s entirely optional but highly recommended for a nutritional upgrade. Use any milk you prefer; coconut milk makes it particularly rich.
Equipment Needed
You likely have everything you need already:
- Medium Mixing Bowl: For combining the yogurt base ingredients.
- Whisk or Spatula: For mixing the yogurt base smoothly.
- Small Bowl (Optional): If making the chia pudding layer.
- Knife and Cutting Board: For slicing the bananas.
- Measuring Cups and Spoons: For accurate ingredient amounts.
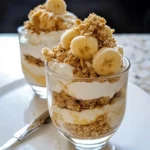
- Serving Glasses or Jars: Clear glasses or jars (like Mason jars) showcase the beautiful layers. Aim for 8-12 oz capacity depending on desired serving size. Small bowls also work, but the visual appeal of layers is lost.
- Zip-top Bag and Rolling Pin/Glass (Optional): For crushing the vanilla wafers or other crunchy elements. Alternatively, use a food processor (pulse briefly).
Instructions (Step-by-Step)
Follow these steps for parfait perfection:
Step 1: Prepare the Chia Pudding (If Using – Start Ahead)
- (Do this at least 2 hours before assembling, or ideally overnight)
- In a small bowl or jar, combine the chia seeds, milk, optional sweetener, and optional vanilla extract.
- Whisk thoroughly for about 30 seconds to break up any clumps. Let it sit for 5 minutes, then whisk again vigorously to ensure seeds are well-distributed and prevent clumping at the bottom.
- Cover the bowl or jar and refrigerate for at least 2 hours, or preferably overnight, until the mixture has thickened into a gel-like pudding consistency. Stir once more before using.
Step 2: Prepare the Creamy Vanilla Yogurt Base
- In a medium mixing bowl, combine the Greek yogurt, sweetener (start with the lower amount), vanilla extract, and optional pinch of salt and/or cinnamon/nutmeg.
- If using cream cheese for extra richness, ensure it’s fully softened and beat it until completely smooth in a separate small bowl before adding it to the yogurt. This prevents lumps.
- Whisk or stir the yogurt mixture until it’s completely smooth, glossy, and well combined. Taste and add more sweetener if desired. Set aside.
Step 3: Prepare the Bananas and Crunch
- Peel and slice the bananas into rounds, about ¼ inch (½ cm) thick. If not assembling immediately, toss gently with a tiny squeeze of lemon juice to minimize browning (use sparingly to avoid altering the flavor).
- If you haven’t already, crush your vanilla wafers (or chosen crunchy element) into coarse crumbs. Keep some slightly larger pieces for texture. Place the crumbs in a small bowl.
Step 4: Assemble the Parfaits
- Choose your serving glasses or jars (2 large or 4 small). The key is layering! Work methodically for clean, distinct layers.
- Layer 1 (Bottom): Start with a layer of the crushed vanilla wafers/granola at the bottom of each glass. About 1-2 tablespoons per glass.
- Layer 2: Spoon a layer of the vanilla yogurt mixture over the crumbs. Use the back of the spoon to spread it gently towards the edges.
- Layer 3 (Optional): If using chia pudding, add a layer now.
- Layer 4: Arrange a single layer of banana slices over the yogurt (or chia pudding). Press them slightly against the glass for visual appeal.
- Layer 5: Add another layer of crushed wafers/granola.
- Layer 6: Spoon another layer of the vanilla yogurt mixture.
- Layer 7: Add another layer of banana slices.
- Repeat (Optional): Depending on the height of your glasses, you might repeat layers (crunch, yogurt, banana) until the glass is nearly full, ending with a yogurt layer.
- Final Topping: Finish with a final sprinkle of crushed wafers/granola.
Step 5: Garnish and Serve (or Chill)
- Add any desired garnishes: a dollop of whipped cream, an extra sprinkle of cinnamon, a whole vanilla wafer standing upright, a few fresh banana slices (add these just before serving if not treated with lemon juice), or a drizzle of caramel/maple syrup.
- Serve immediately for the best crunchy texture.
- Alternatively, you can cover the parfaits tightly with plastic wrap and chill them in the refrigerator for at least 30 minutes or up to 4 hours. This allows the flavors to meld nicely, though the crunchy layer directly under the yogurt will soften slightly (similar to traditional banana pudding). Avoid chilling for too long if you want maximum crunch. If making further ahead, consider assembling just before serving or layering the crunch on top only.
Nutrition Facts
- Servings: Makes approximately 2 large parfaits or 4 smaller parfaits.
- Calories per Serving (Estimate): Approximately 350-550 calories per large serving (or 175-275 per small serving).
- Disclaimer: This is an estimate and can vary significantly based on:
- The specific type and fat content of Greek yogurt used (full-fat vs. low-fat vs. non-fat).
- The amount and type of sweetener used.
- The type and amount of crunchy topping (granola calories vary wildly, wafers add sugar/refined carbs, nuts add healthy fats but also calories).
- Whether cream cheese or chia pudding is added.
- The exact size of the bananas.
- Potential Nutritional Highlights (per serving, approximate):
- Protein: High (especially from Greek yogurt). ~15-25g per large serving.
- Fiber: Moderate (from bananas, chia seeds if used, whole grain granola if used). ~4-8g per large serving.
- Potassium: Good source (from bananas and yogurt).
- Calcium: Good source (from yogurt/milk).
- Probiotics: If using yogurt with live active cultures.
For precise nutritional information, use an online calculator and input your specific ingredients and quantities. This recipe provides a good balance of protein, carbohydrates, and fats for a satisfying breakfast or snack.
Preparation Time
- Active Preparation Time: 15-20 minutes (mixing yogurt, slicing bananas, crushing wafers, layering).
- Chia Pudding Setting Time (If Using): 2 hours to overnight.
- Optional Chilling Time: 30 minutes to 4 hours.
- Total Time (Without Chia Pudding, Served Immediately): 15-20 minutes.
- Total Time (With Chia Pudding prepared overnight, Served Immediately): 15-20 minutes active time.
- Total Time (With Chia Pudding + Chilling): ~2 hours 45 minutes (minimum) to overnight + 15-20 mins active + 30 mins chill.
This is generally a quick recipe to assemble, especially if you make the chia pudding (if using) ahead of time.
How to Serve
Presentation enhances the experience! Here are some ways to serve your Banana Pudding Breakfast Parfaits:
- Glassware Choice:
- Clear Glasses/Jars: Tall parfait glasses, stemless wine glasses, Mason jars (8oz or 16oz), or even sturdy drinking glasses work best to show off the layers.
- Small Bowls: If glassware isn’t available, small bowls work, but you lose the layered visual.
- Serving Temperature:
- Chilled: Ideal for allowing flavors to meld. Serve straight from the fridge.
- Immediately After Assembly: Best for maximum crunch from the wafer/granola layers.
- Garnishes (Apply Just Before Serving):
- Whipped Cream: A classic banana pudding topping. Use sweetened whipped cream or coconut cream for a dairy-free option.
- Crunch: An extra sprinkle of the crushed wafers, granola, or toasted nuts on top.
- Fruit: A few perfectly placed fresh banana slices (lemon-treated if needed) or even a single raspberry or strawberry for color contrast.
- Spice: A light dusting of cinnamon or nutmeg.
- Drizzle: A thin stream of maple syrup, honey, caramel sauce, or melted peanut butter.
- Mint Sprig: For a touch of green and freshness.
- Occasions:
- Weekday Breakfast: A special treat to start the day right. Assemble the night before (maybe keep crunch separate) for a quick grab-and-go option.
- Weekend Brunch: Impressive yet easy addition to a brunch spread.
- Healthy Snack: A satisfying mid-day or post-workout snack.
- Light Dessert: A healthier alternative to traditional banana pudding.
- Pairings:
- Serve alongside coffee, tea, or a glass of milk/plant milk.
- For a larger brunch, pair with eggs, bacon, or other savory items to balance the sweetness.
Additional Tips (5 Tips)
- Make-Ahead Strategy for Busy Mornings: You can fully assemble the parfaits the night before and store them covered in the fridge. The crunchy layers will soften, creating a texture closer to traditional banana pudding, which many people enjoy! If you strongly prefer crunch, layer everything except the final crunchy topping. Store the crushed wafers/granola separately in an airtight container and sprinkle them on top just before eating. The yogurt base and chia pudding (if using) can definitely be made 1-2 days ahead and stored separately in airtight containers in the fridge.
- Preventing Brown Bananas: While a little browning is fine if eating soon, for make-ahead or presentation, toss the banana slices very lightly with lemon juice (about ½ tsp lemon juice per banana, gently tossed). Alternatively, use lime juice or even pineapple juice. Use sparingly to avoid overpowering the banana flavor. Another trick is to layer bananas between yogurt layers, minimizing air exposure.
- Customize Your Crunch: Don’t feel limited to vanilla wafers! Experiment with different textures and flavors. Gingersnaps add warmth, chocolate graham crackers offer a different twist, toasted coconut flakes add tropical notes, and a mix of seeds (pumpkin, sunflower) boosts nutrition. Layering two types of crunch (e.g., wafers at the bottom, granola on top) can add complexity.
- Adjusting Sweetness and Flavor: Taste your yogurt base before layering! Greek yogurt varies in tartness. Add sweetener gradually until it reaches your desired level. Remember the bananas and wafers/granola also add sweetness. Consider adding other extracts like almond or coconut alongside vanilla, or spices like cardamom for a unique flavor profile. A tiny pinch of salt really does enhance the overall taste.
- Layering Like a Pro: For neat layers, use a spoon to gently place ingredients rather than dumping them in. Spread the yogurt carefully to the edges of the glass using the back of the spoon – this creates defined lines. Wipe the inside rim of the glass with a paper towel if needed between layers for a cleaner look. Don’t overfill the glass; leave some room at the top for garnish and easier eating.
Frequently Asked Questions (FAQ)
Q1: Can I make this Banana Pudding Breakfast Parfait vegan?
A: Absolutely! It’s very easy to make this vegan.
- Yogurt: Use a thick, plain, unsweetened plant-based yogurt (coconut yogurt works especially well for richness, but almond, soy, or oat-based Greek-style yogurts are also great options).
- Milk (for Chia Pudding): Use any plant-based milk like almond, soy, oat, or cashew milk. Full-fat coconut milk will make the chia pudding extra creamy.
- Sweetener: Maple syrup and agave nectar are already vegan. Ensure your sugar (if using instead) is vegan-certified, as some white sugar is processed with bone char.
- Crunch: Check your vanilla wafer or granola ingredients. Many commercial vanilla wafers contain milk or eggs. Look for vegan-specific brands, use naturally vegan options like some granolas (check labels for honey), graham crackers (some are vegan), or simply use toasted nuts/seeds. Many digestive biscuits are vegan.
- Garnish: Use vegan whipped cream (coconut or oat-based).
Q2: How can I make this recipe gluten-free?
A: Yes, this is also straightforward. The yogurt, bananas, sweetener, vanilla, and chia seeds are naturally gluten-free. The main concern is the crunchy layer.
- Crunch: Instead of vanilla wafers or standard granola/graham crackers, use certified gluten-free options. Look for gluten-free vanilla cookies, gluten-free granola, or gluten-free graham crackers. Alternatively, use naturally gluten-free crunch like toasted nuts (pecans, walnuts, almonds), seeds (pumpkin, sunflower), or toasted gluten-free rolled oats mixed with a little coconut oil/butter and sweetener. Crushed gluten-free pretzels could even offer a sweet-salty contrast. Always check labels to ensure products are certified gluten-free if catering to celiac disease.
Q3: How long do these Banana Pudding Breakfast Parfaits last in the refrigerator?
A: Assembled parfaits are best consumed within 24-48 hours when stored tightly covered in the refrigerator.
- Texture Changes: The main change will be the softening of the crunchy layers as they absorb moisture from the yogurt. The bananas may also brown slightly, even if treated with lemon juice, especially after the first day.
- Flavor: The flavors will continue to meld, which can be pleasant.
- For Optimal Freshness/Crunch: Eat within a few hours of assembly, or store components separately and assemble just before serving if making more than a day ahead (yogurt mix, chia pudding, and crunch stored separately; slice bananas fresh).
Q4: Can I use frozen bananas in this recipe?
A: It’s generally not recommended to use frozen bananas directly for the layers. When frozen bananas thaw, they release a lot of water and become very mushy, which can make the parfait watery and negatively impact the texture.
- Alternative Use: You could potentially blend thawed frozen bananas into the yogurt base to intensify the banana flavor and add sweetness (you might need less added sweetener). However, for the distinct banana slice layers, fresh, ripe-but-firm bananas are definitely best. If you only have frozen bananas, consider making a banana smoothie bowl instead.
Q5: Can I use instant banana pudding mix instead of the yogurt base?
A: You could, but it would fundamentally change the recipe from a breakfast parfait into a more traditional (and typically less nutritious) dessert parfait.
- Nutritional Difference: Instant pudding mixes often contain significant amounts of sugar, artificial flavors, colors, and thickeners, lacking the protein and probiotics found in Greek yogurt.
- Flavor/Texture: It would taste much more like classic banana pudding, but potentially overly sweet or artificial for a breakfast item. The texture would be smoother and less tangy than the yogurt base.
- If You Choose To: Prepare the instant pudding according to package directions (likely using milk). Let it set fully before layering it as you would the yogurt mixture. You’d still layer it with fresh bananas and a crunchy element. Consider it a dessert rather than a healthy breakfast option. The Greek yogurt base is key to making this recipe feel appropriate and satisfying for the morning.
Banana Pudding Breakfast Parfaits Recipe
Ingredients
- For the Creamy Vanilla Base:
- Greek Yogurt: 2 cups (approx. 450-500g) plain, full-fat or low-fat Greek yogurt. (Greek yogurt provides thickness and protein. Regular plain yogurt can work but will be runnier. For extra richness and tang, you could substitute 1/4 cup of the yogurt with softened cream cheese, whipped until smooth before folding into the rest of the yogurt).
- Sweetener: 2-4 tablespoons maple syrup, honey, or agave nectar (adjust to your taste preference and the yogurt’s tartness). You can also use a sugar substitute like stevia or erythritol, adjusting the amount according to its sweetness level.
- Vanilla Extract: 1 ½ teaspoons pure vanilla extract. This is crucial for the “pudding” flavor. Use good quality vanilla.
- Optional: Pinch of salt (enhances sweetness and flavor complexity).
- Optional: 1/4 teaspoon ground cinnamon or nutmeg for warmth.
- For the Banana Layers:
- Bananas: 2 large, ripe but still firm bananas. Avoid overly mushy bananas as they can make the parfait watery.
- For the Crunchy Layers:
- Crushed Vanilla Wafers: ½ to ¾ cup crushed vanilla wafers (like Nilla Wafers). Place them in a zip-top bag and crush gently with a rolling pin or the bottom of a glass. You want some smaller crumbs and some slightly larger pieces for texture.
- Alternatively: Use ¾ cup of your favorite granola, crushed graham crackers, digestive biscuits, or even toasted chopped pecans or walnuts.
- Optional Chia Pudding Layer (for extra texture & nutrients):
- Chia Seeds: ¼ cup (approx. 40g) chia seeds.
- Milk: 1 cup (240ml) milk (dairy or plant-based like almond, soy, oat, or coconut milk).
- Sweetener: 1 tablespoon maple syrup or honey (optional, adjust to taste).
- Vanilla Extract: ½ teaspoon vanilla extract (optional).
- (Note: If adding this layer, prepare it ahead of time as it needs to set).
- Optional Garnish:
- Whipped cream (store-bought or homemade).
- A sprinkle of cinnamon.
- A whole vanilla wafer.
- A few extra banana slices (treat with lemon juice to prevent browning if not serving immediately).
- A drizzle of caramel sauce or extra maple syrup.
Instructions
Step 1: Prepare the Chia Pudding (If Using – Start Ahead)
- (Do this at least 2 hours before assembling, or ideally overnight)
- In a small bowl or jar, combine the chia seeds, milk, optional sweetener, and optional vanilla extract.
- Whisk thoroughly for about 30 seconds to break up any clumps. Let it sit for 5 minutes, then whisk again vigorously to ensure seeds are well-distributed and prevent clumping at the bottom.
- Cover the bowl or jar and refrigerate for at least 2 hours, or preferably overnight, until the mixture has thickened into a gel-like pudding consistency. Stir once more before using.
Step 2: Prepare the Creamy Vanilla Yogurt Base
- In a medium mixing bowl, combine the Greek yogurt, sweetener (start with the lower amount), vanilla extract, and optional pinch of salt and/or cinnamon/nutmeg.
- If using cream cheese for extra richness, ensure it’s fully softened and beat it until completely smooth in a separate small bowl before adding it to the yogurt. This prevents lumps.
- Whisk or stir the yogurt mixture until it’s completely smooth, glossy, and well combined. Taste and add more sweetener if desired. Set aside.
Step 3: Prepare the Bananas and Crunch
- Peel and slice the bananas into rounds, about ¼ inch (½ cm) thick. If not assembling immediately, toss gently with a tiny squeeze of lemon juice to minimize browning (use sparingly to avoid altering the flavor).
- If you haven’t already, crush your vanilla wafers (or chosen crunchy element) into coarse crumbs. Keep some slightly larger pieces for texture. Place the crumbs in a small bowl.
Step 4: Assemble the Parfaits
- Choose your serving glasses or jars (2 large or 4 small). The key is layering! Work methodically for clean, distinct layers.
- Layer 1 (Bottom): Start with a layer of the crushed vanilla wafers/granola at the bottom of each glass. About 1-2 tablespoons per glass.
- Layer 2: Spoon a layer of the vanilla yogurt mixture over the crumbs. Use the back of the spoon to spread it gently towards the edges.
- Layer 3 (Optional): If using chia pudding, add a layer now.
- Layer 4: Arrange a single layer of banana slices over the yogurt (or chia pudding). Press them slightly against the glass for visual appeal.
- Layer 5: Add another layer of crushed wafers/granola.
- Layer 6: Spoon another layer of the vanilla yogurt mixture.
- Layer 7: Add another layer of banana slices.
- Repeat (Optional): Depending on the height of your glasses, you might repeat layers (crunch, yogurt, banana) until the glass is nearly full, ending with a yogurt layer.
- Final Topping: Finish with a final sprinkle of crushed wafers/granola.
Step 5: Garnish and Serve (or Chill)
- Add any desired garnishes: a dollop of whipped cream, an extra sprinkle of cinnamon, a whole vanilla wafer standing upright, a few fresh banana slices (add these just before serving if not treated with lemon juice), or a drizzle of caramel/maple syrup.
- Serve immediately for the best crunchy texture.
- Alternatively, you can cover the parfaits tightly with plastic wrap and chill them in the refrigerator for at least 30 minutes or up to 4 hours. This allows the flavors to meld nicely, though the crunchy layer directly under the yogurt will soften slightly (similar to traditional banana pudding). Avoid chilling for too long if you want maximum crunch. If making further ahead, consider assembling just before serving or layering the crunch on top only.
Nutrition
- Serving Size: One Normal Portion
- Calories: 350-550
- Fiber: 4-8g
- Protein: 15-25g