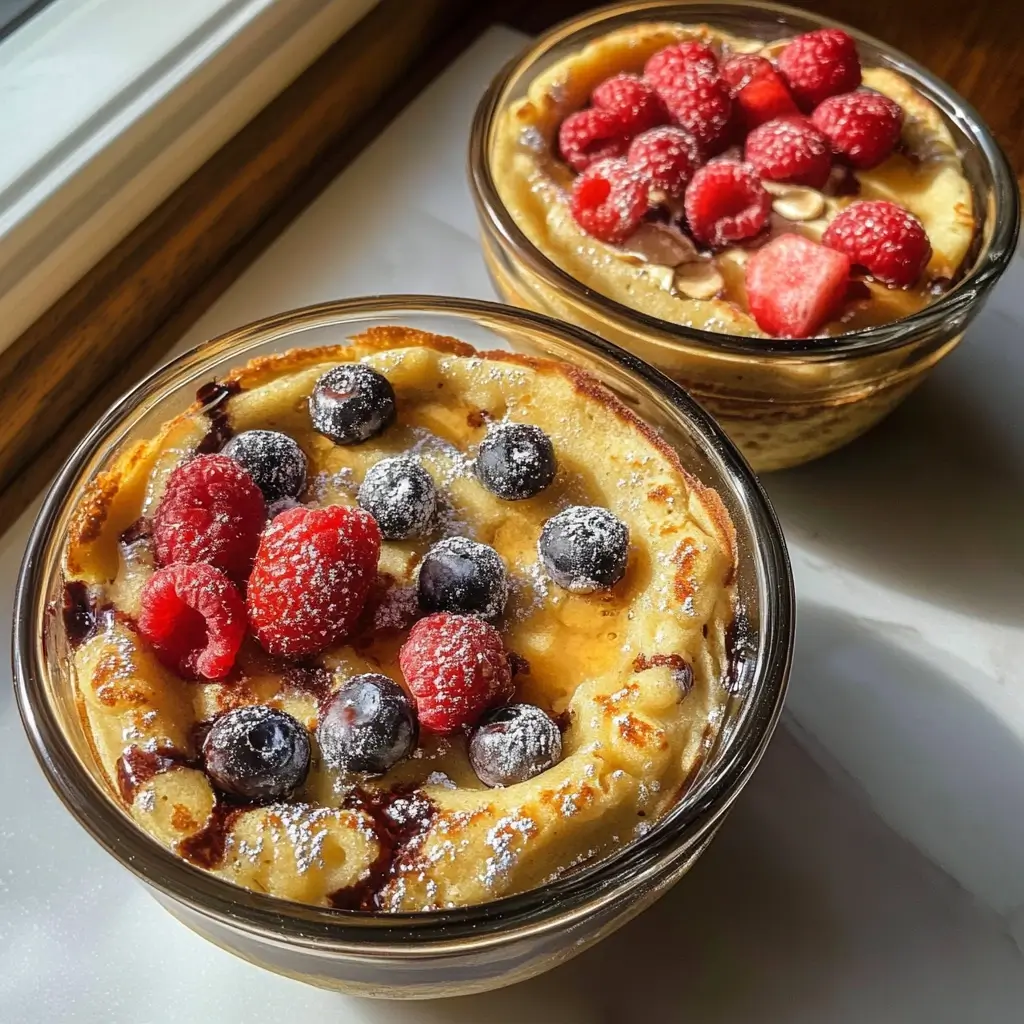
Weekdays mornings can be a whirlwind, especially when trying to juggle work, family, and healthy eating. For years, breakfast in our house was a constant battle between convenience and nutrition. Cereal was quick, but lacked staying power, and elaborate breakfasts felt like a weekend luxury. That’s where these Baked Protein Pancake Bowls became an absolute game-changer. Honestly, they’ve revolutionized our mornings. My kids, who are usually picky eaters, devour them, and my husband and I love the protein boost to kickstart our day. The best part? They are incredibly easy to prepare ahead of time, making busy mornings a breeze. Forget soggy, rushed pancakes – these bowls are fluffy, flavorful, and packed with protein to keep you full and energized until lunchtime. If you’re searching for a breakfast that’s both healthy and satisfying, look no further. These Baked Protein Pancake Bowls are about to become your new breakfast obsession!
Ingredients
To create these delightful and protein-packed Baked Pancake Bowls, you’ll need a handful of wholesome ingredients. Here’s a detailed list to ensure you have everything ready:
- 1 cup Rolled Oats (Gluten-Free if needed): Oats form the base of our pancake bowls, providing fiber, complex carbohydrates for sustained energy, and a lovely, slightly nutty flavor. Rolled oats, also known as old-fashioned oats, are preferred for their texture and ability to absorb liquid well, resulting in a moist and fluffy final product. Quick oats can also be used in a pinch, but the texture might be slightly softer. For those with gluten sensitivities, ensure you use certified gluten-free rolled oats.
- 1 scoop Vanilla Protein Powder (Whey, Casein, or Plant-Based): Protein powder is the star of the show, boosting the protein content of these bowls and keeping you feeling full and satisfied for longer. Vanilla protein powder adds a subtle sweetness and vanilla flavor that complements the other ingredients beautifully. You can use whey protein, casein protein, or a plant-based protein blend (like pea protein, brown rice protein, or soy protein) depending on your dietary preferences and needs. Whey protein is known for its fast absorption, while casein protein digests slower, providing sustained protein release. Plant-based options are excellent for vegans or those with dairy sensitivities and often offer a good source of fiber as well.
- 1 ripe Banana, mashed: Mashed banana acts as a natural sweetener and binder in these bowls. It adds moisture, sweetness, and a subtle banana flavor that enhances the overall taste. Ripe bananas are crucial as they are sweeter and easier to mash. Look for bananas with brown spots, as these are at their peak ripeness. If you don’t have a banana, you can substitute with unsweetened applesauce or pumpkin puree, although the flavor profile will slightly change.
- 1 cup Milk (Dairy or Non-Dairy): Milk provides moisture and helps to create the right consistency for the pancake batter. You can use any type of milk you prefer – dairy milk (like cow’s milk or goat’s milk), or non-dairy alternatives such as almond milk, soy milk, oat milk, coconut milk (from a carton, not canned), or cashew milk. Each type of milk will impart a slightly different flavor and texture. Oat milk, for example, can make the bowls extra creamy, while almond milk is lighter and lower in calories.
- 2 Large Eggs (or Flax Eggs for Vegan Option): Eggs are essential for binding the ingredients together and adding richness and structure to the pancake bowls. They also contribute to the protein content and create a fluffy texture. For a vegan option, you can easily substitute with flax eggs. To make a flax egg, mix 1 tablespoon of ground flaxseed meal with 3 tablespoons of water and let it sit for 5-10 minutes until it thickens to an egg-like consistency. Two flax eggs will be needed for this recipe to replace the two regular eggs.
- 1 teaspoon Baking Powder: Baking powder is a leavening agent that helps the pancake bowls rise and become light and fluffy. It’s crucial for achieving that airy pancake texture. Ensure your baking powder is fresh for optimal results. Old baking powder may lose its potency and not provide adequate lift.
- ½ teaspoon Vanilla Extract: Vanilla extract enhances the overall flavor profile and adds a warm, comforting note to the pancake bowls. Use pure vanilla extract for the best flavor, but imitation vanilla extract can also be used if preferred.
- ¼ teaspoon Salt: Salt enhances the sweetness and balances the flavors of the ingredients. Even in sweet recipes, a pinch of salt is essential to bring out the best in the other flavors.
- Optional Toppings (Fresh Fruit, Nuts, Seeds, Nut Butter, Syrup, Chocolate Chips): The beauty of these pancake bowls is their versatility. Toppings allow you to customize them to your liking and add extra flavor, texture, and nutritional value. Consider a variety of toppings to choose from, such as fresh berries (strawberries, blueberries, raspberries), sliced bananas, chopped nuts (almonds, walnuts, pecans), seeds (chia seeds, flax seeds, pumpkin seeds), nut butter (peanut butter, almond butter, cashew butter), a drizzle of maple syrup or honey (in moderation), or a sprinkle of dark chocolate chips for a treat. Having a selection of toppings allows everyone to personalize their bowls and adds visual appeal.
Instructions
Creating these Baked Protein Pancake Bowls is surprisingly simple and straightforward. Follow these step-by-step instructions for delicious and fluffy results every time:
- Preheat Oven and Prepare Baking Dishes: Begin by preheating your oven to 375°F (190°C). This ensures the oven is at the correct temperature when you place the pancake bowls in to bake, promoting even cooking and rising. While the oven is preheating, prepare your baking dishes. You can use oven-safe bowls, ramekins, or even muffin tins for smaller, individual portions. Lightly grease your chosen baking dishes with cooking spray or a touch of coconut oil to prevent the pancake bowls from sticking and ensure easy removal after baking. If using muffin tins, you can also use muffin liners for even easier cleanup.
- Combine Dry Ingredients: In a large mixing bowl, combine the rolled oats, protein powder, baking powder, and salt. Whisk these dry ingredients together thoroughly to ensure they are evenly distributed. This step is important because it ensures that the baking powder is properly dispersed throughout the oat mixture, leading to even rising. Whisking also helps to break up any clumps in the protein powder, resulting in a smoother batter.
- Combine Wet Ingredients: In a separate bowl, mash the ripe banana until it is smooth and creamy. You can use a fork or a potato masher for this. Add the milk, eggs (or flax eggs), and vanilla extract to the mashed banana. Whisk the wet ingredients together until they are well combined and the mixture is smooth. Ensure the eggs are fully incorporated into the banana mixture, creating a cohesive liquid base for the batter.
- Combine Wet and Dry Ingredients: Pour the wet ingredients into the bowl with the dry ingredients. Gently stir to combine until just mixed. Be careful not to overmix the batter. Overmixing can develop gluten (even in gluten-free oats to some extent) and result in tougher pancake bowls. Mix until the dry ingredients are just moistened and there are no large streaks of dry oat mixture remaining. A few small lumps are perfectly fine; they will disappear during baking.
- Divide Batter into Baking Dishes: Evenly divide the pancake batter among your prepared baking dishes. If using bowls or ramekins, fill them about ¾ full to allow room for the pancakes to rise during baking. If using muffin tins, fill each muffin cup about ¾ full as well. Distributing the batter evenly ensures that all the pancake bowls bake at the same rate and are ready simultaneously.
- Bake in Preheated Oven: Place the baking dishes in the preheated oven and bake for 20-25 minutes, or until the pancake bowls are golden brown on top and a toothpick inserted into the center comes out clean. The baking time may vary slightly depending on your oven and the size of your baking dishes. Start checking for doneness around 20 minutes and add a few more minutes if needed. The tops should be nicely browned and springy to the touch.
- Cool Slightly and Serve: Once baked, remove the pancake bowls from the oven and let them cool slightly in the baking dishes for a few minutes before serving. This allows them to set up a bit and makes them easier to handle. Serve warm, topped with your favorite toppings such as fresh fruit, nuts, seeds, nut butter, syrup, or chocolate chips. Enjoy immediately for the best flavor and texture.
Nutrition Facts
(Per Serving – Recipe makes approximately 4 servings)
- Serving Size: 1 Baked Pancake Bowl (approximately ¼ of the total recipe)
- Calories: Approximately 250-350 kcal (depending on protein powder and milk type)
- Protein: 20-30g (depending on protein powder)
- Carbohydrates: 30-40g
- Fiber: 5-8g
- Sugar: 8-12g (naturally occurring from banana and milk)
- Fat: 5-10g
- Saturated Fat: 1-3g
- Cholesterol: 50-80mg (from eggs, if using)
- Sodium: 150-250mg (depending on protein powder and salt added)
Important Notes:
- These nutrition facts are estimates and can vary based on the specific brands and types of ingredients used, especially protein powder and milk.
- The calorie and macronutrient content will increase with the addition of toppings such as syrup, nut butter, and chocolate chips. Be mindful of your topping choices if you are tracking calories or macronutrients.
- This recipe is naturally high in protein and fiber, making it a satisfying and nutritious breakfast option.
For a more precise calculation of nutrition facts, you can use online nutrition calculators or apps, inputting the specific brands and quantities of ingredients you use.
Preparation Time
- Prep Time: 10 minutes
- Cook Time: 20-25 minutes
- Total Time: 30-35 minutes
These Baked Protein Pancake Bowls are incredibly efficient in terms of preparation time. The active prep time is minimal, mainly involving measuring ingredients and mixing them together. The majority of the time is hands-off baking time in the oven, allowing you to multitask or relax while breakfast is cooking. This makes them ideal for busy weekday mornings or for meal prepping ahead of time. You can easily prepare a batch on the weekend and reheat them throughout the week for quick and healthy breakfasts.
How to Serve
These Baked Protein Pancake Bowls are delicious on their own, but they truly shine when topped with a variety of flavorful and textural additions. Here are some serving suggestions to elevate your breakfast experience:
- Fresh Fruit Fiesta:
- Berries: Strawberries, blueberries, raspberries, blackberries – a mix of berries adds sweetness, antioxidants, and vibrant colors.
- Sliced Bananas: Enhances the banana flavor and adds creaminess.
- Diced Peaches or Nectarines: For a summery and juicy twist.
- Mango or Pineapple: For a tropical flavor profile.
- Apple Slices with Cinnamon: For a warm and comforting autumn vibe.
- Nutty & Seedy Goodness:
- Chopped Almonds, Walnuts, or Pecans: Adds crunch and healthy fats. Toasting the nuts beforehand enhances their flavor.
- Chia Seeds or Flax Seeds: Provides extra fiber, omega-3 fatty acids, and a slight nutty flavor.
- Pumpkin Seeds or Sunflower Seeds: For a different texture and nutrient boost.
- Creamy & Dreamy Delights:
- Nut Butter Drizzle: Peanut butter, almond butter, cashew butter, or sunflower seed butter – adds healthy fats, protein, and a rich, creamy texture. Warm the nut butter slightly for easier drizzling.
- Greek Yogurt or Skyr: Adds extra protein and creaminess, while also providing probiotics. Plain or vanilla flavored yogurt works well.
- Coconut Whipped Cream (Dairy or Non-Dairy): For a decadent and slightly tropical touch (use sparingly as it can be higher in fat).
- Sweet & Indulgent Touches (Use in moderation):
- Maple Syrup or Honey Drizzle: Adds sweetness and a classic pancake flavor. Use sparingly to control added sugar.
- Chocolate Chips or Cacao Nibs: For a touch of chocolate indulgence. Dark chocolate or cacao nibs provide antioxidants.
- A Sprinkle of Cinnamon or Nutmeg: Enhances the warm and comforting flavors.
- Make it a Breakfast Bowl Bar: Set out a variety of toppings and let everyone customize their own pancake bowls. This is especially fun for families or brunch gatherings.
Serving Occasions:
- Weekday Breakfast: Perfect for a quick and healthy breakfast before work or school. Prepare a batch ahead of time and reheat for busy mornings.
- Weekend Brunch: Elevate your weekend brunch with these delicious and customizable pancake bowls.
- Post-Workout Meal: The high protein content makes them a great option for refueling after a workout.
- Healthy Dessert: Enjoy them as a lighter and healthier alternative to traditional desserts.
Additional Tips for Perfect Baked Protein Pancake Bowls
To ensure your Baked Protein Pancake Bowls are consistently delicious and perfectly textured, here are five helpful tips:
- Don’t Overmix the Batter: As mentioned in the instructions, it’s crucial not to overmix the batter. Overmixing can lead to tougher, less fluffy pancake bowls. Mix the wet and dry ingredients together until just combined, and stop mixing as soon as the dry ingredients are moistened. A few small lumps are perfectly acceptable.
- Adjust Sweetness to Your Preference: The recipe uses banana for natural sweetness, and protein powder often adds some sweetness as well. Taste the batter before baking and adjust the sweetness to your liking. If you prefer a sweeter pancake bowl, you can add a touch of maple syrup, honey, or a sugar substitute like stevia or erythritol to the batter. Keep in mind that toppings will also add sweetness.
- Customize with Flavor Extracts & Spices: Vanilla extract is included in the base recipe, but you can experiment with other flavor extracts to customize your pancake bowls. Almond extract, lemon extract, or even a hint of peppermint extract can add interesting flavor variations. Spices like cinnamon, nutmeg, ginger, or cardamom can also be incorporated into the dry ingredients for added warmth and depth of flavor.
- Meal Prep Magic – Bake Ahead and Reheat: These pancake bowls are fantastic for meal prepping. Bake a batch on the weekend and store them in airtight containers in the refrigerator for up to 3-4 days. To reheat, you can microwave them for 30-60 seconds or warm them in a toaster oven or oven at a low temperature until heated through. They reheat beautifully and are just as delicious as freshly baked.
- Experiment with Protein Powder Flavors: While vanilla protein powder is a versatile choice, don’t be afraid to experiment with other protein powder flavors to create different pancake bowl variations. Chocolate protein powder for chocolate pancake bowls, strawberry protein powder for strawberry-banana bowls, or even cinnamon roll flavored protein powder for a more indulgent treat. Choose flavors that complement your desired toppings.
FAQ Ingredients
This FAQ section addresses common questions specifically related to the ingredients used in the Baked Protein Pancake Bowls recipe, offering helpful tips and substitutions.
Q1: Can I substitute the rolled oats with quick oats?
A: Yes, you can substitute rolled oats with quick oats if that’s what you have on hand. However, the texture of the final pancake bowls might be slightly softer and less chewy compared to using rolled oats. Rolled oats provide a bit more structure and a heartier texture. If using quick oats, you might want to slightly reduce the amount of milk to prevent the batter from becoming too thin.
Q2: I don’t have protein powder. Can I still make this recipe?
A: While protein powder is a key component for boosting the protein content and adding structure, you can still make a version of these baked pancake bowls without it. If omitting protein powder, you might want to increase the amount of rolled oats slightly to maintain the batter consistency. The protein content will be lower, and the texture may be a bit less fluffy and more dense. Consider adding a tablespoon or two of flour (all-purpose or gluten-free blend) to help bind the ingredients if omitting protein powder.
Q3: Can I use frozen bananas instead of fresh bananas?
A: Yes, you can use frozen bananas. Thaw the frozen banana completely before mashing it. Frozen bananas are often even sweeter than fresh bananas as the freezing process concentrates the sugars. Make sure to drain any excess liquid that may be released during thawing to prevent the batter from becoming too watery.
Q4: What are good vegan substitutes for eggs in this recipe?
A: Flax eggs are an excellent vegan substitute for eggs in this recipe, as mentioned in the ingredients section. Another option is to use chia eggs, prepared in the same way as flax eggs (1 tablespoon chia seeds + 3 tablespoons water, let sit until thickened). You can also use ¼ cup of unsweetened applesauce per egg as a binder, although this may slightly alter the texture and flavor. Silken tofu (¼ cup pureed silken tofu per egg) is another vegan egg substitute that can work well in baked goods, adding moisture and protein.
Q5: Can I use different types of milk besides cow’s milk and almond milk?
A: Absolutely! You can use a variety of milk types in this recipe. Oat milk will add extra creaminess and a slightly sweeter flavor. Soy milk is another good option, providing a similar protein content to cow’s milk. Cashew milk is a lighter and lower-calorie alternative, similar to almond milk. Coconut milk from a carton (not canned coconut cream) can also be used for a subtle coconut flavor. Experiment with different milk types to find your favorite flavor and texture combination!
Print
Baked Protein Pancake Bowls Recipe
Ingredients
- 1 cup Rolled Oats (Gluten-Free if needed): Oats form the base of our pancake bowls, providing fiber, complex carbohydrates for sustained energy, and a lovely, slightly nutty flavor. Rolled oats, also known as old-fashioned oats, are preferred for their texture and ability to absorb liquid well, resulting in a moist and fluffy final product. Quick oats can also be used in a pinch, but the texture might be slightly softer. For those with gluten sensitivities, ensure you use certified gluten-free rolled oats.
- 1 scoop Vanilla Protein Powder (Whey, Casein, or Plant-Based): Protein powder is the star of the show, boosting the protein content of these bowls and keeping you feeling full and satisfied for longer. Vanilla protein powder adds a subtle sweetness and vanilla flavor that complements the other ingredients beautifully. You can use whey protein, casein protein, or a plant-based protein blend (like pea protein, brown rice protein, or soy protein) depending on your dietary preferences and needs. Whey protein is known for its fast absorption, while casein protein digests slower, providing sustained protein release. Plant-based options are excellent for vegans or those with dairy sensitivities and often offer a good source of fiber as well.
- 1 ripe Banana, mashed: Mashed banana acts as a natural sweetener and binder in these bowls. It adds moisture, sweetness, and a subtle banana flavor that enhances the overall taste. Ripe bananas are crucial as they are sweeter and easier to mash. Look for bananas with brown spots, as these are at their peak ripeness. If you don’t have a banana, you can substitute with unsweetened applesauce or pumpkin puree, although the flavor profile will slightly change.
- 1 cup Milk (Dairy or Non-Dairy): Milk provides moisture and helps to create the right consistency for the pancake batter. You can use any type of milk you prefer – dairy milk (like cow’s milk or goat’s milk), or non-dairy alternatives such as almond milk, soy milk, oat milk, coconut milk (from a carton, not canned), or cashew milk. Each type of milk will impart a slightly different flavor and texture. Oat milk, for example, can make the bowls extra creamy, while almond milk is lighter and lower in calories.
- 2 Large Eggs (or Flax Eggs for Vegan Option): Eggs are essential for binding the ingredients together and adding richness and structure to the pancake bowls. They also contribute to the protein content and create a fluffy texture. For a vegan option, you can easily substitute with flax eggs. To make a flax egg, mix 1 tablespoon of ground flaxseed meal with 3 tablespoons of water and let it sit for 5-10 minutes until it thickens to an egg-like consistency. Two flax eggs will be needed for this recipe to replace the two regular eggs.
- 1 teaspoon Baking Powder: Baking powder is a leavening agent that helps the pancake bowls rise and become light and fluffy. It’s crucial for achieving that airy pancake texture. Ensure your baking powder is fresh for optimal results. Old baking powder may lose its potency and not provide adequate lift.
- ½ teaspoon Vanilla Extract: Vanilla extract enhances the overall flavor profile and adds a warm, comforting note to the pancake bowls. Use pure vanilla extract for the best flavor, but imitation vanilla extract can also be used if preferred.
- ¼ teaspoon Salt: Salt enhances the sweetness and balances the flavors of the ingredients. Even in sweet recipes, a pinch of salt is essential to bring out the best in the other flavors.
- Optional Toppings (Fresh Fruit, Nuts, Seeds, Nut Butter, Syrup, Chocolate Chips): The beauty of these pancake bowls is their versatility. Toppings allow you to customize them to your liking and add extra flavor, texture, and nutritional value. Consider a variety of toppings to choose from, such as fresh berries (strawberries, blueberries, raspberries), sliced bananas, chopped nuts (almonds, walnuts, pecans), seeds (chia seeds, flax seeds, pumpkin seeds), nut butter (peanut butter, almond butter, cashew butter), a drizzle of maple syrup or honey (in moderation), or a sprinkle of dark chocolate chips for a treat. Having a selection of toppings allows everyone to personalize their bowls and adds visual appeal.
Instructions
- Sauté Aromatics: Heat olive oil in a large, oven-safe pot or Dutch oven over medium heat. Add chopped onion and bell pepper. Sauté for 5-7 minutes, or until softened and the onion becomes translucent. Stir occasionally to prevent sticking and ensure even cooking. This step is crucial for building the flavor base of the dish. Sautéing the vegetables first releases their natural sweetness and aroma, which will infuse the entire dish.
- Add Garlic and Spices: Add minced garlic, smoked paprika, turmeric, and dried oregano to the pot. Cook for 1 minute more, stirring constantly, until fragrant. Be careful not to burn the garlic and spices, as this can result in a bitter taste. Cooking the spices in oil releases their essential oils, intensifying their flavor and allowing them to fully bloom before adding the other ingredients.
- Brown Chicken: Add chicken thighs to the pot and season with salt and pepper. Sear the chicken for 2-3 minutes per side, or until lightly browned. You don’t need to cook the chicken through at this stage; you are just browning the outside to develop flavor and create a nice crust. Browning the chicken adds depth and richness to the final dish.
- Deglaze and Add Tomatoes: Pour in diced tomatoes (undrained) and chicken broth. Stir to deglaze the bottom of the pot, scraping up any browned bits (fond) that have accumulated. These browned bits are packed with flavor and will enhance the richness of the sauce. Ensure all the ingredients are well combined and the chicken is partially submerged in the liquid.
- Add Rice and Simmer: Stir in long grain rice, ensuring it is evenly distributed in the liquid. Bring the mixture to a boil, then reduce heat to low, cover the pot tightly with a lid, and simmer for 20-25 minutes, or until the rice is cooked through and the liquid is absorbed. It’s crucial to keep the pot covered tightly during simmering to trap steam and ensure the rice cooks evenly. Avoid lifting the lid during cooking, as this can release steam and prolong the cooking time.
- Check for Doneness and Rest: After 20 minutes, check the rice for doneness. Gently fluff the rice with a fork. If the rice is still slightly firm or there is still liquid in the pot, continue simmering for another 5 minutes, checking periodically. Once the rice is cooked and the liquid is absorbed, remove the pot from the heat and let it rest, covered, for 5-10 minutes. This resting period allows the rice to fully absorb any remaining moisture and become perfectly fluffy.
- Serve: Fluff the rice again with a fork before serving. Garnish with fresh parsley and lemon wedges, if desired. Serve hot and enjoy! The lemon wedges add a bright, acidic counterpoint to the richness of the dish, while fresh parsley adds a pop of color and herbaceousness.
Nutrition
- Serving Size: one normal portion
- Calories: 450-550
- Sugar: 5-8g
- Sodium: 400-600mg
- Fat: 15-25g
- Saturated Fat: 3-5g
- Unsaturated Fat: 10-20g
- Carbohydrates: 45-60g
- Fiber: 3-5g
- Protein: 35-45g