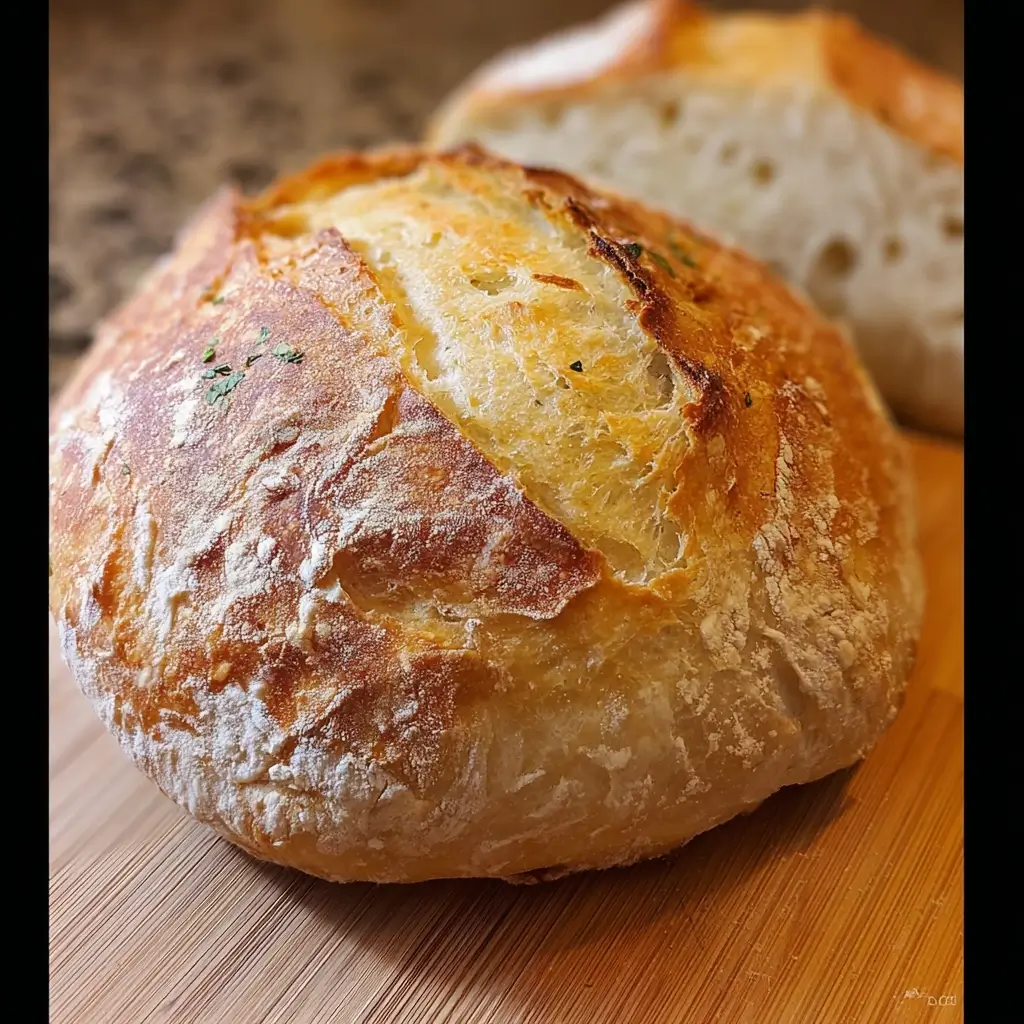
The aroma of freshly baked bread is, for me, one of life’s simplest yet most profound pleasures. For years, I was intimidated by the thought of making artisan bread at home, imagining complicated steps, special equipment, and hours of laborious kneading. Then I discovered this unbelievably straightforward 4-ingredient artisan bread recipe, and it completely revolutionized my baking game. The first time I pulled a golden, crackling loaf from my Dutch oven, my family gathered around, eyes wide with anticipation. The sound of the crust shattering as I sliced into it, revealing a soft, airy crumb, was pure magic. That first taste – slightly tangy, deeply satisfying – was a revelation. We devoured half the loaf standing at the counter, slathered with butter. Since then, this recipe has become a weekly staple, a testament to the fact that incredible results don’t always require incredible effort. It’s the kind of recipe that makes you feel like a culinary hero with minimal fuss, and sharing it feels like passing on a delicious secret.
The Magic of 4-Ingredient Artisan Bread: What You’ll Need
The beauty of this recipe lies in its simplicity. You likely have most, if not all, of these ingredients in your pantry right now. This short list is all that stands between you and a loaf of bakery-quality bread.
- All-Purpose Flour: 3 cups (approximately 400g). The backbone of our bread, providing structure. While bread flour can be used for a slightly chewier crumb due to its higher protein content, all-purpose flour works wonderfully and is more commonly available. Ensure it’s unbleached for the best flavor. The way you measure flour can impact your results; using a kitchen scale for grams is most accurate, but if spooning and leveling, be gentle to avoid packing too much flour into your cup.
- Instant Yeast (or Rapid Rise Yeast): ¼ teaspoon. This tiny amount is all you need for a slow, flavorful fermentation. Instant yeast can be mixed directly with dry ingredients. If you only have active dry yeast, you can use it, but it’s best to dissolve it in a portion of the warm water with a pinch of sugar for 5-10 minutes until foamy before adding it to the flour. You might need slightly more active dry yeast, perhaps ½ teaspoon.
- Fine Sea Salt (or Kosher Salt): 1 ½ teaspoons. Salt is crucial not just for flavor, but also for controlling yeast activity and strengthening gluten structure. Avoid iodized table salt if possible, as it can sometimes impart a metallic taste.
- Warm Water: 1 ½ cups (approximately 355-360ml), at about 105-115°F (40-46°C). The water should feel like a warm bath – not too hot to kill the yeast, and not too cold to slow it down excessively. This temperature range is ideal for activating the yeast and hydrating the flour.
Equipment Note: While not an “ingredient,” a 5 to 6-quart Dutch oven (or any heavy, oven-safe pot with a tight-fitting lid) is highly recommended for achieving that signature crispy crust.
Crafting Your Loaf: Step-by-Step Instructions
This recipe relies on a long, slow fermentation (the “no-knead” method), which develops incredible flavor and texture with minimal hands-on time. Patience is your primary tool here!
- Combine Dry Ingredients:
In a large mixing bowl, whisk together the 3 cups of all-purpose flour, 1 ½ teaspoons of fine sea salt, and ¼ teaspoon of instant yeast. Whisking ensures the salt and yeast are evenly distributed throughout the flour, which is crucial for a consistent rise and flavor. If you were using active dry yeast, you would have already proofed it in the warm water and would add it in the next step with the remaining water. - Add Water and Mix:
Pour the 1 ½ cups of warm water into the bowl with the dry ingredients. Using a sturdy spatula or a wooden spoon, mix until all the flour is hydrated and a shaggy, sticky dough forms. There’s no need to knead! Just ensure there are no dry patches of flour remaining. The dough will look quite wet and unkempt at this stage – this is perfectly normal for a no-knead recipe. - First Rise (Bulk Fermentation):
Cover the bowl tightly with plastic wrap or a reusable bowl cover. You can also use a clean kitchen towel secured with a rubber band, but plastic wrap is better at preventing the dough surface from drying out. Let the dough rise at room temperature (ideally between 68-72°F or 20-22°C) for 12 to 18 hours. Some recipes even go up to 24 hours. The longer the rise, the more developed the flavor will be. During this time, the yeast will work its magic, creating carbon dioxide bubbles that give the bread its airy structure and developing complex, slightly tangy flavors. The dough should at least double, or even triple, in size and be very bubbly and jiggly. You’ll notice a pleasantly fermented aroma. If your room is warmer, the rise might be faster; if cooler, it might take longer. - Shape the Dough (Gently!):
Lightly flour a clean work surface (a wooden board or countertop). Gently scrape the risen dough out of the bowl onto the floured surface. The dough will be very sticky and full of air bubbles – handle it with care to preserve those precious bubbles. Lightly flour your hands as well.
Gently pull the edges of the dough towards the center, rotating the dough as you go, to form a rough ball. You’re essentially deflating it slightly and creating surface tension. Do this a few times (4-6 “folds”) until it starts to hold a roundish shape. Avoid overworking the dough. It doesn’t need to be perfectly smooth. - Second Rise (Proofing):
Place a piece of parchment paper (large enough to lift the dough into your pot later) on your work surface and lightly dust it with flour. Carefully transfer the shaped dough, seam-side down, onto the center of the parchment paper. Lightly dust the top of the dough with a little more flour.
Cover the dough loosely with plastic wrap or a clean kitchen towel. Let it rest and rise again for 1 to 2 hours, or until it has increased in size by about 50% and doesn’t spring back immediately when you gently poke it (it should leave a slight indentation that slowly fills in). The exact time will depend on your room temperature. - Preheat Oven and Dutch Oven:
About 30-45 minutes before the second rise is complete, place your Dutch oven (with its lid on) into your oven. Preheat the oven to 450°F (232°C). It is crucial that the Dutch oven is thoroughly preheated. This intense heat will create steam when the dough is added, which is essential for that coveted crispy, crackly crust. - Score and Bake:
Once the Dutch oven is preheated and the dough has completed its second rise, carefully remove the hot Dutch oven from the oven using sturdy oven mitts. Be extremely cautious as it will be very hot.
Remove the lid.
If you wish to score your dough (make a slash on top), now is the time. Using a very sharp knife, a bread lame, or even clean kitchen shears, make one or two decisive slashes about ½ inch deep across the top of the dough. This allows steam to escape in a controlled way and can create an attractive “ear” on the finished loaf. This step is optional but recommended for aesthetics and oven spring.
Carefully lift the dough by the edges of the parchment paper and lower it (parchment paper and all) into the hot Dutch oven.
Place the lid back on the Dutch oven. - Bake Covered:
Return the lidded Dutch oven to the preheated oven. Bake for 30 minutes with the lid on. The trapped steam inside the pot creates a humid environment, allowing the crust to remain soft initially so the bread can expand fully (this is called “oven spring”) before setting. - Bake Uncovered:
After 30 minutes, carefully remove the lid from the Dutch oven (again, using oven mitts – watch out for steam!). The bread will look pale but puffed.
Continue baking, uncovered, for another 15 to 25 minutes, or until the crust is a deep golden brown and beautifully crackled. The internal temperature of the bread should register between 200-210°F (93-99°C) on an instant-read thermometer. - Cool Completely:
Carefully remove the Dutch oven from the oven. Using the parchment paper edges as handles (or a sturdy spatula), lift the bread out of the Dutch oven and transfer it to a wire cooling rack.
This is perhaps the hardest part: you must let the bread cool completely for at least 1-2 hours, preferably longer, before slicing. If you cut into it while it’s still hot, the steam will escape too quickly, and the interior crumb can become gummy and dense. As it cools, you might even hear the delightful “singing” or crackling of the crust.
Understanding the Goodness: Nutrition Facts
Nutrition facts for homemade bread can vary based on the specific brands of ingredients used and the exact size of your slices. The following is an estimation:
- Servings: This recipe typically yields 1 medium-sized loaf, which can be cut into approximately 10-12 generous slices.
- Calories per serving (1 slice, approx. 1/12th of the loaf): Around 120-150 calories.
Breakdown (Estimated per slice):
- Fat: <1g
- Saturated Fat: <0.5g
- Cholesterol: 0mg
- Sodium: Around 250-300mg (depending on salt type and amount)
- Carbohydrates: 25-30g
- Fiber: 1-2g
- Sugar: <1g
- Protein: 3-4g
Disclaimer: These are approximate values. For precise nutritional information, it’s best to use a nutrition calculator with your specific ingredient brands and quantities.
Time Investment: Preparation & Baking Breakdown
While this bread requires a long waiting period, the actual hands-on time is remarkably minimal.
- Active Preparation Time (Mixing & Shaping): 10-15 minutes total.
- Mixing initial dough: 5 minutes
- Shaping the dough: 5-10 minutes
- First Rise (Bulk Fermentation): 12-18 hours (or even up to 24 hours) at room temperature. This is entirely hands-off.
- Second Rise (Proofing): 1-2 hours at room temperature. Also hands-off.
- Oven Preheat Time (including Dutch oven): 30-45 minutes.
- Baking Time:
- Covered: 30 minutes
- Uncovered: 15-25 minutes
- Cooling Time: 1-2 hours (minimum, longer is better). Crucial and hands-off.
Total Time (from start to sliceable bread): Approximately 15-23 hours, but only about 15 minutes of that is active work!
Savoring Your Creation: How to Serve Your Artisan Bread
The versatility of this homemade artisan bread is one of its greatest charms. Here are some delightful ways to enjoy your freshly baked masterpiece:
- Classic Simplicity:
- Warm with Butter: The ultimate way to appreciate its flavor and texture. Use good quality salted or unsalted butter.
- With Jam or Honey: Perfect for breakfast or a sweet snack. Raspberry jam, apricot preserves, or a drizzle of local honey are fantastic.
- Accompaniments to Meals:
- Soup Dipper: Ideal for soaking up hearty soups, stews, and chilis. Its sturdy crust holds up well.
- Alongside Salads: A satisfying counterpart to a fresh, crisp salad.
- With Pasta Dishes: Use it to mop up every last bit of delicious sauce.
- Appetizers and Snacks:
- Bruschetta or Crostini: Slice, toast, rub with garlic, and top with diced tomatoes, basil, and balsamic glaze, or other savory toppings.
- Cheese Board: A star component of any cheese platter, served with various cheeses, cured meats, fruits, and nuts.
- Dipping in Olive Oil: Serve with a good quality extra virgin olive oil, perhaps infused with herbs or balsamic vinegar.
- Sandwiches:
- Gourmet Sandwiches: The robust structure makes it excellent for substantial sandwiches with quality fillings like roasted vegetables, deli meats, and artisan cheeses.
- Open-Faced Sandwiches: Avocado toast, smoked salmon with cream cheese, or a simple tomato and mozzarella.
- Breakfast Delights:
- French Toast: If your bread happens to get a day or two old (though it rarely lasts that long!), it makes incredible French toast due to its dense crumb and sturdy crust.
- Alongside Eggs: Perfect for dipping into runny yolks.
Elevating Your Bake: Additional Tips for Perfection
While this recipe is incredibly forgiving, a few extra pointers can help you achieve consistently amazing results and even experiment further.
- Flour Power – Consider Bread Flour: While all-purpose flour works great, using bread flour (which has a higher protein content) can yield a slightly chewier crumb and a more robust structure. You can substitute it 1:1. Experiment to see which you prefer.
- Water Temperature is Key: Using water that is too hot can kill the yeast, while water that is too cold will significantly slow down fermentation. An instant-read thermometer is a baker’s friend here, aiming for that 105-115°F (40-46°C) sweet spot.
- The Dutch Oven Difference (and Alternatives): The heavy, lidded Dutch oven traps steam released from the dough during the initial baking phase. This steam keeps the crust soft, allowing the bread to expand fully (oven spring) before the crust sets and becomes wonderfully crispy. If you don’t have a Dutch oven:
- You can use a heavy, oven-safe pot with a tight-fitting lid.
- Alternatively, bake on a preheated pizza stone or baking steel. To create steam, place a metal pan (like a cast iron skillet or a broiler pan) on the bottom rack of your oven while it preheats. When you put the bread in, carefully pour a cup of hot water into the hot pan to create a burst of steam. Be cautious of the hot steam.
- Scoring for Success (and Beauty): Scoring the dough just before baking isn’t just for looks. It provides a designated weak spot for the steam to escape, preventing the loaf from bursting open in unexpected places. A sharp knife, razor blade, or a dedicated bread lame works best. Make quick, confident slashes about ¼ to ½ inch deep.
- Patience in Cooling – The Secret to Texture: It’s incredibly tempting to slice into that warm, aromatic loaf straight from the oven, but resist! The bread is still cooking internally as it cools. Slicing too early releases steam and results in a gummy, dense crumb. Allowing it to cool completely on a wire rack for at least 1-2 hours (longer is even better) allows the internal structure to set properly.
Your Artisan Bread Questions Answered: FAQ
Here are answers to some common questions you might have about making this 4-ingredient artisan bread:
Q1: Can I use active dry yeast instead of instant yeast?
A1: Yes, you absolutely can. The main difference is that active dry yeast typically needs to be “proofed” or activated first. To do this, dissolve the active dry yeast (you might use a slightly larger quantity, like ½ teaspoon for this recipe) in the 1 ½ cups of warm water (ensure it’s 105-115°F / 40-46°C). You can add a tiny pinch of sugar to help it along. Let it sit for 5-10 minutes until it becomes foamy or bubbly. Then, add this yeast-water mixture to your flour and salt, and proceed with the recipe as written.
Q2: My dough didn’t rise much. What went wrong?
A2: Several factors could be at play:
* Yeast Viability: Your yeast might be old or expired. Always check the expiration date. You can test yeast by proofing it in warm water with a pinch of sugar; if it doesn’t get foamy, it’s likely no longer active.
* Water Temperature: Water that was too hot could have killed the yeast. Water that was too cold might not have activated it sufficiently, or it will just take much, much longer to rise.
* Room Temperature: A very cold room will significantly slow down fermentation. Try to find a slightly warmer spot (but not hot) for your dough to rise.
* Salt Amount: Too much salt can inhibit yeast activity. Ensure you’re measuring accurately.
* Not Enough Time: Especially in cooler environments, the dough might simply need more time to rise.
Q3: I don’t have a Dutch oven. Can I still make this bread?
A3: Yes! While a Dutch oven provides the ideal steamy environment for a super crispy crust, you can achieve good results without one. The key is to introduce steam into your oven.
* Baking Stone/Steel Method: Preheat a baking stone or steel in your oven. Place an empty metal pan (like a cast iron skillet or a deep baking pan) on a lower rack while preheating. When ready to bake, slide your dough (on parchment) onto the hot stone/steel. Carefully pour about 1 cup of hot water into the preheated metal pan below. Quickly close the oven door to trap the steam. Bake as directed, though you might need to adjust timing slightly.
* Heavy Pot Method: Any heavy, oven-safe pot with a tight-fitting lid (like a large casserole dish made of ceramic or cast iron) can work as a substitute.
Q4: How should I store leftover artisan bread?
A4: To maintain its crusty exterior for the first day or so, store the cooled bread at room temperature, cut-side down on a cutting board, or in a paper bag. For longer storage (2-3 days), place it in a bread box or a loosely sealed plastic bag (though this will soften the crust). For storage beyond a few days, it’s best to freeze it. Slice the completely cooled bread, wrap the slices tightly in plastic wrap, then place them in a freezer-safe bag or container. It can be frozen for up to 3 months. Thaw at room temperature or toast directly from frozen.
Q5: Can I add other ingredients like herbs, cheese, or seeds?
A5: Absolutely! This basic recipe is a fantastic canvas for additions.
* Herbs: Add 1-2 tablespoons of dried herbs (like rosemary, thyme, or Italian seasoning) or 2-3 tablespoons of fresh chopped herbs to the dry ingredients.
* Cheese: Mix in about ½ to ¾ cup of shredded or cubed sturdy cheese (like cheddar, Gruyère, or Parmesan) when you initially mix the dough.
* Seeds/Nuts: Incorporate ¼ to ½ cup of seeds (sunflower, pumpkin, sesame) or chopped nuts (walnuts, pecans) during the initial mixing.
* Olives/Garlic: Add chopped olives or roasted garlic for a savory twist.
Start with smaller quantities and experiment to find your favorite combinations. It’s usually best to add these mix-ins when you combine the flour, salt, and yeast, before adding the water.

4-Ingredient Artisan Bread Recipe
Ingredients
- All-Purpose Flour: 3 cups (approximately 400g). The backbone of our bread, providing structure. While bread flour can be used for a slightly chewier crumb due to its higher protein content, all-purpose flour works wonderfully and is more commonly available. Ensure it’s unbleached for the best flavor. The way you measure flour can impact your results; using a kitchen scale for grams is most accurate, but if spooning and leveling, be gentle to avoid packing too much flour into your cup.
- Instant Yeast (or Rapid Rise Yeast): ¼ teaspoon. This tiny amount is all you need for a slow, flavorful fermentation. Instant yeast can be mixed directly with dry ingredients. If you only have active dry yeast, you can use it, but it’s best to dissolve it in a portion of the warm water with a pinch of sugar for 5-10 minutes until foamy before adding it to the flour. You might need slightly more active dry yeast, perhaps ½ teaspoon.
- Fine Sea Salt (or Kosher Salt): 1 ½ teaspoons. Salt is crucial not just for flavor, but also for controlling yeast activity and strengthening gluten structure. Avoid iodized table salt if possible, as it can sometimes impart a metallic taste.
- Warm Water: 1 ½ cups (approximately 355-360ml), at about 105-115°F (40-46°C). The water should feel like a warm bath – not too hot to kill the yeast, and not too cold to slow it down excessively. This temperature range is ideal for activating the yeast and hydrating the flour.
Instructions
- Combine Dry Ingredients:
In a large mixing bowl, whisk together the 3 cups of all-purpose flour, 1 ½ teaspoons of fine sea salt, and ¼ teaspoon of instant yeast. Whisking ensures the salt and yeast are evenly distributed throughout the flour, which is crucial for a consistent rise and flavor. If you were using active dry yeast, you would have already proofed it in the warm water and would add it in the next step with the remaining water. - Add Water and Mix:
Pour the 1 ½ cups of warm water into the bowl with the dry ingredients. Using a sturdy spatula or a wooden spoon, mix until all the flour is hydrated and a shaggy, sticky dough forms. There’s no need to knead! Just ensure there are no dry patches of flour remaining. The dough will look quite wet and unkempt at this stage – this is perfectly normal for a no-knead recipe. - First Rise (Bulk Fermentation):
Cover the bowl tightly with plastic wrap or a reusable bowl cover. You can also use a clean kitchen towel secured with a rubber band, but plastic wrap is better at preventing the dough surface from drying out. Let the dough rise at room temperature (ideally between 68-72°F or 20-22°C) for 12 to 18 hours. Some recipes even go up to 24 hours. The longer the rise, the more developed the flavor will be. During this time, the yeast will work its magic, creating carbon dioxide bubbles that give the bread its airy structure and developing complex, slightly tangy flavors. The dough should at least double, or even triple, in size and be very bubbly and jiggly. You’ll notice a pleasantly fermented aroma. If your room is warmer, the rise might be faster; if cooler, it might take longer. - Shape the Dough (Gently!):
Lightly flour a clean work surface (a wooden board or countertop). Gently scrape the risen dough out of the bowl onto the floured surface. The dough will be very sticky and full of air bubbles – handle it with care to preserve those precious bubbles. Lightly flour your hands as well.
Gently pull the edges of the dough towards the center, rotating the dough as you go, to form a rough ball. You’re essentially deflating it slightly and creating surface tension. Do this a few times (4-6 “folds”) until it starts to hold a roundish shape. Avoid overworking the dough. It doesn’t need to be perfectly smooth. - Second Rise (Proofing):
Place a piece of parchment paper (large enough to lift the dough into your pot later) on your work surface and lightly dust it with flour. Carefully transfer the shaped dough, seam-side down, onto the center of the parchment paper. Lightly dust the top of the dough with a little more flour.
Cover the dough loosely with plastic wrap or a clean kitchen towel. Let it rest and rise again for 1 to 2 hours, or until it has increased in size by about 50% and doesn’t spring back immediately when you gently poke it (it should leave a slight indentation that slowly fills in). The exact time will depend on your room temperature. - Preheat Oven and Dutch Oven:
About 30-45 minutes before the second rise is complete, place your Dutch oven (with its lid on) into your oven. Preheat the oven to 450°F (232°C). It is crucial that the Dutch oven is thoroughly preheated. This intense heat will create steam when the dough is added, which is essential for that coveted crispy, crackly crust. - Score and Bake:
Once the Dutch oven is preheated and the dough has completed its second rise, carefully remove the hot Dutch oven from the oven using sturdy oven mitts. Be extremely cautious as it will be very hot.
Remove the lid.
If you wish to score your dough (make a slash on top), now is the time. Using a very sharp knife, a bread lame, or even clean kitchen shears, make one or two decisive slashes about ½ inch deep across the top of the dough. This allows steam to escape in a controlled way and can create an attractive “ear” on the finished loaf. This step is optional but recommended for aesthetics and oven spring.
Carefully lift the dough by the edges of the parchment paper and lower it (parchment paper and all) into the hot Dutch oven.
Place the lid back on the Dutch oven. - Bake Covered:
Return the lidded Dutch oven to the preheated oven. Bake for 30 minutes with the lid on. The trapped steam inside the pot creates a humid environment, allowing the crust to remain soft initially so the bread can expand fully (this is called “oven spring”) before setting. - Bake Uncovered:
After 30 minutes, carefully remove the lid from the Dutch oven (again, using oven mitts – watch out for steam!). The bread will look pale but puffed.
Continue baking, uncovered, for another 15 to 25 minutes, or until the crust is a deep golden brown and beautifully crackled. The internal temperature of the bread should register between 200-210°F (93-99°C) on an instant-read thermometer. - Cool Completely:
Carefully remove the Dutch oven from the oven. Using the parchment paper edges as handles (or a sturdy spatula), lift the bread out of the Dutch oven and transfer it to a wire cooling rack.
This is perhaps the hardest part: you must let the bread cool completely for at least 1-2 hours, preferably longer, before slicing. If you cut into it while it’s still hot, the steam will escape too quickly, and the interior crumb can become gummy and dense. As it cools, you might even hear the delightful “singing” or crackling of the crust.
Nutrition
- Serving Size: One Normal Portion
- Calories: 120-150
- Sugar: <1g
- Sodium: 250-300mg
- Fat: <1g
- Saturated Fat: <0.5g
- Carbohydrates: 25-30g
- Fiber: 1-2g
- Protein: 3-4g
- Cholesterol: 0mg